Documenting Procedures For Effective Content Management
Learn how to improve your content management practices by documenting procedures effectively.
 In this article, we will explore the importance of documenting procedures and how to effectively create and maintain them.
We’ll also walk you step-by-step through an example of documenting a procedure when creating content documentation for your business.
***
Why Document Procedures?
Writing clear and comprehensive procedures is crucial for the smooth operation of your organization.
Not only do well-documented procedures provide a roadmap for your employees and team members to follow, but they also provide a record of the steps taken to complete a task, serve as a useful reference for new hires, set standards of quality and ensure consistency in work processes, and improve your overall content management practices.
What Is The Best Way To Document A Procedure?
There are a few key steps to documenting a procedure effectively:
- Identify the purpose of the procedure: Clearly stating the purpose of the procedure will help ensure that it is followed correctly and will be useful for those who need to follow it.
- Outline the steps involved: List the steps involved in the procedure in a logical order, using numbered or bullet points. Make sure to include any necessary details, such as specific tools or equipment that will be needed.
- Use clear and concise language: Use language that is easy to understand and avoid using jargon or technical terms that may not be familiar to all readers.
- Include any necessary warnings or precautions: If there are any potential hazards or risks associated with the procedure, make sure to include them in the documentation.
- Include any necessary illustrations or diagrams: If a visual aid would help to explain the procedure more effectively, consider including a diagram or illustration.
- Test the procedure: Before finalizing the documentation, it can be helpful to test the procedure to ensure that it is clear and easy to follow.
- Review and update the documentation regularly: Procedures may change over time, so it is important to review and update the documentation as needed to ensure that it remains accurate and up-to-date.
An Example Of Documenting A Procedure
While the summarized steps shown above are helpful, the actual process of documenting a procedure effectively can sometimes be challenging.
To illustrate this, we’ll go through an actual example and show you how we add new videos to our training sites.
In addition to ContentManagementCourse.com, we also run two online training sites:
- WPMasterclasses.com – WordPress and digital business video courses.
- WPTrainingManual.com – Tutorials on how to use WordPress.
As part of our content management processes for these sites, any time WordPress releases a new version of its core software, we add information about the new version features and improvements, including video tutorials covering these features to the above sites as follows:
- WPMasterclasses.com – Add the videos to our video course on building a WordPress site, and update the product information page, the site’s video lesson counters, and the page listing recently added videos.
- WPTrainingManual.com – Publish a post about the latest WordPress version.
Note: We write our own content for those sites but we outsource the creation of the WordPress update videos to an external supplier.
So, when our video supplier notifies us that new videos covering the new WordPress version release are available, we then add these videos to our video training site and create a post about it on our WordPress training site.

Adding videos to a couple of sites and creating a post about it sounds simple and straightforward enough.
However, suppose we want to assign these tasks to a newly-hired team member or outsource it to a third-party service provider.
How would we communicate this process effectively to ensure that whoever does the work will perform all tasks consistently to the standards of quality that we ourselves maintain and expect?
Obviously, this involves creating some form of documentation, but how detailed does this documentation have to be?
Let’s walk through the actual process and see.
Documenting Processes vs Documenting Procedures
The simple diagram shown above explains what we want to do whenever a new version of WordPress is released (i.e. add videos to our training sites and create a post about it).
Here is the diagram again:
This diagram shows what we want done, but doesn’t explain any of the processes involved in adding video content to the training sites, creating a post about it, and making sure that all relevant information is included for our users and formatted correctly.
So let’s expand the diagram and include these processes as shown in the flowchart below:
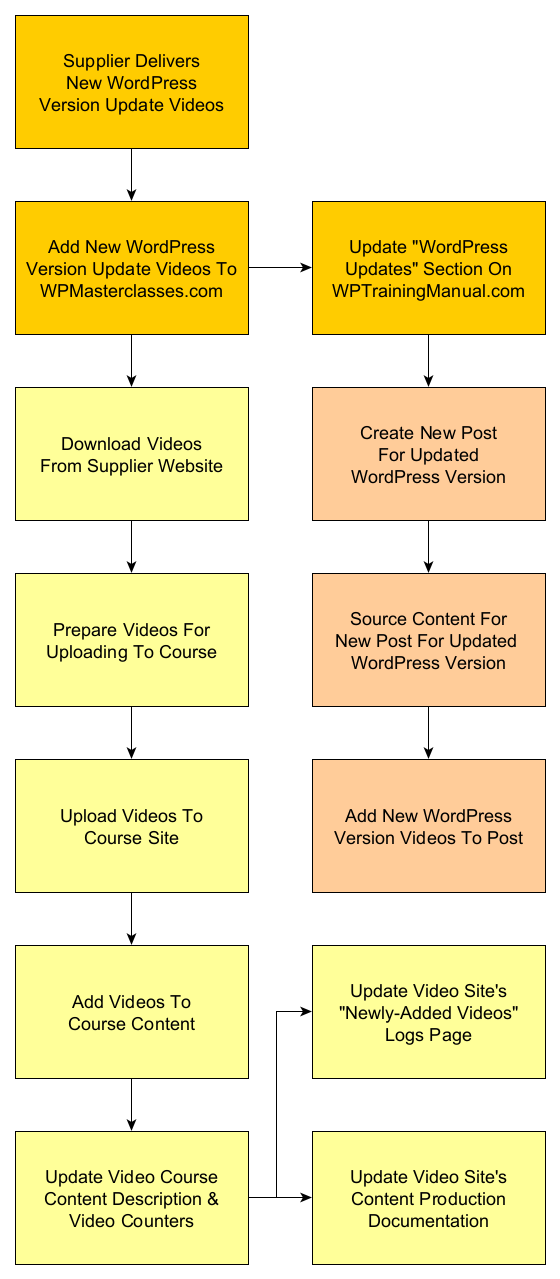
In a nutshell, these are the processes we need done:
- When our video supplier notifies us that a new set of videos is available, we then…
- Log into the supplier’s website and download a zip file containing the videos and any additional information included with those files to our computer.
- Extract the video files, rename these to match our course website requirements, and prepare the videos for uploading.
- Upload the videos to our video course site via Amazon S3.
- Create new course pages for our members and embed the video file URLs into the course content.
- Update the product information page that non-members see when they visit the site, including the video lesson counters on the site’s home page and the All Access Pass Membership pages.
- Update the Video Updates Log page that informs users about the latest videos added to the site.
- Update the video site’s content production documentation (so we can track what content is added to the site).
Once the above is done, we then also…
- Source content about the new WordPress release from the official WordPress site.
- Create a new post for the updated WordPress version on the WordPress Updates section of WPTrainingManual.com
- Embed the video content into the post and publish.
- Promote the new post.
The above lists the processes we need to go through every time WordPress releases a new version.
It is, however, still only an “overview.” While it can serve as a guide to help our newly-hired team member or outsourced person understand what we need them to do, it doesn’t specify “how” we want all of these processes to be effectively carried out.
This can lead to confusion, errors, and time-wasting delays due to the lack of detailed instructions, and low-quality output.
So, the next step is to turn all of the above processes into documented step-by-step procedures that anyone can follow to ensure that all of the required tasks are carried out effectively to consistently high standards and performed correctly and efficiently.
Documenting Procedures: Creating Step-By-Step Documentation
In addition to the steps provided earlier, here is the process we suggest following to create step-by-step procedures for your team or for outsourcing:
- As you go through the process yourself, initially record the steps involved in the process (tip: record these in a plain text file using simple bullet-point lists).
- The next time you repeat the process, follow the steps on your bullet-point list and fill in any “missing gaps” you identify as you work through the processes.
- Transfer the contents of your list to a shareable format (e.g. a Word or Google Doc document, an online page on a private section of your site reserved for staff training, etc.)
- The next time the task needs to be done, give your list to someone else and ask them to follow the documented instructions. Note down any areas of difficulty experienced by the other person, particularly areas like not knowing where to access login details, not knowing how to use certain software or tools, or not knowing how to perform certain tasks (e.g. how to create a post in WordPress).
- Use the information obtained from the previous step to expand your documentation (e.g. add links to other documents containing login details, link to software tutorials or other training sites, add screenshots or video screencasts to illustrate certain steps, etc.)
- Give your expanded document to someone else and repeat Step 3, i.e. ask them to complete the task following the documentation. Repeat this process until someone else can perform all of the required tasks successfully on their own by simply following the documentation.
- Add the documented procedure to your main content documentation and periodically review and update the information to keep it current, relevant, and accurate.
Let’s show you what “Steps 1 to 3” above would look like as a documented procedure using the example in the section below…
=== START EXAMPLE DOCUMENTATION ===
[Note: Begin this document by providing an “Overview” of the 12 processes involved in performing and completing the task, as described earlier.]
WordPress Videos – New Version Releases
This section explains how to:
- Add new WordPress update videos to WPMasterclasses.com.
- Add a new WordPress version release tutorial to WPTrainingManual.com.
Tools And Resources Required To Perform This Task
The following resources, sites, services, tools, etc. are required to complete this task (contact your manager for access to all login details, software licenses, etc.):
- Login details to PLR4WP.com (video supplier website).
- Access to hard drive folders:
C:\Business\Businesses\A - WPMasterclasses\01-Vids Various\PLR4WPandC:\Business\Businesses\A - WPMasterclasses\00-Production\WPMC-0019 - BuildWP\00-videos - Access to Amazon AWS S3 account: Bucket = “wpmasterclasses” https://wpmasterclasses.s3.us-east-1.amazonaws.com/vids/0019
- Admin access to sites: https://wpmasterclasses.com and https://wptrainingmanual.com (if you are a site administrator, see “Assets” spreadsheet for login details. If you are not a site administrator, then contact your manager for login details).
- S3 Browser
- S3 Media Maestro plugin for WordPress (use the supplied shortcode shown in the documentation).
- NoteTab Pro text editor.
- Photoshop image editing application.
- WPMasterclasses Video Course Production Documentation master spreadsheet (Excel).
1 – Adding New Videos to WPMasterclasses.com
Destination Video Course
Add the WordPress version update videos to the following video course:
- Build A WordPress Site Fast
- Course ID: WPMC-0019
- URL: https://wpmasterclasses.com/video-courses/build-a-wordpress-site-fast/
NEW WORDPRESS VERSION Videos – Procedures
1) Download And Prepare Video Source Files
When an email notification is sent from the video supplier informing us that videos for a new WordPress version or video updates are available, do the following:
- Log into
https://members.plr4wp.com/vol-01sn4/ - Create a new folder with the WP version number (note: ignore periods, so “WP61” not “WP6.1, “WP62” not “WP6.2”, etc.) inside hard drive folders
C:\Business\Businesses\A - WPMasterclasses\01-Vids Various\PLR4WPandC:\Business\Businesses\A - WPMasterclasses\00-Production\WPMC-0019 - BuildWP\00-videos - Download video zip files from the supplier website into the hard drive folder
C:\Business\Businesses\A - WPMasterclasses\01-Vids Various\PLR4WP - Extract all videos into the above-created folder. Note: the extracted files contain various folders (transcripts, raw video files, audio files, etc.). The video files we need to upload are the finished .mp4 files (not the whitelabel version with the included source files).
- Duplicate the extracted .mp4 video folder and add “renamed” to the file name.
- Rename .mp4 videos to the filename format
wp-version-videonumber-concisefilename(e.g. from “vol1-vid3.18d-whats-new-in-wp-6.1-document-settings-changes” to “wp-61-d-document-settings-changes”). - Move renamed .MP4 videos to the WP version folder created in
C:\Business\Businesses\A - WPMasterclasses\00-Production\WPMC-0019 - BuildWP\00-videos - Notes: some videos include accompanying notes (e.g. scripts, checklists, or templates). Add these to this hard drive folder:
C:\Business\Businesses\A - WPMasterclasses\00-Production\WPMC-0019 - BuildWP\02-dl
2) Upload Video Files To S3 Bucket
After downloading the video files from the video supplier’s website and preparing the video source files for uploading, the next step is to upload all the video files to the correct S3 bucket on our Amazon S3 account.
To do this, follow the steps below:
- Launch S3 Browser
- Go to Amazon S3 bucket =
wpmasterclasses > vids > 0019 - Create a new folder in S3 with the same name as the video download folder (e.g.:
wp61) inside the course folder0019 - Upload all videos to the above bucket.
- After all video files are uploaded, select all files and set permissions as follows:
- Owner = Full Control
- Any AWS Users = Read
- All Users = Read
- After setting permissions for files inside the S3 bucket, select all files and copy their URLs to your clipboard.
3) Prepare Content For Video Course
Once all the video files have been uploaded to our S3 account, file permissions have been set correctly, and video file URLs have been copied to your clipboard, the next step is to create a text file containing all the information we will need to update our course content and product pages.
To do this, follow the steps below:
- Open up NoteTab Pro text editor, create a new text file, and paste all video URLs into the text file. All videos should have the following format:
https://wpmasterclasses.s3.us-east-1.amazonaws.com/vids/0019/foldername/filename - Save this text file as
wpversion-notes(e.g. “wp61-notes”) into the WP version folder created inC:\Business\Businesses\A - WPMasterclasses\00-Production\WPMC-0019 - BuildWP\00-videos - Open up the folder containing the renamed video files inside
C:\Business\Businesses\A - WPMasterclasses\00-Production\WPMC-0019 - BuildWP\00-videos. Switch the folder view to “details.” Below the list of video URLs add the following details about each video:- Video Title – Use the format
WP Version: Part X - Short Title - Video Description – You can obtain this by watching the first few seconds of each video or opening the video transcripts that accompany the videos.
- Video Duration – Use the format
(XX:XX)for the duration in minutes and seconds.
- Video Title – Use the format
- Also, add the following information to the text file (to be added to WPMasterclasses Video Production master spreadsheet):
- Total number of new videos
- Total duration of new videos
- Proof all of the content (spelling, punctuation, accurate descriptions, video duration, etc.), as this description will be used in various locations (video course, product page, and video update post).
- Save the text file when done.
4) Add Video Content To Video Course
After uploading all the video files to Amazon S3 and preparing all the information you will need to describe the content of these videos, the next step is to add this information to the video course.
To do this, follow the steps below:
- Log into WPMasterclasses.com and select the
WP Courseware > Coursesmenu option from the main menu to bring up theCoursesscreen. - Locate the
How To Build A WordPress Site Fastcourse and clickEdit. - Scroll down to the Course Builder section and expand
Module 3 - New WordPress Features. - Right-click on the top entry and select ‘Open link in new tab’ from the menu. This will load the entry into the post editor.
- Switch to the ‘Text’ tab, then select all the content and copy it to your clipboard.
- Create a new text file in your text editor and paste the content from your clipboard into this file. You will use this as your template for adding new videos to the course module.
- Close the existing course unit window after copying and pasting the item’s contents into your text file.
- Return to the Course Builder section, scroll down to the bottom of the section and click on the “+Add Unit” button to create a new lesson page.
- Select and copy all the contents from your text file. In the course unit post, switch to the ‘Text’ tab and paste in the content from your clipboard.
- Switch to the Visual tab and do the following:
- Copy and paste the video description from your ‘WPXX-Notes’ text file into the course unit’s content section. Make whatever adjustments are necessary to the body section of the content.
- Change the highlighted section of the video’s filename in this line to match the correct location of the uploaded video (see list of video URLs copied into your text file):
[s3mm type="video" files="vids/0019/wp60/wp-60-a-intro.mp4" /] - Copy and paste the video title into the course unit’s Title field. Make it as short as possible (this title will appear on the Course Lessons menu for users.
- Switch the course unit post to ‘Text’ tab, then select and copy all the content to your clipboard and click ‘Add Unit’.
- This will load another course unit black post into your window. Paste in the contents of your clipboard, make the same adjustments described above, and repeat this process until you have added all the videos to the course.
- Drag the newly-added video lessons into their correct positions on the Course Builder module section to arrange course lessons so that newer videos display at the top of the course module.
- Click the Update button when done to save your course settings.
- Click on the View Course link at the top of the page to bring up the video course module as users will see it.
- Click on each of the new video lessons and check that the correct video has been added and plays fine. If you spot any errors (i.e. wrong video, video not playing, typos in content, etc.), fix these by editing the course units and resaving, then test again.
5) Updating Video Course Product Page
After adding the videos to the course, the next step is to update the product page with information about the additional videos.
To do this, follow the steps below:
- While logged into WPMasterclasses.com, navigate to the video course page (How to Build A WordPress Site Fast) and click on the Edit product link in the WordPress admin dashboard menu to edit the product page.
- Copy all of the video description information from the “WPXX-Notes” file to your clipboard.
- Scroll down to the ‘Module 3 – New WordPress Features & Updates’ section of the page and paste in the video description list from your clipboard.
- Make sure the content is formatted correctly:
- WordPress – Version X.X – Add an H4 heading tag
- Titles – Bold
- Proof content and formatting.
- Scroll down to the Course Duration and Video Lessons fields. Update these fields with the additional number of videos and new total duration (hours and minutes).
- Notes: Calculate video course duration by dividing the total minutes by 60 (to get the hours), then multiplying the whole integer by 60 and subtracting this number from the total to get the minutes. For example, 397 minutes = (397/60=6.61 = 6 hours. 6 x 60 = 360. 397-360 = 37 minutes. Total video course duration = 6 hours, 37 minutes).
- You can get the total number of minutes from the video course production spreadsheet after completing the next step below.
- Save to update the product page with the new information.
- Click on the View Product link and open the link in a new tab to visit the product page. Perform a visual check to make sure that everything looks ok, i.e.:
- Video content
- Updated number of video lessons
- Updated course duration
6) Update Video Course Production Documentation
After updating the video course and product page, the next step is to update the number of videos and video duration in the video course production documentation so we have an accurate inventory of the site’s content.
To do this, follow the steps below:
- Open the Video Course Production Documentation spreadsheet.
- Scroll to Row 21 (WPMC-0019).
- Add the number of new videos to the number shown in the Lessons cell (Column G).
- Add the additional number of minutes to the number shown in the Durations cell (Column H).
- Scroll to the top of the spreadsheet. Note the following (you will need these numbers for the next step below):
- Column G, Row 1 = New total number of video lessons.
- Column Z, Row 1 = New total number of hours of video content.
- Save the spreadsheet.
7) Update Video Counters
After updating the product page, the next step is to update the number of “Video Lessons” and “Hours of video” details on the home page and the ‘All Membership Access’ product page.
To do this, follow the steps below:
- While logged into WPMasterclasses.com, click on the logo on the top left corner of the site to visit the home page.
- Click on the Edit with WPBakery Page Builder link in the dashboard admin menu.
- Scroll down to the Pie Charts. Edit the following:
- Video Lessons – Click Edit Pie Chart and update the number of video lessons with the number shown in Column G, Row 1 of the Video Course Production Documentation spreadsheet. Click Save to update the pie chart.
- Hours of video – Click Edit Pie Chart and update the number of video hours (whole integers only) with the number shown in Column Z, Row 1 of the Video Course Production Documentation spreadsheet. Click Save to update the pie chart then Close to exit the edit screen.
- Click Update when done to save your new page contents.
- Repeat the above process to update the pie charts on the All Access Pass Membership product page.
8) Update The Video Updates Log Page
After updating the video counters on the home page and the ‘All Membership Access’ product page, the last step is to add an entry about the newly-added videos to the content to the Video Updates Log page of this site.
To do this, follow the steps below:
- While logged into WPMasterclasses.com, go to the Video Updates Log page and click on the Edit Page link to edit the page.
- The easiest way to create a new entry for this page is to select and copy an existing entry from this page (preferably one where updates were made to the same course).
- Paste this at the top of the content. Update the date and information (i.e. number of videos added and video topic).
- Update the page to save the new content.
- Click on the View Page link to inspect the page and make sure that all the information is correct.
This completes the update tasks for new WordPress version release videos on WPMasterclasses.com.
The last step is to create a new post about the updated WordPress version on WPTrainingManual.com.
2 – Create A New WordPress Release Post On WPTrainingManual.com
Create a post for every new major WordPress version release and publish it under the WordPress Updates section of WPTrainingManual.com.
1) Content Planning & Research
- Use the following sources to perform content research for the new post:
- WordPress News
- About WordPress section inside the WordPress Dashboard (under the WordPress icon on the very left of the admin menu bar).
- Create a new folder in your hard drive called wp-xx (where xx=version number. For example, WordPress 6.0 = wp-60) inside this directory:
C:\Business\Businesses\A - WPTrainingManual\Content\Updates. - Right-click and save any new version release images and videos to be used in the post content to the newly-created folder.
- In Amazon S3, create a new folder inside the
wp-versionsbucket located herehttps://wptrainingmanual.s3.us-east-1.amazonaws.com/elite/tut/wp-versions/. Name the bucket wp-xx (where xx=version number. For example, WordPress 6.0 = wp-60). - Upload media content to be used in the post to this bucket. Set the correct permissions, then select all file URLs and copy these to your clipboard.
- Open the text file created earlier containing notes about the new version and paste the file URLs from your clipboard into the text file. Save the file.
2) Create A Featured Image
Each new version release post requires a featured image with the new version number.
To do this, follow the steps below:
- Launch Photoshop and open the file
WPTM-VideoUpdates.psdin this folder:C:\Business\Businesses\A - WPTrainingManual\Images\FeaturedImages-WPUpdates - Edit the text layer and add the correct version number to the slide.
- Name the file wpxx (where xx=version number without periods or dashes. For example, WordPress 6.0 = wp60) and save the image file to the same folder.
- Upload this image as the Featured Image of the post (see next section).
3) Create A New Post In WordPress
The easiest way to create a new post for WordPress version updates is to duplicate an existing post, keep the post content structure intact and edit the content to match the new version number.
To do this, follow the steps below:
- Log into WPTrainingManual.com. From the WordPress Dashboard, select Posts > All Posts and then filter the table of posts by Category > WordPress Updates.
- Hover over an existing post entry and click Clone to duplicate the post.
- Click Edit to open the duplicate post in the WordPress Editor.
- Edit the post as follows:
- Change the Post Title
- Change the Post Slug
- Change the Post Tags
- Upload the Featured Image created in the previous step.
- Update the Post Content.
- Add all media files saved earlier to the Post Content.
- Add links from the post to relevant tutorials (e.g. if the post mentions a new feature of the WordPress Block Editor, then link the content to the WordPress Block Editor tutorial).
- Fix the post’s meta description.
- Save and publish the post.
- After publishing the post, visit the WordPress Updates section and make sure that the new entry displays correctly in the grid list, then click through and check to make sure that all the post content is ok.
- Promote the post.
=== FINISH EXAMPLE DOCUMENTATION ===
Creating Hands-Free Step-By-Step Documentation: Benefits & Challenges
The above example illustrates the kind of basic documentation your business should aim to create before handing the responsibility for performing the task to someone else, whether in-house or outsourced.
In addition to text instructions, you can add screenshots, videos, etc. to the above documentation and publish it as an online tutorial inside a private or password-protected area of your site (e.g. give staff-only access to the training and documentation).
After documenting the above steps, make sure that the process can be run repeatedly to deliver consistent results, and periodically review and update the content.
![]()
Creating detailed documented procedures helps you to see what challenges you will need to address when choosing to outsource the task.
With the above, for example, some of the challenges to work out before outsourcing the task include:
- Storing media files, notes, content production logs, etc. on a hard drive: In terms of document storage, it would probably be better to move these to the cloud and use collaborative/shared applications with separate user logins.
- Access to tools and applications and competency in using these: The above process requires using licensed tools like Photoshop and S3 Browser, having basic skills in Photoshop, WordPress, etc., and having admin access to your website in order to perform certain functions.
- Managing/sharing logins and passwords. For services that require access to credentials (e.g. Amazon S3), it’s important to set things up so that the security of important business accounts is never compromised.
- Workflow processes. It’s important to work out beforehand how processes fit into your overall workflow.
- Related processes and procedures also need documentation. Processes often involve additional or related processes and subprocesses, and these also need to be documented. For example, the last task in our example (“Promote the post”) is a whole separate process in itself, as documented in our Content Promotion training module.
Documenting Procedures: Final Thoughts
Creating detailed documented procedures can be very time-consuming but it’s vitally important for the sustainability, growth, and long-term success of your business.
Hopefully, you can see from the above that documenting procedures allows your business to:
- Create “hands-free” step-by-step documentation that can be used to train new team members and outsource work effectively,
- Track and measure the progress of its content strategy.
- Improve content management practices.
Documenting Procedures – FAQs
Here are frequently asked questions about documenting procedures:
What is the purpose of documenting procedures?
Documenting procedures helps standardize practices, ensures consistency in operations, and facilitates training and compliance. It serves as a reference tool that can guide current and future actions within an organization.
What should be included in a documented procedure?
A documented procedure should include the purpose of the procedure, scope of where and when it applies, detailed step-by-step instructions, roles and responsibilities, required resources, and safety or compliance considerations.
How detailed should a procedure be?
The level of detail should be sufficient to enable a person with general knowledge of the field to perform the procedure without prior experience. This means including all necessary steps and avoiding assumptions about the user’s knowledge.
Who is responsible for creating procedures?
Typically, the responsibility for creating procedures lies with subject matter experts and managers who oversee the specific processes. It is crucial that those who are intimately familiar with the tasks write the procedures to ensure accuracy and completeness.
How often should procedures be updated?
Procedures should be reviewed and updated regularly to reflect changes in technology, compliance requirements, and operational practices. A good rule of thumb is to review procedures annually, but updates may be needed more frequently depending on the pace of change.
What is the difference between a policy, a process, and a procedure?
A policy outlines the rules or guidelines under which a company operates. A process is the highest level description of a broad task that may involve multiple steps. A procedure is a specific, detailed series of actions that are followed to comply with the policy or to complete a component of the process.
How should documented procedures be formatted?
Documented procedures should be clearly formatted with headings, subheadings, bullet points, and numbered steps to make them easy to follow. Visual aids like diagrams, flowcharts, and screenshots can also be helpful, particularly for complex tasks.
What are the best practices for maintaining procedure documentation?
Best practices include regularly reviewing and updating documentation, ensuring accessibility to all who need it, maintaining clear version control, and getting feedback from users to improve the clarity and effectiveness of the documents.
***
Image: Binders