
Content Management Tips & Tricks
Here are some useful content management tips & tricks to help you get things done faster.
 Sometimes a content manager has to fix up things “on the fly” to get the content published and approved.
When this happens, it pays to have a few tips, tricks, and hacks up your sleeve.
This section contains a number of useful quick fixes that are worth knowing for when such occasions arise.
Note: One of the great benefits of working with content on the web is that you can publish something to meet a deadline and then go back and edit or fix things up after publishing. (e.g. replace banners and images, fix up typos, add or delete text, etc.)
In this lesson, we’ll cover a number of tips and tricks we’ve picked up over the years to help you get things done quicker when things need to be done quickly.
***
Changing Web Browser Text
Let’s say that you are writing an article or a tutorial about upcoming changes that will be made to content on your website. These changes haven’t been implemented yet but your business wants you to publish the article or tutorial as soon as the changes to the website are made.
Here is a really useful tip for whenever these situations arise.
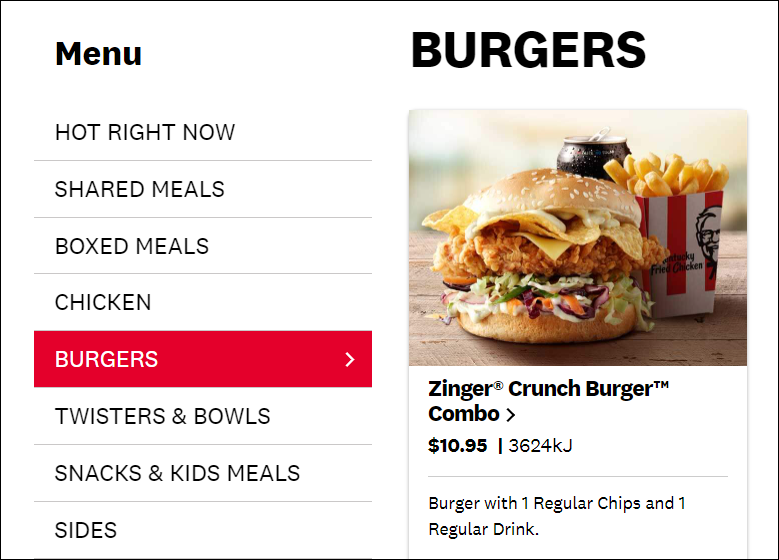
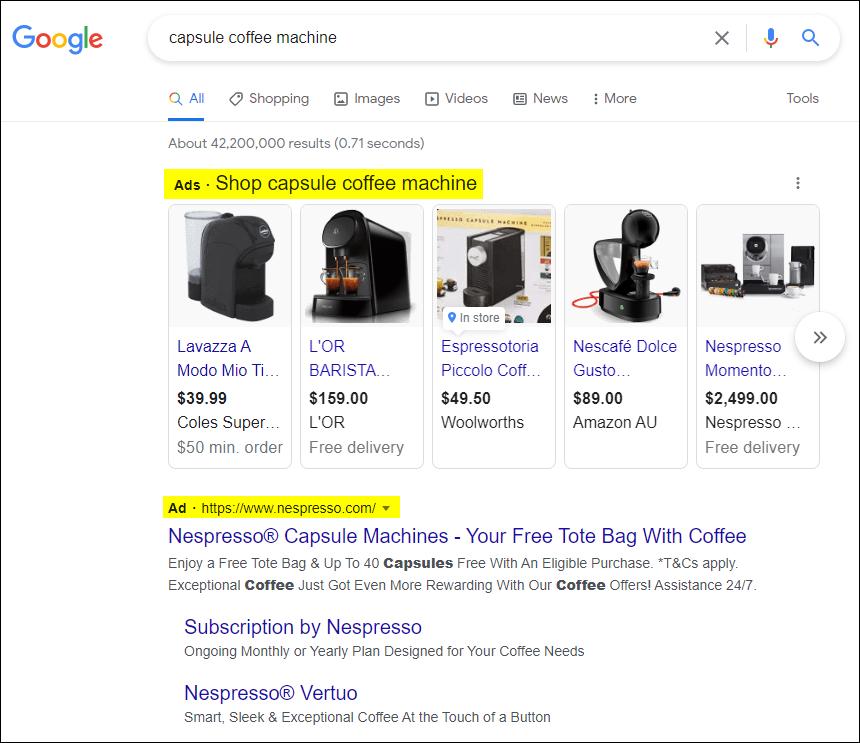
Let’s say that some of the content in the screenshot below needs to be changed on your website for your article or tutorial.
How can you change the content on your website to create new screenshots that reflect this “updated” content without changing the actual content of the website?
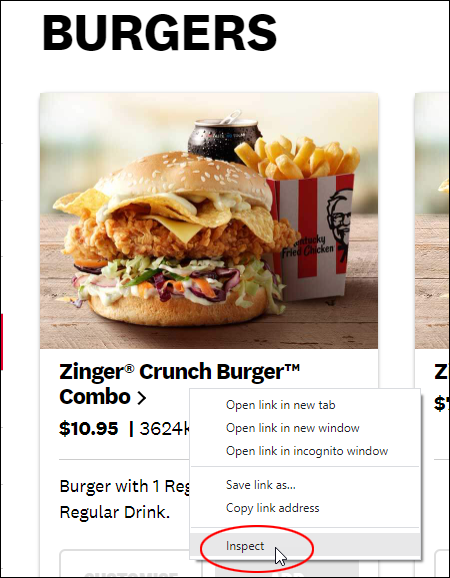
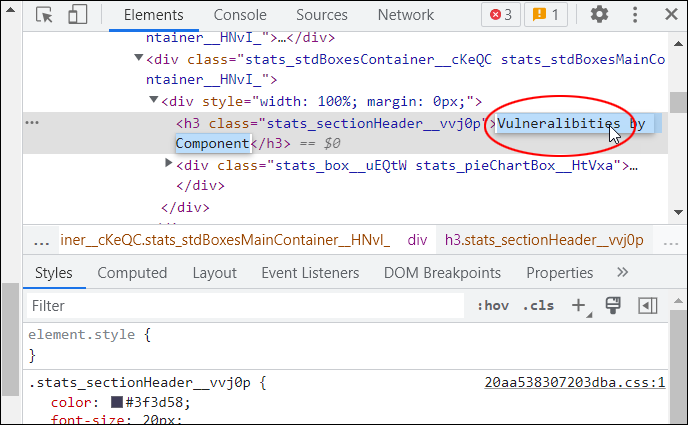
Simple! Here’s how … if you are using the Chrome web browser, right-click on the content that needs changing and select “Inspect” from the menu…
This will bring up the Web Developer’s Tools section and display a bunch of code on your screen.
Ignore all the code and locate the string of text that needs to be changed. You may have to dig a little and open up some nested sections in the code to find the text.
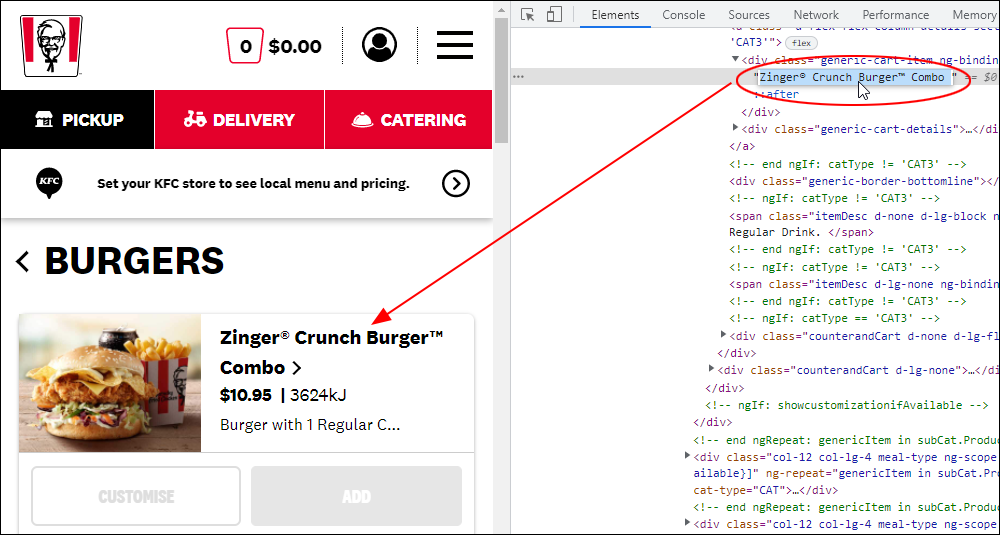
Once you find the string of text that needs changing, double-click on the text to select it, make the changes to the text, and hit the Enter button.
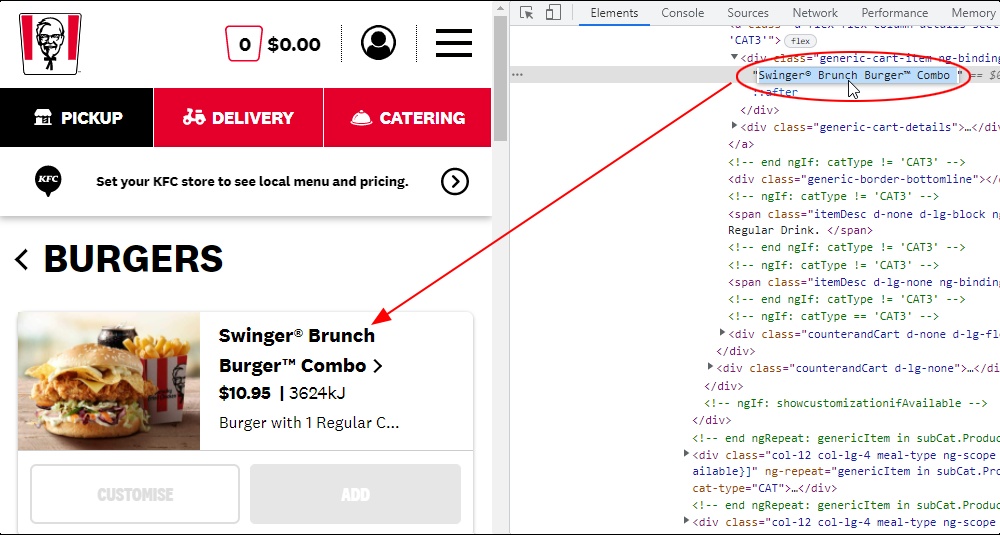
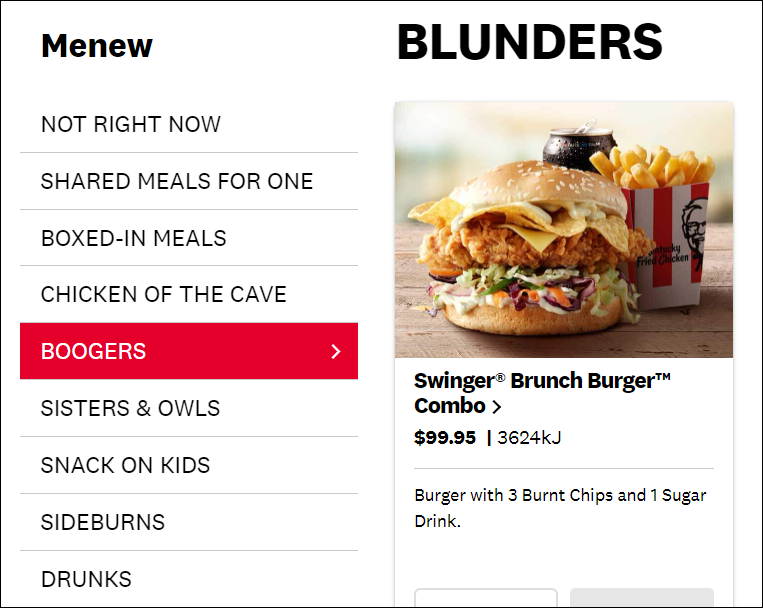
Close the Web Developer Tools section (click on the ‘X’). Your web browser should display the edited text in the same styling and format of the website. You can now take screenshots of the “new” content…
![]()
Note: Don’t worry…nothing has actually changed on the actual website – you’re only playing with text on your own web browser.
This tip is really useful for taking screenshots of things like upcoming changes to pricing, product names, etc.
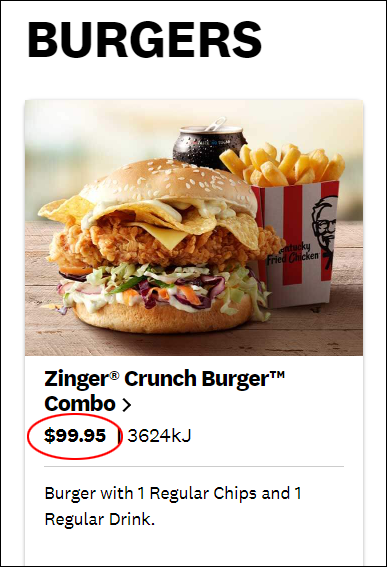
Use this tip to change any text on your website…
![]()
To view the original content on your website, just refresh your web browser. Everything will be restored to normal!
Working With Images
Having basic image editing skills can help you save time and money when making small fixes to content-like images.
![]()
Note: The following examples use Photoshop (other image editing applications should have similar features). You don’t need to be an advanced user to perform the tasks shown below, but having some basic Photoshop skills is useful.
Fixing Screenshots With Misspelled Words
Let’s apply the “Changing Web Browser Text” tip shown above to fix misspelled words on screenshots.
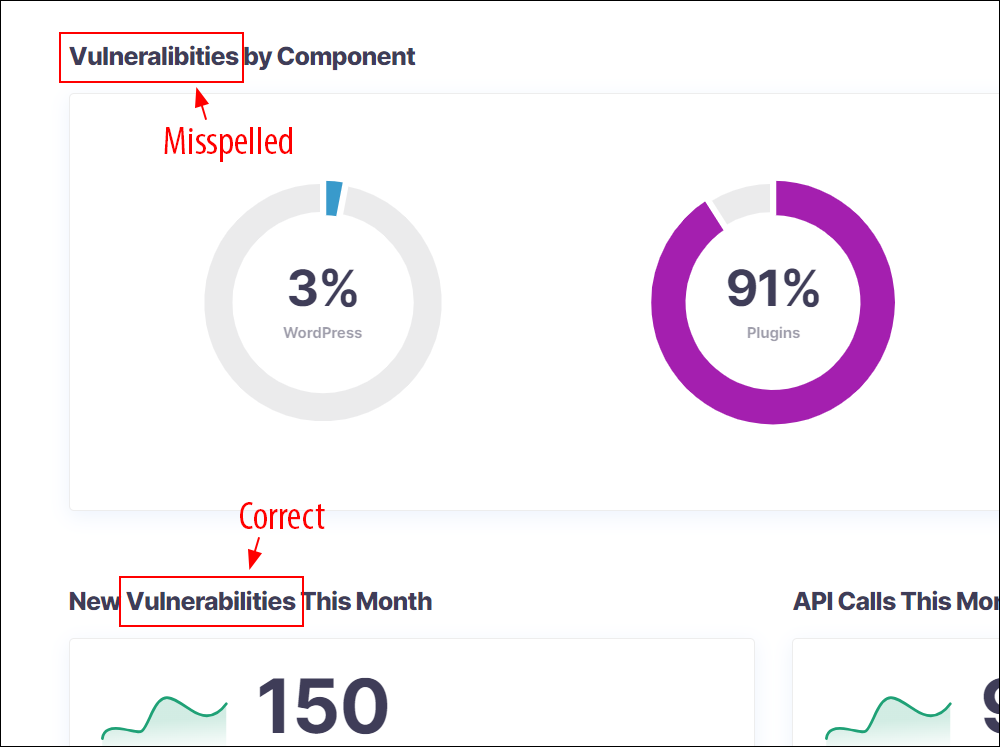
Suppose that you take a screenshot of an element on a web page for an article, tutorial, etc., and you discover there is a misspelling on the screenshot image, as shown in the example below…
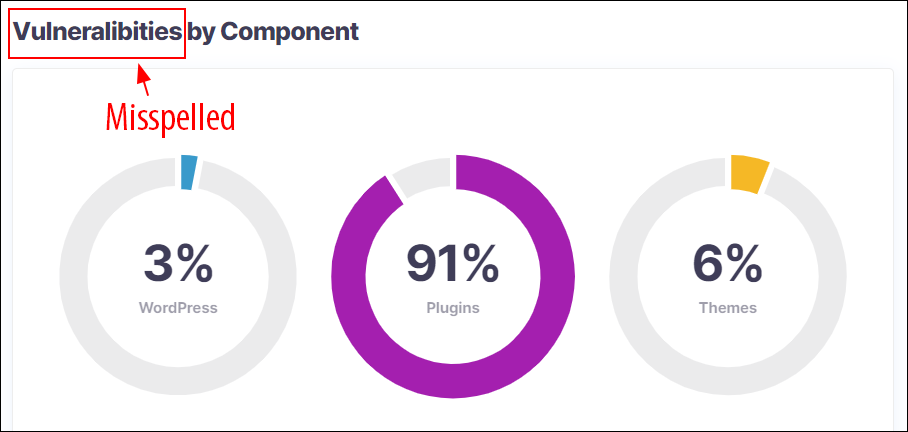
The misspelled word is part of the screenshot image and the screenshot was taken from a web page.
The obvious solution would be to log into the website, edit the page, fix the spelling error, republish the page, then take a new screenshot of the web page with the word spelled correctly. But…what if it’s not your website?
Here’s one way to fix the screenshot…
First, go back to the web page that is the source of your screenshot and see if you can find the same word spelled correctly. Note: the correctly-spelled word needs to have the same typeface, heading size, color, etc. for this screenshot fix to work (it’s like finding the proverbial “needle in a haystack”).
Take a screenshot of the correctly-spelled word (crop the image to make sure there is no extra spacing around the word), then superimpose the image with the word spelled correctly over the original screenshot in your image editing application.
Nudge the image into its correct position until the screenshot looks right, then save your image.
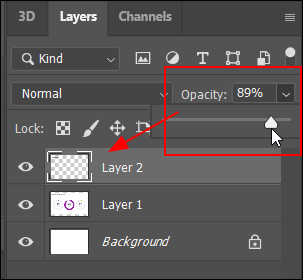
Tip: Use the layer opacity tool to make sure the superimposed image is aligned correctly with the screenshot below it (i.e. make the top layer slightly transparent so you can see the layer below as you nudge the image into position).
Now that you know the manual way to fix misspelled words on screenshot images, let’s use the “browser editing” method, which is so much faster and easier if you are using the Chrome browser.
Go back to the web page and right-click on the misspelled word, then select “Inspect” from the menu…
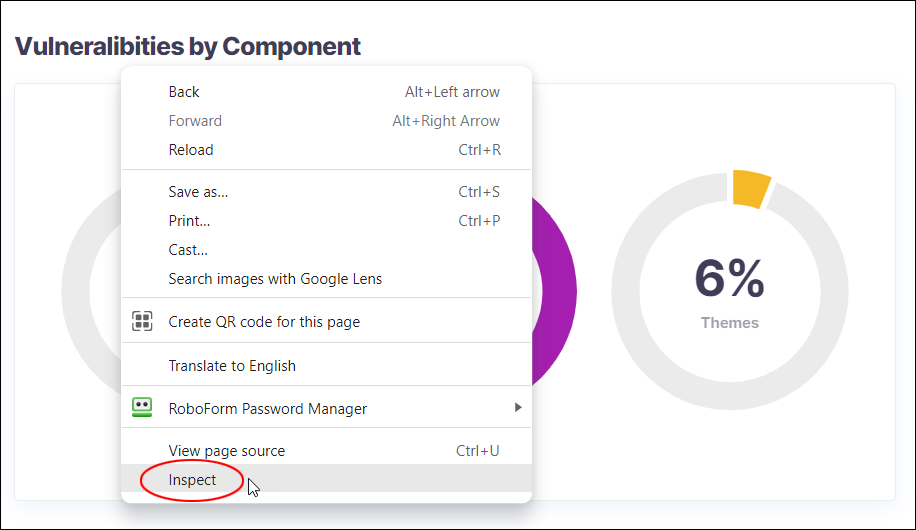
This should bring up the Web Developer’s Tools section with the line containing the misspelled word.
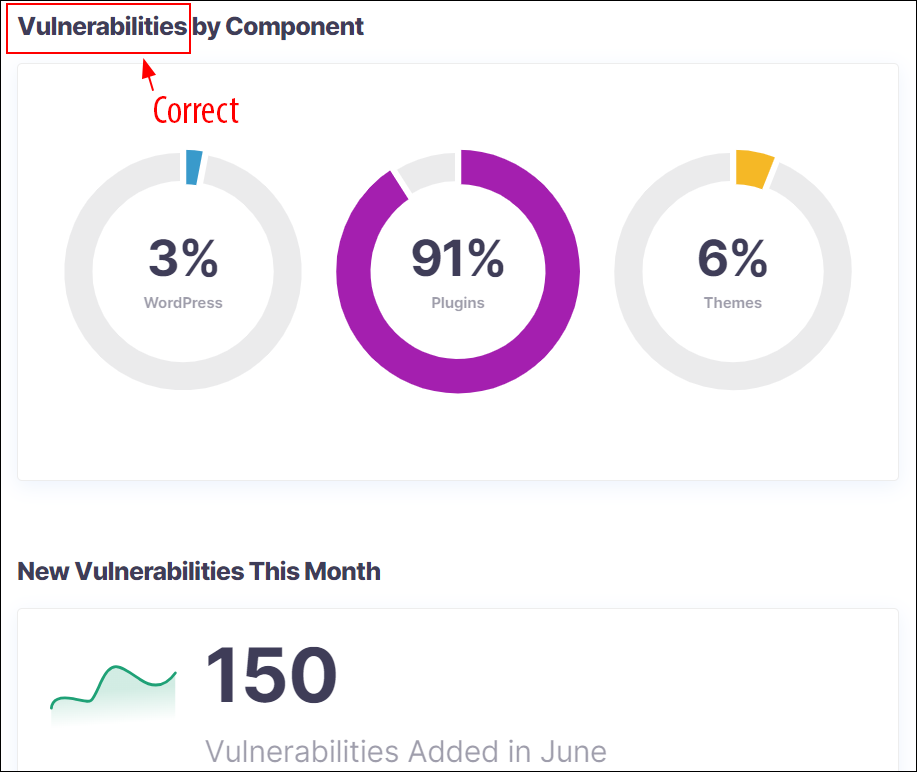
Click on the line, fix the spelling of the word, then hit “enter” or click outside that section to make the change…
The misspelled word should now be “magically” fixed on the web page, so you can take a new screenshot of the page with the correctly spelled word.
Adding A Callout To Images
Adding a callout to an image is useful when you want to bring attention to a particular feature or section of an image, create step-by-step screenshot tutorials, etc.
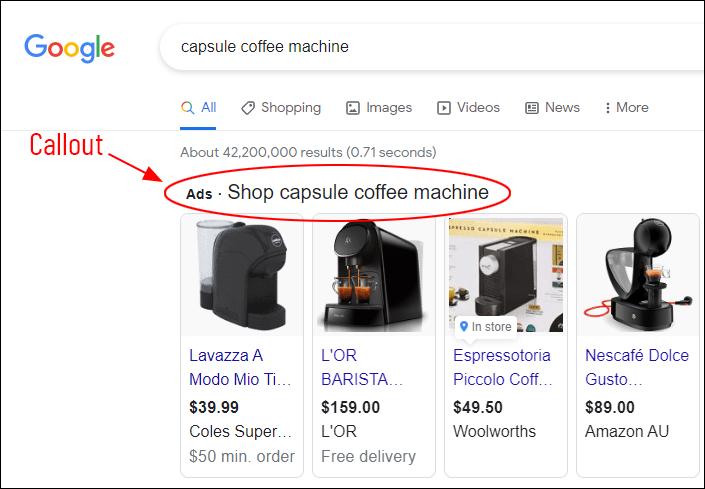
Adding callouts to images typically involve adding layered text, images, and shapes (e.g. ovals, rectangles) over the section of the image you want to make stand out.
In this example, we’ll add a red oval callout shape to the image below.

To add a callout, first, take a screenshot of your image and bring it into your image editing application (e.g. Photoshop).
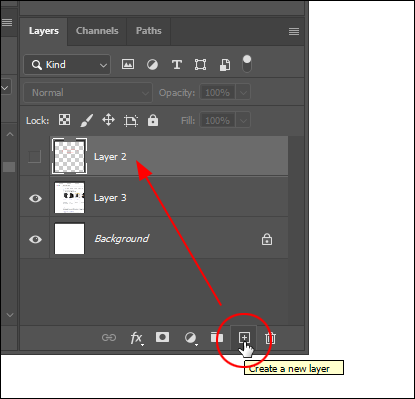
Next, create a new layer (so you’re not adding pixels directly to the screenshot image). This way, if you make a mistake, you can just delete the layer and start again.
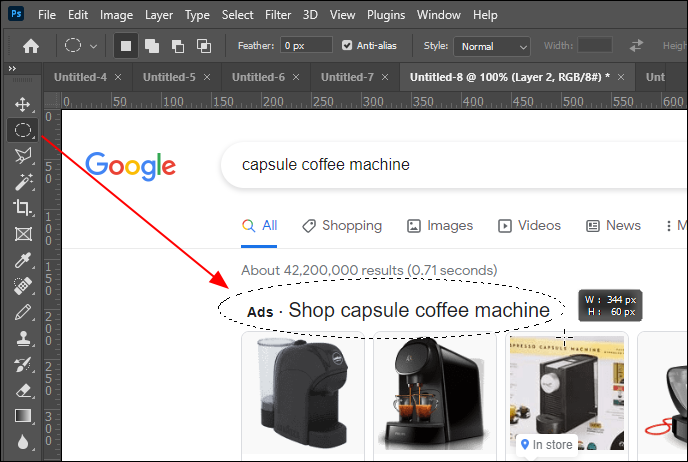
Next, select a marquee tool (elliptical or rectangular) from the tools menu. In this example, we want to add an oval-shaped callout, so we’ll select the elliptical marquee and a border to it.
Draw the shape over the section of the image you want to make stand out.
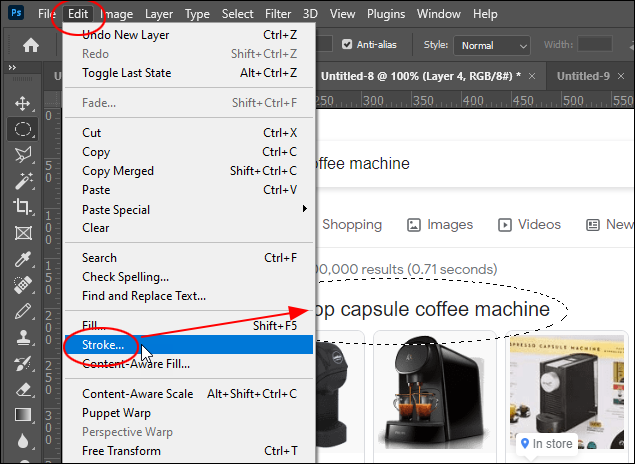
Next, select Edit> Stroke from the main menu.
Enter the Stroke width (e.g. 1 px, 2 px, 4 px, etc.) and color (e.g. red), and a location (inside, center, outside), and click the OK button.
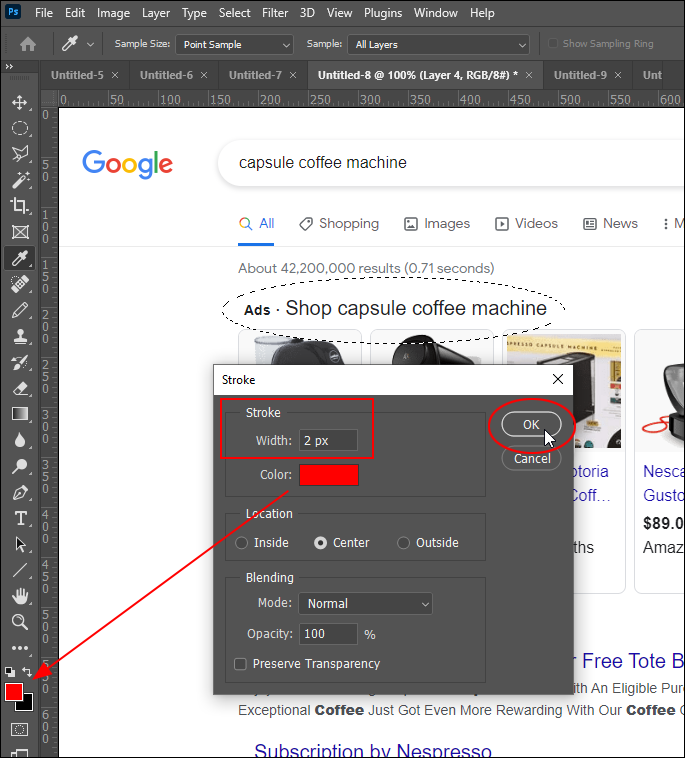
Finally, click on the image to deselect the marquee.
Congratulations! You have added a callout to the image. Since you have added this element to your image on a separate layer, you can use the Move Tool to adjust the position of the callout. Also, feel free to add text overlays and arrows if required.

Here’s the process from start to finish:
Video: Adding callouts to images.
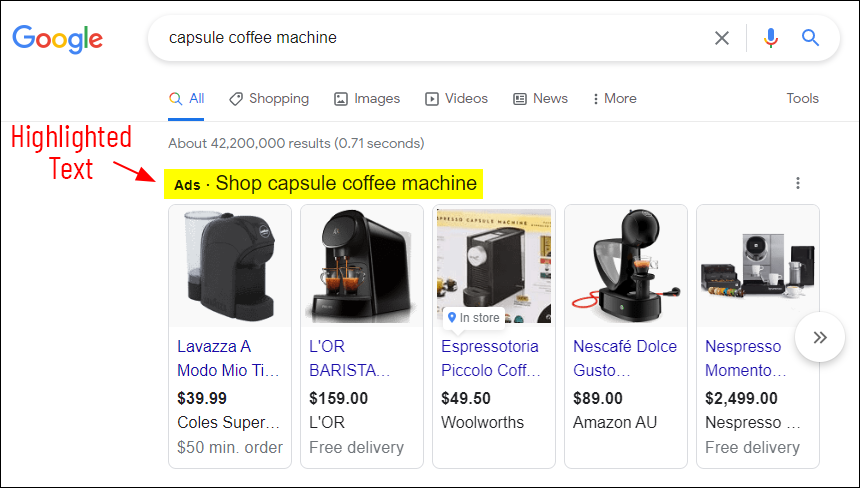
Highlighting Text In Images
If you know how to add callouts to images, then you will find that highlighting text (or sections of an image) is just as quick and easy.
To highlight a section of an image, add the image to your image editing application.
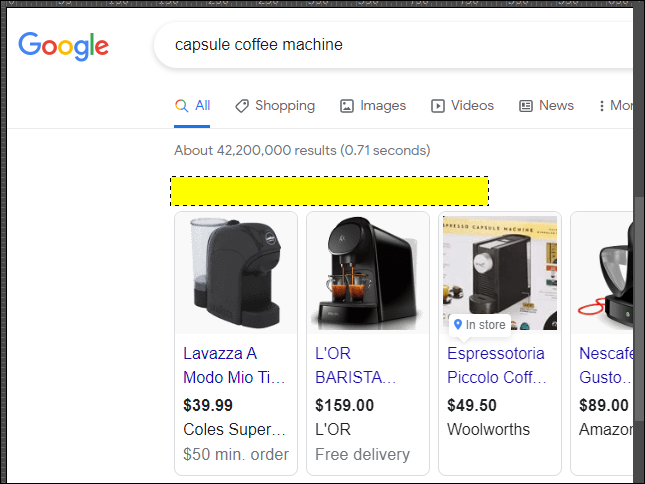
In this example, we want to emulate a highlighter pen, so select the Rectangular Marquee Tool from the Tools section and draw a rectangle over the text you want to be highlighted.
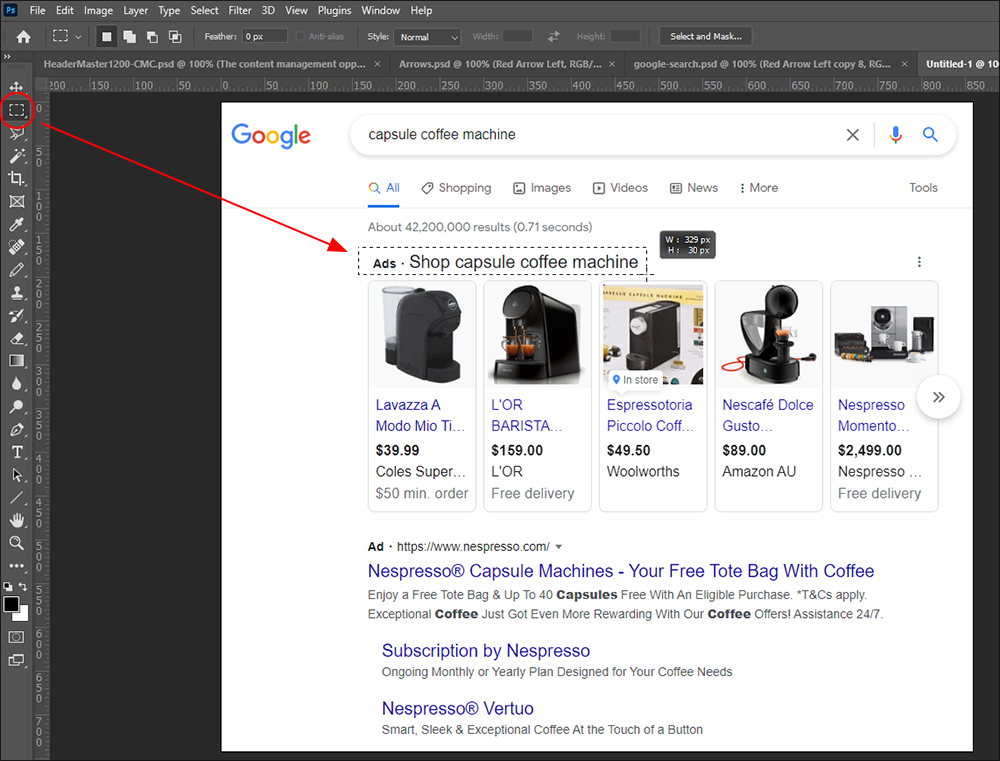
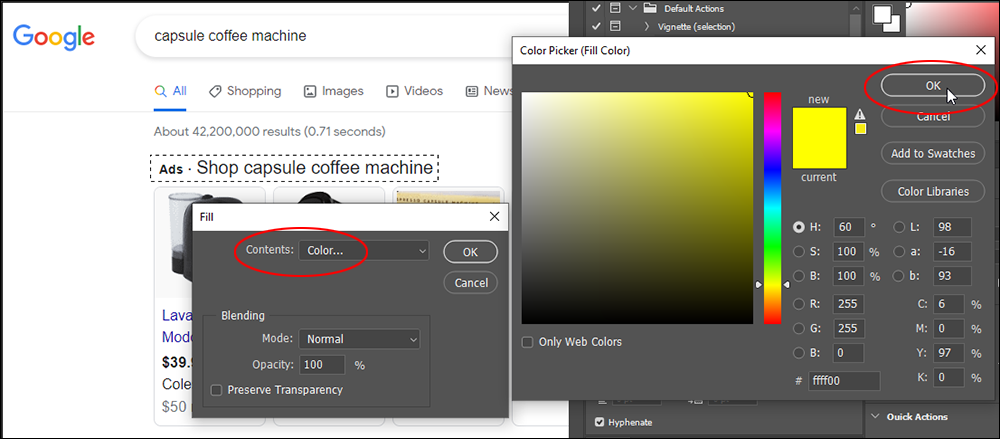
Make sure that you are working on a new layer when you do this (in case you make a mistake). Next, in the main menu, select Edit > Fill…
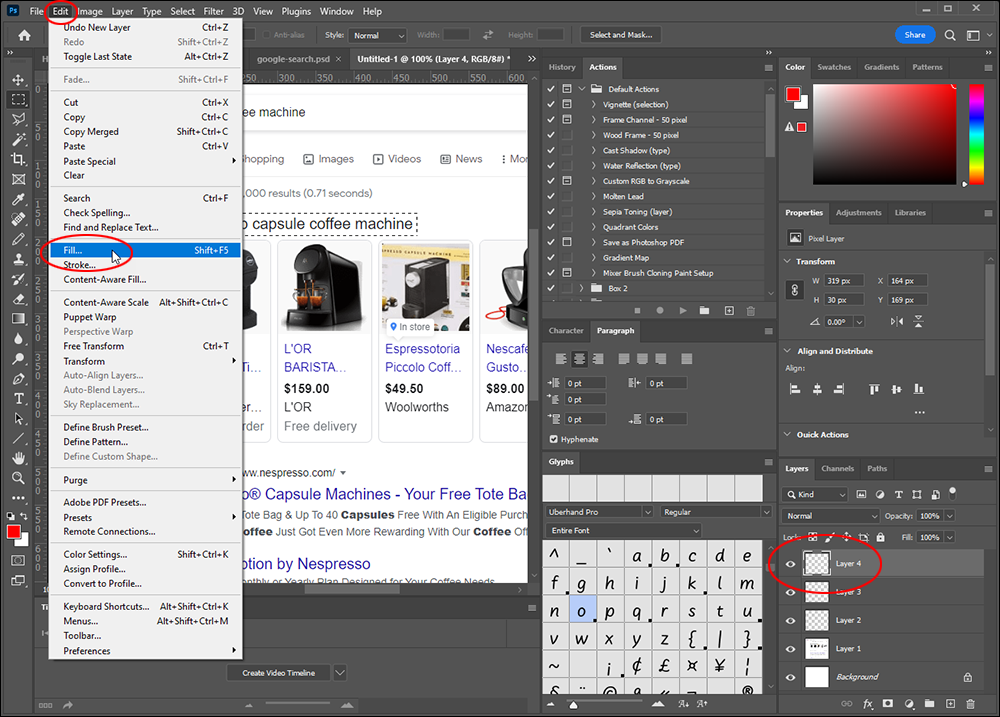
You can highlight your image using any color you like. For this example, let’s use a bright yellow color to make the highlight stand out.
Select Color from the Fill > Contents dropdown menu.
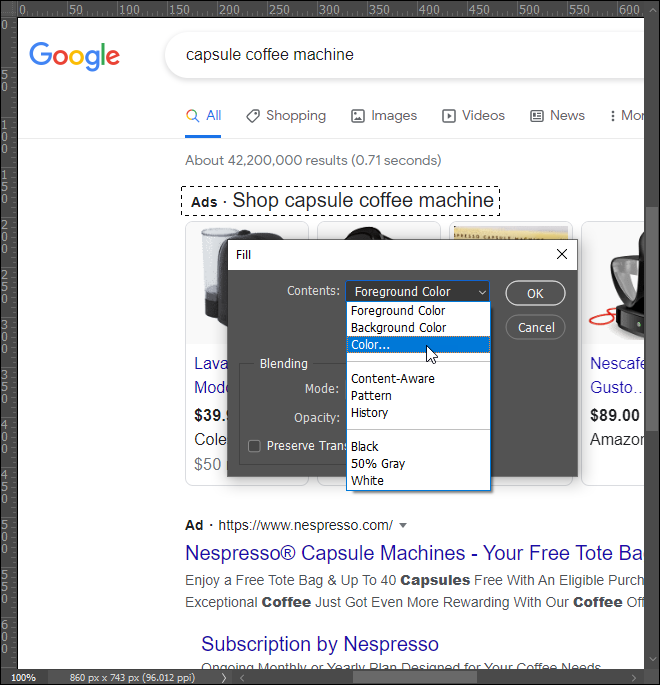
In the color picker, select the color for your highlight using any of the color palette tools, then click on the OK button.
As we are adding a color using the Fill tool, this should completely fill the rectangular marquee. As long as you have added the marquee and fill on a new layer, everything should be fine…there’s nothing to worry about!
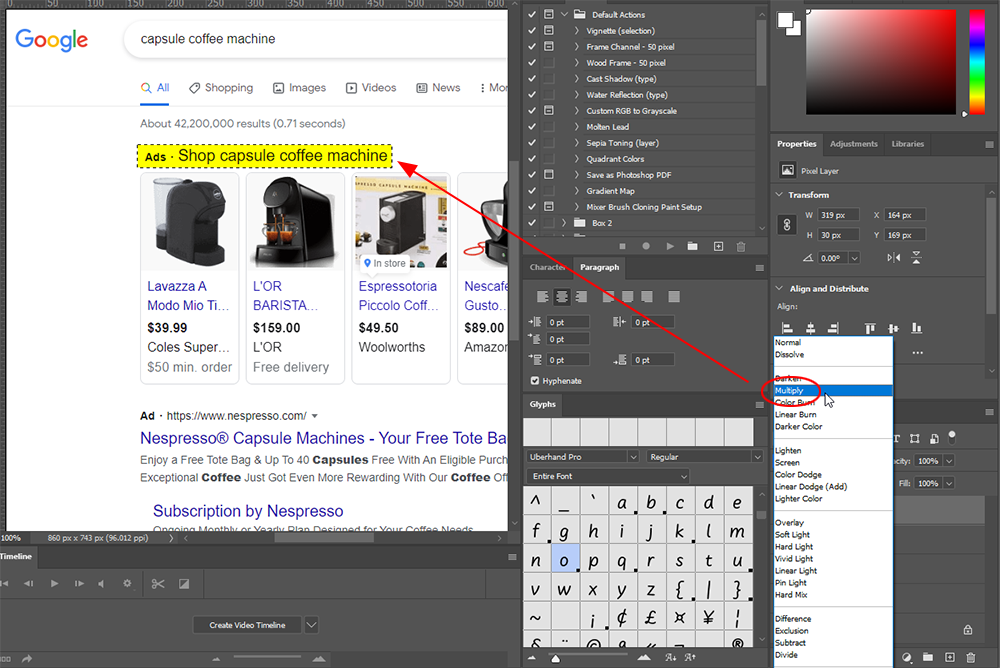
In the Layers tab, look for the Blending Modes dropdown menu (it will probably display the Normal mode) and select Multiply.
This multiplies the luminosity of the base color by the blend color, allowing the image below to show through the color-filled marquee. You can also adjust the intensity of the highlight color by reducing its opacity (increasing transparency).
Click anywhere on the image to deselect the marquee. Congratulations! You should now see the section of text on your image highlighted.
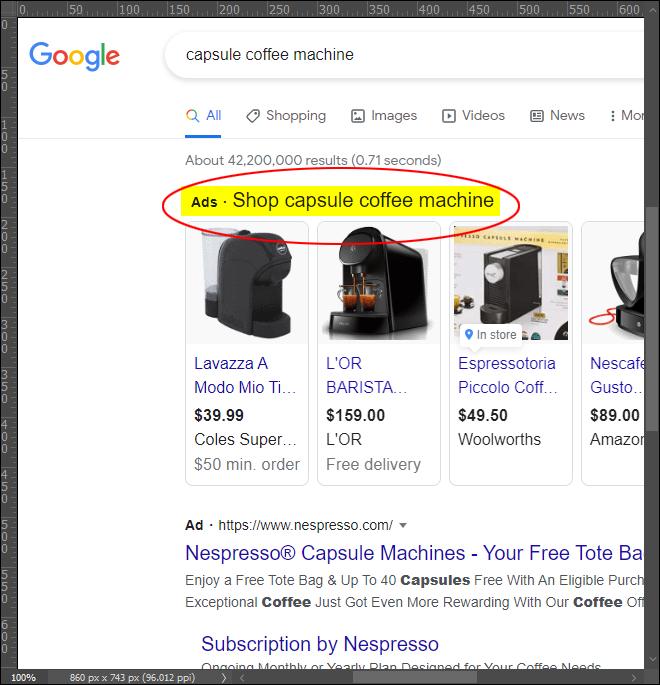
Repeat this process to highlight other sections of your image. As we have added this element to a new layer, you should be able to easily adjust the highlight by moving it around on the image. You can also erase or trim any excess color sections to suit your taste.
Here’s the process from start to finish:
Video: Adding highlights to images.
Adding A Logo With White Background To Images
This is a quick hack that can help you if you need to overlay an image with a white background (e.g. a logo or watermark) on another image (e.g. a photo or stock image).
As you can see from the example image below, placing the logo with a white background over the stock image doesn’t look good.
Here’s a quick fix: Make sure to select the layer with the white background image and go to the Blending Modes dropdown menu (it will probably display the Normal mode).
Select Multiply.
This multiplies the luminosity of the white color pixels by the blend color, creating the illusory effect of “transparency”.
Note: Sometimes you can get a better result by selecting Color Burn instead of Multiply from the Blending Modes dropdown menu, as shown in the image below.
Here’s the process from start to finish:
Video: Adding overlays with white backgrounds to images.
Grabbing Text From Images
You can easily copy text from most web pages by simply highlighting the text on the page and copying it to your clipboard. There’s no trick to that.
Using a tool like Snagit, however, also lets you quickly and easily copy text embedded in images.
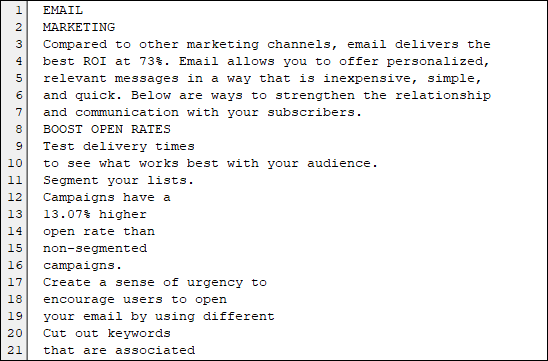
For example, to grab the text from an infographic image like the one shown below, simply launch Snagit, select the “Grab Text” option, and click on the “Capture” button.

Select the section of the image containing the text and Snagit intelligently analyzes and grabs the text contained in the selected section of that image.

Now, simply copy and paste the results into your text editor.
More info: Snagit
Resources
See the sections below for useful tools and resources that will help you manage your content more easily.

Free Video Course: How To Create An Effective Content Strategy For Your Business

File Transfer Tools

Using Amazon S3

Content Research Tools

Headline Generating Tools

Password Management Tools

Customer Surveys

Content Production Tools

Content Editing Tools

Content Promotion Tools

Media Creation Tools
Logo Makers
Media Editing Tools

Search Optimization Tools (SEO)

Content Management System (CMS)

WordPress Plugins

WordPress User Manual

Free Content Ideas Course

Digital Business Video Courses

Content Troubleshooting Guide

The Small Business Digital Manager

Learn Basic HTML

Social Media Tools

Free Marketing Membership Sites

Content Outsourcing Resources
Link Tracking Management Tool

Keyboard Shortcuts

Content Management Glossary

Retired Resources
***
Image: Laptop User