Image Management Guide
 Images play an important role in the creation of digital content and content management.
Effective image management and optimization enhance website performance and contribute to an overall positive user experience.
This comprehensive guide walks you through the essentials of optimizing and managing your web images effectively and ensuring that your site performs well to improve search engine rankings and increase user satisfaction.
Introduction To Image Management
One of the primary reasons web image management is essential is to optimize your website’s performance.
Image resizing and compression techniques can help reduce file sizes without compromising quality, ensuring faster loading times and improved user experience.
Online image editing tools allow you to enhance and customize images to suit your brand and messaging.
Image asset management is another critical aspect of web image management, allowing you to organize and categorize your images for easy retrieval. Implementing image tagging and categorization techniques can make locating specific images easier when needed.
With the rise of mobile device usage, it’s also vital to consider mobile image management solutions. Ensuring images are mobile-friendly and optimized for different screen sizes can help reach a wider audience and enhance user engagement.
Cloud-based image storage and retrieval systems offer a convenient and secure way to store and access your images from anywhere. Also, tracking image performance and analytics can provide valuable insights into how your images resonate with your audience.
Protecting your images from unauthorized use and ensuring compliance with copyright laws is crucial for maintaining the integrity of your website. Web-based image resizing and cropping tools can help you tailor your images for different platforms and devices, while CDN management can further improve loading times for your website.
Mastering web image management is essential for creating a visually appealing and high-performing website. This section covers how to optimize your images for the web and manage your web images effectively.
The Role Of Image Management In Content Management
Image management plays a crucial role in enhancing overall content management effectiveness:
- Organizing Visual Assets: Image management involves storage, organization, and centralization of digital images and graphics, contributing to a well-structured content repository.
- Efficient Distribution: Proper image management facilitates seamless distribution of visual content across various channels. This ensures that the right images are readily available for different contexts, improving overall content accessibility.
- Collaboration and Workflow: Implementing a robust image management system enables content creators to collaborate effectively. Teams can efficiently work with visual assets, reducing friction and enhancing content creation workflows.
- Brand Consistency: For organizations, image management ensures consistent use of brand images at scale. This consistency is vital for maintaining a cohesive visual identity across all content, contributing to brand recognition.
- Boosting Efficiency with Tags: Image tagging within image management systems streamlines content management. It helps categorize images, making it easier to search and retrieve specific visuals, improving overall efficiency.
Understanding Image Optimization
Definition and Importance
Image optimization involves enhancing images for web use, focusing on factors like size, format, and descriptive elements.
This is important for :
- SEO Boost: Optimized images contribute to higher search engine rankings, ensuring better visibility for your website.
- Improved User Experience: Fast-loading images enhance user experience, reducing bounce rates and increasing engagement.
Image File Formats
An image file format serves as a blueprint for saving, organizing, and storing images or files. Different formats cater to specific needs, with each possessing unique characteristics.
Compatibility with programs and technologies often guides the choice of image file format. Program limitations may require converting files for seamless integration with websites or various recipients.
The selection process considers factors like image quality, size, intended use, image type, and program requirements.
Vector vs. Raster
Vector images are produced by computer systems through mathematical equations, forming points, lines, or curves. Their defining feature is resolution independence, ensuring consistent quality regardless of size adjustments.
In contrast, raster images consist of colored pixels, and their quality is tied to resolution. Enlarging or reducing a raster image can result in blurriness due to pixel limitations. Most photographic files fall into the raster category.
High Resolution vs. Low Resolution
Image resolution, measured in dots per inch (DPI) or pixels per inch (PPI), defines image clarity.
Higher resolutions boast more DPI or PPI, delivering a clearer image, while lower resolutions result in a blurry or unclear appearance.
Adjusting the resolution allows control over the number of pixels or dots in an image, directly influencing its clarity.
Types of Image Formats
Understanding different image formats is crucial for effective optimization. Different image formats are designed to cater to specific needs and preferences in the digital landscape.
Here are some of the most common image formats and what they are typically used for:
- JPEG (Joint Photographic Experts Group) – Ideal for photographs and images with complex color gradients, JPEG is a lossy compression format that balances quality and file size (JPEG makes file sizes smaller but sacrifices some image quality) and is commonly used for digital photography, web images, and social media graphics.
- PNG (Portable Network Graphics) – PNG is a lossless compression format that supports transparency and high detail, preserving image quality without sacrificing file size efficiency. Suitable for images with transparency, logos, icons, and graphics requiring sharp edges.
- GIF (Graphics Interchange Format) – GIF is a lossless compression format known for supporting animations and simple graphics with limited color palettes. GIF supports animation and transparency but has limited color depth compared to other formats. GIFs are used for animated images, logos, and simple graphics on websites.
- WebP – Developed by Google, WebP offers both lossy and lossless compression for web images. It provides superior compression compared to JPEG and PNG formats, resulting in faster load times.
- TIFF (Tagged Image File Format) – TIFF is a high-quality, lossless compression format that maintains high-quality images but results in larger file sizes. TIFF is commonly used in professional photography, publishing, printing, and archiving industries.
- BMP (Bitmap) – BMP is an uncompressed raster image format with high quality that results in larger file sizes and limited compatibility. It is a native Windows image format seldom used on the web due to file size, but used in certain applications and older systems, and suitable for simple graphics and icons.
- RAW Image Files – RAW is a format storing unprocessed data from a camera’s sensor, offering maximum editing flexibility. RAW files are uncompressed and retain all image information but require specialized software for editing. Mainly used by photographers for post-processing and editing.
- EPS (Encapsulated PostScript) – EPS is a vector image format that supports text and graphics and is preferred for vector graphics and illustrations. EPS files can be resized without loss of quality and are widely used in professional graphic design and print industries
- AVIF (AV1 Image File Format) – AVIF is a modern, open, and royalty-free format providing high compression efficiency. Suitable for both static and animated images, gaining popularity for web optimization.
- PDF (Portable Document Format) – A versatile format for showcasing text-based documents, graphics, and illustrations. Offering features like embedded links, buttons, and interactive fields, PDF files provide a user-friendly experience. Notably, PDFs can be effortlessly viewed without additional editing programs, enhancing their accessibility.
- PSD (Photoshop Document) – A file format tailored for Adobe Photoshop. Featuring layers and image adjustments, designers favor PSDs for storing high-quality graphics. While exclusive to Photoshop for opening, this format excels in image editing and diverse project applications.
- INDD (Adobe InDesign Document) – INDD is designed to store InDesign projects. Leveraging InDesign’s capabilities for content layout and document design, INDD files are integral to creative projects. However, it’s crucial to recognize the format’s limitation of opening solely in InDesign, making it essential to consider compatibility when sharing images and projects. The format’s capacity to handle large, multi-paged documents makes it particularly valuable in book publishing.
- SVG (Scalable Vector Graphics) – SVG stands out as an XML-based vector image format catering to two-dimensional graphics like icons, diagrams, or logos. Renowned for maintaining image quality regardless of size changes, SVGs are pivotal tools in web design. These files are editable in text and graphic editing programs, adding to their versatility.
- XCF (eXperimental Computing Facility) – XCF, associated with the image editor GIMP, is a file format allowing for sizable files with lossless image quality. Despite its capabilities, XCF faces limited browser support. Noteworthy features include support for images with layers, transparency, and guides, making it a preferred choice within the GIMP ecosystem.
- HEIF (High-Efficiency Image File Format) – HEIF closely resembles JPEG but boasts superior compression, offering better image quality with smaller file sizes. Despite this advantage, HEIF faces limited browser support, making it a relatively newer format often defaulted in smartphone image storage.
- AI (Adobe Illustrator Document) – AI is a vector image file format crafted by Adobe Illustrator. Frequently employed by designers to store digital art and web projects, AI files shine in creating logos, icons, and banners. Adobe Illustrator is the exclusive platform for opening and editing AI files.
Resizing and Compression
Optimizing image size is important for website speed and performance.
It’s important to understand the following two image optimization techniques below, as these serve different purposes to enhance performance and user experience:
- Image Resizing – Relates to image dimensions.
- Image Compression – Relates to image file size.
Image Resizing
Image resizing involves adjusting the width and height dimensions of an image.
Resizing is primarily used to fit an image into a specific space or to create size variations for different devices or layouts.
Resizing can lead to a loss of image clarity if the dimensions are increased, known as upscaling, or a loss of detail if decreased, known as downscaling.
Resizing images incorrectly can also lead to distorted images.
For example, look at the image below:

If the image is resized and enlarged from this thumbnail image to the above dimensions…

It will end up looking pixelated, like this…
If the image is resized without maintaining the correct aspect ratios, it can end up distorted like this…

Resizing images can also reduce file size and make pages load faster.
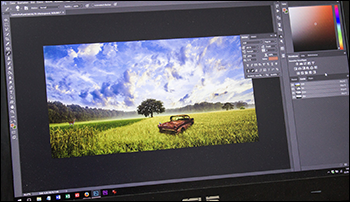
For example, compare the dimensions and filesizes of the images listed in this screenshot:
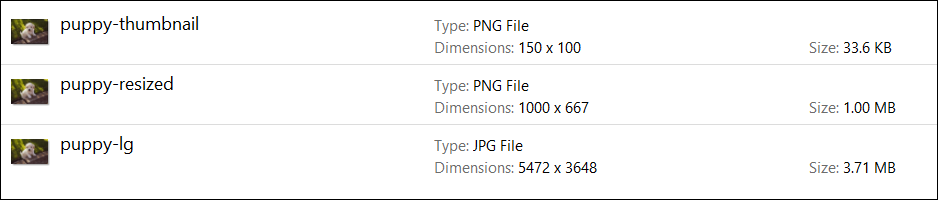
So, it’s important to learn how to resize images without affecting the image quality.
Below are some image resizing techniques you can explore to adjust image dimensions without compromising quality:
- Maintain Aspect Ratio – When resizing images, the original aspect ratio should be preserved to avoid stretching or distortion. This ensures the image maintains its original proportions and proportional resizing while adjusting its width and height dimensions.
- Start with High-Quality Images – Start with high-resolution images to retain detail and clarity during resizing. Resizing low-quality images can lead to pixelation and loss of detail and quality.
- Use Advanced Interpolation Algorithms – Some image editing software and online tools offer advanced interpolation algorithms that minimize quality loss during resizing. These algorithms maintain image sharpness and detail and let you upscale images without quality loss by employing advanced interpolation algorithms during resizing, maintaining smooth transitions between pixels.
- Use Vector Graphics for Enlargement – For scalability without quality loss, consider using vector graphics formats like SVG (Scalable Vector Graphics) for enlarging images without sacrificing quality. Vector images use mathematical equations to define shapes, allowing them to scale seamlessly and be resized infinitely without pixelation, making them ideal for size adjustments.
- Choose The Right Interpolation for Online Resizing – When resizing images in software like Photoshop or GIMP, select high-quality interpolation methods like “Sinc” or “Lanczos” to maintain image integrity and higher quality.
- Choose Cloud-Based Tools for Compression – Online tools and cloud-based services offer image compression and resizing capabilities with minimal quality loss. These tools use advanced algorithms to optimize images for the web while preserving visual fidelity.
Image Compression
Compression is the process of reducing the file size of an image by eliminating unnecessary data.
It is mostly used to minimize image storage space and improve website loading times.
Compression may result in image quality reduction, often measured in terms of compression artifacts or a slight loss of detail. However, modern compression algorithms aim to maintain acceptable quality levels.
Below are some image compression methods that will help you reduce the file size of your images while maintaining their visual integrity:
- Lossless Compression – Preserves image quality by reducing file size without removing any image data. Common formats include PNG, GIF, and WebP, suitable for images where every detail is crucial.
- JPEG Compression – A popular lossy compression method specifically for photographs. Adjusting the compression level allows a balance between file size reduction and acceptable visual quality.
- Image Resizing – Reducing image dimensions effectively reduces file size. Ensure you maintain the aspect ratio to prevent distortion and preserve visual integrity while achieving a smaller file size.
- Content Delivery Networks (CDNs) – Utilizing CDNs optimizes file delivery, reducing load times and bandwidth usage without compromising image quality. CDNs cache and serve images efficiently.
- Vector Graphics – Ideal for logos and simple illustrations, vector graphics (e.g., SVG) maintain visual integrity during resizing as they use mathematical equations instead of pixels.
- Image Optimization Tools – Online tools and software like Adobe Photoshop or TinyPNG offer automated image optimization. They employ various algorithms to compress images intelligently while retaining visual quality.
Resizing And Compression In Image Optimization
Image resizing and image compression relate to image optimization as follows:
- Synergy – Resizing and compression are often used together in image optimization strategies. Resizing sets the appropriate dimensions, and compression ensures efficient storage and faster loading without sacrificing quality significantly.
- Contextual Use – Resizing is crucial for responsive design, ensuring images adapt to various screen sizes. Compression is vital for minimizing bandwidth usage, especially in web environments.
In short, image resizing tailors dimensions, while image compression minimizes file size, contributing to efficient image optimization with a balance between quality and performance.
![]()
Understanding Pixels per inch (PPI) helps ensure optimal image quality across digital platforms and printed materials.
PPI refers to the measure of resolution in a digital image or video display and is crucial in determining image quality for digital displays, printing, and graphic design.
- PPI measures how many pixels are displayed per inch on a screen or printout.
- Higher PPI results in sharper and clearer images.
- PPI is calculated by dividing the number of pixels along the horizontal or vertical axis by the physical width or height of the display.
- PPI can vary depending on the device’s screen size and resolution.
- PPI should not be confused with dots per inch (DPI), which applies to printing resolution rather than digital displays.
Images for the web don’t need the same resolution as images for print. Typically, web images are 72 ppi, while print images are 300 ppi.
Keep this in mind when resizing images. It will help you keep file sizes to a minimum and ensure that image quality is not compromised.

Resources
For additional tutorials and information on image management, see the following resources:
- Content Production
- Content Organization
- Using Images In WordPress
- Image Creation And Editing Tools
- Media Editing Tools
References
For additional information on topics related to this section, see the references below:
- Image File Formats
- Image File Type And Format Guide
- Types of Image File Extensions and When to Use Them
- How to Resize Images Without Losing Quality
This is the end of Part 1 of our Image Management Guide. For Part 2 “Image SEO” click on the pagination links below.
***
Image: Paris Images

 This section covers