Learn how to set up and use Amazon S3 to store, manage, and serve content on your website.
Using Amazon S3
This section covers how to set up and use Amazon S3 to store, manage, and serve content remotely on your website.
Amazon S3 is an affordable and almost limitless cloud storage solution that lets you store your files and large amounts of data, including images, media files, and website backups securely and embed these in your web content.
In this lesson, we provide an overview of the Amazon S3 service, show you how to set up an Amazon S3 account for your business, and how to upload files to S3 directories.
***
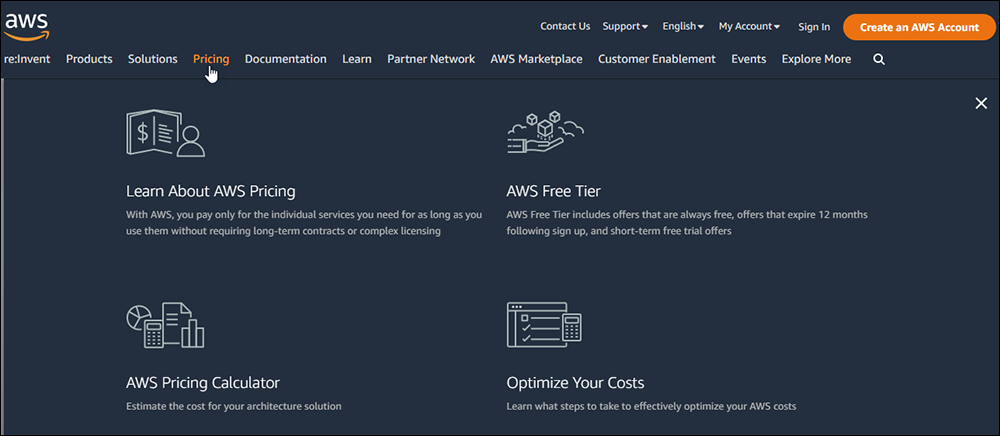
Why Store Your Site’s Content In The Cloud?
Hosting and streaming large media files on your website (e.g. videos) can be expensive and sometimes even complicated.
When it comes to storing files to be used as content on your website, you have a number of options.
While the WordPress Media Library is a great tool for storing media files used in your content, these files are stored on your own server, and depending on your web hosting setup, these can take up excessive space and cause issues with site performance, or exceed your data or bandwidth allowance.
Another option is to upload and stream videos from a free video hosting site like YouTube, display images stored on Flickr, etc., and embed these into your content.
The problem with storing your web content files on free sites, however, is that you are not in control of your content. If, for example, the site changes its policies, this could have a significant effect on how your site can access your files and potentially even disrupt your entire business.
Given the above options and their respective challenges, a viable alternative is to serve content on your site that is stored and streamed from the cloud.
Many companies offer inexpensive cloud storage solutions that allow you to host and embed media, files, and documents into your website content.
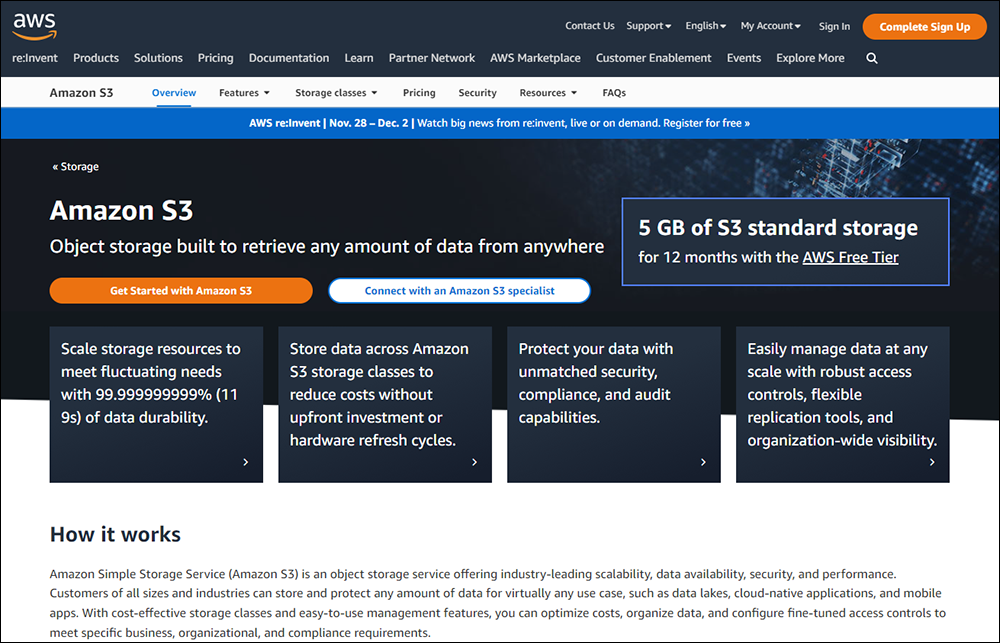
Amazon Simple Storage Service (Amazon S3) is an affordable, secure, and reliable cloud storage solution service from Amazon Web Services (AWS) that you can use to store and retrieve any amount of data, at any time, from anywhere on the web.
Amazon S3 lets you share, distribute and download zip, PDF, audio, and video files, and stream videos on your site without consuming a large amount of bandwidth or straining your server’s resources.
Essentially, you’re using Amazon’s servers to store as much information as you want (videos, audio files, images, large files, etc.) at very little cost (you’ll pay only a few dollars per month for large amounts of data use), making this an ideal solution for using media content on your website.
The video below provides an overview of the Amazon S3 service:
Note: Amazon S3 is one of several applications that Amazon offers in its stable of products, so it’s important not to confuse Amazon S3 with Amazon AWS (i.e. the entire suite of services).
Benefits Of Using Amazon S3
Amazon S3 helps to address some of the biggest technical challenges many businesses face managing content on their websites, like site speed, security, and bandwidth cost.
Here are some of the benefits of using Amazon S3 to host your site’s content:
Improve Site Speed
When you host images, videos, and other heavy bandwidth items like large downloadable files on your own server, the more simultaneous traffic you have (i.e. many users visiting your site at the same time), the slower your pages load on your visitors’ browsers.
If you have spikes in traffic, this extra load can even crash your site.
One of the benefits of storing content remotely on the cloud is that uploading images, videos, and other large bandwidth-consuming files to Amazon S3 instead of your own server allows thousands of visitors to access your information without slowing down your site because the files are being delivered from Amazon’s servers, not yours.
Storing large-sized files or a large number of files in the cloud and streaming these in your content remotely can help to improve your site’s performance.
Host Large-Sized Files
Imagine having a product launch where lots of customers try to download a number of large zip files hosted on your server. Your server could crash, support tickets would start piling up and what should be a very happy day would quickly turn into a nightmare.
If you host your images, videos, and other downloadable files on Amazon S3, your visitors will not experience your site slowing down, buffering, or crashing due to excessive bandwidth consumption.
You could have 100, 1,000, or 10,000 people downloading your zip files simultaneously without any problems.
Save Money Streaming Your Content
Another benefit of using Amazon S3 is how much money you can save. Amazon S3 is an “online scalable (simple) storage service,” which means that it’s essentially a hard drive in cyberspace with unlimited storage – you only pay for what you use.
When Amazon launched S3 back in 2006 (2007 in Europe) they began by charging only 15 cents per gigabyte, and this price has been getting cheaper over time. Currently, it’s in the range of around 3 cents per Gb. This means better service and more savings for you.
Storing large-sized files or a large number of files in the cloud and streaming these in your content remotely can help to keep your web hosting costs down.
Save Time Managing Your Media Content
One of the many benefits and advantages of using a remote storage service like Amazon S3 to add media to your content instead of serving those files from the WordPress Media Library or a free media-hosting site like YouTube is the amount of time you can save managing your media content.
For example, let’s say that you decide to change an image that you have used multiple times throughout your site.
Instead of searching and replacing every instance of that image on your entire site, you can simply upload the new image file and overwrite the old file in your Amazon S3 account. All instances of that file will then automatically update on your site.
There are many advantages to storing your website’s content files on the cloud.
Additionally, if you use WordPress, adding media files like images and videos to your content is as simple as copying and pasting the file’s link wherever you would like that file to display.
All images used on this site (except for the featured images containing the titles of our course modules and lessons) are streamed from an Amazon S3 account.
Read the relevant sections of the AWS website before creating an account.
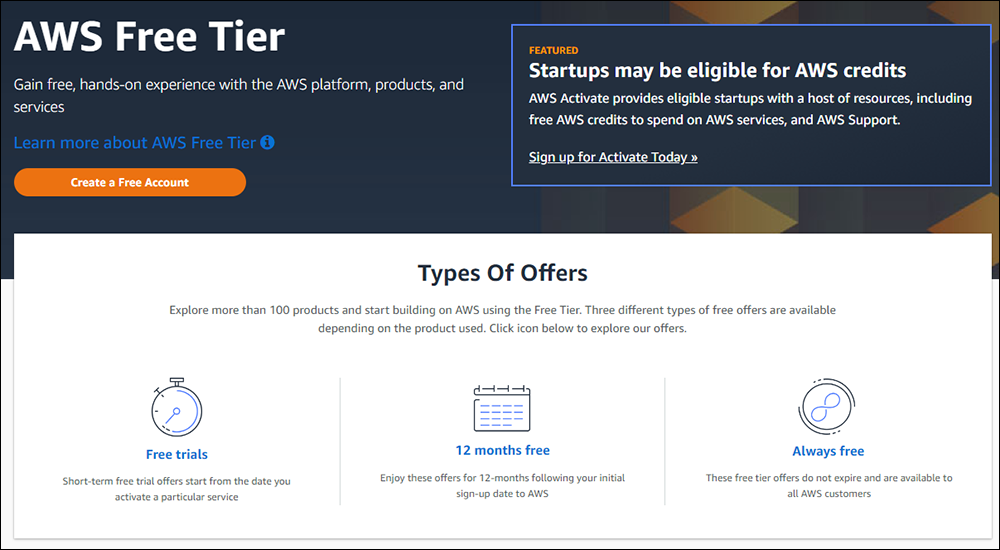
You can sign up for a free Amazon S3 account and get a generous amount of storage and 12 months free…
Create an Amazon S3 account for free.
This allows you to experience the service without having to pay until you exceed their trial quota or period…
Amazon S3’s Free Tier gives you a generous amount of storage and 12 months free.
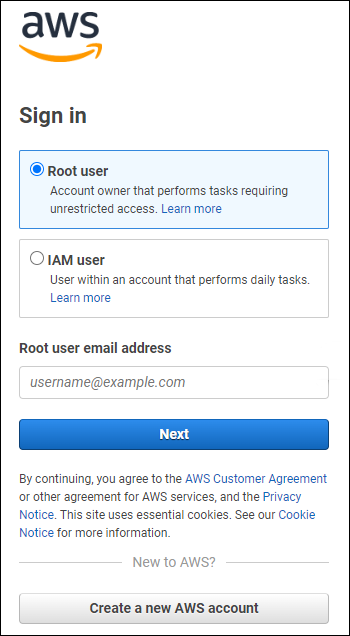
If this is your first time using an Amazon service, create a new account. Otherwise, sign in with your existing Root or IAM user account.
AWS Sign In
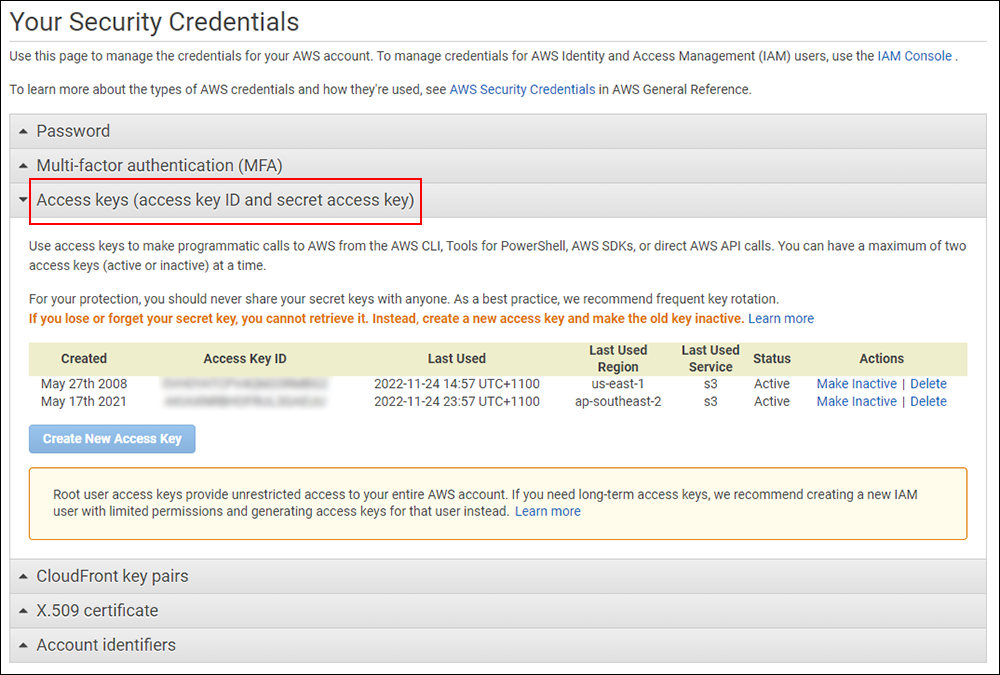
After logging in, go to your Dashboard section and click on Quick Links > My security credentials.
In the AWS Dashboard, click on My security credentials.
Inside the Your Security Credentials section, click on the Access keys tab.
You’ll need access keys to set up your service.
In the “Access Credentials” section, you will find your Access Key ID code and Secret Access Key code. Click on “Show” to reveal your Secret Access Key code.
You need both your Access Key ID code and Secret Access Key code to use the Amazon S3 service.
Copy both of these codes to a plain text file – make sure there are no spaces at the end of the code strings, or you will experience errors using the service.
Important: Never share your codes with anyone!
Save these codes for now on your hard drive (tip: don’t make the file name or location obvious). You will need these codes in the next step.
Note: If you need help creating directories (called “buckets”) to store your files or setting file permissions (so that other users can view, access, and download your files), we recommend watching the Amazon S3video course before proceeding to the next step.
You need to set file permissions for users to view or access files stored on Amazon S3.
You do not have to enable permissions on your files if you don’t plan to share your files with other users or want to keep these files private (e.g. backup files).
How To Upload And Share Files On Amazon S3
After setting up your Amazon S3 account, you can upload files from your hard drive to your Amazon AWS S3 buckets. These files will be stored as an S3 object.
An object consists of the uploaded file and its metadata. You can upload any kind of file you like to an S3 bucket (e.g. images, videos, audio files, backups, data, etc.)
Amazon S3 stores your files inside data containers called buckets.
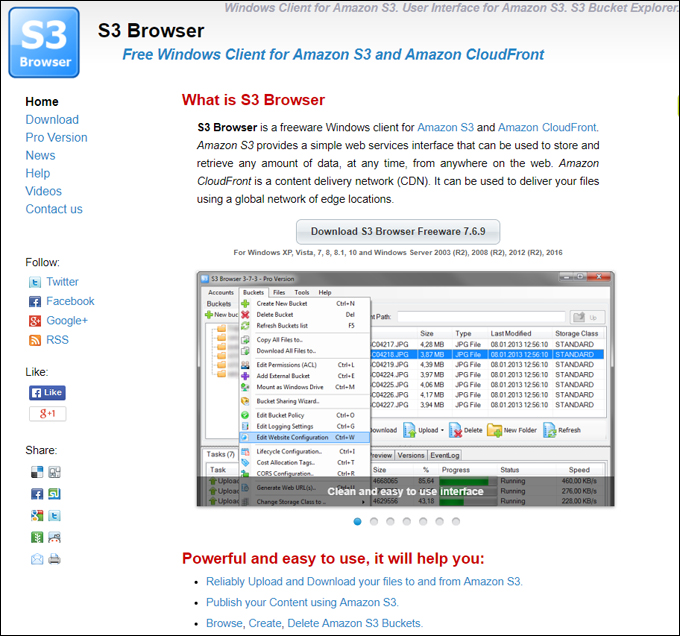
As uploading files to Amazon S3 can be a little technical, we recommend using the tool described below to transfer files between your computer and your Amazon S3 account.
S3 Browser is a freeware tool for Windows users. You can use this tool to access, upload, and share files from your Amazon S3 account.
S3 Browser
After downloading and installing the S3 Browser tool, you will need to add your S3 account details (see the previous section for details on how to set up an Amazon S3 account).
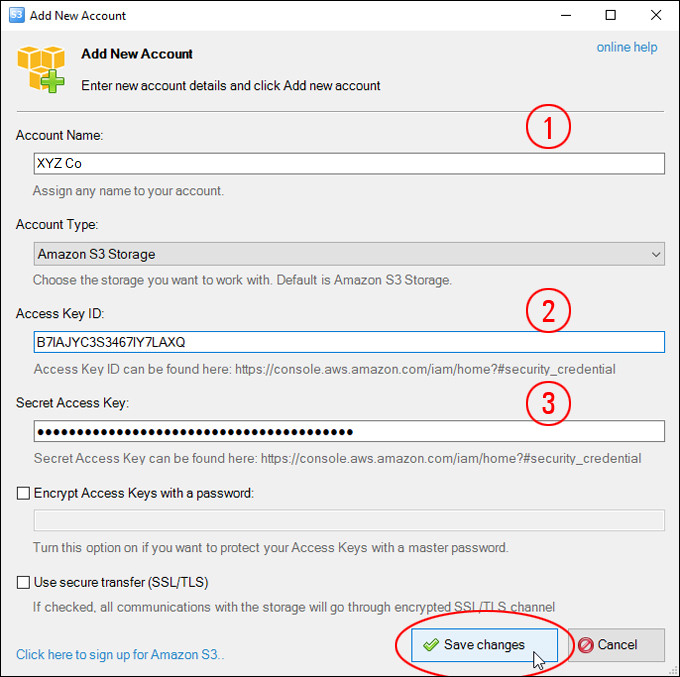
Click on ‘Add new account’…
Add a new account in S3 Browser.
Enter your details:
Account Name
Access Key ID
Secret Access Key
Click ‘Save changes’ to update your settings.
S3 Browser – Add new account
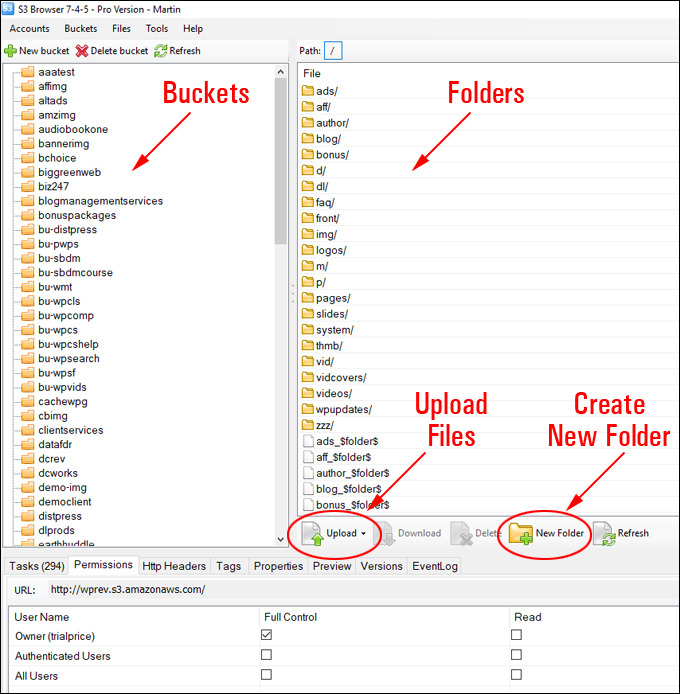
Once your account is set up, the S3 Browser interface lets you access your S3 account.
Access your S3 account files via the S3 Browser interface.
S3 Browser provides a simple interface where you can perform tasks like set up, delete, and edit ‘buckets’ and folders, configure permissions, upload, download, and delete files and folders, and a whole lot more.
You can do everything you need inside the S3 Browser buckets screen.
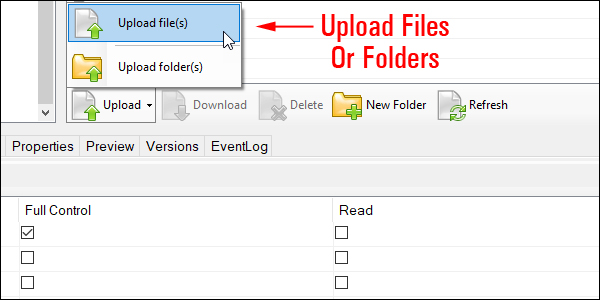
To upload files or folders, navigate to the bucket and folder you want to upload your files to (or create a new bucket or folder), then click on ‘Upload’ and select your option …
Upload files or folders.
Locate and select the files (or folders) to upload and click ‘Open’.
Select the files to upload from your hard drive.
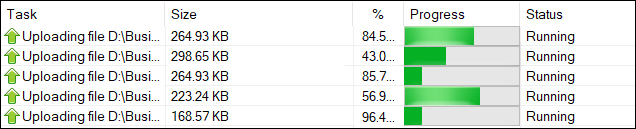
Your files will begin uploading to your S3 bucket on Amazon’s cloud server.
Your files will upload to your S3 bucket.
Consider upgrading to the S3 Browser PRO version for additional features, including faster uploading of files to your S3 account.
***
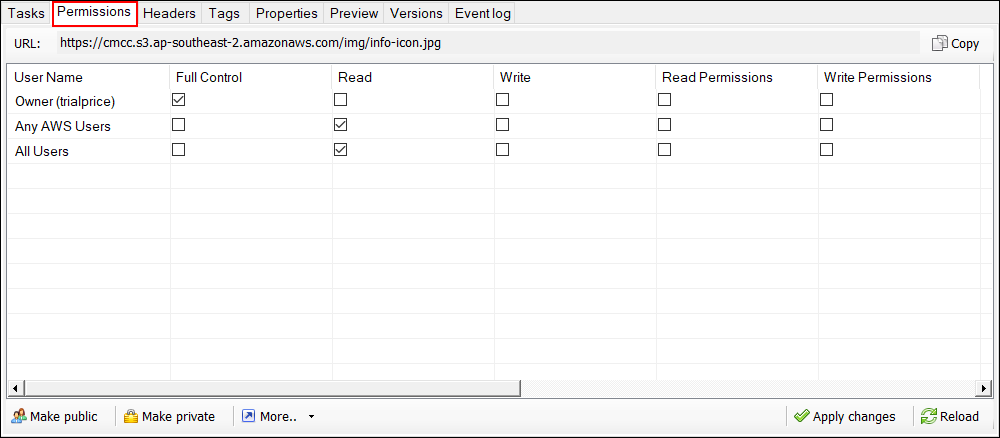
By default, anything uploaded to your Amazon S3 account will not be accessible to the public. You must set file permissions for uploaded items to make these visible or accessible if you plan to allow other users to view or download your files.
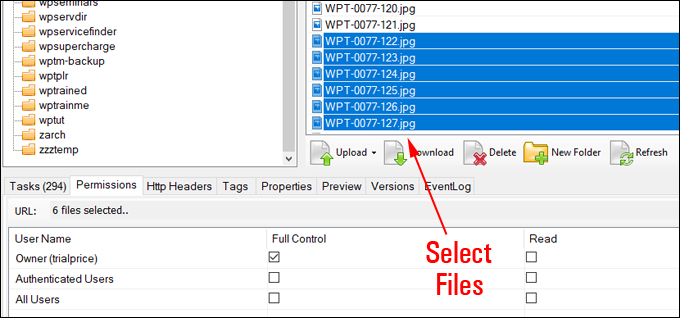
To set file permissions, select one or more files that you have uploaded.
Select your files.
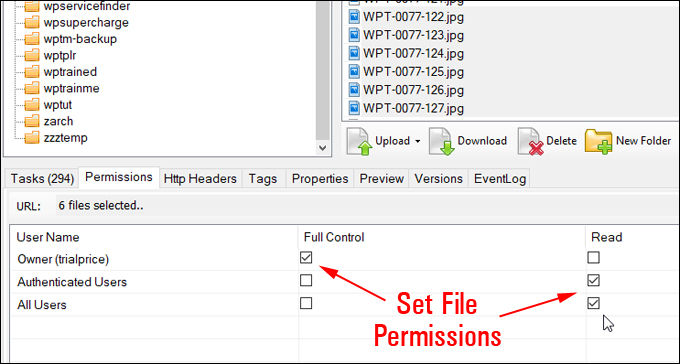
Tick the checkboxes shown in the screenshot below to configure basic access permissions for your files (i.e. display images or share files).
Set your file permissions.
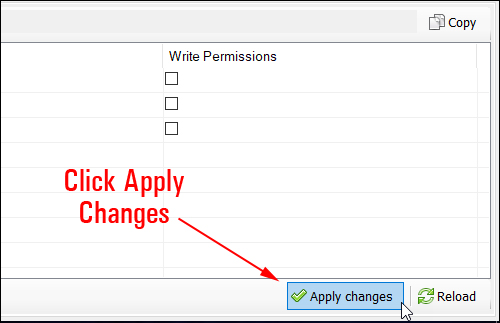
After setting file permissions, click the ‘Apply changes’ button to set file permissions.
Click ‘Apply changes’ to set your file permissions.
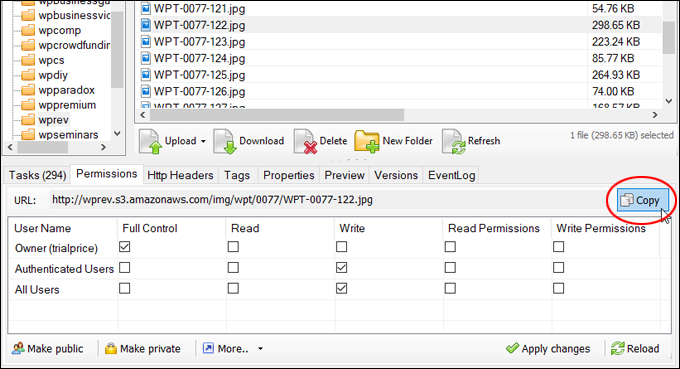
To copy your files’ URL(s) to your clipboard, click on ‘Copy’.
Copy your file URLs.
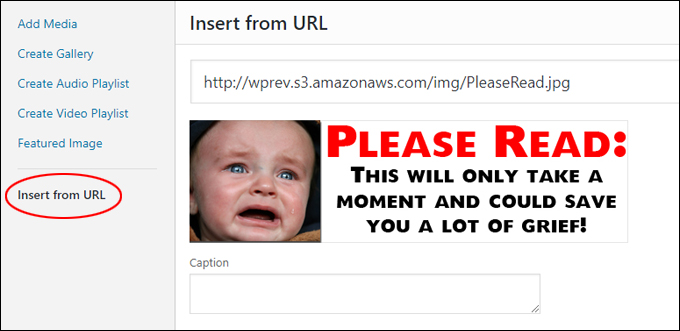
You can now paste the URL of your file wherever you need to use it.
For example, if using WordPress, you can add an image to your posts or pages using the WordPress Add Media tool.
Add images from Amazon S3 to your content.
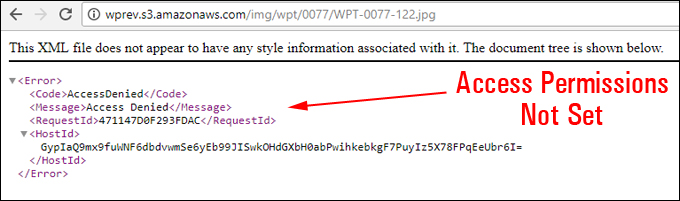
If you get an error (e.g. an image or video is not displaying), check that the file’s access permissions have been set by copying the URL and pasting it into your web browser.
In addition to the tools described above, here are some alternative tools and applications you can use to upload, transfer, share, and backup files using your Amazon S3 account:
S3 File Transfer Tools
Cloudberry Explorer – This is a freeware file manager for Amazon S3. Cloudberry Explorer provides a user interface to Amazon S3 accounts allowing accessing, moving, and managing files, buckets, and vaults across your local and cloud storage.
Cyberduck – This is a free 3rd party tool (User Interface) that connects your computer to your Amazon AWS account. Cyberduck is like an FTP client that works with PCs & Macs.
S3 File Backup Tools
The tools below allow you to back up your files and data securely to Amazon S3 and can be used as part of your Content Backup Strategy.
Snapshot Pro – Snapshot lets you set up automated safe and secure site files and content backups to S3 and other remote storage locations at a frequency that suits you best (e.g. monthly, weekly, daily, even hourly.)
S3Backup – This is a Windows desktop application that allows you to use the Amazon S3 service for remote backups and secure online file storage.
Congratulations! Now you know how to set up an Amazon S3 account to store your data offsite and how to use Amazon S3 to upload, store, and share your files online.
Learn how to use Amazon S3 to store your web content.
Related Tutorials
See the lessons below for additional information related to this tutorial on how to use Amazon S3:
Learn about tools you can use to send files to other users and transfer files between devices, your web server, and cloud storage services.
File Transfer Tools
Learn about tools you can use to send files to other users and transfer files between devices, your web server, and cloud storage services.
Sending and receiving files to and from other users, transferring files between different devices, and uploading or downloading files or media from various computer devices to your website, server, or remote storage services are all essential aspects of managing your content effectively.
In other lessons, we’ve looked at setting up effective content storage systems and documenting these processes to manage your organization’s files, media, and content.
If you need help in those areas, refer to the following lessons:
In this lesson, we look at various file transfer tools and methods you can use to get your content and files quickly and easily to other users, devices, web servers, and cloud storage services.
We’ll cover:
Essential File Transfer Tools
Transferring Files To Your Server Or Remote Storage
Uploading Files To Your Website From Different Locations
Using CMS Features To Upload Files To Your Website
***
Essential File Transfer Tools
Being able to transfer files quickly and easily to other users is essential for areas like content production, so it’s important to organize your content management systems around tools like:
Email (e.g. Gmail, Outlook, etc.)
Mobile Devices
Team Communication Tools (e.g. Zoom, Slack, etc.)
Email
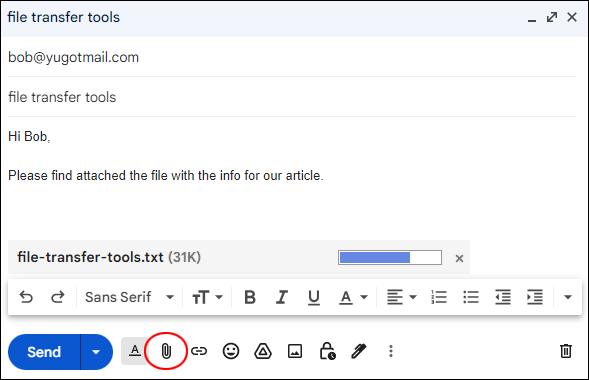
You already know that you can send files via email as an attachment.
You can send files via email as an attachment…
But…did you know that with certain applications like Gmail, you can also send your files via email securely?
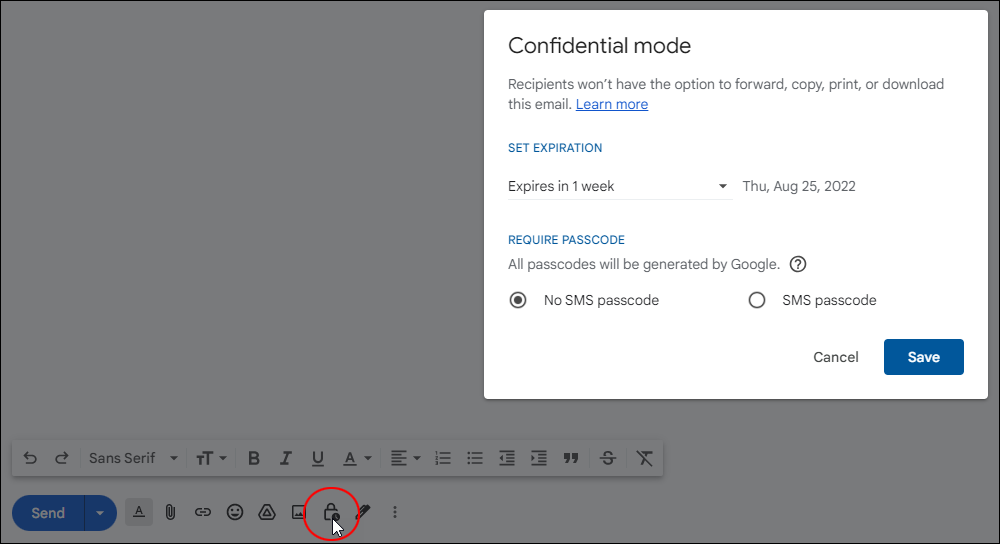
Gmail also lets you send files over email securely using Confidential mode.
For example, Gmail offers a confidential mode that prevents your email recipients from forwarding, copying, printing, or downloading either the message or its attachments. This helps you protect sensitive information from being shared accidentally or without your consent.
Watch the video below for more information about this feature:
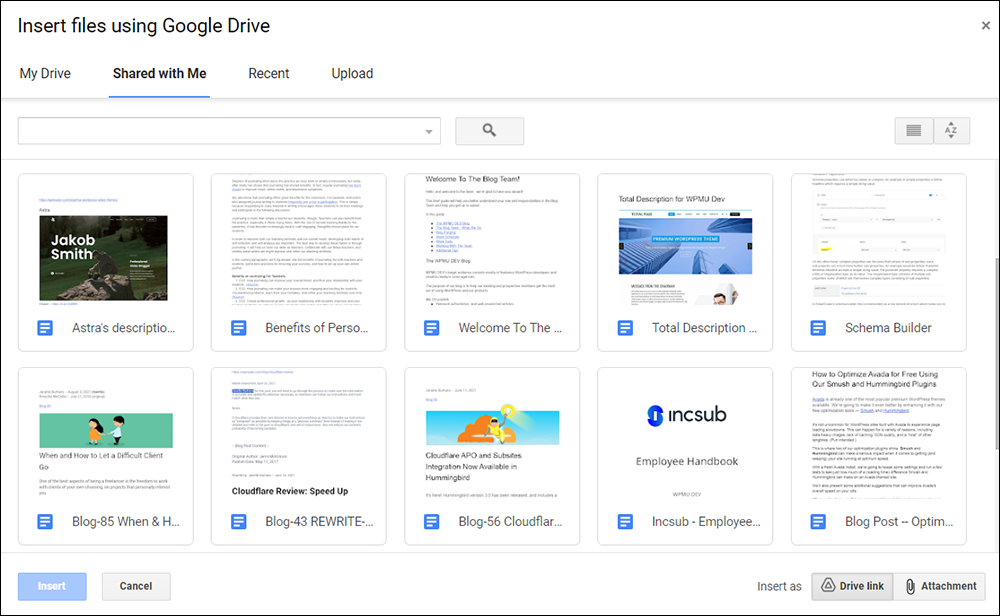
With Gmail, you can also insert a file from Google Drive as an attachment (we cover Google Drive further down)…
Use Gmail and Google Drive to upload, store, and send files online to other users.
Mobile Devices
Mobile devices are another great tool for sending media files like images, videos, audio recordings, notes, etc.
See the ‘References’ section at the end of this lesson for links to excellent articles covering different methods you can use to transfer files using your mobile devices.
Team Collaboration Tools
Applications like Slack, Zoom, and many other tools have built-in features for sharing files, so your team can use these to quickly send files to different team members and across to other users and departments.
For example, Slack lets you upload files like documents, videos, artwork, etc. from your computer and shared drives and share these with your team.
Use Slack’s built-in features to upload and share files with your team.
Zoom also lets you upload and share file attachments, as the video below shows.
Transferring Files Between Your Computer And Your Web Server
Managing content effectively often requires uploading (and downloading) files between your computer or other devices and your web server.
Two popular methods used for transferring files between computers and web servers are:
Using a Desktop FTP client
Using a webhosting control panel application (e.g. cPanel’s File Manager.)
We’ll look at using these methods below, as they don’t require you to have advanced technical skills like other file transfer methods (e.g. SSH).
Checklist: Set Up Tools For File Transfers
Use the checklist below to set up the tools and services you will need to transfer files between your computer, website, server, and remote storage services:
These tools will allow you to connect to your website’s server and transfer files between your computer and the server.
2. Set Up FTP/SFTP Connection
Obtain FTP/SFTP credentials from your web hosting provider (usually found in the hosting control panel).
In the FTP client, add a new site with the following information:
Host: Your domain or server IP address.
Port: 21 for FTP, 22 for SFTP.
Protocol: Choose FTP or SFTP.
Enter your username and password.
Save the settings and connect.
3. Transfer Files to the Website
Use the FTP client to drag and drop files from your computer to your website’s server. For example, upload a new theme or plugin.
Make sure you place files in the correct directories (e.g., /wp-content/themes/ for themes).
4. Install a Backup Plugin
Install a WordPress backup plugin.
Use this plugin to automatically back up your website files and database to your remote storage service.
5. Configure Remote Storage
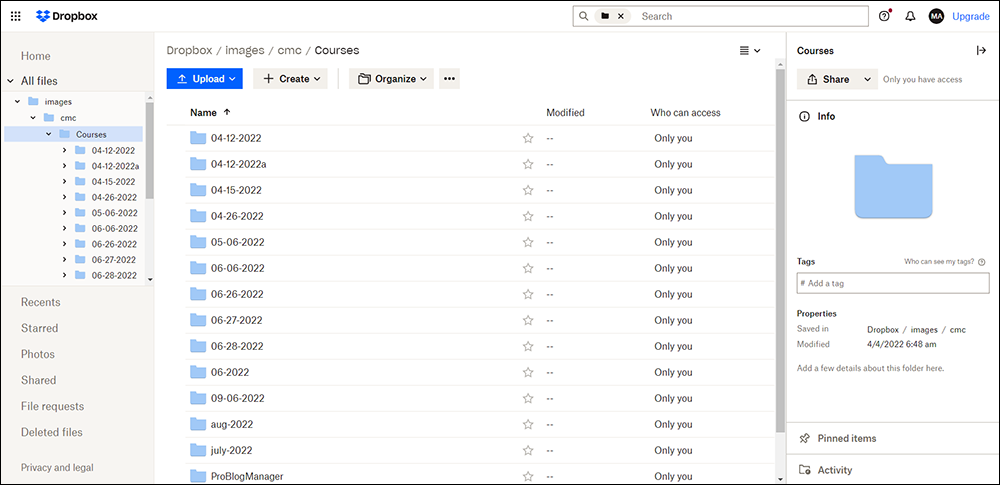
In the backup plugin settings, configure remote storage options like Google Drive, Dropbox, or Amazon S3.
Authenticate and allow the plugin to connect to the chosen remote storage service.
6. Automate Backups
Set up a backup schedule (e.g., daily or weekly) to automatically back up your website.
Ensure backups are stored both locally and remotely for redundancy.
7. Use a File Syncing Service
Set up a cloud storage service like Dropbox or Google Drive on your computer.
Use the service’s desktop app to sync files between your computer and the cloud.
This setup allows easy access to website files, backups, and media from any device.
8. Secure File Transfers
Always use SFTP instead of FTP for secure file transfers.
Enable two-factor authentication (2FA) on your web hosting and remote storage accounts to add an extra layer of security.
9. Test File Transfers
Perform a test transfer by uploading a file from your computer to the server and then to the remote storage.
Verify that the file is accessible in all locations.
10. Document the Process
Create a document detailing your FTP/SFTP credentials, backup schedules, and remote storage settings.
Store this document securely for future reference.
The above setup will ensure that you can easily manage, back up, and transfer files across your computer, website, server, and remote storage services.
Always back up your website (files and data) before modifying any files on your server.
Follow the tutorials and the links provided below to learn how to use an FTP tool and File Manager to transfer files from your computer to your web server.
Desktop FTP (File Transfer Protocol)
This section explains how to set up a desktop-based FTP application to transfer files directly from your computer or laptop.
File Transfer Protocol (FTP) is an outdated way of sharing files and most web browsers no longer support it, as it is no longer considered to be secure.
Browser FTP was once popular but most web browsers no longer support it.
Using SFTP or FTPS (and HTTPS) instead of FTP is highly recommended.
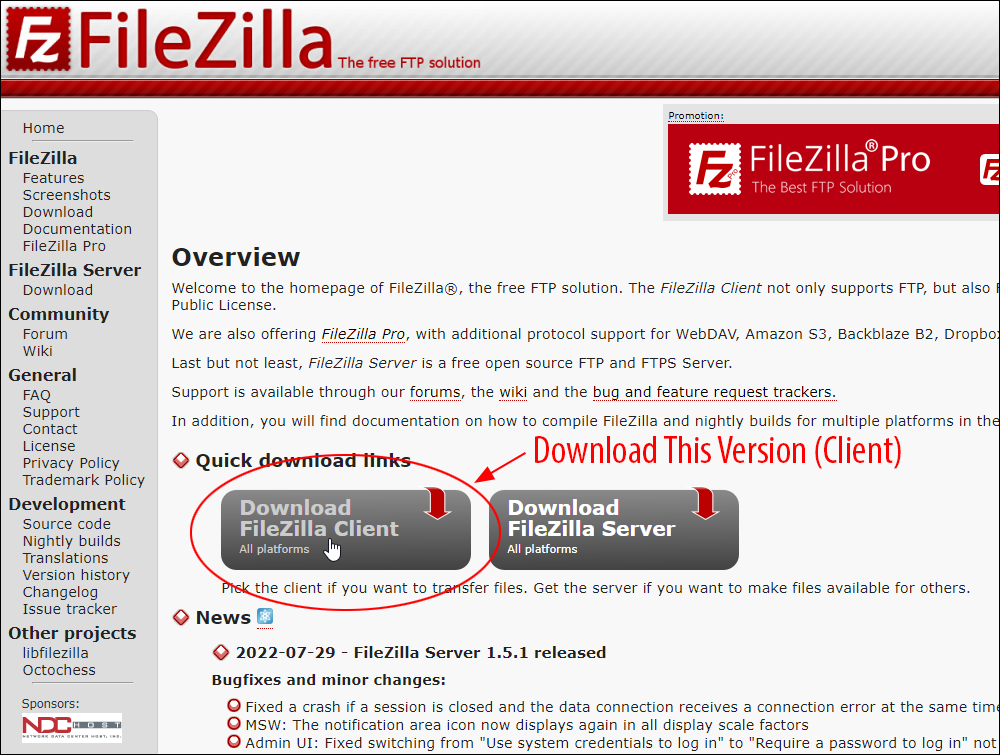
The most reliable alternative to browser FTP is a dedicated FTP/SFTP client installed on your computer, like Filezilla
Setting Up A Desktop FTP Client – How To FTP/SFTP Files To Your Server Using Filezilla
Filezilla is a popular free desktop FTP (File Transfer Protocol) program. It is open-source software distributed free of charge under the terms of the GNU General Public License.
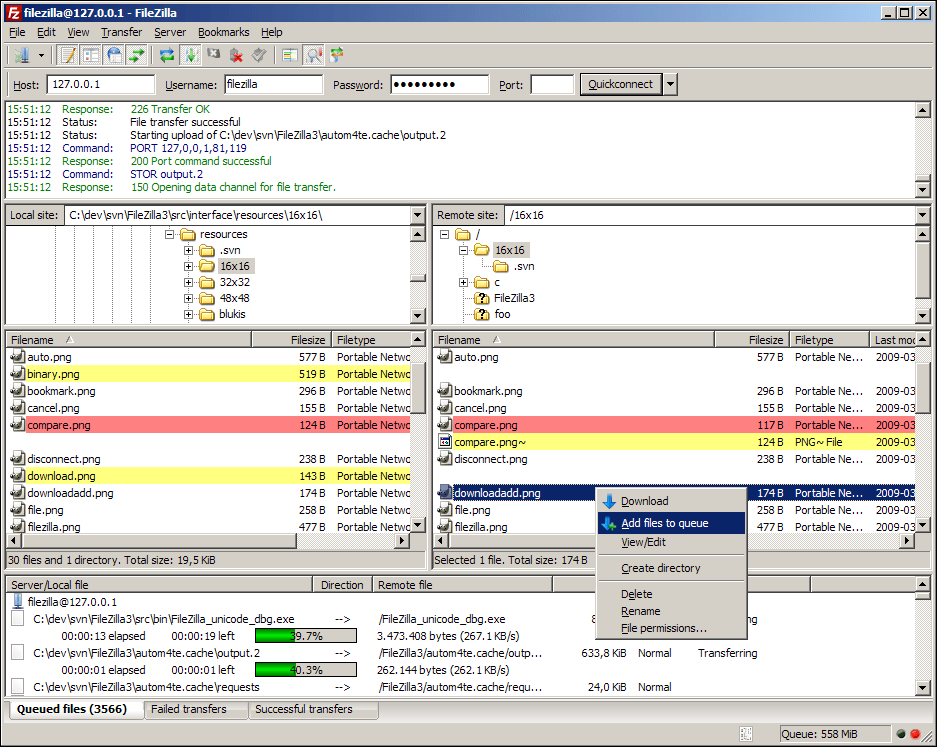
Transferring files using a desktop FTP application like Filezilla is all done via the tool’s interface.
Filezilla interface
Filezilla’s interface looks complicated, but it’s really not. After connecting to your server, all you basically do is select files from a folder in your computer or hard drive (left panel) and drag these across to a folder on your server (right panel) and the tool will automatically begin to upload your files.
Similarly, you can download files by selecting and dragging these from a folder on your server (right panel) to a folder on your computer or hard drive (left panel).
Filezilla provides a basic tutorial on its site. If you need more help using Filezilla, see this video course for beginners: How To Use FTP
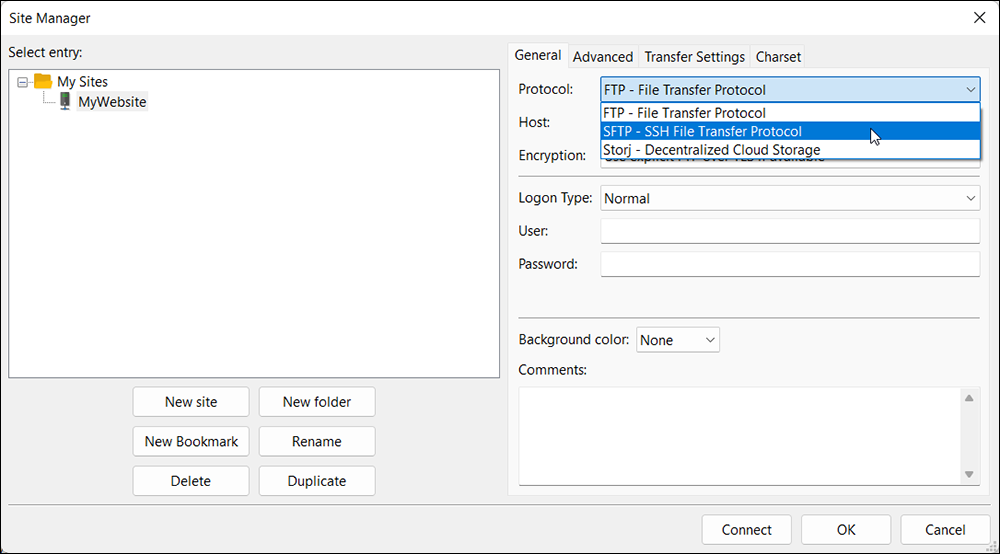
When using FileZilla, we recommend selecting the SFTP- SSH File Transfer Protocol for transferring files from your computer to your server securely.
Click on the General tab and select SFTP File Transfer Protocol.
Transferring Files Using cPanel’s File Manager: Step-By-Step Tutorial
Let’s show you how to use cPanel’s File Manager to upload files from your computer or external hard drive to your web server.
We’ll go through a step-by-step example on how to upload and extract a zipped file.
Note: Make sure your hosting uses cPanel for this tutorial. Otherwise, check with your hosting company to see what file transfer tools they provide.
First, log into cPanel…
cPanel’s login screen.
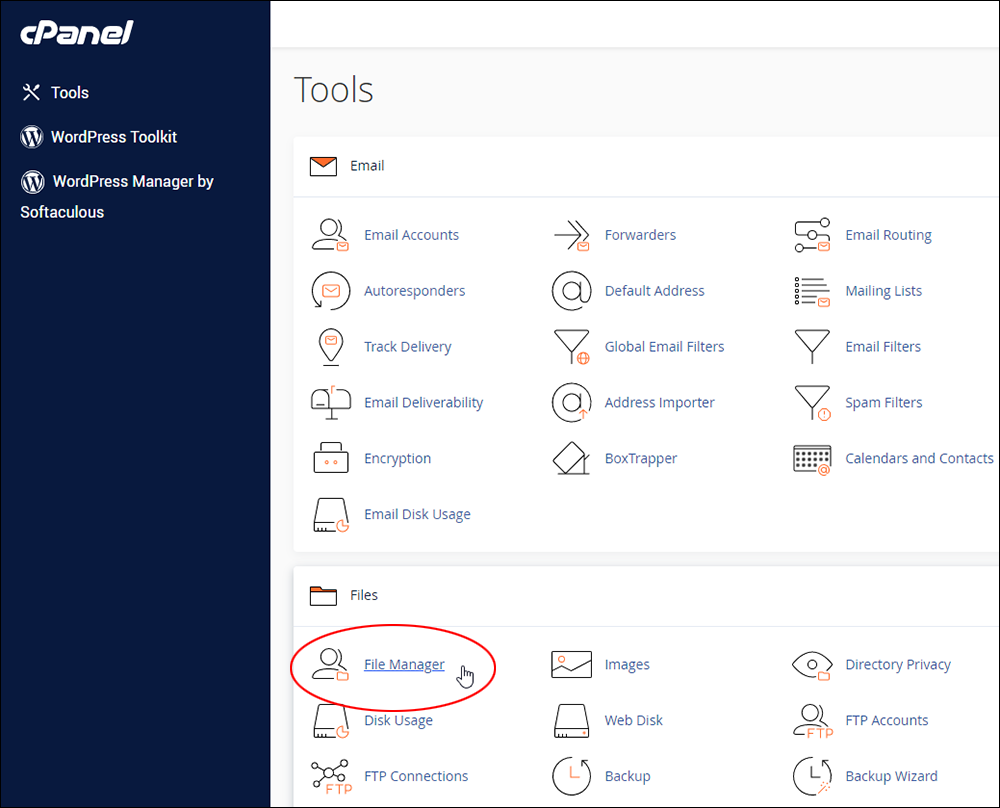
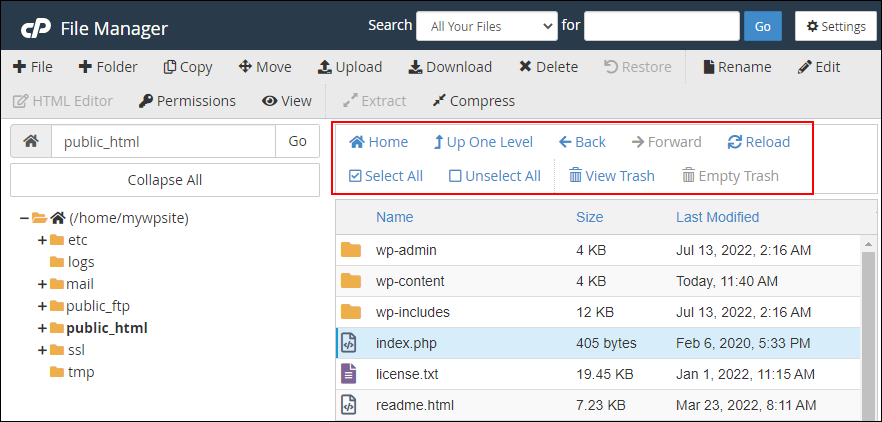
File Manager is located in the Tools > Files section of your cPanel administration screen.
Click on File Manager…
cPanel: Files – File Manager
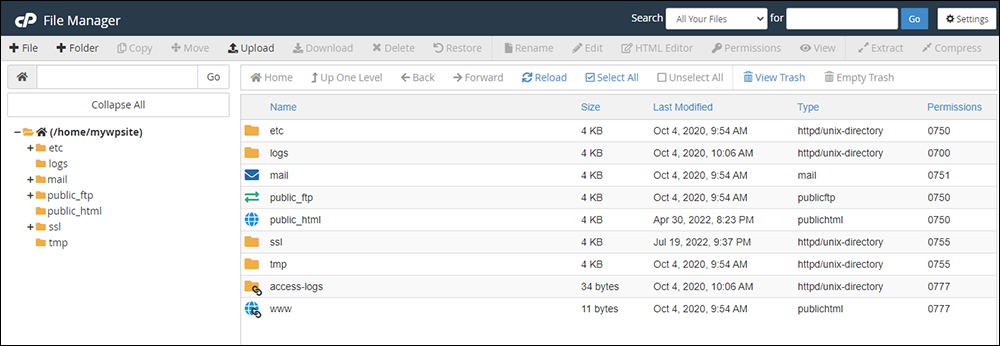
Your server files will be visible inside the File Manager screen.
The File Manager screen.
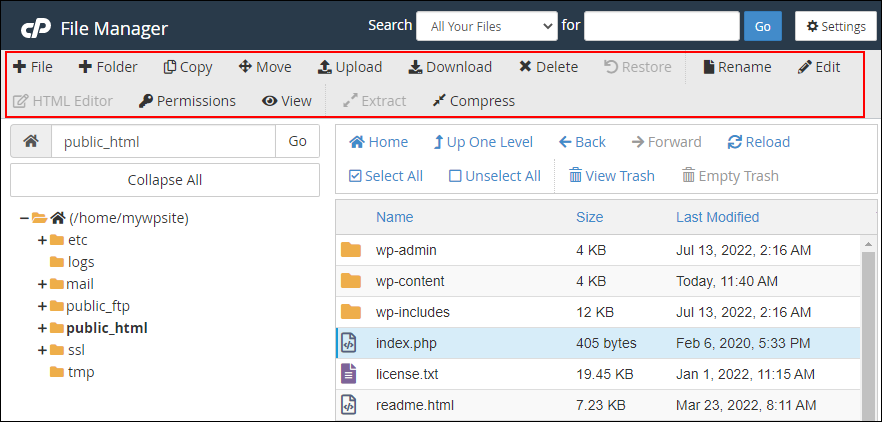
Some of the main functions you will use inside File Manager to perform file transfer operations include:
Move File – allows you to select files and move them into another directory. This feature is useful if you upload files to the wrong folder and want to move these to another folder location.
Upload – allows you to upload files directly to your server. This feature is useful when performing manual software updates, and restoring or reinstalling website files.
Download – allows you to download files from your server to your local machine. This feature is useful when performing manual backups.
Delete – allows you to delete selected folders and files on your server.
Extract – allows you to unzip files inside your server directories. This feature is useful for uploading folders or multiple files (covered below).
Compress – allows you to compress (zip) folders inside your server directories. This feature is useful for downloading entire folders, large files, etc.
cPanel’s File Manager allows you to perform a range of useful functions by clicking buttons.
Additionally, you will find useful Directory Navigation Menu Buttons inside the File Manager area, including:
Up One Level – Moves files up one level inside the folder.
Reload – Refreshes your screen.
Select All – Selects all files.
Unselect All – Unselects all files.
Use the buttons in the navigation menu to perform additional functions.
Using File Manager To Upload And Extract Zipped Files
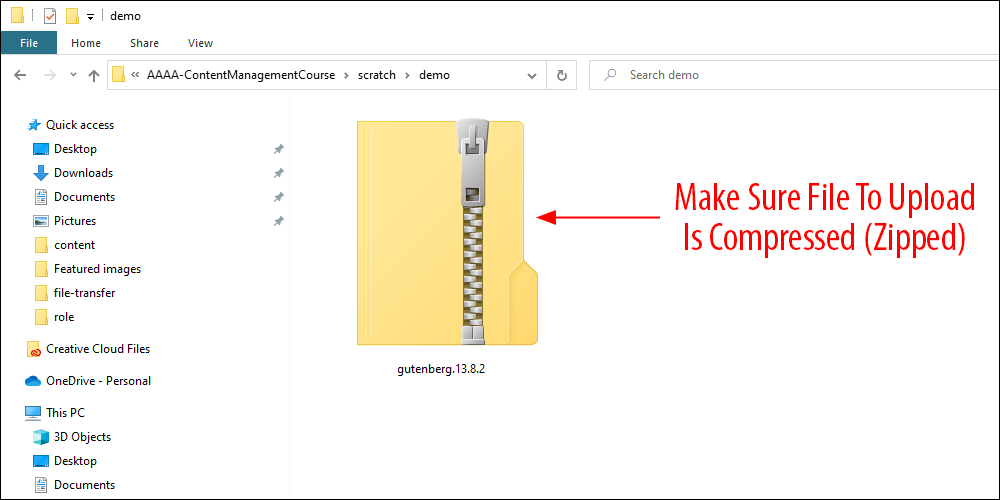
In this example, we’ll show you how to upload and extract a zipped plugin file to your server.
First, make sure to have your zipped file ready for upload.
A zipped file ready to upload to the server.
Next, log into cPanel and open up the File Manager panel.
Log into cPanel’s File Manager.
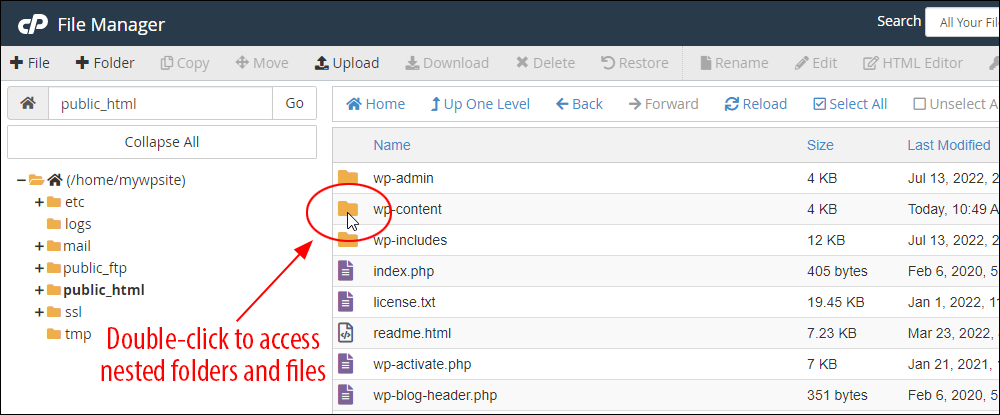
You can drill down folder hierarchies to access nested folders and files by double-clicking on the upper directory folders.
Double-click folders to access nested folders and files
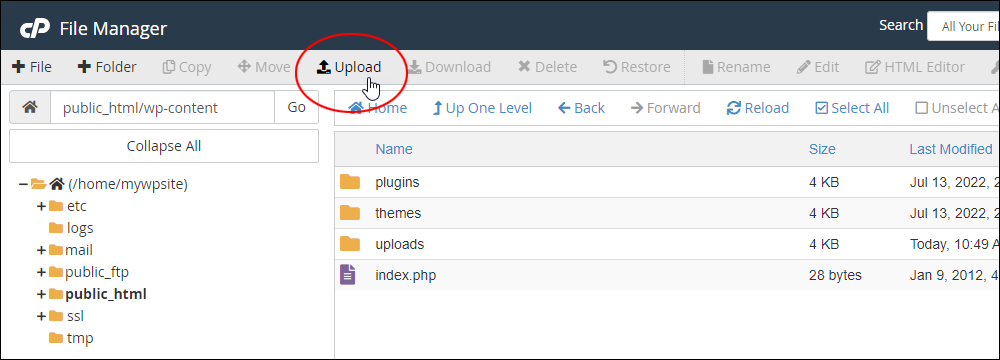
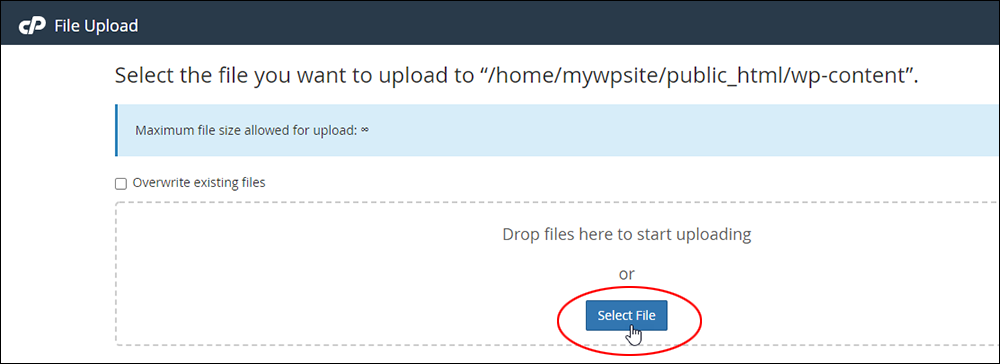
Next, locate the folder on your server where you will upload your file and click Upload.
In the screenshot below, we will upload the zipped plugin file into the plugins folder section of our WordPress site installation.
Click on the Upload button to upload your file to your server.
A new screen called ‘Upload files’ will open up in your web browser. You can drag and drop files into the section with the dotted border to automatically begin uploading your files, or click on the ‘Select File’ button as shown below, then locate and select your zipped file to upload.
Click the Select File button to select and upload your file.
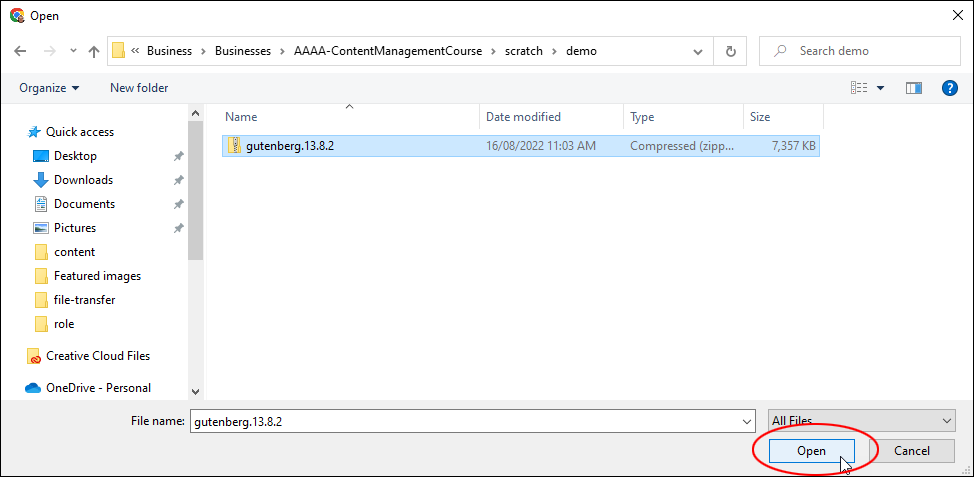
Select your file and click ‘Open’ to begin uploading the file to your server …
Select your file and click the Open button to upload your file to your server.
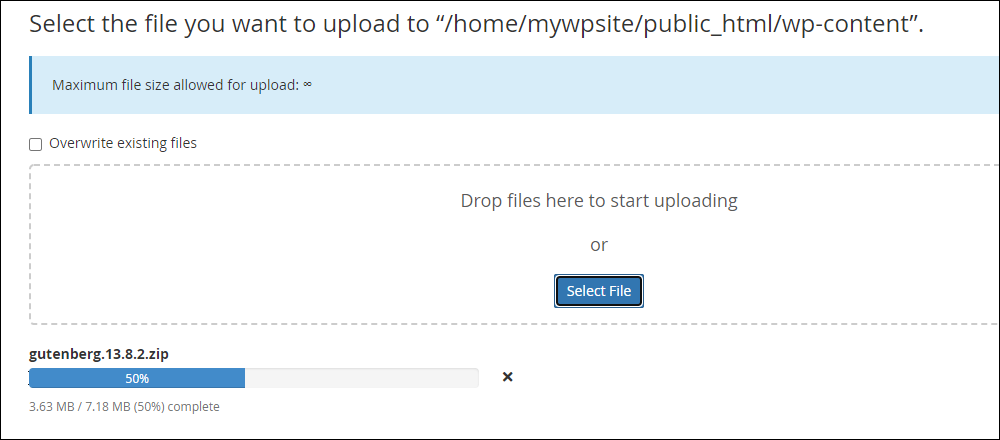
File Manager will begin to upload your file to your server. Wait until the file has finished uploading.
Wait until your files have been uploaded…
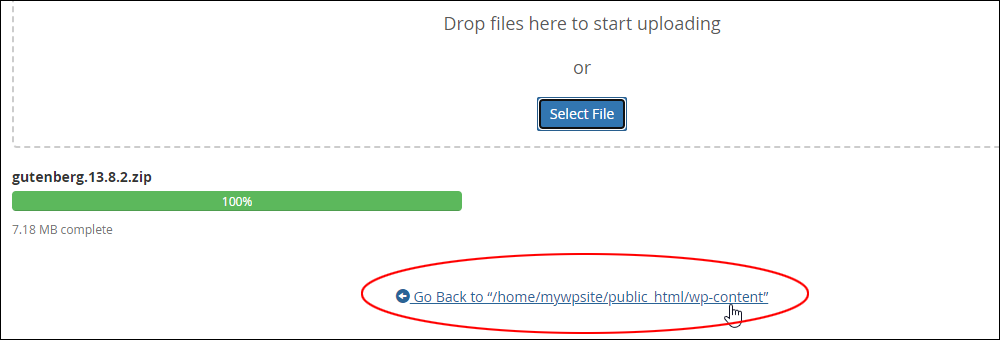
Once your file has been uploaded, click on the “Go Back…” link to return to the folder inside your File Manager’s screen where you have uploaded the file to.
Your file has now been uploaded. Click on the link to return to the File Manager’s folder screen.
You should see the file you have uploaded inside the folder on your server.
If you cannot see the file, then do the following:
Check that you are in the correct folder, and
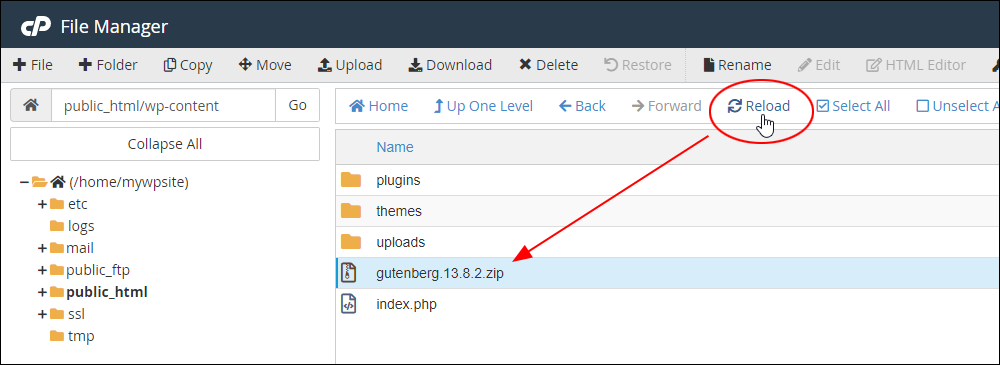
Click the Reload button to refresh the screen.
Click Reload to refresh the screen if you cannot see the file you have just uploaded.
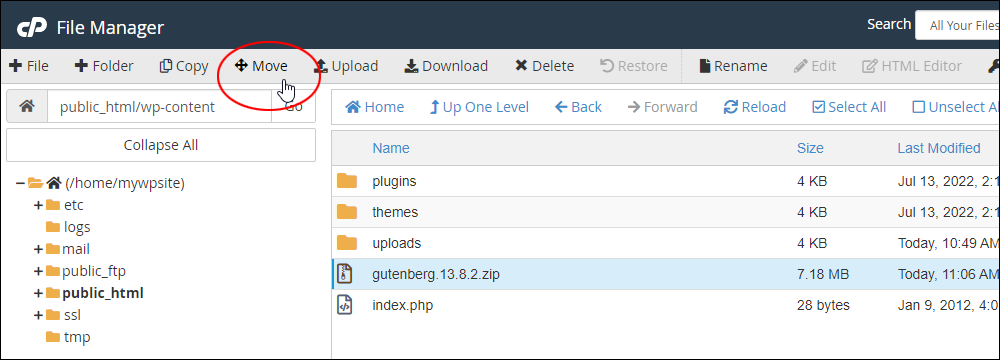
Also, if you upload a file to the wrong directory, use the Move button to select the right destination folder for your file.
Have you uploaded a file to the wrong folder on your server? No problem, use the Move button to place it in the right folder.
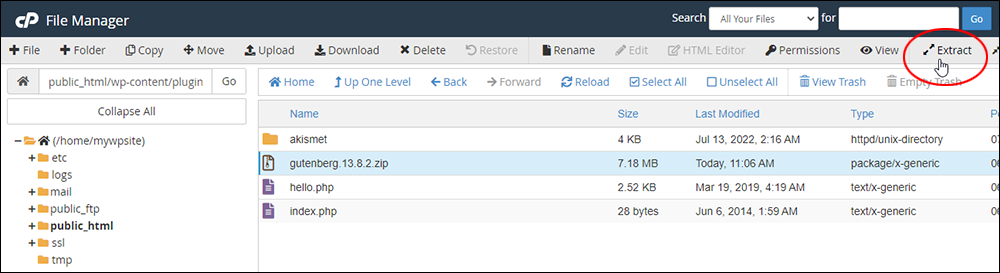
After your zipped file has been uploaded, click on the ‘Extract’ button to decompress (unzip) your file.
Let’s extract this zipped file inside your server.
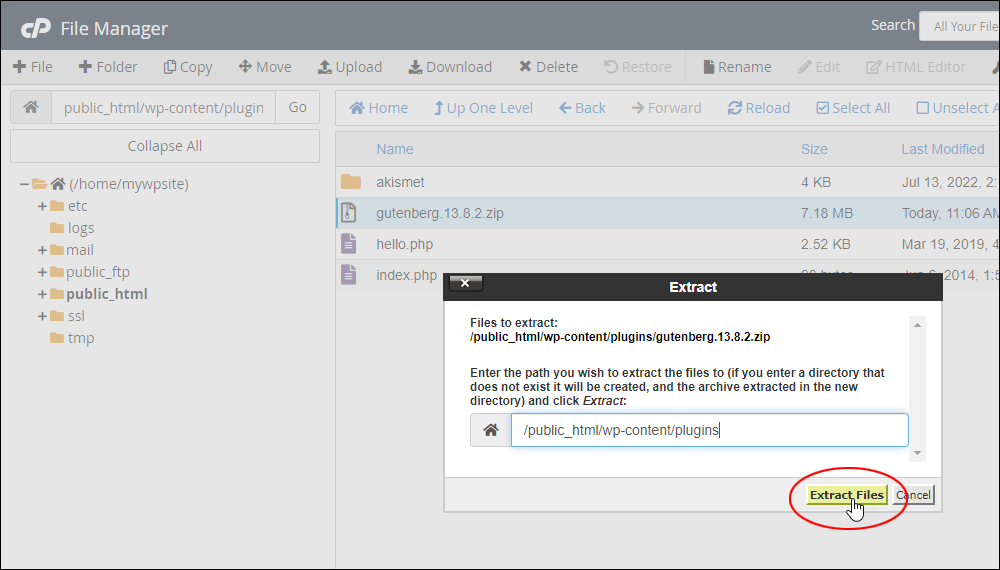
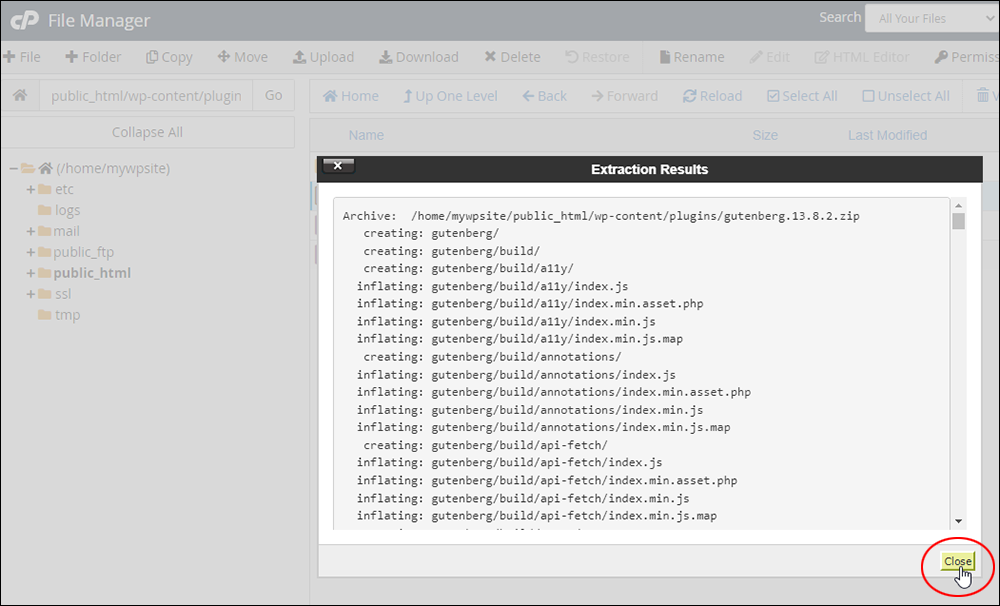
A pop-up window will appear asking you to confirm the location where you want to extract your files to. Click Extract File(s) to continue.
Click Extract Files to confirm and begin unzipping your file.
The ‘Extraction Results’ window displays all of your extracted files once the operation has been completed.
Click Close to return to the File Manager screen.
All of your zipped files are now extracted. Go ahead and close the Extraction Results window.
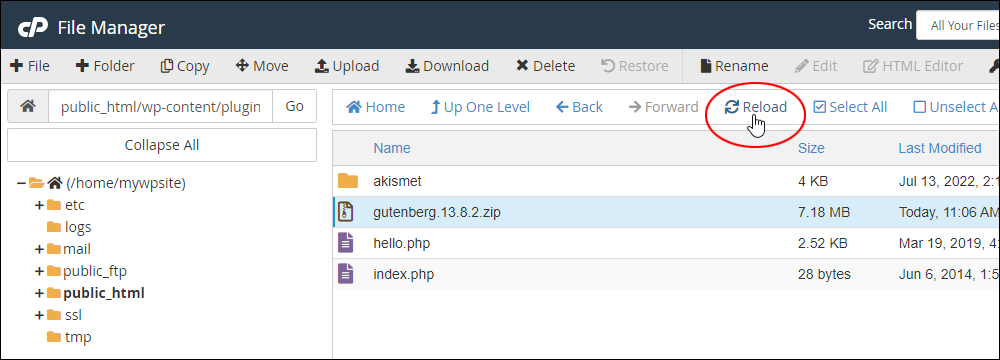
Click the Reload button to refresh your screen.
Click Reload to refresh your screen.
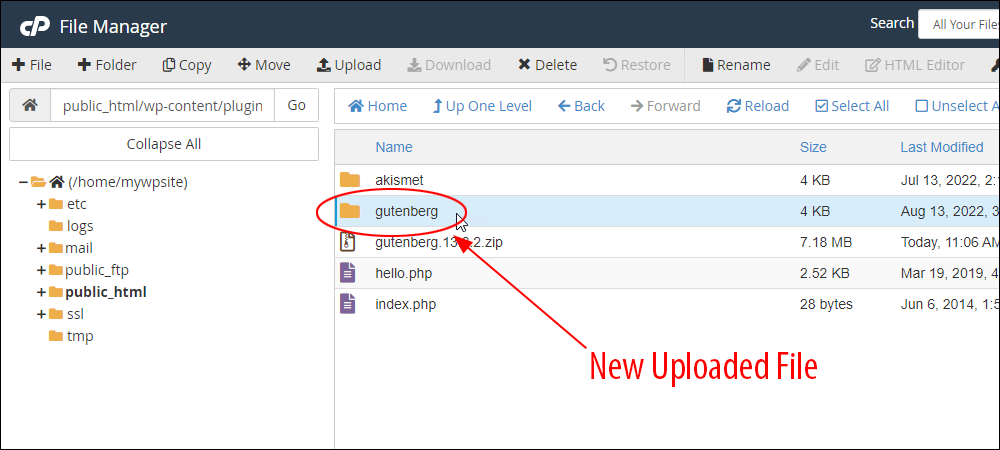
All uploaded files are now extracted and added to your server.
Your newly uploaded file…fully extracted and ready for use!
You can delete the original zip file from your server to save space and keep your folder free of unnecessary clutter.
To delete the zipped file, select it in your File Manager screen and click on the Delete button.
Select the original zipped file and click the Delete button to remove the file from your server and save space.
The above method for uploading files to your server is useful. Large files that normally take a long time to upload via FTP can upload in seconds or just a few minutes when transferred using cPanel’s File Manager.
Not all hosting companies offer cPanel. Many hosting companies, however, offer a file manager application, so check with your web host.
How To Configure Server File Permission Settings
Most software program installations nowadays will configure everything automatically for you. Sometimes, however, you may need to manually set permissions to allow other users to read, write, modify, and/or access information after uploading some files or programs to your web server.
File permissions specify what can and can’t be done to your server files and folders or directories.
Server file permissions specify what can and can’t be done to your files.
This is important because some applications need to upload or access files in some of your server directories to perform certain functions. If permissions for these files or directories are not enabled or set correctly, it can cause errors.
Errors can occur if file permissions on server directories are not set correctly.
For example, if your site runs on WordPress and permissions have not been automatically set or enabled for files in your wp-content directory, you may experience errors when uploading plugins or you may not be able to save changes made to plugin settings.
Refer to the short tutorial below to learn how to configure server file permission settings for files and directories on an open-source operating system like Linux.
Again, we recommend doing a full backup of your website’s files and data before modifying any files on your server.
How To Configure File Permission Settings On Your Server (Linux)
CHMOD
Chmod (abbreviated from change mode) is a command that lets a user tell the system (or server) how much or how little access it should permit a file or a file directory to be given.
It changes the file system modes of files and directories, including permissions and special modes.
If you experience issues you may need to configure file permission settings on your server.
Setting File Permission Settings Using ‘CHMOD’
If you use an FTP program like Filezilla, do the following to view and change security permission settings for your server files and folders:
Access your server
Locate the directory or file with the permissions you want to change
Right-click on the file and select ‘Properties’
File Properties
The CHMOD options should display in the menu. If not, access the help section of your FTP client and search for chmod, permissions, or change mode. Most FTP programs have this feature readily available.
To change or set permissions for your files, simply check or uncheck the permission boxes (for Owner, Group, or Public), or add the desired permission setting number in the Manual display field, then click OK to save.
Setting CHMOD File Permissions
Common WordPress file and directory permissions include the following settings:
777 – Everything for everyone. This command gives read, write, and execute permission to the owner, group, and public. chmod 777 is considered potentially dangerous because you are giving read, write, and execute permission on a file/directory to everyone on your system. Normally, this setting should be avoided.
755 – Only the owner can write, read and execute for everyone. This command means that only the owner will be allowed to write to the file. The owner, group members, and everyone else will have read and execute permissions.
644 – Everyone can read, only the owner can write. With this setting, the owner will have read and write permissions while the group and everyone else has read permission only.
Setting directory permissions to make your files writable depends on your web hosting environment. For example, to make a file or directory writable, you would normally set (i.e. chmod) file permissions either to 777 or 755.
Notes:
Only change file permission settings if your site installation or plugin requires it. Normally, this will either be specified in a user manual (e.g. a plugin manual or installation guide) or if changing file permissions is required while performing some kind of function on your site (e.g. installing or making changes to plugins or themes).
If you are performing installations using wizards, a notification message will usually appear on your screen asking you to make a particular file or directory writable, or specifying which permission settings you need to change.
Unless the change required to the file permission settings is permanent, you would normally restore the file to its original settings after making and saving the change for security purposes (e.g. changing a file from 644 to 755, then back to 644 again). This prevents hackers and unauthorized users from accessing and modifying the files on your server.
After making changes to files, refresh your site’s page in your browser to make sure that everything is working correctly.
Changing file permissions is not complicated. However, if you don’t know what you’re doing or if you are concerned that you might do something that can cause errors, don’t modify any files. Instead, ask your web hosting provider or someone with more knowledge or experience to do this for you.
If you experience errors after changing permission settings, change the permission settings back to what they were and see if the error messages disappear. If errors persist after restoring file permissions, contact your web hosting provider for help.
Use this handy chmod calculator if you need help configuring different file or directory permissions.
Amazon S3
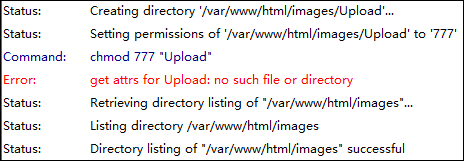
If you are hosting media files (e.g. an image) on Amazon S3 (covered in the next section) and the file is not displaying correctly on your browser, you may not have set the correct permissions for that file.
Typically, this is what you will see if a file has incorrect permissions…
This is what you will see if you have not set the correct permissions for your file on Amazon S3.
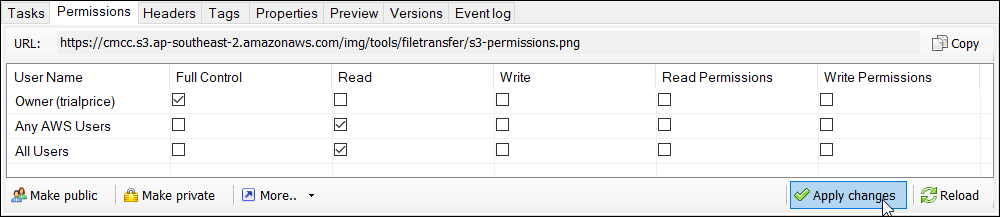
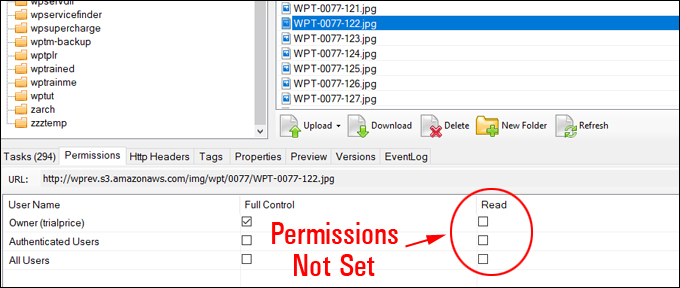
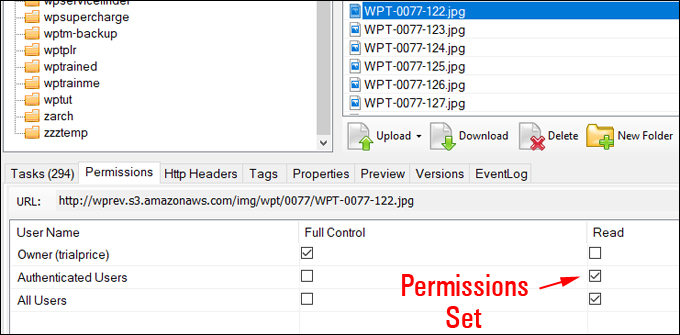
To display images stored on Amazon S3 on your website’s pages, set your file permissions as shown below:
Set up your image file permission as shown here and click Apply Changes to display images stored on Amazon S3 to users on your website.
Full Control
Owner – Tick the checkbox
Any AWS Users – Leave the checkbox unticked
All Users – Leave the checkbox unticked
Read
Owner – Leave the checkbox unticked
Any AWS Users – Tick the checkbox
All Users – Tick the checkbox
After ticking the boxes as described above, click on Apply changes to set your file permissions.
The images should now display to your website users. The Amazon S3 section below shows you how to add media files from S3 to your web pages.
Transferring Files To Cloud Storage Services
Your website files can be stored on your web server or a cloud storage service.
Some of the most popular storage services for storing files remotely in the cloud include:
Amazon S3
Google Drive
Dropbox
Let’s take a brief look at each of these services and how to transfer cloud-hosted files to and from your devices and your website.
Amazon S3
Store your files remotely using Amazon S3’s cloud storage service.
Amazon S3 (Amazon Simple Storage Service) is a scalable cloud storage service offered by Amazon Web Services (AWS).
Amazon S3 is great for storing all kinds of files, especially media files, website backups, data archives, and more.
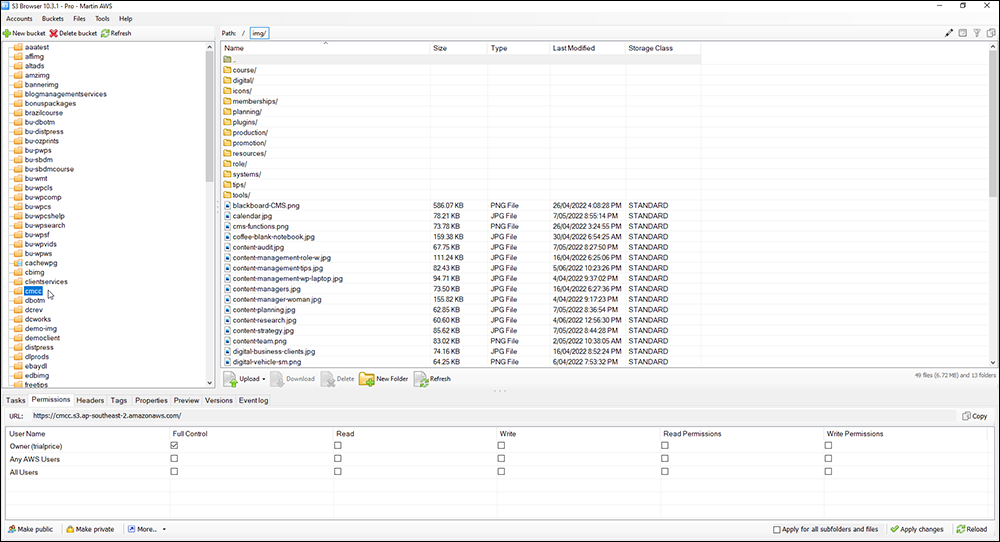
Amazon S3 storage folders are called buckets.
With Amazon S3, you store your files in buckets (folders).
A bucket is a container for objects stored in Amazon S3. You can store any number of objects in a bucket and can have up to 100 buckets in your account.
Many applications can connect directly with your Amazon S3 account, allowing you to quickly and easily upload and store files in your s3 buckets and serve these directly on your website.
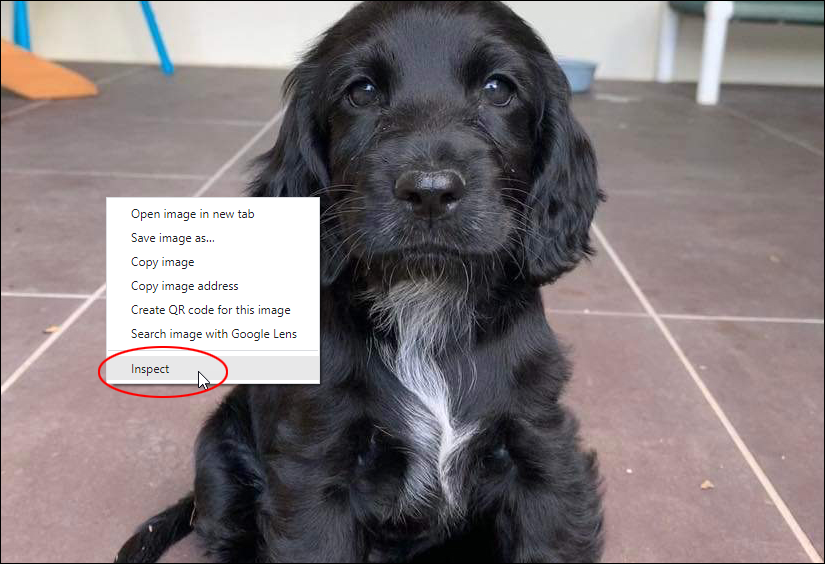
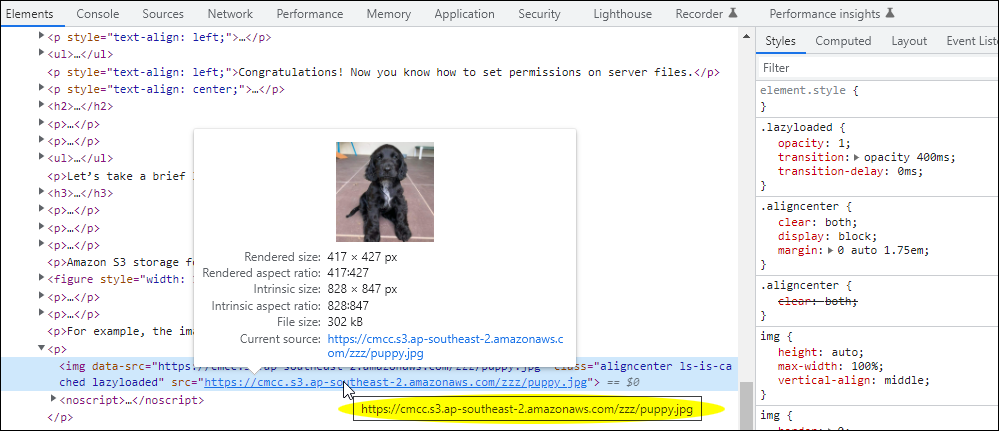
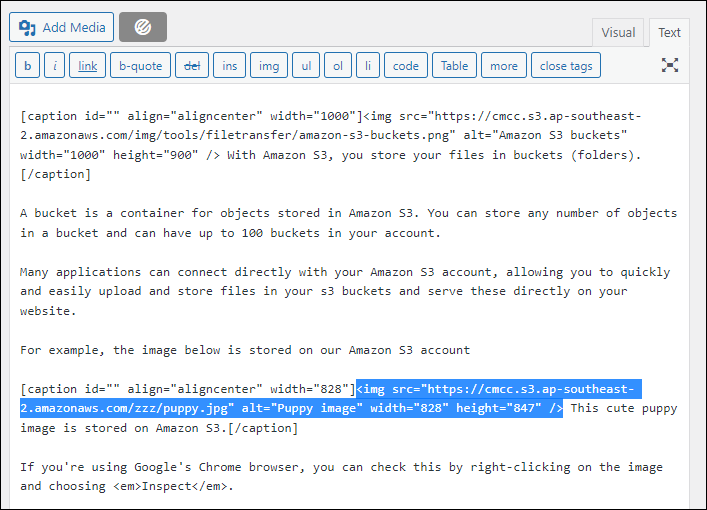
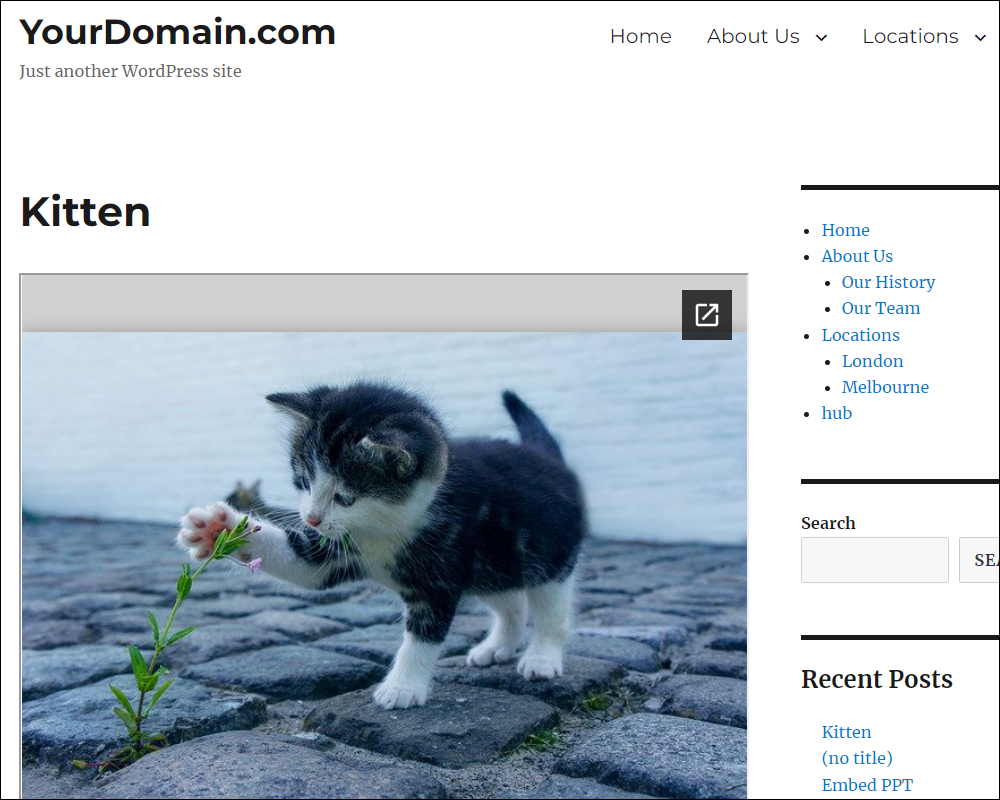
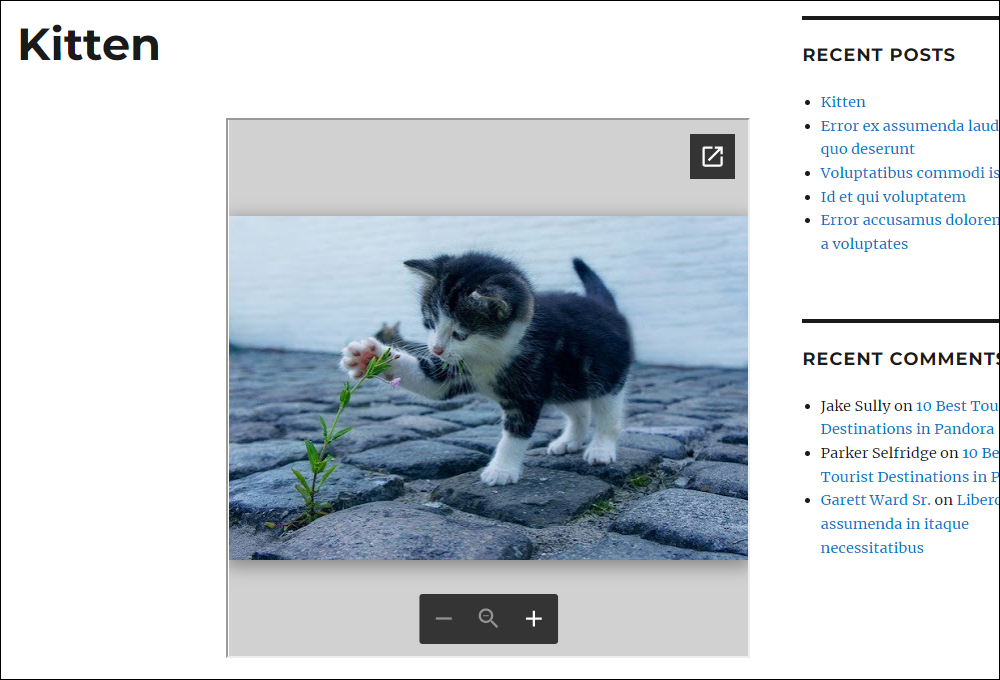
For example, the image below is being hosted on Amazon S3.
This image of a cute puppy is hosted on Amazon S3.
To check this using Google’s Chrome browser, right-click on the image and choose Inspect.
Right-click on the image and select Inspect (Chrome browser users).
You should see an Amazon S3 bucket address displayed for the image.
This image is hosted on Amazon S3 as the Chrome Browser’s Inspect function shows.
Uploading files directly to Amazon buckets can be a little complicated, so we recommend using a tool like the one below to transfer files to and from your computer or hard drive and your Amazon S3 account…
S3 Browser
We recommend using a tool like S3 Browser to upload files to your S3 account.
S3 Browser is a free Windows client for Amazon S3 and Amazon CloudFront, a content delivery network, (CDN). We use and recommend installing the paid version of this tool as S3 Browser is free for personal use only.
Also, as this site is built using WordPress, media files stored on Amazon S3 can be inserted directly into the content, so here’s what we did to display the image above on this web page:
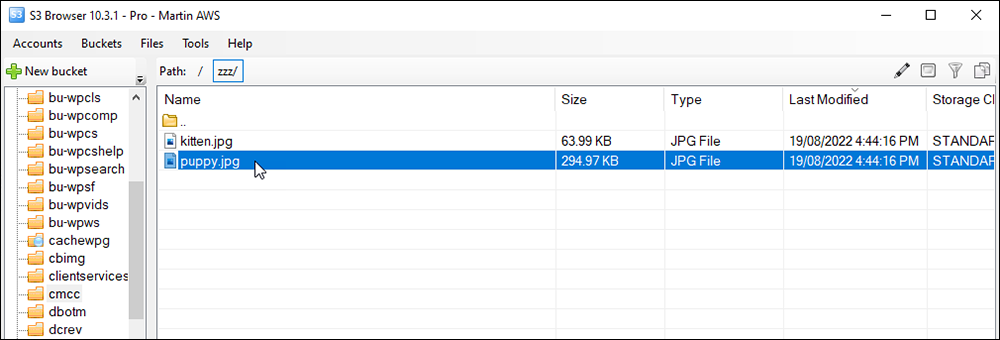
First, we uploaded the image to our Amazon s3 account…
Image uploaded to S3 bucket.
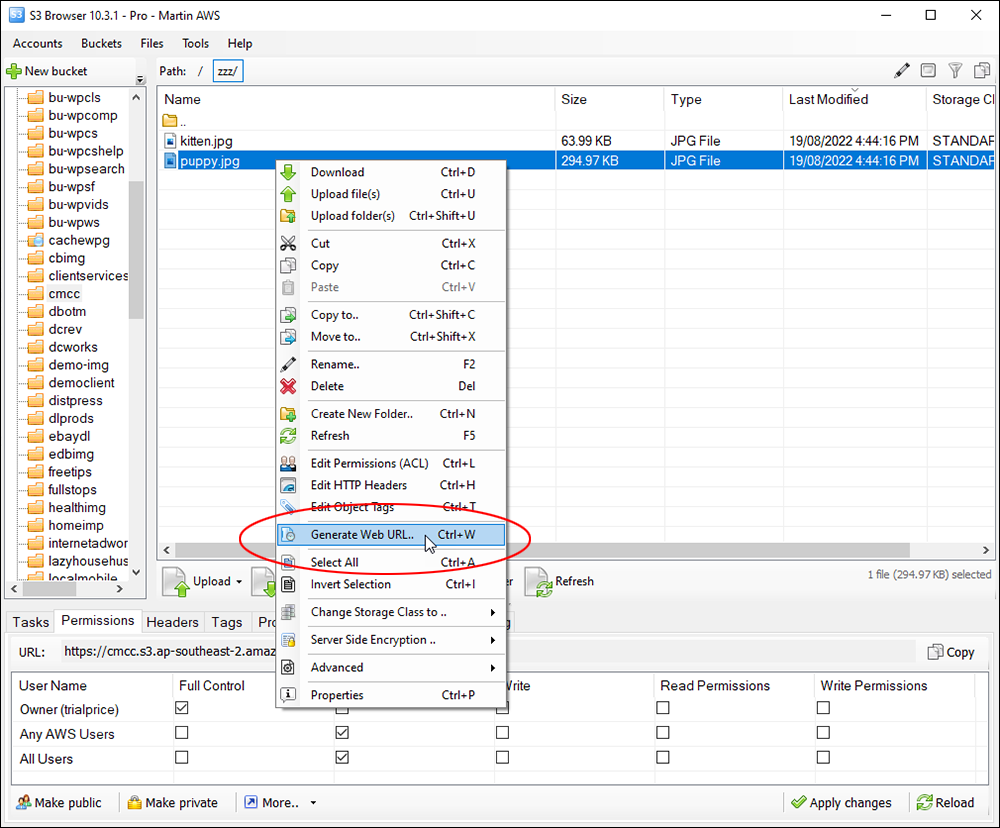
After the image was uploaded, we then set file permissions as explained earlier, right-clicked on the file, and selected Generate Web URL…
Select Generate Web URL…
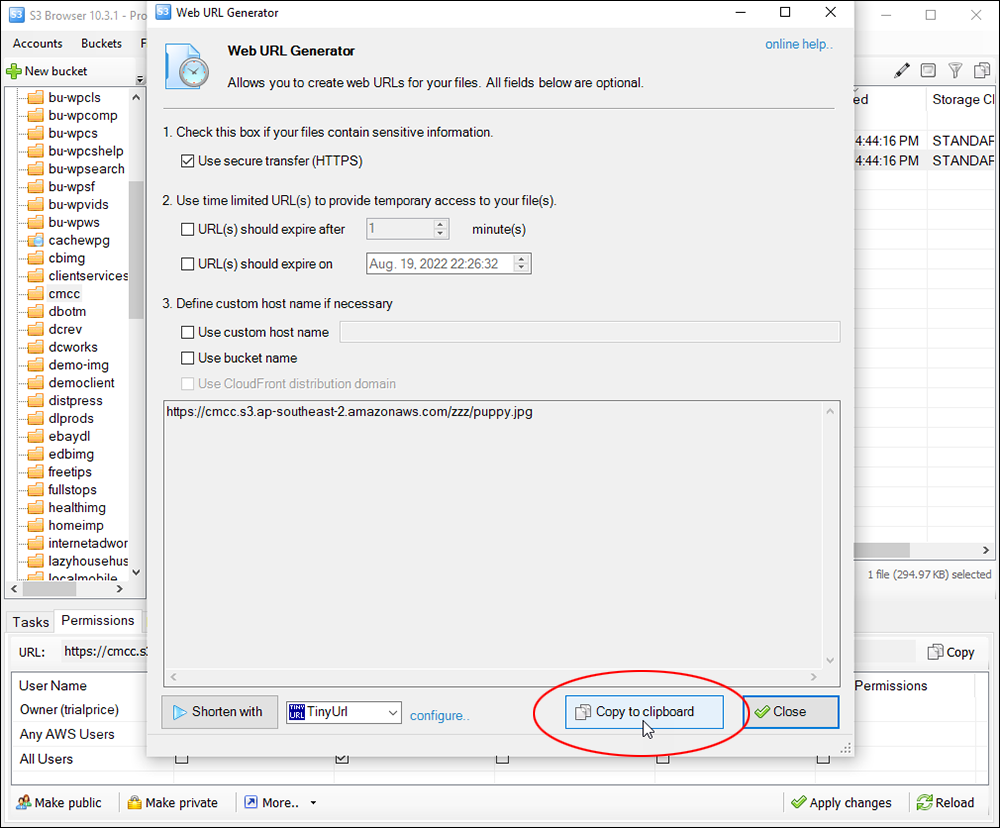
We then copied the URL of the image to our clipboard…
Click the button to copy the file URL to your clipboard.
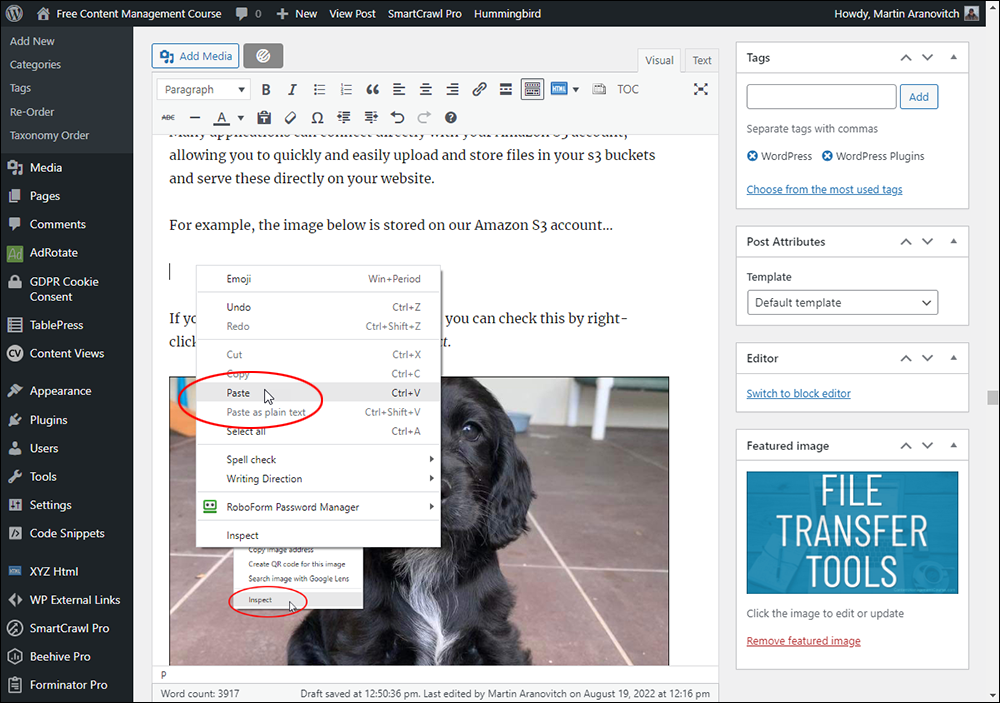
And pasted the URL into the content…
Paste…done!
That’s it! When you look at that image on our web page, it’s being served from Amazon S3, not from our web server.
Remember to add an alt tag image and a caption to your image URL before publishing to improve your content SEO.
Easily add media files hosted on Amazon S3 to a WordPress site.
Amazon S3 also allows you to set up a “bucket policy” on your server that protects files stored in buckets from being hotlinked.
Google Drive lets you store files on Google’s servers in the cloud. You can also share files and synchronize files across different devices.
Google Drive is great for storing documents, spreadsheets, presentations, drawings, forms, and other files created using Google Docs, Google Sheets, and Google Slides. It also lets you collaborate with your content team to edit your documents.
Files created and edited through the Google Docs suite are automatically saved in Google Drive. You can also upload large files (up to 750 GB in size), and change privacy settings for individual files and folders, including enabling sharing with other users or making your content public.
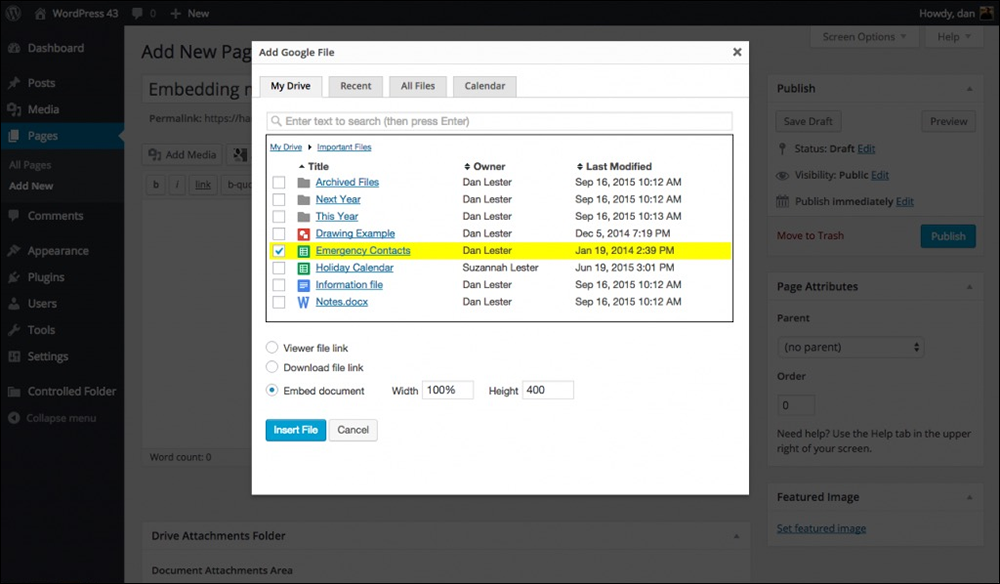
Tutorial: How To Embed Files From Google Drive Into Your Website
You can easily embed files from Google Drive into your website.
In this example, we’ll embed an image stored on Google Drive into a WordPress site.
Note: You can use the same method as shown in the tutorial below to embed other types of files into your site like videos, audios, etc.
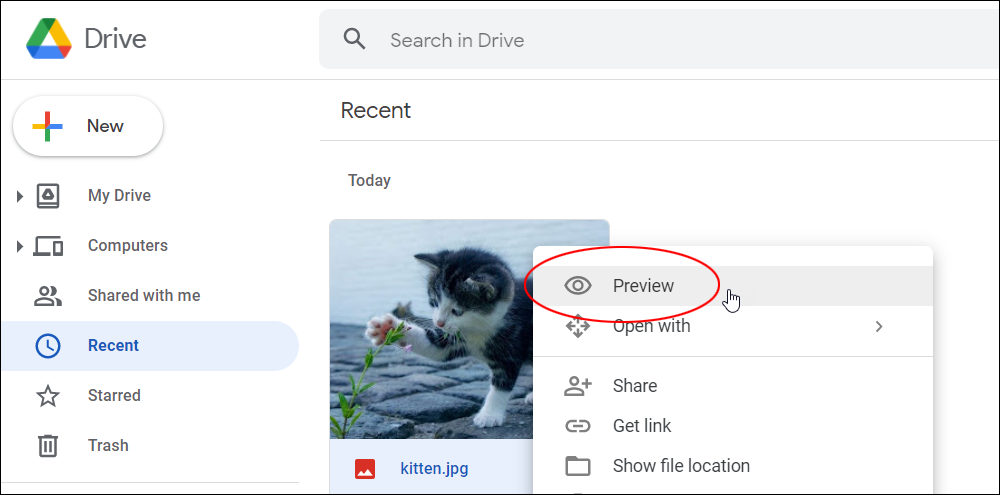
After uploading your media file to Google Drive, right-click on the file and select Preview.
Right-click on your file and select Preview.
Next, click on the vertical ellipsis icon (More Options) and select Open in new window…
Select Open in new window.
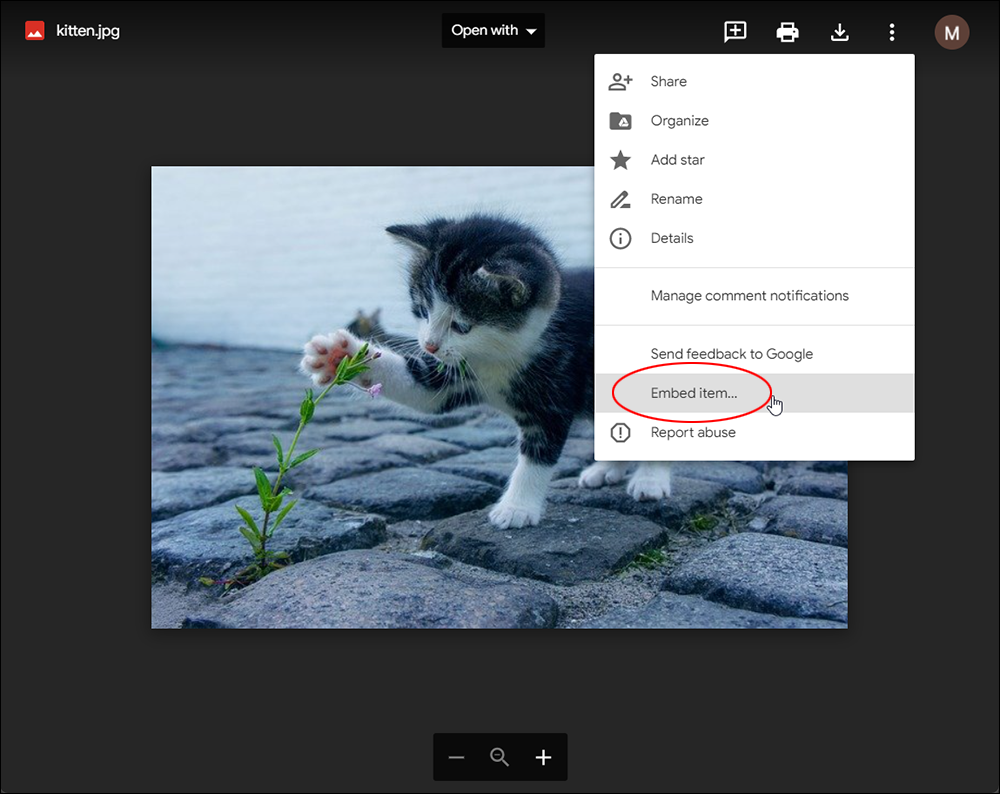
Click on the vertical ellipsis icon again and select Embed item…
Select Embed item…
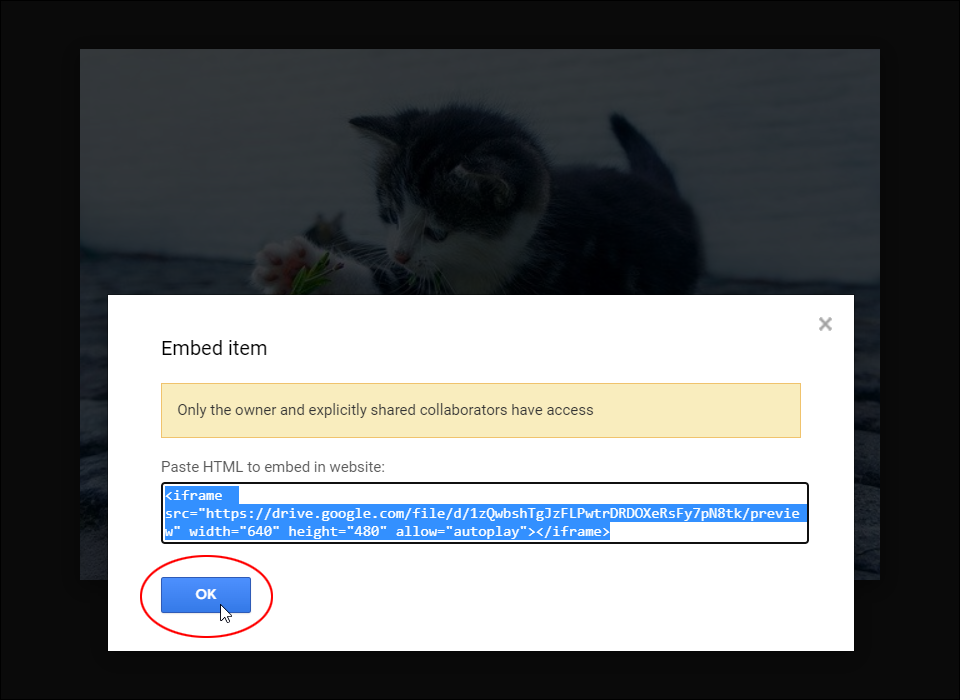
Copy the embed code to your clipboard…
Select and copy the embed code to your clipboard.
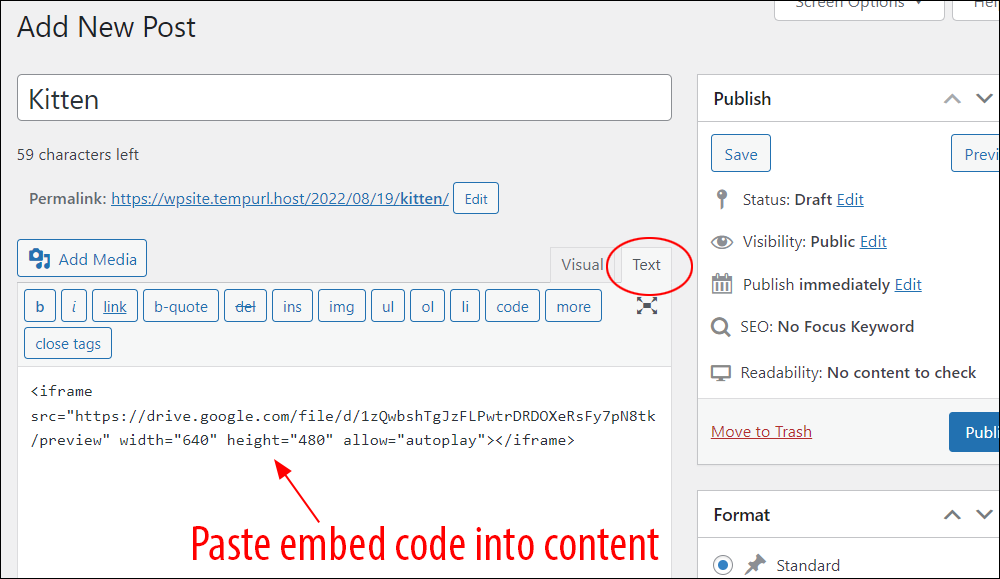
If you are using the WordPress classic editor, switch to the Text tab and paste the content from your clipboard into the location where you want your image (or video, or audio file, etc.) to display.
Paste the embed code into your content.
Your embedded file should display when you publish and preview your content.
Dropbox is a file hosting service that lets you store, share, and synchronize files in the cloud.
Dropbox is excellent for transferring files between multiple devices, as it allows you to access your account from anywhere, on any device.
For example, let’s say that you have a home computer and a work laptop and your media editing tools are installed on both devices.
With Dropbox (and Google Drive too), you can upload files to your account while you are at work via your laptop…
Upload files to Dropbox from one device (e.g. your work laptop)…
And download these files to your home computer when you get home to continue working…
And download the files from Dropbox to another device (e.g. your home computer).
Additional Cloud Storage Solutions
In addition to the above, here are some affordable cloud, remote and offsite storage solutions you can use to transfer and store your website files and backups securely:
External Drive: Purchase an external hard drive and regularly back up your site files and data to this drive.
Microsoft OneDrive: Offers 5 GB of free storage with seamless integration with Windows and affordable subscription plans. It can be used with various WordPress backup plugins.
Backblaze B2: An affordable alternative to Amazon S3, Backblaze B2 offers competitive pricing for cloud storage, making it a great option for budget-conscious website owners.
Wasabi: Provides low-cost, high-performance cloud storage with no egress fees, making it an attractive option for WordPress users needing reliable offsite backups.
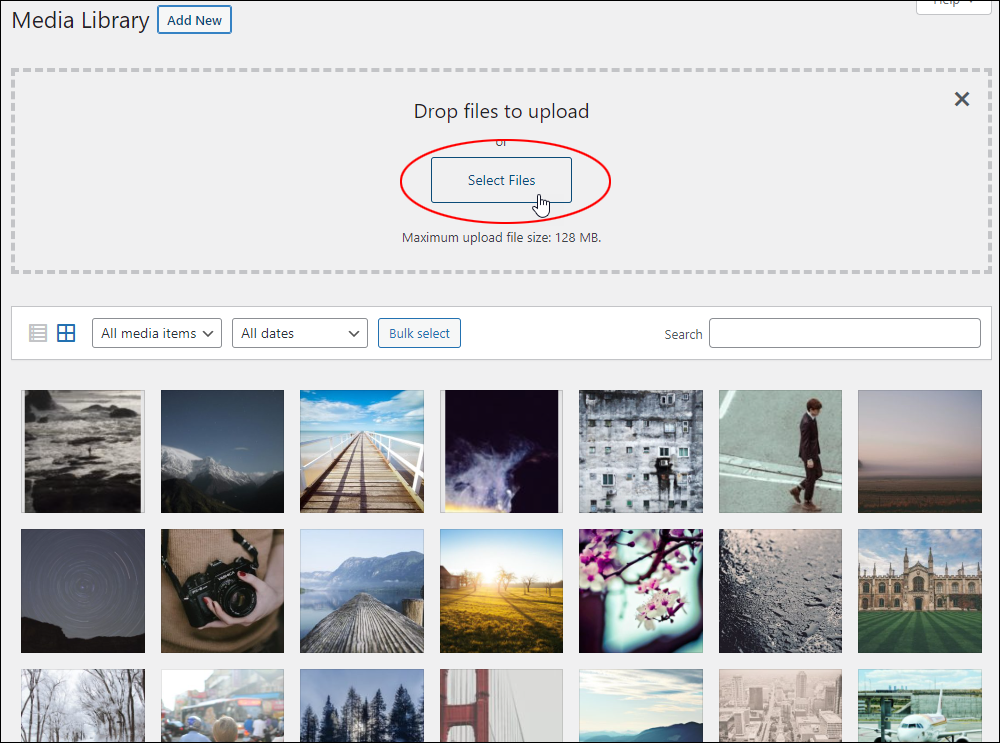
The WordPress Media Library lets you upload all kinds of media files to your site and comes with many built-in features for managing your uploaded files.
You can use drag and drop or select files to upload media to your WordPress site.
In addition to the Media Library, there are various WordPress Media Plugins you can use to transfer and manage files on your site from your computer and cloud storage services.
For example, S3 Media Maestro lets you display videos hosted on Amazon S3 securely on your site.
Use S3 Media Maestro to display content stored on Amazon S3 securely on your WordPress site.
If you store files on Google Drive, you can use a plugin like Google Drive Embedder to add files to your content.
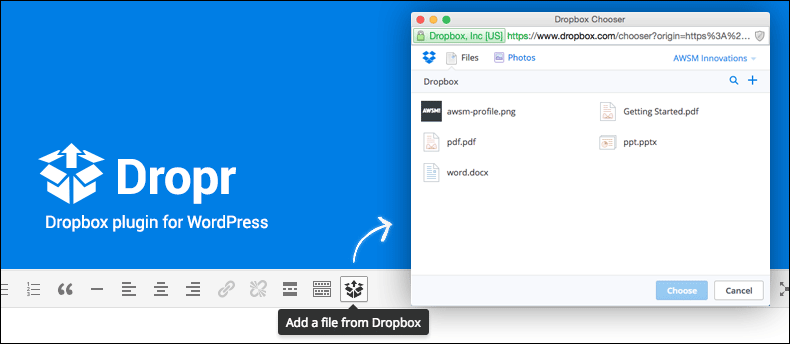
You can also use a plugin like Dropr to easily access files from your Dropbox account and add them to your WordPress website.
Dropr is a Dropbox plugin for WordPress.
For more plugins that can help you manage the transfer of files to your WordPress site, see this section: WordPress Media Plugins
WordPress Automatic Updates
WordPress has a built-in feature that automatically transfers data like new software updates, plugins, and themes from the main WordPress repository (WordPress.org) to the WordPress installation files in your server.
It also automatically uploads, extracts, and places all data directly into the correct folders inside your web server and database.
The WordPress auto-updating feature is useful for transferring files from your server when:
Updating WordPress via the dashboard
Uploading and installing WordPress plugins
Updating WordPress plugins
Uploading and installing WordPress themes
Updating WordPress themes
The ability to perform updates directly inside your WordPress dashboard is extremely convenient. However, keep the following in mind…
One-click updates work on most servers. If you have any problems, it is probably related to permissions issues on the filesystem.
See the section earlier on configuring server file permissions if you run into any issues with WordPress (also refer to this WordPress Troubleshooting Guide if you experience other errors on your site).
Zapier
Zapier lets you connect and integrate your web applications and automate your workflows.
Essentially, Zapier allows thousands of different applications to communicate with each other and create all kinds of “when this happens…automatically do this” tasks (called “Zaps”), saving you a lot of time in the process.
Zapier also offers many integrations with WordPress.
Zapier offers extensive help documentation, including detailed tutorials on how to integrate the tool with all kinds of services.
Video Courses For Beginners – Transferring Files
The video courses below cover basic areas of transferring files and are ideal for beginners (note: you can access all of the video courses below with a single all-access pass):
Learn how to set up and use Amazon S3 to upload, store, manage, and protect your site’s images, large media files, downloadable files, stream videos, and more.
Learn how to safely and automatically back up your WordPress files and database and how to easily restore your WordPress site if something unexpected or disastrous were to happen.
Effective content management involves the continuous transfer of files between users, different devices, web servers, and remote storage services.
In this lesson, we have covered many different methods you can use to transfer files and share content in your organization.
Action Steps
Make an inventory of the file transfer tools, methods, and processes used in your organization and make sure there is workflow documentation for your content team on how to use these effectively.
Resources
WordPress User Manual – The most detailed and comprehensive step-by-step WordPress user manual for non-technical website users available.
We use cookies on our website to give you the most relevant experience by remembering your preferences and repeat visits. By clicking “Accept”, you consent to the use of ALL the cookies.
This website uses cookies to improve your experience while you navigate through the website. Out of these, the cookies that are categorized as necessary are stored on your browser as they are essential for the working of basic functionalities of the website. We also use third-party cookies that help us analyze and understand how you use this website. These cookies will be stored in your browser only with your consent. You also have the option to opt-out of these cookies. But opting out of some of these cookies may affect your browsing experience.
Necessary cookies are absolutely essential for the website to function properly. These cookies ensure basic functionalities and security features of the website, anonymously.
Cookie
Duration
Description
cookielawinfo-checkbox-analytics
11 months
This cookie is set by GDPR Cookie Consent plugin. The cookie is used to store the user consent for the cookies in the category "Analytics".
cookielawinfo-checkbox-functional
11 months
The cookie is set by GDPR cookie consent to record the user consent for the cookies in the category "Functional".
cookielawinfo-checkbox-necessary
11 months
This cookie is set by GDPR Cookie Consent plugin. The cookies is used to store the user consent for the cookies in the category "Necessary".
cookielawinfo-checkbox-others
11 months
This cookie is set by GDPR Cookie Consent plugin. The cookie is used to store the user consent for the cookies in the category "Other.
cookielawinfo-checkbox-performance
11 months
This cookie is set by GDPR Cookie Consent plugin. The cookie is used to store the user consent for the cookies in the category "Performance".
viewed_cookie_policy
11 months
The cookie is set by the GDPR Cookie Consent plugin and is used to store whether or not user has consented to the use of cookies. It does not store any personal data.
Functional cookies help to perform certain functionalities like sharing the content of the website on social media platforms, collect feedbacks, and other third-party features.
Performance cookies are used to understand and analyze the key performance indexes of the website which helps in delivering a better user experience for the visitors.
Analytical cookies are used to understand how visitors interact with the website. These cookies help provide information on metrics the number of visitors, bounce rate, traffic source, etc.
Advertisement cookies are used to provide visitors with relevant ads and marketing campaigns. These cookies track visitors across websites and collect information to provide customized ads.
 Amazon S3 is an affordable and almost limitless cloud storage solution that lets you store your files and large amounts of data, including images, media files, and website backups securely and embed these in your web content.


 Sending and receiving files to and from other users, transferring files between different devices, and uploading or downloading files or media from various computer devices to your website, server, or remote storage services are all essential aspects of managing your content effectively.