Linking Content On Multiple Web Pages
How do you interlink content across many web pages when the content on those pages hasn’t even been written yet? This article provides helpful content-linking planning tips for larger content projects.
 Content linking is not only good for SEO, it’s also what makes the World Wide Web possible.
While interlinking topic-related content in existing web pages is easy to do, how do you link to content that has not been created yet?
This creates challenges when planning larger content projects with fully interlinked content such as an article series or an online course.
Planning a site like ContentManagementCourse.com is a great example of how challenging this can be. This site launched with over 100 fully interlinked course lessons.
In this article, we show you step-by-step how we created the course content for this site as a practical example of interlinking content across many pages.
ContentManagementCourse.com Content Planning Process
Here’s the planning process we used to create the content for ContentManagementCourse.com:
Step 1 – Set Goals
Our goal is to provide a comprehensive and practical online course to help businesses learn how to manage their content more effectively.
Achieving this goal required planning several course modules with many interlinked lessons covering several content-related areas.
Step 2 – Create A Content Strategy
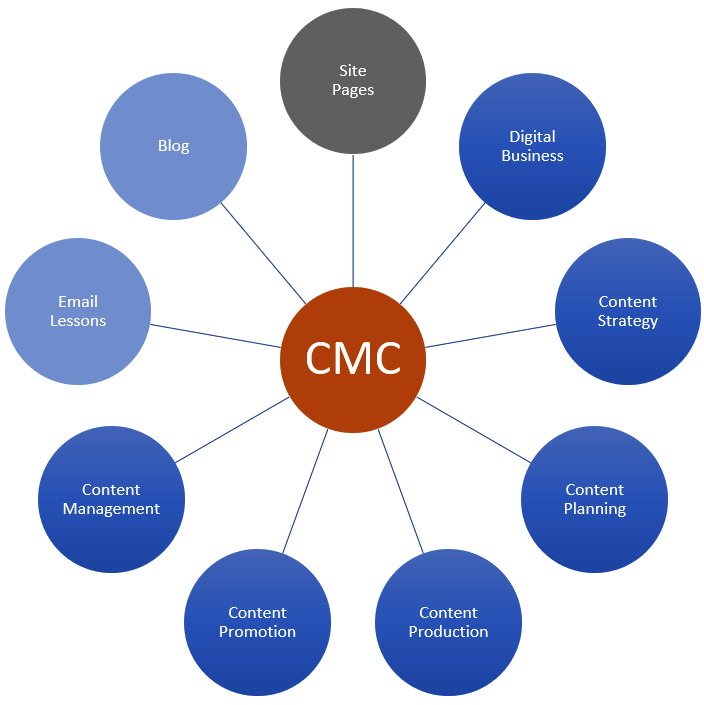
Based on the goals described above, we defined a content strategy for this site that included creating the following content:
- Site Pages – Create standard website ‘must-have’ pages (e.g. Home Page, About Us, Contact Us, Legal Pages, etc.)
- Course Modules – Create comprehensive course modules with fully interlinked course lessons across six categories:
- Digital Business – This module provides context for the other modules.
- Content Strategy – Lessons on how to create a content strategy.
- Content Planning – Lessons on how to plan content.
- Content Production – Lessons on how to produce content.
- Content Promotion – Lessons on how to promote content.
- Content Management – Lessons on how to manage content and the above content-related processes.
- Email Lessons – Create a series of emails aimed at helping users to understand and apply all of the course lessons on this site.
- Blog – Create and publish new content that expands on the content of existing course lessons, with practical tips and additional information o help users improve their content management skills.
Once the main content sections were defined, the strategy was to implement the creation of the course content and the launch of this site into the following stages:
- Set up the site with ‘must-have’ navigational pages.
- Create all course modules and lessons with fully interlinked content prior to launching the site.
- Launch the site, and
- Continually add new content on a regular basis expanding and linking to existing course content.
Stage #2 above is the challenging part and the focus of this article. The other stages are fairly common when developing business websites (i.e. set up and launch the website, then start publishing new content).
After defining the content strategy, the next step was to plan the course content outline describing the modules, lessons, and topics covered in each of these sections.
Step 3 – Planning The Course Content Outline
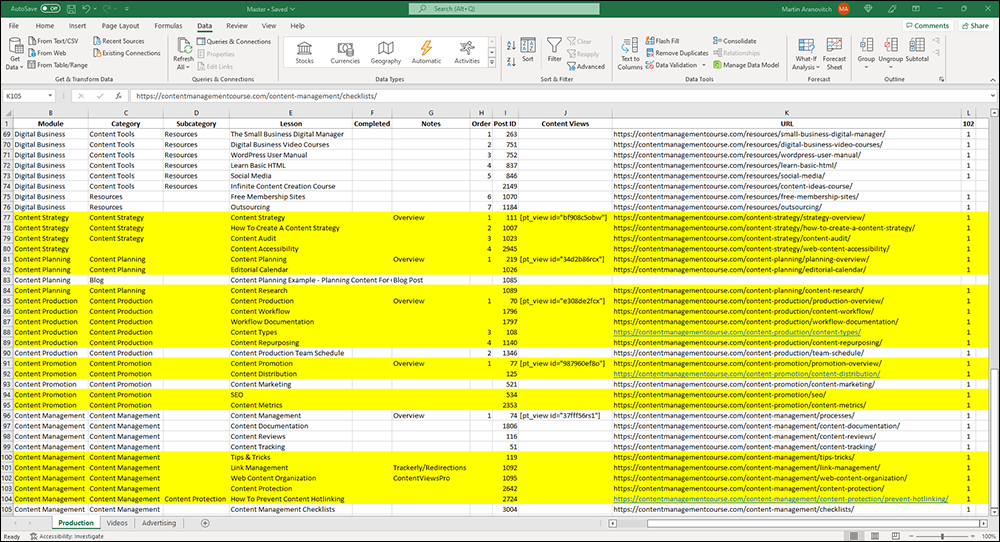
A simple spreadsheet was used to plan the course content outline, with columns to classify and organize course modules and lessons, track content production, and record information about each item of content created for the site.
The spreadsheet also employed a simple color-coding scheme:
- White (No highlight) – Lesson planned but not worked on yet.
- Yellow – Lesson worked on but not completed yet.
- Green – Lesson completed.
- Purple – New lesson or blog article to be added later (the content is not required to launch the course. It can be created, published, then linked to and from the main course content afterward).
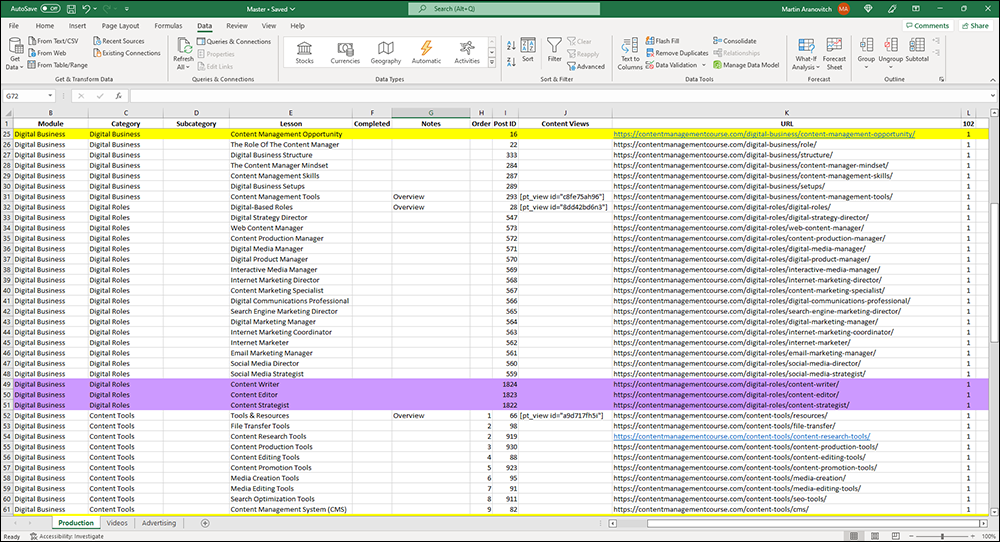
Note: In addition to adding course content planning columns, other columns were included for additional information about each content item, so this spreadsheet can be used to perform a content audit and content reviews.
Planning the course and creating the course content outline took several weeks.
Step 4 – Developing The Course Website
Here’s a breakdown of the steps required to complete this stage:
1 – Build The Website
As explained throughout this course, one of the most effective tools for managing content is to use a Content Management System (CMS) and WordPress is the world’s most widely used CMS platform.
So, this site was built with WordPress. All the steps are documented on our free WordPress training sites for non-technical users: WPCompendium.org (free tutorials on how to build a WordPress site without coding skills) and WPTrainingManual.com (free tutorials on how to use WordPress).
2 – Put Site In Under Construction Mode
After building the site and adding basic pages (e.g. Contact Us, Legal Pages, etc.), I then installed and activated an “Under Maintenance” plugin so I could work on the content without making it public.
3 – Add Placeholder Pages For Content
This step is really important for your content linking strategy to work. Careful planning is required before building your content pages.
After setting up and configuring the website (about a week’s work), I then returned to the spreadsheet and began to add “placeholder” pages (pages without content) to the website for each content item that would need to be created.
Note: We used WordPress Posts, not WordPress Pages for our course modules and lessons.
This step was comprised of the following tasks:
- Create a WordPress post for each course module and lesson,
- Add the course lesson title,
- Configure the post slug for the URL (i.e. the web address),
- Create a title image and add it to the post as a featured image,
- Note the post ID on the spreadsheet (to make it easier to organize the content later), and
- Add SEO meta descriptions to each page.
After creating a placeholder post for the content as per the above, I then published the page.
The reason for publishing pages instead of keeping these unpublished (i.e. in ‘draft’ mode) was to obtain the actual URL of each course module or lesson and record this on the spreadsheet.
I then used these URLs to link to other course content later.
I repeated this process until all the ‘placeholder’ pages (100+ pages) required to launch this course were created (about a week’s work).
Step 5 – Course Content Production
After creating all the placeholders for course modules and lessons listed on the course planning spreadsheet, the process of researching and writing the course content began.
The aim of this stage was to flesh out each lesson as much as possible and worry about final editing and putting the finishing touches later, so I used the content planning spreadsheet to track content production with most of the content being worked on highlighted in yellow.
While working on the lessons, new content ideas came to mind, and I recorded these on the spreadsheet for later.
Writing the course content for this site took about a year.
After creating all the course content, I then went back and reviewed each lesson, making final tweaks and edits to the content, formatting, and structure, checking that the links worked, etc.
As each item was completed, I added the details to the spreadsheet and highlighted them in green.
When all the rows of the spreadsheet were green, the site was then ready to launch.
![]()
As you build out your content, you may discover that you need to make changes to the page URLs that you are linking to (e.g. you may need to assign the lesson to a different post category or edit the post slug).
Changing the URL of a page, however, can affect the existing links in your content. With WordPress, you can easily fix this using plugins like Better Search Replace and Redirection.
Step 6 – Launch Website
With all the initial content created and fully interlinked, the site was ready to launch.
All we needed to make the content public was to deactivate the “Under Construction” plugin. The site then immediately became “live”.
After this, we simply began to implement some basic content promotion methods like notifying the search engines (e.g. by submitting sitemaps to Google Search Console and Bing Webmaster Tools, etc.) to get the pages crawled and indexed.
Step 7 – Add New Content With Links To Existing Content
The hardest part of creating a large project with extensive content interlinking is getting the content planning right and then building out all of your initial content.
Once this is done, adding new content (e.g. via the blog section) and linking it to existing pages is relatively easy, as the main content structure is already in place.
For example, this article was written after the site was launched. All the links you see on this page were easy to add as all of the content being linked to was already written.
In time, this article may also link to content that has yet to be written.
When/if this content eventually does get written, it will simply be a matter of referring to the notes in the content planning spreadsheet, editing this article, adding a link to the newly-created content, and marking the task as done (i.e. highlighting it in green on the spreadsheet ).
Summary
While linking content between existing web pages is simple and easy to do, planning how to fully interlink content on larger projects can be challenging, as it may require linking to content that hasn’t been created yet.
Here’s the strategy for addressing this challenge in a nutshell:
- Create and publish ‘placeholder’ pages to get all the web addresses you will link to in your content project.
- After obtaining the URL of all your interlinking pages, start building the content for those pages.
- As you build out the content on each of your ‘placeholder’ pages, link your content to other content using their page URLs.
We hope that you have found this article useful.
***