Learn about different ways to monetize your content.
Content Monetization
Content monetization and content management are intricately connected in our digital ecosystem.
Mastering the art of content management sets the stage for successful content monetization, unlocking new and exciting opportunities for revenue generation in the competitive digital landscape.
In this series of lessons, we look at different methods you can implement to monetize your digital content.
Understanding Content Monetization
Content monetization is not only a strategic avenue for businesses to disseminate valuable content but also to generate revenue.
Content monetization refers to the process of leveraging content assets to earn money, transforming the creation and distribution of content into a profitable venture.
This means strategically capitalizing on the content you produce, whether it be articles, videos, or other forms of media, to cultivate new revenue streams.
The symbiotic relationship between content monetization and content management is crucial for success in the digital realm.
Effective content management lays the foundation for organizing, optimizing, and distributing content seamlessly. This, in turn, streamlines the content monetization process by ensuring that valuable assets are easily accessible and can be strategically leveraged for financial gain.
By recognizing that the efficiency of content management directly impacts the effectiveness of content monetization strategies and adopting robust content management systems and practices, your organization can not only enhance its content creation and distribution processes but also maximize the revenue potential of its valuable digital assets.
The Basics of Content Monetization
Whether you create video content, blog posts, podcasts, social media posts, e-books, online courses, email newsletters, webinars, or subscription-based content, there are various strategies you can utilize to generate revenue from your content.
One of the most common ways to monetize your content is through advertising. This can include placing ads on your website, YouTube videos, podcasts, or social media posts. You can also partner with brands for sponsored content, where you promote their products or services in exchange for payment.
Another popular monetization strategy is affiliate marketing, where you earn a commission for promoting products or services on your platform. This can be done through affiliate links in your blog posts, social media posts, or email newsletters.
Creating premium content is another effective way to monetize your website. This can include offering online courses, e-books, webinars, or subscription-based content that users can access for a fee.
By providing valuable and exclusive content, you can attract a loyal audience willing to pay for your expertise.
It’s important to diversify your monetization strategies to maximize your revenue potential. Experiment with different tactics to see what works best for your audience and niche.
Remember, building a profitable website takes time and effort, but with the right strategies in place, you can turn your passion into a successful online business or boost your existing website’s revenue.
Why Monetize Content?
Your business may have invested a lot of time and effort into creating valuable content for its audience. It’s very important, therefore, to realize the importance of monetizing this content effectively and getting the most return on investment.
Content monetization is essential for businesses across all niches and offers a myriad of benefits for businesses, bloggers, digital marketers, and individuals with an online presence.
Here are just of the benefits and reasons to consider monetizing your content:
1. Diversify Income Sources: Monetizing content provides an additional revenue stream, reducing dependency on a single income source and offering financial stability and protection against fluctuations in the market and changes in consumer behavior.
By implementing one or multiple content monetization strategies, you can also turn your passion or website into a profitable and sustainable business.
2. Increase Reader Loyalty: By introducing subscriptions or micropayments, content creators can establish themselves as an authority in their niche and enhance reader loyalty, fostering a dedicated audience base. This can lead to increased traffic, engagement, and ultimately, more opportunities for monetization.
3. Tap into Affiliate Marketing: Affiliate marketing through content monetization allows businesses and bloggers to earn commissions by promoting products or services on their platforms.
4. Optimize Digital Marketing Efforts: Monetizing content aligns with digital marketing strategies, helping businesses optimize their efforts and generate returns on their marketing investments.
5. Enhance Brand Collaboration Opportunities: Monetized platforms attract brands seeking partnerships, leading to collaborative opportunities and sponsorships for content creators.
6. Maximize Social Media Presence: Content monetization on social media platforms enables individuals and businesses to leverage their audience and transform their online presence into a lucrative venture.
7. Drive Website Traffic and Engagement: Monetized content often attracts more traffic, increasing engagement and interaction with the audience, which is beneficial for SEO and overall online visibility.
8. Establish Thought Leadership: Monetizing content positions businesses and individuals as thought leaders in their respective fields, enhancing credibility and trust among their audience.
9. Adapt to Changing Business Models: In the ever-evolving digital landscape, monetizing content allows businesses to adapt to new business models and stay competitive.
10. Unlock Creative Opportunities: Monetization can provide the financial support needed for content creators to explore innovative and creative projects, pushing the boundaries of their content offerings.
Always prioritize the needs and interests of your target audience. This will ensure long-term success in your content monetization strategies.
Content Monetization Methods
Whether you choose to monetize through ads, affiliate marketing, sponsored content, or other strategies, there are numerous ways to earn money from your valuable content.
Let’s now go through some of these methods…
This is the end of part 1. To continue reading this article series, click on the pagination section below.
This lesson provides an overview of A/B testing and its impact on your content management strategies.
A/B Testing
In content marketing, A/B testing, also known as split testing, is a systematic approach that compares two versions of a webpage to determine which one performs better in achieving predefined goals.
Whether it’s tweaking the color scheme, refining call-to-action buttons, or experimenting with content placement, A/B testing empowers businesses to make data-driven decisions by providing insights into user preferences and behavior.
In this lesson, we provide an overview of A/B testing and its impact on your content management and digital strategies.
Introduction to A/B Testing
Understanding A/B Testing
A/B testing is a powerful tool that you can use to optimize your marketing strategies and improve engagement and conversions.
In this section, we look at the basics of A/B testing and how it can benefit content writers in their quest to create compelling and effective content.
A/B testing, also known as split testing, is a method of comparing two versions of a webpage, email, or other marketing materials to see which one performs better.
By randomly showing different versions to different segments of your audience, you can determine which version is more effective in achieving your goals, whether it’s increasing click-through rates, conversions, or engagement.
For content writers, A/B testing can provide valuable insights into what resonates with your audience and what doesn’t. By testing different headlines, calls to action, images, or even entire pieces of content, you can identify which elements are most effective in driving engagement and conversions.
When conducting A/B tests, it’s important to have a clear hypothesis and goal in mind. What are you trying to achieve with your test? Are you looking to increase click-through rates, improve conversion rates, or boost engagement? By defining your goals upfront, you can better measure the success of your tests and make informed decisions based on the results.
In addition to setting clear goals, it’s also important to track and analyze the results of your A/B tests. By monitoring key metrics such as click-through rates, conversion rates, and engagement metrics, you can identify trends and patterns that can help you refine your content marketing strategies and improve performance over time.
Overall, A/B testing is a valuable tool for content writers looking to optimize their marketing strategies and boost engagement and conversions. By understanding the basics of A/B testing and implementing best practices, you will create more effective and engaging content that resonates with your audience.
Importance of A/B Testing in Content Marketing
As a content writer, understanding the importance of A/B testing in content marketing is crucial for boosting engagement and conversions. A/B testing involves comparing two versions of a piece of content to see which one performs better in terms of achieving the desired outcome, such as clicks, conversions, or engagement.
One of the main reasons why A/B testing is essential in content marketing is that it provides valuable insights into what resonates with your audience. By testing different elements such as headlines, images, calls to action, or even the overall layout of a piece of content, you can determine what drives the most engagement and conversions. This data-driven approach allows you to make informed decisions about your content strategy, ultimately leading to better results.
Another key benefit of A/B testing in content marketing is that it helps you optimize your content for maximum impact. By continuously testing and analyzing the performance of different variations, you can refine your content to ensure it is as effective as possible. This iterative process allows you to constantly improve your content strategy and stay ahead of the competition.
Furthermore, A/B testing can also help you save time and resources by focusing on what works best for your audience. Instead of relying on guesswork or gut feelings, A/B testing provides concrete data that can guide your content decisions. This data-driven approach can lead to higher ROI and better overall performance for your content marketing efforts.
In conclusion, A/B testing is a powerful tool for content writers looking to boost engagement and conversions. By leveraging the insights gained from testing different variations of content, you can optimize your strategy, save time and resources, and ultimately drive better results for your content marketing efforts.
Setting Up A/B Tests
Defining Goals for A/B Tests
Before diving into the world of A/B testing, it is crucial to clearly define your goals for these experiments.
A/B testing is a powerful tool that can help you optimize your content marketing strategies and increase engagement and conversions. However, without clear goals in mind, it can be easy to get lost in the sea of data and lose sight of what you are trying to achieve.
When defining goals for A/B tests, consider what you want to accomplish with your content:
Are you looking to increase click-through rates on a specific call-to-action?
Do you want to improve the conversion rate on a landing page?
Are you trying to boost engagement with your blog posts?
By clearly defining these goals, you can create A/B tests that are focused and targeted towards achieving specific outcomes.
In addition to setting clear goals, you should also consider the key metrics that you will use to measure the success of your A/B tests. Whether it is tracking click-through rates, conversion rates, or engagement metrics, having a solid understanding of the data that will be used to evaluate the performance of the tests is essential.
By defining goals and metrics for A/B tests, you will ensure that your experiments are purposeful and well-executed. This will not only help you make data-driven decisions about your content marketing strategies but also lead to better engagement and conversions in the long run.
So, before starting any A/B test, take the time to clearly define your goals and metrics to set yourself up for success.
Selecting Variables to Test
When it comes to A/B testing for content marketing strategies, selecting the right variables to test is crucial for achieving meaningful results. It is essential to identify key elements that can have a significant impact on engagement and conversions.
Here are some tips for selecting variables to test in your A/B experiments:
1. Headlines: One of the most important elements to test in your content is the headline. A compelling headline can make a big difference in how many people click on your content and engage with it. Try testing different variations of headlines to see which one resonates best with your audience. (Tip: Use a headline generation tool or even an AI tool like ChatGPT to help you create compelling headlines).
2. Call-to-Action (CTA): The call-to-action is another critical variable to test in your content. Whether you want readers to sign up for a newsletter, download a resource, or make a purchase, the CTA should be clear and compelling. Test different variations of CTAs to see which one drives the most conversions.
3. Visuals: Images and videos can play a significant role in capturing the attention of your audience. Test different visuals to see which ones drive the most engagement and conversions. Pay attention to factors such as color, size, placement, and relevance to your content.
4. Content Length: The length of your content can also impact engagement and conversions. Test different lengths of content to see which performs best with your audience. Some readers may prefer shorter, more concise content, while others may prefer longer, more in-depth pieces.
5. Tone and Language: The tone and language used in your content can also affect how it resonates with your audience. Test different tones (e.g., formal vs. informal) and language styles to see which one connects best with your readers.
By selecting and testing these variables in your A/B experiments, you can gain valuable insights into what resonates best with your audience and optimize your content marketing strategies for maximum engagement and conversions.
Remember to track and analyze the results of your tests carefully to make data-driven decisions for future content creation.
Creating A/B Testing Hypotheses
Formulating Hypotheses for Content Experiments
One of the key steps in conducting successful A/B tests is formulating hypotheses for content experiments.
A hypothesis is a statement that predicts the outcome of an experiment. In the context of content marketing, a hypothesis should be based on a specific goal or objective that you want to achieve with your content.
For example, if your goal is to increase the click-through rate on a call-to-action button, your hypothesis could be that changing the color of the button to red will lead to a higher click-through rate compared to the current color.
When formulating hypotheses for content experiments, it’s important to be clear and specific. Your hypothesis should clearly state the changes you plan to make and the expected outcome. Additionally, your hypothesis should be testable, meaning that you should be able to measure the impact of the changes you make.
To increase the chances of success with your content experiments, it’s also important to base your hypotheses on data and insights. Take the time to analyze your existing content performance metrics and identify areas where improvements can be made. Use this data to inform your hypotheses and make informed decisions about the changes you want to test.
By formulating well-crafted hypotheses for your content experiments, you can set clear goals, measure the impact of your changes, and optimize your content marketing strategies for maximum engagement and conversions.
Remember, A/B testing is a powerful tool that can help you continuously improve and refine your content to achieve your marketing goals.
Understanding Statistical Significance in A/B Testing
Understanding statistical significance in A/B testing is crucial for effectively boosting engagement and conversions in your content marketing strategies.
A/B testing involves comparing two versions of a webpage, email, or any other marketing asset to determine which one performs better in terms of a specific goal, such as click-through rates or conversion rates.
Statistical significance is the measure of confidence that the difference in performance between the two versions is not due to random chance.
In other words, it helps you determine whether the observed difference in performance is statistically significant or just a fluke.
Determining Statistical Significance in A/B Testing: P-Value
To determine statistical significance in A/B testing, you need to calculate the p-value, which is the probability of obtaining results as extreme as the ones observed if the null hypothesis (that there is no difference between the two versions) is true.
Typically, a p-value of less than 0.05 is considered statistically significant.
To calculate the p-value in A/B testing, you generally follow a process that assesses the probability of obtaining test results at least as extreme as the ones observed during the test, under the assumption that there are no differences between the test groups (null hypothesis).
Here’s a simplified overview of the steps involved:
1. Define the Null and Alternative Hypotheses: The null hypothesis (H0) usually states that there is no effect or no difference between the groups, while the alternative hypothesis (H1) suggests that there is a difference. 2. Choose a Significance Level (a): Commonly, a significance level of 0.05 is used, indicating a 5% risk of concluding that a difference exists when there is no actual difference. 3. Collect Data: Conduct your A/B test and collect data for each group. This includes the number of trials and the number of successes (e.g., conversions). 4. Calculate Test Statistic: Depending on the data type and test design, calculate a test statistic (e.g., z-score for proportions). 5. Determine the P-Value: The p-value is calculated based on the test statistic. It represents the probability of observing results at least as extreme as those observed if the null hypothesis were true.
Example
Suppose you’re testing two versions of a webpage (A and B) to see which one results in more conversions. Version A had 200 visitors and 40 conversions, while version B had 200 visitors and 50 conversions.
Null hypothesis (H0): Conversion rate of A = Conversion rate of B
Alternative hypothesis (H1): Conversion rate of A ? Conversion rate of B
Significance level (a) = 0.05
Assuming the conversion rates follow a normal distribution, you could calculate the z-score for the difference in conversion rates and then find the corresponding p-value from a standard normal distribution table or using statistical software.
If the p-value is less than the significance level (0.05 in this case), you reject the null hypothesis, concluding there’s a statistically significant difference between versions A and B.
This example is a simplified explanation. In practice, calculating the p-value involves more detailed statistical analysis, and tools or software like Python’s SciPy library, R, or specialized A/B testing calculators are often used to automate this process.
It’s important to keep in mind that statistical significance does not necessarily mean practical significance. Just because a difference is statistically significant doesn’t always mean it’s meaningful or worth implementing in your content marketing strategy. That’s why it’s important to consider other factors, such as the size of the effect and the practical implications of the results.
By understanding statistical significance in A/B testing, you can make data-driven decisions to optimize your content marketing strategies and improve engagement and conversions.
So, next time you’re running an A/B test, make sure to pay attention to statistical significance to ensure that your results are both reliable and actionable.
Implementing A/B Tests
Tools for A/B Testing in Content Marketing
A/B testing is a crucial tool for determining the effectiveness of various strategies and tactics. By testing different versions of content and analyzing the results, you will gain valuable insights into what resonates with your target audience and drives engagement and conversions.
There are a variety of tools available for conducting A/B tests in your content marketing efforts. These tools range from simple, free options to more advanced, paid platforms that offer a range of features and capabilities.
One popular tool for A/B testing in content marketing is Optimizely. This platform offers a range of features, including multivariate testing, personalization, and targeting capabilities. Optimizely is a paid platform, but its advanced features make it a popular choice for content writers looking to take their A/B testing efforts to the next level.
If you are looking for a more budget-friendly option, tools like VWO and Unbounce offer A/B testing capabilities at a lower price point. These tools are user-friendly and offer a range of features for testing and optimizing content for engagement and conversions.
Regardless of the tool chosen, A/B testing is a valuable practice for improving your content strategies. By testing different versions of content and analyzing the results, you will gain valuable insights into what resonates with your audience and drive better results for your content marketing efforts.
Running successful A/B tests is crucial for boosting engagement and conversions. By following best practices, you will ensure that your tests are accurate, reliable, and provide valuable insights for optimizing your content marketing strategies.
One key best practice for running A/B tests is to clearly define your goals and hypotheses before conducting the test. This will help you stay focused on what you are trying to achieve and ensure that your test results are meaningful.
It is also important to have a large enough sample size to ensure that your results are statistically significant. Running tests with too small of a sample size can lead to unreliable results and false conclusions.
Another best practice is to only test one variable at a time. This will help you accurately determine the impact of each change you make to your content.
By testing multiple variables at once, you may not be able to isolate the effects of individual changes, making it difficult to draw clear conclusions from your test results.
Additionally, it is important to set up your tests properly to ensure that your results are accurate. This includes using reliable testing tools, implementing proper tracking mechanisms, and ensuring that your test variations are presented randomly to your audience.
By following these best practices for running A/B tests, you can effectively optimize your content marketing strategies and drive better results. With accurate and reliable test results, you can make data-driven decisions that lead to increased engagement, conversions, and overall success in your content marketing efforts.
Analyzing A/B Test Results
Interpreting Data from A/B Tests
Understanding how to interpret data from A/B tests is crucial for improving the effectiveness of your content marketing strategies. A/B testing allows you to compare two versions of a piece of content to determine which one performs better in terms of engagement and conversions.
However, simply running an A/B test is not enough – you also need to know how to analyze and interpret the data to draw meaningful insights.
One key aspect of interpreting data from A/B tests is statistical significance. This refers to the likelihood that the differences observed in the test results are not due to random chance.
In order to determine statistical significance, you can use statistical tools such as t-tests or chi-squared tests. If the results are statistically significant, you can be more confident in the conclusions drawn from the test.
Another important factor to consider when interpreting A/B test data is the practical significance of the results. This involves looking at the actual impact of the differences observed in the test results on your content marketing goals.
For example, even if a change in a headline leads to a statistically significant increase in click-through rates, if the difference is only a few percentage points, it may not be practical to implement that change.
In addition to statistical and practical significance, it is also important to consider the context in which the A/B test was conducted. Factors such as the sample size, test duration, and external variables can all impact the results of the test.
By taking these factors into account when interpreting A/B test data, you can ensure that you are making informed decisions to optimize your content marketing strategies.
In conclusion, interpreting data from A/B tests is a crucial skill to boost engagement and conversions. By understanding statistical significance, practical significance, and the context of the test, you can draw meaningful insights from your A/B test results and make data-driven decisions to improve your content marketing strategies.
Making Data-Driven Decisions for Content Optimization
Making informed decisions is crucial for success. With the abundance of data available at our fingertips, you have the power to optimize your content for maximum engagement and conversions.
This section explores the process of making data-driven decisions for content optimization through A/B testing.
A/B testing is a powerful tool that allows content writers to experiment with different variables and determine which version performs better. By testing variations of headlines, calls-to-action, images, and more, writers can gain valuable insights into what resonates with their audience.
Before conducting A/B tests, it is important to define clear objectives and key performance indicators (KPIs). By setting specific goals, you can measure the success of your tests and make informed decisions based on the results.
Once the tests are set up, you must analyze the data to identify patterns and trends. By tracking metrics such as click-through rates, bounce rates, and conversions, you can determine which variations are most effective in driving engagement and conversions.
From there, you can use this data to make informed decisions about your content optimization strategies. Whether it’s tweaking headlines, adjusting calls-to-action, or refining messaging, A/B testing empowers you to continuously improve your content based on real-time data.
By embracing data-driven decision-making, your content writers can take their work to the next level and achieve better results for maximum engagement and conversions.
Case Studies in A/B Testing
Successful A/B Testing Examples in Content Marketing
By testing different variations of content and analyzing the results, you can gain valuable insights into what resonates with your audience and drives action.
In this section, we explore some successful A/B testing examples in content marketing that have led to significant improvements in engagement and conversions.
One example of a successful A/B test in content marketing is the use of different headlines for a blog post. By testing two different headlines with the same content, you can determine which headline is more effective at capturing the audience’s attention and driving clicks.
For example, a travel website may test headlines like “Top 10 Destinations to Visit This Summer” versus “Escape to Paradise: The Best Summer Getaways.” By analyzing the click-through rates for each headline, the content writer can identify the most effective headline for driving traffic to the blog post.
Another successful A/B testing example in content marketing is testing different call-to-action (CTA) buttons on a landing page. By testing variations in color, size, and wording of the CTA button, content writers or web designers can determine which version is most effective at encouraging visitors to take action, such as signing up for a newsletter or making a purchase.
For example, an e-commerce website may test a green “Shop Now” button versus a red “Buy Now” button to see which one generates more conversions.
By testing different elements of your content and analyzing the results, you can optimize your strategies and drive better results for your brand.
Lessons Learned from A/B Testing Experiments
A/B testing experiments are a powerful tool for optimizing content marketing strategies and boost engagement and conversions. Through rigorous testing and analysis, valuable lessons can be learned that can significantly impact the success of your content.
One key lesson learned from A/B testing experiments is the importance of testing one variable at a time. It can be tempting to make multiple changes at once to see immediate results, but this can lead to confusion about which change actually had an impact on performance. By testing one variable at a time, you can accurately measure the impact of each change and make informed decisions based on data.
Another valuable lesson is the significance of setting clear goals before conducting A/B tests. Whether your goal is to increase click-through rates, reduce bounce rates, or improve conversion rates, having a clear objective in mind will help guide your testing strategy and ensure that you are measuring the right metrics.
Additionally, A/B testing experiments have taught many businesses the importance of patience and consistency in applying digital marketing strategies. Results may not be immediate, and it is essential to give your tests enough time to gather meaningful data. By consistently testing and refining your content, you can identify trends and patterns that will ultimately lead to more successful campaigns.
In conclusion, A/B testing experiments offer valuable insights that can transform your content marketing strategies. By testing one variable at a time, setting clear goals, and practicing patience and consistency, you can optimize their content for maximum engagement and conversions. Embracing the lessons learned from A/B testing experiments is essential for staying ahead in the competitive world of content marketing.
Advanced Strategies for A/B Testing
Multivariate Testing in Content Marketing
Multivariate testing in content marketing allows you to test multiple variables simultaneously to determine the most effective combinations for boosting engagement and conversions.
Unlike traditional A/B testing, which only compares two variations, multivariate testing allows for the testing of several variables at once, providing more in-depth insights into what resonates with the target audience.
You can use multivariate testing to experiment with different headlines, images, calls to action, and other elements to see which combination drives the desired results. By testing multiple variables at once, you can quickly identify the most impactful elements and optimize your content accordingly.
One key benefit of multivariate testing is its ability to uncover interactions between different variables. For example, a certain headline may perform well on its own, but when paired with a specific image, the engagement and conversion rates may increase significantly. By testing these combinations simultaneously, you can fine-tune your content to create the most effective messaging for your audience.
To conduct a multivariate test, first identify the variables you want to test and create different combinations for each. You can then use a testing tool to measure the performance of each variation and determine which combination yields the best results.
Personalization and Segmentation in A/B Testing
Personalization and segmentation are crucial components of successful A/B testing. By tailoring your content to specific audience segments, you can enhance engagement and drive conversions.
Personalization involves customizing content based on individual preferences, behavior, and demographics. This can include using a reader’s name, recommending personalized products or services, or delivering content at the right time and through the right channel.
By personalizing your content, you can create a more meaningful and relevant experience for your audience, increasing the likelihood of them taking the desired action.
Segmentation, on the other hand, involves grouping your audience into distinct segments based on shared characteristics or behaviors. This allows you to target your content to specific groups of people, making it more relevant and effective.
For example, you could segment your audience based on their location, age, interests, or previous interactions with your content.
When conducting A/B tests, it’s important to consider personalization and segmentation to maximize the impact of your content. By testing different variations of personalized and segmented content, you can identify which strategies resonate best with your audience and drive the most conversions.
To effectively implement personalization and segmentation in your A/B testing strategy, start by defining your audience segments and personalization tactics. Use data and analytics to understand your audience’s preferences and behaviors, and tailor your content accordingly.
Test different variations of personalized and segmented content to see what works best, and iterate on your findings to continuously improve your content performance.
By incorporating personalization and segmentation into your A/B testing for content marketing strategies, you can create more engaging and effective content that drives conversions and delivers results for your business.
Optimizing Content for Engagement and Conversions
Applying A/B Testing Results to Improve Engagement Metrics
Once you have conducted your A/B tests and gathered data on how different variations of your content perform, it is crucial to analyze the results and draw actionable insights.
Look for patterns and trends in the data to identify what elements are resonating with your audience and driving the most engagement. This could include things like headlines, images, call-to-action buttons, or even the overall tone and style of your content.
Once you have identified what is working well, it is time to make data-driven decisions to optimize your content. Implement the winning variations from your A/B tests across your content to see if they have a positive impact on engagement metrics.
Keep in mind that it is important to continue testing and refining your content to ensure that you are always improving and staying ahead of the competition.
Another important aspect of applying A/B testing results is to monitor your engagement metrics closely and track the impact of any changes you make.
Use tools like Google Analytics or other data analytics platforms to measure the effectiveness of your content and see how it is performing over time. This will help you to understand what is resonating with your audience and how you can continue to improve your content marketing strategies.
By applying A/B testing results to your content marketing strategies, you can make data-driven decisions that will help you to boost engagement metrics and drive conversions.
Stay proactive, keep testing, and always strive to deliver the best possible content to your audience.
Increasing Conversions Through A/B Testing Techniques
A/B testing involves creating two versions of a piece of content (A and B) with slight variations, such as different headlines, images, or call-to-action buttons. By testing these variations on a sample of your audience, you can determine which version performs better in terms of conversions.
One of the key benefits of A/B testing is that it allows you to make data-driven decisions about your content. Instead of relying on guesswork or intuition, you can use concrete data to determine which elements of your content are most effective at driving conversions.
To effectively implement A/B testing techniques, you should first identify your goals and key performance indicators (KPIs). Whether you’re looking to increase email sign-ups, downloads, or purchases, having clear goals in mind will help you design experiments that are focused and actionable.
Next, you should carefully design your A/B tests, making sure to test only one variable at a time to accurately determine the impact of each change. This may involve testing different headlines, images, or layouts to see which version resonates most with your audience.
Finally, analyze the results of your A/B tests and use this data to inform future content decisions. By continuously testing and optimizing your content, you can ensure that you’re delivering the most engaging and conversion-focused content to your audience.
By implementing these techniques thoughtfully and consistently, you can increase conversions and boost engagement with your audience.
Conclusion
Recap of Key Concepts in A/B Testing for Content Writers
Let’s recap some key concepts in A/B testing to help you boost engagement and conversions in your content marketing strategies.
A/B testing is a powerful tool that allows you to test different versions of your content to see which one performs better with your audience. By analyzing the results of these tests, you can make data-driven decisions to optimize your content and achieve your marketing goals.
One of the key concepts in A/B testing is defining clear and measurable goals for your content. Before you start testing different versions of your content, it’s important to have a clear understanding of what you want to achieve.
Whether your goal is to increase website traffic, improve conversion rates, or boost engagement, having a specific goal in mind will help you design effective tests and interpret the results accurately.
Another important concept in A/B testing is selecting the right variables to test. When conducting A/B tests, it’s crucial to focus on testing one variable at a time to accurately measure the impact of that change on your content’s performance.
Some common variables to test include headlines, call-to-action buttons, images, and copywriting.
Additionally, it’s essential to ensure that your tests are statistically significant. This means that you need to test your content with a large enough sample size to ensure that the results are reliable and representative of your audience’s behavior.
By following these key concepts in A/B testing, you can make informed decisions to optimize your content and drive better results for your content marketing strategies.
Future Trends in A/B Testing for Content Marketing
It’s important to stay ahead of the curve. As technology continues to evolve, so do the trends in A/B testing.
Here are some future trends to keep an eye on:
1. Personalization: In the future, A/B testing will become even more focused on personalization. Content writers will need to create tailored content for specific audience segments to improve engagement and conversions. A/B testing will help determine which personalized content resonates best with different demographics.
2. Artificial Intelligence: AI will play a larger role in A/B testing for content marketing. Machine learning algorithms can analyze data faster and more accurately than humans, making it easier to identify trends and optimize content strategies. Content writers will need to learn how to work alongside AI tools to create more effective A/B tests.
3. Multichannel Testing: As consumers interact with brands on multiple platforms, A/B testing will need to expand beyond just websites and emails. Content writers will need to test different types of content across various channels, including social media, mobile apps, and even voice assistants. This will require a more integrated approach to A/B testing.
4. Real-Time Testing: In the future, A/B testing will become more immediate and responsive. Content writers will be able to test different versions of content in real-time, allowing them to quickly adjust their strategies based on user behavior. This agile approach will help content writers stay ahead of the competition and adapt to changing trends.
By staying informed of future trends in A/B testing in the ever-evolving world of digital marketing, your business can continue to boost engagement with its audience and conversions.
A/B Testing – FAQs
Here are frequently asked questions about A/B testing:
What is A/B testing?
A/B testing, also known as split testing, is a method of comparing two versions of a webpage or app against each other to determine which one performs better on a specified metric, such as conversion rate, click-through rate, or any other meaningful indicator.
When is A/B testing a good idea?
A/B testing is advantageous when you want to make data-driven decisions about changes to a webpage, app, or marketing strategy. It is particularly useful when you have a clear hypothesis and measurable goals.
When should A/B testing be avoided?
Avoid A/B testing if the goals are unclear, the testable audience is too small to produce statistically significant results, or if the variations are too minor to drive meaningful differences.
How do you set up an A/B test?
Setting up an A/B test involves defining the goal, choosing the variable to test, creating two versions (A and B), splitting your audience randomly, and then measuring the performance of each version against the defined goal.
What are common pitfalls in A/B testing?
Common pitfalls include not running the test long enough to gather sufficient data, making changes to the test mid-way, not ensuring audience segments are properly randomized, or basing decisions on non-statistically significant differences.
How long should you run an A/B test?
The duration of an A/B test should be long enough to achieve statistical significance and account for variations in traffic and behavior. Typically, this can range from a few days to several weeks, depending on the traffic and the metrics being tested.
What metrics should you track during an A/B test?
The choice of metrics depends on the test’s objectives but commonly includes conversion rates, click-through rates, bounce rates, and average session duration. Choose metrics that directly relate to the business impact of the tested variations.
Can A/B testing be used for anything other than websites?
Yes, A/B testing can also be applied to email marketing campaigns, mobile apps, online ads, and more, wherever there are two alternatives to compare with measurable outcomes.
What is the difference between A/B testing and multivariate testing?
A/B testing compares two versions of a single variable, whereas multivariate testing involves changing multiple variables simultaneously to see which combination performs best.
How do you analyze A/B testing results?
Analysis typically involves statistical methods to determine whether the differences in performance between the two versions are significant. Tools like t-tests or analysis of variance (ANOVA) are commonly used for this purpose.
Resources
Visual Web Optimizer – VWO is a powerful A/B Testing and tracking tool that lets you analyze, optimize, and personalize split-tests.
A comprehensive overview of content management for e-commerce websites and product retailers.
Chapter 1: Introduction to Content Management for Product Retailers
This guide provides a comprehensive overview of content management for e-commerce websites.
This series of articles also provides practical tips for product retailers on ways to drive more revenue by managing content more effectively on their eCommerce website.
For expanded tutorials, click on the content links.
Importance of Content Management for eCommerce Websites
eCommerce has become an integral part of the retail industry. As a product retailer, having a strong online presence to attract and engage customers is not only important, but necessary.
Simply having an eCommerce website, however, is not enough to drive revenue and ensure success in the competitive online marketplace.
To truly stand out and capture the attention of potential customers, you need to prioritize content management.
Content management refers to the process of creating, organizing, and maintaining digital content on your eCommerce website. It involves not only the textual components but also visual elements such as images, videos, and infographics.
Effective content management is crucial for several reasons.
Firstly, content management is essential for providing accurate and up-to-date product information. As a product retailer, your customers rely on your website to gain insights into the products you offer.
By regularly updating and managing your content, you can ensure that the product descriptions, specifications, and pricing details are accurate and reect the current inventory. This instills trust and condence in your customers, leading to increased conversions and repeat purchases.
Secondly, content management plays a crucial role in enhancing the user experience on your eCommerce website. A well-organized and visually appealing website with clear and concise content helps customers navigate effortlessly through your product catalog.
By implementing effective content management strategies, such as categorizing products, providing detailed descriptions, and incorporating search functionality, you can improve the overall user experience and reduce bounce rates.
Furthermore, content management is vital for search engine optimization (SEO). Search engines rely on relevant and high-quality content to determine the ranking of your website in search results.
By consistently updating and optimizing your website content with relevant keywords and meta tags, you can improve your visibility and attract organic traffic to your eCommerce site.
Moreover, content management also enables you to leverage content marketing strategies. By creating and publishing valuable and engaging content such as blog posts, product guides, and customer testimonials, you can establish yourself as an industry expert and build a loyal customer base.
Content marketing not only drives traffic to your website but also helps in nurturing leads and increasing customer engagement.
Content management is of utmost importance for eCommerce websites. It ensures accurate product information, enhances the user experience, improves search engine rankings, and enables effective content marketing.
By investing in a robust content management system and implementing best practices, you can drive revenue, increase customer satisfaction, and stay ahead in the competitive online retail landscape.
Benefits of Effective Content Management For Product Retailers
Effective content management is crucial for product retailers, especially for those operating eCommerce websites.
There are numerous benefits that you can reap by implementing smart content management strategies.
First and foremost, effective content management enables product retailers to create a seamless and engaging user experience on their eCommerce websites.
By organizing and structuring content in a logical and user-friendly manner, you can ensure that visitors can easily find the information they are looking for, leading to increased customer satisfaction and improved conversion rates.
Furthermore, content management systems provide you with the ability to easily update and modify product information, prices, and availability in real-time.
This means that you can quickly respond to market changes, launch new products, and manage inventory efficiently. Such agility not only saves time and resources but also allows you to stay ahead of the competition.
By implementing SEO best practices, such as optimizing metadata, keywords, and URLs, you can enhance your website’s visibility in search engine results.
This, in turn, drives organic traffic and increases the chances of attracting potential customers who are actively searching for the products you offer.
Moreover, content management systems offer robust analytics and reporting capabilities, allowing you to gain valuable insights into their website’s performance.
By tracking key content metrics such as page views, bounce rates, and conversion rates, you can identify areas for improvement and make data-driven decisions to optimize your content strategy. This data-driven approach ultimately leads to increased sales and revenue.
Effective content management also plays a vital role in building brand consistency and loyalty. By maintaining a consistent brand voice and messaging across all content channels, you can establish trust and credibility with your target audience.
This consistency fosters brand loyalty and encourages customers to return for repeat purchases, ultimately driving long-term customer value.
Incorporating effective content management practices is essential for product retailers operating eCommerce websites. From enhancing user experience and agility to improving SEO and customer loyalty, the benefits are numerous.
By investing in a robust content management system and implementing a smart content strategy, you can drive revenue, stay ahead of the competition, and build a strong online presence in the ever-evolving digital marketplace.
Challenges in Content Management for eCommerce Websites
Content management plays a crucial role in driving revenue for product retailers. With the rise of eCommerce websites, managing content effectively has become more challenging than ever.
There are key challenges faced by product retailers when it comes to managing their eCommerce website content.
One of the foremost challenges in content management for eCommerce websites is maintaining consistency across multiple channels. product retailers often struggle with ensuring that the content displayed on their website is consistent with what is presented on social media platforms or in email marketing campaigns.
This inconsistency can lead to confusion among customers and negatively impact their purchasing decisions. To address this challenge, you must implement a centralized content management system that allows your business to maintain uniformity across all channels.
Another signicant challenge is the sheer volume of content that needs to be managed. eCommerce websites typically have a vast product catalog, each with its own set of descriptions, images, and specifications.
Updating and organizing this content can be a time-consuming task. To overcome this challenge, leverage automation tools and content management systems that enable bulk updates and streamline your content creation process.
Furthermore, ensuring accurate and up-to-date product information poses a challenge for many eCommerce websites. You must constantly update your content to reflect changes in pricing, availability, or specifications. Failure to do so can result in customer dissatisfaction and lost sales.
Implementing a content management system that integrates with inventory and pricing systems can help automate these updates and ensure that customers have access to the most accurate information.
Additionally, maintaining search engine optimization (SEO) for product content is a challenge in itself. eCommerce websites must optimize their content to rank higher in search engine results and attract organic traffic.
This involves keyword research, metadata optimization, and regular content updates. product retailers should invest in SEO tools and strategies to boost their website’s visibility and drive more traffic and sales.
Content management for eCommerce websites presents several challenges for product retailers. However, by implementing a centralized content management system, leveraging automation tools, ensuring accurate product information, and prioritizing SEO, these challenges can be effectively addressed.
By overcoming these hurdles, you can drive revenue and create a seamless shopping experience for your customers.
This is the end of part 1. To continue reading this article series, click on the pagination section below.
A practical guide to content management for small businesses.
Introduction to Content Management
In today’s digital age, effective content management has become a cornerstone for small business success.
This practical guide provides an introduction to content management for small businesses and offers a blueprint on how to effectively organize, manage, and optimize your digital content.
It also provides a comprehensive overview on content management systems (CMS), content strategy development, and best practices for content creation, curation, and distribution.
This series of articles is also designed to address common challenges faced by small businesses in the digital sphere, including limited resources, content visibility, and audience engagement. It will help you gain a practical understanding of how to develop a personalized content management plan that aligns with your business objectives, to enhance your online presence and drive growth.
Whether you’re looking to launch a new business, elevate an existing one, or searching for tools and insights to make content work smarter, not harder, for your business, we recommend using this series as a roadmap to your digital empowerment.
NOTE: For accompanying online tutorials that expand on the topics covered in this guide, click on the links in the content.
Why Do You Need This Guide?
The importance of having quality content cannot be overstated. Businesses, both big and small, are constantly competing for the attention of their target audience.
To stand out from the crowd, therefore, it is crucial for your business to have an effective content management strategy in place.
This practical guide dives into the concept of content management, exploring its significance and providing practical insights for small businesses looking to develop their own content management blueprint.
What is Content Management?
Content management can be defined as the process of organizing, creating, managing, and distributing valuable content to reach and engage a specific audience. It encompasses various activities, such as content creation, editing, storage, and publishing.
A well-executed content management strategy helps your business establish brand identity, attract potential customers, and retain existing ones.
For a small business, having a content management blueprint is vital for several reasons. Firstly, it allows you to have a clear understanding of your target audience and their needs.
By creating content that resonates with your audience, your businesses can build trust and credibility, ultimately driving customer loyalty and increasing sales.
Secondly, a content management blueprint helps your businesses maintain consistency across different channels.
Whether it’s a blog post, social media update, or email newsletter, delivering a consistent message and tone helps reinforce your brand image and fosters a sense of familiarity among customers.
Furthermore, effective content management enables your business to stay relevant and up-to-date in your industry.
By regularly sharing valuable and informative content, your business can position itself as a thought leader, attracting industry experts and influencers to collaborate and promote your brand.
Developing a content management blueprint for your small business starts with defining your goals and objectives. This includes identifying your target audience, specifying the types of content to be created, and determining the desired outcome.
Once your goals are clear, your business can start developing a content calendar, outlining the topics, formats, and distribution channels to be utilized.
To ensure the success of your content management blueprint, it is essential to regularly analyze and measure the effectiveness of the content.
Your business can monitor metrics such as website traffic, social media engagement, and conversion rates to evaluate the impact of their content and make necessary adjustments.
In conclusion, content management is a critical component of any successful small business marketing strategy.
By developing a content management blueprint, your business can effectively engage itstarget audience, build brand awareness, and drive business growth.
Importance of Content Management for Small Businesses
No doubt, you’ve heard that “content is king.”
Content is everywhere. All websites need content, and all content needs management.
Whether you are a small business owner or an entrepreneur looking to establish your brand online, content management is essential for your success.
Let’s explore, then, the significance of content management and highlight the benefits it can offer your business.
Content Management Blueprint: A Practical Approach
Businesses often struggle with limited resources. However, by implementing a content management blueprint tailored to your needs, you can effectively manage your online presence.
A content management blueprint provides your business with a practical approach to creating, organizing, and distributing your content consistently across various platforms.
Enhancing Brand Awareness and Visibility
One of the primary reasons your business should prioritize content management is to enhance your brand awareness and visibility.
By consistently producing high-quality and relevant content, you will engage your target audience, build credibility, and establish your brand as an industry expert.
This increased visibility can lead to more website traffic, improved search engine rankings, and ultimately, more conversions.
Driving Customer Engagement and Loyalty
Effective content management allows your business to engage customers in meaningful ways.
By creating valuable content such as blog posts, articles, videos, and social media updates, you will establish a connection with your audience.
Engaging content not only keeps your customers informed and entertained but also fosters loyalty, as they perceive your business as a reliable source of information.
Content management and SEO go hand in hand. By optimizing your content with relevant keywords, meta tags, and descriptions, you can improve your search engine rankings.
When potential customers search for products or services related to your business, having a solid content management strategy in place will make your website more visible, increasing the likelihood of attracting organic traffic.
Streamlining Workflow and Collaboration
Efficient content management systems streamline workflow and collaboration within small businesses.
By centralizing content creation, editing, and scheduling processes, you can eliminate duplicate efforts, reduce errors, and ensure consistent messaging across all channels.
Additionally, content management tools often offer collaboration features, allowing team members to work together seamlessly, even remotely.
In conclusion, content management plays a crucial role in the success of small businesses.
By implementing a content management blueprint tailored to your specific needs, you can enhance brand awareness, drive customer engagement and loyalty, improve SEO rankings, and streamline workflow and collaboration.
Investing time and resources in content management will undoubtedly yield long-term benefits, and help your small business thrive in the digital landscape.
This is the end of part 1. To continue reading this article series, click on the pagination section below.
This lesson looks at leveraging AI tools like custom chatbots for superior customer support and more effective documentation management.
Managing Customer Support Documentation Using AI Tools
Automate your customer support and manage your support documentation more effectively using AI tools like custom chatbots.
In today’s competitive business landscape, providing exceptional customer support is no longer an option, it’s a necessity.
Customers have become more discerning and demanding, expecting prompt and personalized assistance at their convenience.
A positive customer support experience will not only lead to greater customer satisfaction but also contribute to customer loyalty, brand reputation, and ultimately, the growth of your business.
On the other hand, poor customer support can result in customer churn, negative word-of-mouth, and potential revenue loss.
Providing exceptional customer support, however, requires effective customer support documentation management.
In this lesson, we look at the importance of managing customer support documentation, the challenges faced by traditional customer support methods, and the benefits of leveraging custom chatbots for superior customer support and more effective documentation management.
***
Importance Of Managing Customer Support Documentation
Managing customer support documentation effectively in your business is crucial to ensure smooth, reliable, and efficient customer service operations.
The primary goal of your customer support documentation is to provide customers and support teams with accurate, relevant, and up-to-date information that can help to resolve product or service-related issues quickly.
This documentation requires effective management to maintain a high level of customer satisfaction, streamline support operations, and minimize overall support costs.
Customer Support Documentation Types
Customer support documentation types that your business may need to manage effectively in order to provide exceptional customer support include:
1. Knowledge Base Articles: These include support articles, how-to guides, FAQs, and troubleshooting tips for product issues. These resources are essential for assisting customers in finding quick solutions to their problems, without needing to contact your support team directly.
2. Support Ticket Notes: Customer inquiry records and support ticket notes help support agents track the progress of issue resolutions, maintain consistency in the service provided, and ensure smooth hand-offs between agents.
3. Standard Operating Procedures (SOPs): SOPs outline specific processes and best practices for your support team to follow when addressing customer inquiries. They help maintain quality assurance and consistency in service.
4. Training Manuals: Training resources are essential for onboarding new members to your support team and keeping current team members updated on product developments, support tools, and best practices.
5. Internal Wikis and Forums: These platforms facilitate knowledge-sharing among support team members and foster a collaborative learning environment.
Managing this documentation effectively, however, is not the only challenge your business will face in the area of providing customer support.
Challenges Of Providing Customer Support
Traditional customer support methods often struggle to meet the evolving needs and expectations of customers.
Some of the more common challenges include:
1. Limited availability: Traditional support channels, such as phone calls or emails, may have limited operating hours, leaving customers frustrated when they need assistance outside those hours.
2. High response time: Due to manual handling and dependency on human agents, response times can be lengthy, causing customer dissatisfaction and impatience.
3. Inconsistency in support quality: Human agents may vary in their level of knowledge, experience, and ability to provide accurate and consistent information, leading to inconsistent customer experiences.
4. Scalability limitations: As your business grows and your customers’ demands increase, traditional support methods can struggle to scale efficiently, resulting in long wait times and overwhelmed support teams.
Thankfully, the explosion of new Artificial Intelligence tools like custom chatbots can greatly assist your business to improve its customer support.
Leveraging Custom Chatbots for Enhanced Customer Support
More businesses today are turning to custom chatbots as a transformative solution to address their customer support challenges.
What Are Custom Chatbots?
Chatbots are computer programs designed to simulate human conversations and provide automated assistance to users.
Custom chatbots are specifically tailored to the unique needs of a business, ensuring a personalized and seamless support experience.
Many custom chatbots are also conversational. A conversational chatbot is a computer program that simulates and engages in conversations with users in order to answer their questions or perform certain tasks.
Custom chatbots can be found everywhere today.
No doubt, you’ve seen these little chatbot icons on the websites you visit…
You have probably come across them when visiting retail websites…
Chatbots are now used on retail sites… source: Adairs
Even Government agencies use chatbots. Source: MyGov.au
Chatbots, in fact, are now being used across all kinds of businesses and in types of industries.
Automating Customer Support Using Custom Chatbots
Custom chatbots help to automate your customer support in many different ways:
Centralized Knowledge Base And Self-Service Options
Custom chatbots can significantly streamline your documentation management by leveraging a centralized knowledge base and self-service options.
Your knowledge base serves as a repository of information, containing FAQs, product manuals, troubleshooting guides, and other relevant documentation. By integrating a custom chatbot with your knowledge base, your customers can access information and find answers to their questions directly through the chatbot interface.
When customers engage with your chatbot, it can intelligently search the knowledge base and provide accurate and up-to-date information in real time. This reduces the reliance on human agents and empowers your customers to resolve their queries independently, at their own convenience.
Self-service options offered by custom chatbots not only enhance customer satisfaction but also alleviate the burden on support teams, allowing them to focus on more complex or specialized customer issues.
Seamless Integration With Existing Systems And Processes
One of the key advantages of using custom chatbots is their ability to seamlessly integrate with your existing systems and processes.
Documentation management often involves multiple systems and platforms, such as content management systems, ticketing systems, and customer relationship management (CRM) tools. Custom chatbots can be integrated with these systems, ensuring a unified and cohesive customer support ecosystem.
Integration enables the chatbot to retrieve relevant information from different sources and present it to customers seamlessly.
For instance, if a customer raises a specific issue, the chatbot can access relevant documentation from the knowledge base, pull customer data from the CRM, and even create support tickets in the ticketing system, all within the chatbot interface. This integration streamlines the documentation management process, eliminates the need for manual data entry, and provides a consistent and efficient support experience.
Intelligent Search And Retrieval Capabilities
Custom chatbots leverage intelligent search and retrieval capabilities to enhance your documentation management. These capabilities enable chatbots to understand customer queries and retrieve the most relevant information from your knowledge base or other sources. Through natural language processing and machine learning algorithms, chatbots can analyze customer input, identify keywords, and provide accurate responses.
Intelligent search and retrieval empower customers to ask questions in their own words, rather than navigating through complex menus or search functions. Chatbots can interpret and understand the intent behind customer queries, even if they are phrased differently or contain typos or grammatical errors. By quickly delivering precise information, chatbots reduce the time and effort required for customers to find the documentation they need, resulting in improved customer satisfaction and a more efficient support process.
Automation Of Documentation Updates And Maintenance
Keeping your documentation up to date can be a tedious and time-consuming task. Custom chatbots offer automation capabilities that streamline the process of updating and maintaining documentation. When updates or changes occur in products, services, or policies, the chatbot can be programmed to automatically reflect those changes in your knowledge base.
Through integration with content management systems, chatbots can retrieve the latest versions of your documentation and ensure that customers receive accurate and current information. This automation eliminates the need for manual updates and reduces the risk of outdated or inconsistent documentation. By maintaining a reliable and updated knowledge base, your business can deliver accurate support information to customers, reducing confusion and enhancing the overall customer experience.
Custom Chatbots: Key Benefits
Custom chatbots have emerged as a powerful tool for transforming customer support, providing benefits like:
1. Improved Accuracy and Consistency: AI-driven tools can automatically update documentation based on changes made to product offerings or support policies, ensuring consistency and accuracy across all resources.
2. Time and Cost Efficiency: By automating processes such as content creation, organization, and indexing, AI tools can significantly reduce the time and costs associated with manual documentation management.
3. Personalization: AI can analyze customer data and past interactions to tailor documentation to specific customer needs, helping to provide a more personalized and effective customer experience.
4. Enhanced Discoverability: AI-driven search engines and chatbots can better understand customer queries and help them quickly find the information they need in the support documentation.
5. Real-time Analysis and Updates: With AI, your business can monitor customer interactions and feedback in real-time, allowing you to quickly identify documentation gaps, outdated information, or areas in need of improvement.
6. Scalability: By automating documentation processes, your business can easily scale its support operations according to demand fluctuations without sacrificing quality or consistency.
Custom Chatbots vs Traditional Customer Support
Custom chatbots also offer several advantages over using traditional methods:
1. Improved response time and availability
Chatbots can provide instant and round-the-clock support, eliminating the need for customers to wait on hold for human agents or an email response. With 24/7 availability, chatbots can respond promptly to customer queries regardless of time zones or holidays, ensuring a faster and more efficient support experience.
2. Personalized and interactive customer interactions
Through natural language processing and machine learning algorithms, custom chatbots can understand and respond to customer inquiries in a conversational manner.
By analyzing the context and intent behind customer messages, chatbots can deliver tailored responses and recommendations, access customer data, purchase history, and preferences to offer personalized product suggestions or troubleshoot specific issues, guide customers through complex processes, step-by-step, and provide the necessary support and information to not only resolve customer queries efficiently but also leave them feeling valued and heard, thus enhancing the overall customer experience.
3. Scalability and cost-efficiency
Unlike human agents, chatbots can handle multiple customer interactions simultaneously without compromising on quality. Unlike human agents, chatbots do not experience fatigue, allowing them to maintain consistent performance even during peak times. This scalability enables your business to handle increasing customer volumes without the need to hire and train additional support staff.
Additionally, chatbots can help reduce operational costs by automating repetitive and routine tasks, allowing human agents to focus on more complex issues.
4. Enhanced customer satisfaction and loyalty
The ultimate goal of any customer support strategy is to enhance customer satisfaction and foster long-term loyalty. By providing instant and accurate responses, custom chatbots contribute to improved customer satisfaction.
Consistency in support quality is another advantage of chatbots. Unlike human agents who may have varying levels of expertise or encounter bad days, chatbots consistently provide accurate and reliable information.
Furthermore, chatbots contribute to improved customer loyalty by offering personalized experiences. By leveraging customer data and historical interactions, chatbots can make tailored recommendations, offer relevant promotions, or remember previous conversations. These personalized interactions create a sense of being understood and valued, deepen the customer’s emotional connection with your brand, and lead to increased customer loyalty and advocacy.
Custom Chatbots – Examples Of Use
Below are just some of the practical ways and real-world scenarios that highlight the tangible benefits of implementing custom chatbots to improve business results:
Increase Customer Satisfaction Through Intelligent Chatbot Support
If you are an eCommerce retailer, you can implement a custom chatbot-powered live chat solution designed with advanced natural language processing capabilities and a deep understanding of your company’s products and services to enhance your customer support and drive customer satisfaction.
By leveraging the chatbot’s intelligence, your customers will be able to interact with your live chat tool in a conversational manner, asking questions and seeking assistance. Your chatbot will provide real-time responses, address common inquiries such as product information, order status, and return policies, and offer personalized recommendations based on customer preferences and previous purchase history.
Implementing a live chat tool powered by a chatbot with AI capabilities can also result in a significant improvement in response time and availability.
Your customers no longer have to wait in long queues or navigate through complex IVR systems. Instead, they can receive instant assistance and have their issues resolved efficiently, leading to a boost in customer satisfaction levels, positive feedback, and an increase in customer retention.
Live chat tools powered by AI can help to increase customer satisfaction. Source: Adairs
Moreover, the chatbot’s ability to handle multiple interactions simultaneously would prove invaluable during peak shopping seasons. The scalability of the chatbot can ensure that customer inquiries are promptly addressed, reducing wait times and enhancing the overall customer experience.
Additionally, by seamlessly integrating the chatbot with your company’s existing systems, including the order management and CRM platforms, you can provide a unified support experience across all areas of the business.
Optimize Documentation Management With Chatbot-Powered Solutions
Suppose you are a software development firm. Your business most likely has a vast knowledge base of technical documentation, including APIs, user manuals, and troubleshooting guides.
You can implement a chatbot-powered solution to streamline your documentation management processes and address challenges in ensuring easy access and accuracy of the information being presented to your customers.
Custom chatbots help you manage your documentation more efficiently when assisting users. Source: WPTrainingManual.com
By integrating a chatbot with intelligent search and retrieval capabilities into your existing content management system, your customers can engage with the chatbot and ask technical questions or seek guidance. The chatbot will understand their queries and quickly retrieve relevant information from your knowledge base, presenting it to your customers in a user-friendly manner.
This implementation can result in significant improvements in the efficiency of your documentation management. Customers can find the information they needed independently with ease, reducing the need to contact support or browse through lengthy manuals, leading to faster issue resolution and reduced dependency on support teams.
The chatbot’s intelligent search capabilities would allow your customers to ask questions naturally, without having to navigate through complex menus or keyword-based searches, and ensure they receive reliable and up-to-date information, further enhancing the quality of the support you provide.
This automation can also play a crucial role in maintaining your documentation up-to-date. Whenever there are updates or changes in software features or APIs, the chatbot can automatically update the knowledge base, ensuring that customers receive accurate and current information. This will reduce the manual effort required for documentation updates and minimize the risk of outdated or conflicting information.
Finding the Right Chatbot Type For Your Business
Depending on the application and functionality you have in mind, you may need to research the right type of chatbot for your business.
Here are some of the different types of chatbots you can choose from and their key features and characteristics:
Menu/Button-Based Chatbots
Basic chatbots with decision tree hierarchies are presented as buttons.
Suitable for answering FAQs but not ideal for complex scenarios.
May be slower in delivering the desired value to users.
Linguistic Based (Rule-Based) Chatbots
Create conversational automation flows using if/then logic.
Requires defining language conditions and permutations for each question.
Offers quick assistance when conditions match, but development can be time-consuming.
Keyword Recognition-Based Chatbots
Listens to user input and responds based on customizable keywords and NLP.
Performs well when questions are not too similar but struggle with redundancies.
Hybrid models combine keyword recognition and menu/button-based features for better results.
Machine Learning Chatbots
Utilizes ML and AI to remember conversations and learn from users over time.
Contextually aware and can improve based on user interactions.
Provides an enhanced user experience and streamlines processes through conversation context.
Hybrid Model
Offers the simplicity of rule-based chatbots combined with the complexity of AI bots.
Ideal for businesses seeking sophistication without extensive data or AI capabilities.
Voice Bots
Voice-based chatbots gaining popularity for their convenience and frictionless experience.
Users can interact through speech instead of typing.
Choosing The Right Chatbot
Consider the value your users seek and if a conversational context is crucial.
Evaluate user preferences and UX expectations.
Test extensively before implementing to ensure the best fit for your users.
The ideal chatbot aligns with your value proposition, whether it requires AI capabilities or simple menu buttons.
Customer Support Documentation – FAQs
Here are frequently asked questions about customer support documentation:
What is customer support documentation?
Customer support documentation includes all the written guides, FAQs, and help articles that provide assistance to customers about a product or service. It is designed to enable customers to solve problems independently or understand products better.
Why is it important to maintain up-to-date customer support documentation?
Keeping documentation current ensures that customers receive the most accurate and relevant information. This reduces confusion, prevents outdated practices, and improves customer satisfaction by helping them resolve issues more quickly.
What should be included in effective customer support documentation?
Effective documentation should include troubleshooting guides, how-to articles, FAQ sections, user manuals, and policy information. It should be clear, concise, and easy to navigate.
How often should customer support documentation be updated?
Documentation should be reviewed and updated regularly, ideally aligned with product updates or when new customer issues frequently arise. This could be quarterly, semi-annually, or annually based on the company’s product lifecycle.
What tools can be used to manage customer support documentation?
Tools such as content management systems (CMS), documentation platforms like Zendesk, Confluence, or proprietary software tailored to customer support needs are effective for creating, maintaining, and distributing support content.
How can customer feedback be incorporated into improving documentation?
Customer feedback can be gathered via surveys, direct feedback on documentation pages (like “Was this page helpful?” prompts), and customer support interactions. Analyzing this feedback helps identify gaps in content and areas needing clarification or expansion.
What role does search engine optimization (SEO) play in customer support documentation?
SEO helps ensure that the support documentation is easy to find both through external search engines and internal search features. Incorporating relevant keywords and structuring content for readability and accessibility can drastically improve the visibility of support documents.
Who should be involved in creating and maintaining support documentation?
A dedicated team including technical writers, product specialists, customer support representatives, and SEO experts should collaborate to create comprehensive, accurate, and user-friendly documentation.
What are AI chatbots and how do they support customer documentation?
AI chatbots are software applications equipped with artificial intelligence to understand and respond to user queries automatically. They can support customer documentation by providing real-time assistance and dynamically accessing relevant FAQs and knowledge bases to answer queries.
What benefits do AI chatbots offer in managing customer support documentation?
AI chatbots improve customer service by offering instant responses, reducing wait times, and providing 24/7 support. They also help in personalizing customer interactions and can scale to handle large volumes of queries without additional costs.
How do AI chatbots utilize existing documentation to answer customer questions?
Chatbots use natural language processing (NLP) to understand and process user questions, then match these queries to the most relevant information in the existing documentation, such as FAQs and user manuals, to provide appropriate responses.
What are the challenges in integrating AI chatbots with customer support documentation?
Challenges include ensuring the chatbot understands various user intents, maintaining the accuracy of responses, integrating with existing databases, and continual learning to update its knowledge base with new information.
How can AI chatbots be optimized to improve documentation searchability?
Implementing AI-driven FAQ software can enhance the searchability of documentation by improving how chatbots understand and process natural language queries, thereby boosting user confidence and satisfaction through more accurate search results.
What future trends are expected in using AI chatbots for customer support documentation?
Future trends include the development of more sophisticated AI capabilities such as deeper natural language understanding and predictive analytics, which will enable chatbots to anticipate user needs and provide more proactive support.
Summary
Managing customer support documentation is crucial for maintaining customer satisfaction, reducing costs, and delivering reliable support.
Custom chatbots, powered by AI, offer significant advantages in this area. They enhance documentation management by providing centralized knowledge bases, self-service options, and seamless integration with existing systems. Chatbots improve response time and availability, offer personalized interactions, and foster customer loyalty. They also ensure scalability and cost-efficiency, allowing businesses to handle increasing customer volumes without compromising quality or incurring high expenses.
In addition to documentation management, chatbots bring benefits to customer support operations. They alleviate the burden on support teams by automating routine tasks and handling simpler inquiries, freeing up human resources to focus on complex issues. Chatbots contribute to operational efficiency and cost savings while meeting customers’ expectations for efficient and personalized support experiences.
As chatbot technology evolves, advancements in natural language processing, context awareness, emotional intelligence, and integration with emerging technologies like machine learning and voice recognition will enable more human-like interactions and personalized support.
By leveraging data analytics, chatbots can gain insights into customer preferences and behaviors, allowing businesses to offer proactive support and further personalize interactions.
To thrive in the digital era, embracing chatbot technology is essential. Custom chatbots empower businesses to revolutionize their support operations, streamline documentation processes, and deliver exceptional customer experiences.
As chatbot capabilities continue to evolve, businesses will have even more powerful tools at their disposal to engage with customers and meet their evolving expectations.
Chatbots are no longer just an option; they have become a necessity for businesses seeking to excel in the digital landscape.
Chatbots are a powerful tool for managing customer support documentation.
Chatbots
Chatbots are not only revolutionizing customer conversations, but they are also a powerful tool for managing customer support documentation.
Are your customers spending a huge amount of time searching through your documentation for answers? Do you wish you could automate your customer support and free up valuable time for your team?
If so, then it may be time to consider adding an intelligent chatbot to your site!
In this lesson, we present various solutions to integrate AI-powered chatbots with your documentation to engage your customers in natural and meaningful conversations and provide instant support and personalized experiences.
***
What Is A Chatbot?
A chatbot is an innovative conversational tool that harnesses the power of artificial intelligence (AI) and human language to provide instant responses to customer queries. By employing cutting-edge technology such as natural language processing (NLP), chatbots simulate human-like conversations, revolutionizing the way businesses interact with their customers.
Through the use of AI, chatbots can understand and interpret the nuances of human language, comprehending the intent and context behind customer inquiries. This allows them to generate intelligent and contextually relevant responses, making interactions with customers feel more personalized and human.
By leveraging NLP, chatbots go beyond simple keyword recognition, enabling them to understand the meaning behind customers’ messages. They can process and analyze input in real-time, extracting crucial information and accurately addressing customer needs.
Whereas customers seeking support traditionally engaged with businesses through static FAQs or waiting for customer support agents to be available, chatbots provide instant assistance, 24/7, ensuring they receive prompt responses to their inquiries.
Whether it’s answering frequently asked questions, providing product recommendations, or guiding users through complex processes, chatbots are designed to deliver efficient and effective support.
Moreover, chatbots can handle multiple conversations simultaneously, scaling effortlessly to accommodate high volumes of inquiries. This enables businesses to provide consistent and uninterrupted support, even during peak periods, enhancing customer satisfaction and loyalty.
The versatility of chatbots extends across various communication channels, including websites, messaging platforms, and mobile apps. They seamlessly integrate with these platforms, meeting customers where they are and facilitating convenient interactions.
As technology continues to advance, chatbots are becoming increasingly sophisticated, capable of learning and improving over time. Through machine learning algorithms, chatbots can analyze user interactions, gather insights, and adapt their responses accordingly, constantly enhancing their performance and accuracy.
To learn more about the benefits of leveraging custom chatbots for superior customer support and more effective documentation management, see this lesson: Managing Customer Support Documentation Using AI
AI-Powered Chatbot Solutions
The services below can help your business harness the capabilities of Natural Language Processing (NLP) and AI, and integrate AI-powered chatbots to streamline customer support document management and elevate customer experience.
DocsBot
DocsBot – add an AI chatbot to your site trained with your content and documentation.
DocsBot is powered by ChatGPT and provides an innovative and inexpensive solution for streamlining your customer support process and managing the way users search through documentation on your website.
Use DocsBot’s Q&A feature to help users find information faster on your site. Source: WPTrainingManual.com
Key features of this tool include:
Instant Answers with Custom Chatbots
DocsBot enables you to build custom chatbots that are specifically trained with your content and documentation. This means that your bots have in-depth knowledge about your product, tutorials, whitepapers, technical specifications, and more.
When customers have detailed questions, DocsBot’s ChatGPT-powered bots can provide instant answers, including code examples and formatted output.
Additionally, DocsBot provides links to the source documentation used in its reply that users can click on to explore your content in more depth.
This is great for helping users find product documentation, tutorials, etc.
DocsBot replies include links to the source documentation.
Effortless Deployment and Customization
With DocsBot, deploying custom chatbots is a breeze. You can train and deploy bots within minutes, saving you valuable time and resources.
The Q/A bot feature allows you to make your documentation interactive, providing detailed and direct answers to queries about your product.
DocsBot provides instant answers and links to sourced content.
You can even embed DocsBot into your website effortlessly using fully customizable widgets. Just add a script tag or WordPress plugin, and you’re ready to go.
Adding the chat widget to your site lets you provide user support on every page they visit.
Custom Copywriting Made Easy
In addition to customer support, DocsBot offers an extra feature that can enhance your content creation process. If you need help writing marketing copy or blog posts, DocsBot utilizes a customized ChatGPT, specifically trained on your product, to assist in generating high-quality content.
Efficient Support Ticket Management
Writing the same responses to support tickets repeatedly can be a monotonous task. DocsBot eliminates this challenge by allowing you to train your bot on your support history and documentation. As a result, DocsBot can automatically reply to new support tickets, saving you both time and money.
Empower Your Employees with Internal Knowledge Bots
Searching for information within your organization’s knowledge base can often be a time-consuming process for employees. With DocsBot, you can address this issue effortlessly. DocsBot indexes your internal knowledge base and documentation, enabling your employees to find answers instantly. This functionality boosts productivity and saves valuable time, allowing your team members to focus on more critical tasks.
Seamless Integration with Powerful API
DocsBot offers a powerful API that enables you to integrate AI chat into your own products seamlessly. Whether it’s your website, app, or WordPress plugin, DocsBot can provide answers to your users. The API integration opens up endless possibilities for leveraging DocsBot’s capabilities and enhancing user experiences across various platforms.
User-Friendly Interface and Content Indexing
Managing your documentation and content is made simple with DocsBot’s intuitive interface. With just a few clicks, you can index your documentation, blog posts, or any other content source.
The URL and sitemap importers allow you to index webpages or entire websites effortlessly. You can also upload document files in various formats such as TXT, DOC, PPT, EML, HTML, PDF, or bulk upload via ZIP. DocsBot takes care of the content indexing process, transforming it into a ChatGPT-powered bot for you or your users.
Effortless Content Updates and Integration
Keeping your content up to date is vital, and DocsBot makes it effortless. Schedule regular updates to ensure your content stays fresh and accurate. Whether it’s updating webpages, support docs, or blog posts, DocsBot’s seamless integration with URL and sitemap importers simplifies the process.
DocsBot offers source refreshing options to keep your bot updated with your latest documentation.
You can also train your DocsBot on your blog content using WordPress export files or RSS feeds, making it easier to surface your best content to those seeking answers.
Extensive Content Source Options
DocsBot offers an impressive range of options for content sources. You can add any type of content you want your bot to be able to answer questions about. Whether it’s a URL, document files, WordPress, sitemaps, URL lists, CSV files, or even YouTube transcripts, DocsBot ensures you have the flexibility to customize your bot’s knowledge base to fit your specific needs.
DocsBot is a game-changing solution for managing your customer support documentation effectively. With its ChatGPT-powered bots, intuitive interface, and seamless integration options, DocsBot empowers you to automate your customer support, enhance content creation, streamline support ticket management, and boost employee productivity.
DocsBot offers a free version that you can sign up to test the tool with no credit card required and various paid options to suit your business needs.
Intercom provides no-code Custom Bots for your business.
Intercom provides bots that can be completely customized without the need for coding and designed and launched within minutes.
Intercom’s Custom Bots can assist users with questions related to different areas of your business.
The bots can be adapted to your business needs, seamlessly integrating with your tech stack, automating workflows, and extending your sales and support teams.
Intercom’s Custom Bots efficiently gather upfront customer information, prioritize and route new conversations, and streamline your support process, allowing your business to experience faster customer resolutions and generate leads 24/7.
Engati – low-code, enterprise-grade AI chatbot and live chat platform.
Engati provides a comprehensive Chatbot and Live Chat Platform, with a wide range of intelligent solutions to enhance customer interactions.
Engati offers chatbots with multi-lingual capabilities.
Engati focuses on solutions that deliver seamless omnichannel engagement, and consistent customer experiences across various channels such as web, mobile, Facebook, and WhatsApp.
It provides an array of powerful features and capabilities, including:
Whatsapp Chatbot
Shopify Chatbot
AI Chatbot
Instagram Chatbot
Live Chat
The platform seamlessly connects with your existing systems and tools, supports multi-lingual conversations, and offers flexible chatbot training options to provide tailored and accurate responses.
Industries that can benefit from Engati’s chatbots include e-commerce & retail, logistics, travel & hospitality, insurance & banking, government, edtech, and real estate.
Drift’s custom chatbots provide specific messages and interactions for your users.
Drift offers custom chatbots that help to engage with your website visitors using specific messages and interactions for each visitor and every page. The chatbot will even pre-qualify visitors and schedule a meeting with your sales team.
Drift’s custom chatbots help you engage with users.
Key features include:
A/B Testing capability lets you test different bot messages to improve conversions.
Custom-train your AI model with GPT in minutes
50+ native integrations and a Zapier connection to over 500+ apps.
While Zapier is primarily an automation platform that lets you connect apps and automate workflows without coding skills required, it offers a feature called Zapier Interfaces that lets you create your own custom AI chatbot.
Zapier lets you create your own custom chatbot without coding.
Hopefully, the various solutions presented above will help you integrate AI-powered chatbots with your documentation.
Chatbots – FAQs
Here are frequently asked questions about chatbots:
What is a chatbot?
A chatbot is an automated software powered by rules or artificial intelligence to simulate human conversation through text or voice interactions.
How do chatbots work?
Chatbots process user inputs through natural language processing (NLP) and respond based on a set of predefined rules or by leveraging machine learning to understand the context and intent of the conversation.
What are the benefits of using chatbots?
Chatbots improve customer engagement, provide instant responses to inquiries, reduce operational costs, and can operate 24/7. They help in managing large volumes of requests with ease.
What are the types of chatbots?
There are primarily two types: rule-based chatbots that follow predefined pathways to solve problems, and AI chatbots that use machine learning and NLP to handle complex queries with more human-like responses.
What are FAQ chatbots?
FAQ chatbots are designed to automatically answer frequently asked questions. They can provide quick, consistent answers and are commonly used in customer support to enhance user experience.
Can chatbots replace human customer service agents?
While chatbots can handle routine tasks and provide quick answers, complex issues and emotional nuances are better handled by human agents. The best use case is a hybrid approach where chatbots and humans work together.
How do I implement a chatbot on my website?
To implement a chatbot, define its purpose, select the right platform or tools, design the conversation flow, train the bot with FAQs and possible interactions, and integrate it with your website backend for seamless performance.
What are the best practices for designing a chatbot?
Key practices include keeping conversations natural, designing a clear and intuitive user interface, ensuring the bot understands and responds accurately to user requests, and continuously training the bot with new data.
How can I measure the effectiveness of a chatbot?
Effectiveness can be measured by tracking metrics like user satisfaction scores, resolution rate, engagement level, and conversion rate. Regularly updating the bot’s knowledge base and refining algorithms are crucial for maintaining effectiveness.
Learn how artificial intelligence and machine learning are being used to improve content management processes.
The Future Of Content Management: AI And Machine Learning
Artificial intelligence and machine learning are being used to improve content management processes, including automated content creation, personalization, and analysis.
Traditional content management practices are time-consuming and resource-intensive.
In recent years, advancements in artificial intelligence (AI) and machine learning have begun to revolutionize the way we manage content.
In this article, we explore some of the ways AI and machine learning are being used to improve content management processes, including automated content creation, personalization, and analysis.
Overview Of Current Content Management Practices
Content management is the process of organizing, storing, and managing digital content. It is a critical aspect of modern business operations, as it allows companies to effectively communicate with their audience, build brand awareness, and drive revenue.
Traditionally, content management practices have involved manual processes such as creating, editing, and publishing content. This typically involves using a team of content creators, editors, and marketers working together to produce and distribute content.
The process can be time-consuming and resource-intensive, and it can be difficult to ensure that all content is consistent and of high quality.
In recent years, however, there has been a shift towards digital content management systems that automate many of these processes. These systems typically include tools for creating, editing, and publishing content, as well as analytics and reporting tools that can help businesses understand how their content is performing.
Many companies are also now using web-based content management systems (CMS) that allow multiple users to access, edit, and publish content from any location, as well as track and measure the performance of the content. Additionally, many CMSs have built-in SEO tools that help improve the visibility and ranking of the content on search engines.
In addition, with the rise of social media and mobile devices, businesses have been increasingly focused on creating and distributing content that is optimized for different platforms and devices. This has led to the development of multi-channel content management systems that can help businesses create and distribute content across multiple channels, such as web, mobile, email, social media, and AI-powered chatbots.
Overall, current content management practices have become more digital and automated, with a focus on creating and distributing content across multiple channels and measuring its performance.
Let’s have a look at some of these digital and automated content management practices.
Automated Content Creation
Automated content creation is the process of using artificial intelligence and machine learning algorithms to generate written or spoken content without the need for human intervention.
Some of the pros and cons of automated content creation include:
Pros
Efficiency: Automated content creation can significantly reduce the time and resources required for manual content creation, allowing businesses to produce more content in less time.
Consistency: Automated content creation can help ensure that all content is written in the same style and tone, which can be beneficial for maintaining a consistent brand voice.
Scalability: Automated content creation can easily scale to meet the needs of large-scale content production, making it cost-effective for businesses of all sizes.
Cons
Quality: Automated content may not be as high quality as content created by humans, as it can lack creativity, imagination, and the ability to pick up on nuances in language.
Lack of personalization: Automated content can be less engaging and less effective at building relationships with customers because it lacks the human touch.
Limited use cases: Automated content creation is currently limited to certain types of content, such as financial reports, news summaries, and weather forecasts, and may not be suitable for more complex and creative content.
While automated content creation has the potential to be a cost-effective and efficient way to produce a large amount of content, it can lack the personalization and creativity of human-written content. You should be aware of these limitations and evaluate whether automated content generation methods are suitable for specific use cases.
For more information on tools that can help to automate content creation, see this lesson: Content Production Tools
About Natural Language Generation (NLG)
One of the key ways in which AI and machine learning are being used to improve content management with automated content creation is through the use of natural language generation (NLG) technology.
NLG uses machine learning algorithms to analyze large sets of data and generate written or spoken content that is both accurate and easy to understand. This technology can be used to automatically generate reports, summaries, and other written content, reducing the time and resources required for manual content creation.
NLG is being used in a variety of industries to automatically generate written content based on data, making it more efficient and effective to stay informed and make decisions.
Here are a few examples of NLG in action:
News Summaries: A news agency can use NLG to automatically generate summaries of important news stories based on data from news articles and other sources. This can make it easier for readers to stay informed and quickly understand the key points of a story.
Financial Reports: Financial companies can use NLG to automatically generate financial reports, such as earnings reports and financial statements. This can help to reduce the time and resources required for manual report generation, and also make it easier for investors and analysts to understand complex financial data.
Weather Forecasts: Weather forecasting companies can use NLG to automatically generate written weather forecasts based on data from weather sensors and other sources. This can make it easier for people to stay informed about weather conditions in their area.
Sports Summaries: Sports teams or news agencies can use NLG to automatically generate summaries of sports games based on data from the game, such as statistics and scores. This can make it easier for fans to stay informed about the performance of their favorite team.
Business Reports: Businesses can use NLG to automatically generate reports on sales, customer behavior, and market trends, based on data from their systems. This can help to reduce the time and resources required for manual report generation and make it easier for managers to understand the performance of their business.
Another way in which AI and machine learning are being used to improve content management is through personalization.
Machine-generated personalized content recommendations are a feature of many modern content management systems that use machine learning algorithms to analyze a user’s browsing history, search queries, and other data to make personalized content recommendations.
Let’s look at some of the pros and cons of using machine-generated personalized content recommendations:
Pros
Increased engagement: Personalized content recommendations can increase engagement by providing users with content that is more relevant and interesting to them.
Improved user experience: Personalized content recommendations can improve the user experience by making it easier for users to find the content they are looking for.
Increased conversions: Personalized content recommendations can increase conversions by providing users with content that is more likely to lead to a desired action, such as making a purchase or signing up for a service.
Cons
Privacy concerns: Personalized content recommendations can raise privacy concerns, as they involve collecting and analyzing user data.
Lack of personal touch: Machine-generated content recommendations may lack the personal touch of human-generated recommendations, which can lead to less engagement and lower conversions.
Limited data availability: Personalized content recommendations are only as good as the data that is available to the algorithm. If the data is incomplete or inaccurate, the recommendations may not be accurate or useful.
Examples
Netflix uses machine learning algorithms to recommend content to its users based on their viewing history and preferences.
Amazon uses machine learning algorithms to recommend products to its users based on their browsing history and purchase history.
YouTube uses machine learning algorithms to recommend videos to its users based on their viewing history and search history.
Machine-generated personalized content recommendations have the potential to improve engagement, user experience, and conversions, but they also raise privacy concerns and may lack the personal touch of human-generated recommendations.
You should weigh the pros and cons when deciding whether to use machine-generated personalized content recommendations and ensure that you have the data and algorithms in place to make accurate recommendations.
About Machine Learning Algorithms
Machine learning algorithms are sets of mathematical equations and statistical models that enable computer systems to learn from data, without being explicitly programmed. They are designed to identify patterns and relationships in data and make predictions or decisions based on that information.
There are several types of machine learning algorithms, including supervised learning, unsupervised learning, and reinforcement learning:
Supervised learning: In supervised learning, an algorithm is trained on a labeled dataset, where the outcome or target variable is already known. This type of algorithm is used for tasks such as classification and regression.
Unsupervised learning: In unsupervised learning, the algorithm is not given any labeled data, and instead it has to find patterns or structure in the data on its own. This type of algorithm is used for tasks such as clustering and dimensionality reduction.
Reinforcement learning: Reinforcement learning is a type of machine learning algorithm that focuses on learning how to make a series of decisions. It uses feedback in the form of rewards or punishments to learn how to achieve a specific goal.
Your business can use a variety of affordable machine-learning technologies and algorithms to improve your content management processes, depending on your specific needs, budget, and expertise in the field.
Some examples include:
Cloud-based machine-learning platforms allow your business to build, train, and deploy machine-learning models without having to invest in expensive hardware. Examples include Amazon SageMaker and Google’s Vertex AI (see further below).
Open-source machine-learning libraries can be used to develop custom machine-learning models for specific business needs. Examples include TensorFlow and Scikit-learn (see further below).
Pre-trained language models have been trained on a large amount of text data to learn the statistical patterns and structures of language. These models are typically based on deep learning architectures, such as recurrent neural networks (RNNs) or transformers, and can be fine-tuned for specific tasks with a relatively small amount of labeled data, making it easier for your business to get started with machine learning. Examples include GPT-4.
Content Analysis
AI and machine learning algorithms are also being used to analyze and understand audience engagement with content, process and analyze data on audience behavior such as website traffic, click-through rates, and social media engagement, and help to identify patterns and trends that can inform your content strategy, optimize content, and improve its performance.
For example, an e-commerce website can use machine learning algorithms to analyze data on customer behavior and preferences to recommend products that are more likely to be of interest to them.
Similarly, a retail store can use social media monitoring to track mentions of its brand on social media platforms and understand how its audience is responding to its products and services.
Additionally, content-based sites can use machine learning algorithms to analyze data on how their audience is engaging with their content and make adjustments to optimize the content and improve engagement.
Here are some examples of how you can use AI to analyze and understand audience engagement and identify patterns and trends that can inform your content strategy:
Social Media Monitoring: Use social media monitoring tools to track mentions of your brand and products on social media platforms. These tools can use natural language processing and machine learning algorithms to analyze the data and provide insights on the sentiment, demographics, and interests of your audience.
Social Media Analytics: Use AI-powered social media analytics tools to process and analyze data on audience engagement on social media platforms. These tools can provide insights into how audiences are interacting with content, such as likes, shares, and comments.
Content Personalization: Use AI-powered content personalization tools to analyze data on audience engagement to understand what content is most engaging to different segments of your audience. These tools can be used to personalize content based on factors such as demographics, behavior, and interests, which can improve engagement.
Content Optimization: Machine learning algorithms analyze data on how your audience is engaging with your content, such as click-through rates and time spent on a page, allowing you to optimize the content and improve engagement. Additionally, you can use AI-powered SEO content optimization tools to analyze and improve the visibility and ranking of your content on search engines.
Sentiment Analysis: Sentiment analysis is a technique that uses natural language processing (NLP) algorithms to analyze text data, such as social media posts and customer reviews, to understand the sentiment or emotion behind the words and how the audience is responding to content. For example, sentiment analysis can be used to classify text data as positive, negative, or neutral. Using AI-powered sentiment analysis tools to process and analyze data on audience engagement helps you understand how audiences are feeling about your content and allow you to make adjustments accordingly.
Predictive Analytics: Predictive analytics is a technique that uses machine learning algorithms to analyze data and make predictions about future events. AI-powered predictive analytics tools help to analyze data on audience engagement and make predictions about how an audience will engage with your content in the future.
Potential Future Developments In AI And Machine Learning That Can Revolutionize Content Management
There are several potential developments in AI and machine learning that can revolutionize content management for businesses in the future.
Here are a few examples:
Deep Learning: Deep learning is a subset of machine learning that uses neural networks with many layers to analyze data. Deep learning can be used to analyze large amounts of data on how audiences are engaging with content and make more accurate predictions on how to improve engagement. For example, a news agency could use deep learning tools to analyze large amounts of data from various sources and automatically generate personalized news summaries for each individual reader.
Generative Adversarial Networks (GANs): GANs are neural networks and a class of machine learning algorithms that can be used to generate new content automatically, such as articles, images or videos, stories, and poetry, based on a set of existing data and without the need for human intervention. Advancements in GANs can open up new opportunities for businesses to create unique and personalized content, such as creating personalized videos for customers or creating unique images for social media campaigns.
Natural Language Processing (NLP): With the advancements in NLP techniques such as deep learning, businesses will be able to create more human-like text, making automated content creation more realistic and sophisticated. This can open up new opportunities for businesses to create more complex and creative content, such as fiction writing or poetry.
Natural Language Understanding (NLU): NLU is a technology that uses machine learning algorithms to analyze text data and understand the meaning behind words. NLU can be used to analyze text data from social media platforms and customer reviews to understand how audiences are responding to content and make adjustments accordingly. For example, a retail store using NLU and GANs could automatically generate product descriptions that are both accurate and engaging.
Reinforcement Learning (RL): RL is a type of machine learning that uses trial-and-error methods to improve performance. RL can be used to optimize content based on feedback from the audience, such as click-through rates and time spent on a page. For example, a company using RL could optimize the layout of its website based on user feedback.
Edge AI: A technology that allows AI to run on devices with limited computing power, such as smartphones and IoT devices. Edge AI can be used to provide personalized content recommendations in real-time, even when a user is offline. For example, a digital marketing agency using edge AI could make real-time adjustments to their clients’ content based on how audiences are engaging with it on mobile devices.
Improved Personalization: With the advancements in machine learning, businesses will be able to analyze an increasingly large amount of data on their audience and make more accurate and personalized recommendations. This can lead to more effective and engaging content, as well as increased conversions.
Virtual and Augmented Reality: Businesses will be able to create more immersive and interactive content. For example, a real estate company could use virtual reality to create virtual tours of properties, while a retail store could use augmented reality to create virtual try-on experiences for customers.
Explainable AI (XAI): As AI becomes more sophisticated and integrated into businesses, it will be important for businesses to understand how and why AI is making decisions. Advancements in Explainable AI (XAI) will enable you to understand and interpret the decisions made by AI models, allowing you to make better decisions based on the results and insights generated by AI.
These are just a few examples of how AI and machine learning can revolutionize content management for businesses in the future. Keep an eye on these developments and be prepared to adapt and integrate them into your content management strategies as these become more advanced and accessible.
Machine Learning Tools, Technologies, And Algorithms
Below is a list of various popular machine-learning tools that can help your business leverage the power of AI:
Amazon SageMaker
Amazon SageMaker allows businesses to easily build, train, and deploy machine learning models in the cloud.
Amazon SageMaker is a powerful, efficient, and fully managed machine learning (ML) platform provided by Amazon Web Services (AWS). It allows businesses to easily build, train, and deploy machine learning models in the cloud.
SageMaker is built on Amazon’s extensive experience in developing real-world ML applications over two decades. It is used for diverse purposes such as product recommendations, personalization, intelligent shopping, robotics, and voice-assisted devices.
For business analysts, SageMaker offers a no-code interface called SageMaker Canvas, enabling them to make ML predictions through a visual interface. Data scientists can leverage SageMaker Studio, an integrated development environment (IDE) that facilitates data preparation, model building, training, and deployment. MLOps engineers can utilize SageMaker MLOps to efficiently deploy and manage models at scale.
SageMaker supports a wide range of ML frameworks, toolkits, and programming languages such as Jupyter, TensorFlow, PyTorch, MXNet, Hugging Face, Scikit-learn, Python, R, and Amazon Bedrock. It also provides the ability to customize foundation models in Amazon Bedrock, utilizing tools like SageMaker Experiments to test different models and SageMaker Pipelines to automate and manage end-to-end ML workflows on a large scale.
SageMaker’s optimized infrastructure significantly reduces training time from hours to minutes, leading to a tenfold increase in team productivity. It automates and standardizes MLOps practices and governance, ensuring transparency and auditability across your organization.
Trusted by tens of thousands of customers across various industries, Amazon SageMaker has proven to be a reliable and versatile ML platform that empowers organizations to unlock the full potential of machine learning.
Some of its main features include:
A wide range of pre-built algorithms and models that can be used for tasks such as image classification, natural language processing, and anomaly detection.
Built-in support for distributed training and hyperparameter tuning, which allows businesses to train models faster and more efficiently.
Integration with other AWS services such as S3 and Lambda, making it easy to build end-to-end machine learning workflows.
Benefits of using Amazon SageMaker include:
Ability to quickly and easily get started with machine learning without having to invest in expensive hardware or hire specialized staff.
The ability to scale models up and down as needed, making it cost-effective for businesses of all sizes.
Access to a wide range of pre-built machine learning models, making it easy to find the right model for a specific use case.
Vertex AI lets you streamline your ML workflow, enhance collaboration, and achieve efficient model training, deployment, and monitoring for improved ML performance.
Vertex AIis a comprehensive machine learning (ML) platform designed for training and deploying ML models and AI applications. With Vertex AI, teams can collaborate seamlessly using a unified toolset that combines data engineering, data science, and ML engineering workflows.
Vertex AI offers flexible options for model training. AutoML allows businesses to train models with tabular, image, text, or video data without the need for coding or data preparation. Custom training provides complete control over the training process, including the ability to use your preferred ML framework, write custom training code, and fine-tune hyperparameters.
Once your models are deployed, Vertex AI’s end-to-end MLOps tools enable automation and scalability throughout the ML lifecycle. These tools run on customizable, fully-managed infrastructure, allowing you to optimize performance and budget based on your specific needs.
You can utilize the Vertex AI SDK for Python to execute the entire ML workflow within Vertex AI Workbench, a Jupyter notebook-based development environment. Other interfaces available include the Google Cloud Console, gcloud command line tool, client libraries, and limited support for Terraform.
Vertex AI covers the entire ML workflow, starting with data preparation, where you can perform exploratory data analysis, apply transformations, and split data into training, validation, and test sets. The platform integrates with Cloud Storage, BigQuery, and Dataproc Serverless Spark for efficient data access, processing, and analysis, even for large datasets.
For model training, you have options like AutoML for code-free training and support for custom training with your preferred ML framework. Vertex AI provides tools for hyperparameter tuning, model comparison, and model registration in the Model Registry for versioning and production deployment.
The platform facilitates model evaluation and iteration by offering evaluation metrics, model comparison, and integration with Vertex AI Pipelines. It enables smooth model serving, including real-time online predictions with customizable containers, asynchronous batch predictions, optimized TensorFlow runtime, and integration with BigQuery ML.
Vertex AI includes features for model monitoring, allowing you to monitor performance, detect training-serving skew, and prediction drift. It also offers Vertex Explainable AI for understanding feature attribution and identifying mislabeled data.
With Google’s Vertex AI, you can streamline your ML workflow, enhance collaboration, and achieve efficient model training, deployment, and monitoring for improved ML performance.
TensorFlow is an open-source machine-learning library that allows businesses to develop custom machine-learning models for specific business needs.
TensorFlow is a free and open-source software library for machine learning and artificial intelligence developed by Google that can be used across a range of tasks.
With TensorFlow, you can easily create machine learning models for various platforms, including desktop, mobile, web, and cloud. It has a particular focus on training and inference of deep neural networks and is suitable for beginners and experts alike.
TensorFlow offers resources and tutorials to enhance machine-learning skills, accelerate machine-learning tasks, and solve real-world problems. From processing and loading data to building, training, and deploying models, TensorFlow provides solutions for every stage of the ML workflow.
Scikit-learn is an open-source machine-learning library for Python that allows you to develop custom machine-learning models for specific business needs.
Scikit-learn, also known as sklearn, is an open-source machine-learning library specifically designed for the Python programming language.
It offers a wide range of algorithms for tasks such as classification, regression, and clustering. Some notable algorithms include support-vector machines, random forests, gradient boosting, k-means, and DBSCAN.
Scikit-learn seamlessly integrates with other popular Python libraries like NumPy and SciPy, leveraging their numerical and scientific capabilities. This allows users to efficiently process and analyze data while utilizing the powerful machine learning algorithms provided by scikit-learn.
Notably, scikit-learn is a fiscally sponsored project of NumFOCUS, an organization dedicated to supporting open-source scientific software. This sponsorship highlights the importance and community-driven nature of the library, contributing to its ongoing development and maintenance.
Some of its main features include:
Support for a wide range of machine learning tasks, including classification, regression, and clustering.
A simple and consistent interface, making it easy to learn and use.
A large and active community, which provides a wide range of resources and support for businesses getting started with scikit-learn.
Benefits of using scikit-learn include:
It’s open-source and free to use, making it affordable for businesses of all sizes.
The library is built on other well-established libraries such as NumPy and SciPy, which provide additional functionality and support.
A simple and consistent interface, making it easy to learn and use.
GPT-4 (Generative Pre-trained Transformer 4): GPT-4 is a state-of-the-art machine learning model developed by OpenAI that can generate human-like text. It can be used to generate a wide variety of content, including articles, stories, and poetry.
Automated Insights is a company that uses natural language generation (NLG) technology to automatically generate written content for a wide range of applications, including financial reports, sports summaries, and weather forecasts.
It includes a feature called Einstein Engagement, which uses machine learning algorithms to analyze data on how users are engaging with content, such as email open rates and click-through rates.
This allows your business to optimize its content and improve audience engagement.
Sprinklr is a customer experience management platform that uses AI to analyze data from social media, email, and other channels to understand audience engagement.
With its natural language processing capabilities, it can understand the sentiment behind customer interactions and provide insights to optimize customer engagement.
Additionally, many social media tools integrate AI and machine learning technologies into their services, allowing you to automate insights about how your audience engages with your content and optimize your content’s performance.
Summary
AI and machine learning play an increasingly important role in the way we manage digital content by automating, optimizing, and streamlining various content management processes such as content creation, personalization, analysis, and SEO optimization.
This allows businesses to better understand and engage with their audience.
As AI and machine learning continue to evolve, we can expect to see even more advanced and sophisticated content management systems in the future.
You told me to write high-quality content, you sold me on traffic and top 10 search ranking…
Hey Bing, Google, And OpenAI…Thanks A Minion!
You told me to write high-quality content
You sold me on traffic and top 10 search ranking
So I worked wholeheartedly writing words with wild abandonment
Imagining all the riches that I’d soon be banking
You said write for people, not bots
Make it free, don’t paywall it
Hold nothing back, write lots
And our spiders will crawl it
You told me to create unique and original content
Let me tell you, I did, and it’s real bloody hard
The hours, days, weeks, months, and years I’ve spent
To eventually do what…get myself Google barred?
You warned that content scraped, duplicated, or plagiarized
Would get my sites de-indexed and my pages penalized
So I followed your guidelines, I optimized for SEO
And complied with algorithms so strange that seemingly change every few days or so
Then ChatGPT ushered in the New Age of AI
Where you can freely scrape content to present as your own
So I’m prompted to ask cause I’m up for the task:
Are you just going to EEATs me up and spit in my eye
And tell me I shouldn’t mumble and grumble and groan?
You promised us traffic and dangled SERP carrots
But visitors don’t even need to visit no more
Cause now they can all chat with stochastic parrots
But…thank you for links in the footnotes that they’ll just ignore.
What’s the score? When will I get more?
Search engine giants, am I now your whore?
Will I just keep putting out content for you till I’m all spent and sore?
Hey Bing, what’s my edgy thing in this whiz-bang transaction?
Hey Google, where’s my consensual contextual satisfaction?
Hey OpenAI, how do I get a slice of the pie of your hot bot interaction?
I know the time has come… AI has changed the game forever
I know things for some will be hard and for others seriously funny
I’m not moralizing it or ethicalizing it – that’s not my endeavor
I’m just sayin’ that if you’re capitalizing it, then where’s my share of the money?
We’ve all been told that Content is King
And all I hold is my humble opinion
If I’m expected to write to feed Google and Bing
Give me the right to a share of their dominion.
After all, it’s our work that you’re gonna go use it
As the source and the power to drive your AIs
So strive to empower, don’t think to abuse it
And of course, please don’t lose it and be evil guys
You need content creators, it’s simple and plain
You need advertisers for financial gain
We all need to live, so help us maintain
A model that works that we all can sustain
So, Google and Bing, how we gonna sort this thing?
How you gonna be compensating
For the content you’ll be scraping
From everyone who’s given you everything?
In closing, I have one last thing to say
Then I’ll get back to work and be on my way…
I accept that AI is the new paradigm
Except that, oh my, content writing takes time
So, dear Google and Bing, let’s just split the Ka-ching
Make it fair, pay our share, and we’ll all then get by
Let’s aim to preserve some data dignity
When skin in the game and prorata apply
Let’s not pull ranks or make this unruly
Let’s not quibble or squabble over IP or AI
So, many thanks Bing, Google, and OpenAI,
Yours truly, and eagerly awaiting payment in reply.
***
Image credit: Thank you to all artists, That helped train the AI, That helped me create, That poor little guy. Source: Dall-E
Content governance helps to create and publish high-quality content consistently and deliver a better ROI.
Content Governance
Learn how content governance can help you create and publish high-quality content consistently and deliver you a better return on investment.
Content governance is the process of establishing rules and guidelines for creating, editing, and publishing content.
This ensures that all content is consistent, accurate, and aligned with your organization’s overall messaging and goals.
In this lesson, we look at the importance of content governance and the role it plays in helping to maintain consistency and quality in all of your content.
***
What Is Content Governance?
Content governance is the process of establishing rules and guidelines for creating, editing, and publishing content in your organization. It is a framework for managing the overall strategy, production, distribution, and archiving of your content.
The goal of content governance is to ensure that all of your content is consistent, accurate, and aligned with your organization’s overall messaging and goals while addressing legal and compliance requirements, performance measurement, and retention policies.
Examples of content governance include:
Defining roles and responsibilities for content creation and editing helps to ensure that your content is created and edited by the appropriate individuals or teams and that the content review and approval process is followed and actioned by all the necessary parties. (See Content Team)
Setting guidelines for messaging, tone, and style of content ensures that your content is consistent in terms of language, tone, and style, which helps to maintain a strong and consistent brand message. (See Content Style Guide)
Setting guidelines for the use of images and videos ensures that all visual content is consistent in terms of style and quality, which helps to maintain a strong and consistent brand message.
Creating a process for reviewing and approving content ensures that your content is accurate and meets your organization’s standards before it is published. (See Content Workflow)
Implementing a content management system allows your organization to organize and streamline its content creation and publishing process, make it easier for multiple users to access and edit content, manage, track, and measure the effectiveness of the content, and control access and permissions for content creation and editing. (See CMS)
Establishing a content calendar and production workflow helps to ensure that your content is created and published on schedule and that it goes through the necessary review and approval steps before being published. (See Content Calendar)
Archiving and retention policies ensure that your content is kept safe and can be recovered in case of any loss. (See Content Documentation)
Legal and compliance requirements ensure that your content is compliant with legal and regulatory requirements.
Measuring performance and monitoring ensures that your organization is able to evaluate the performance of its content to identify what’s working and what’s not and make adjustments to the content and governance process accordingly. (See Content Tracking)
Regularly reviewing and updating guidelines helps to ensure that the guidelines remain relevant and effective and that they are followed consistently.
Having a legal compliance review process in place helps to ensure that your content is compliant with legal requirements such as copyright laws and advertising regulations.
Implementing a governance board or committee helps to ensure that the content governance process is followed consistently and that any issues or concerns are addressed in a timely manner.
Benefits Of Content Governance
The key benefits of having established rules and guidelines for creating and publishing content through content governance include the following:
Consistency: Establishing guidelines for tone, style, and messaging ensures that all content is consistent and helps build trust and credibility with the audience. Example: All press releases are to be written in a formal and professional tone, using the Chicago Manual of Style.
Efficiency: Guidelines streamline the content creation and approval process, reducing errors, and making the process more efficient. Example: Create a content review process with specific steps, roles, and time frames defined for each step, and make sure that the content is reviewed and approved in a timely manner.
Brand alignment: Guidelines help to ensure that all content aligns with the brand’s messaging and values. Example: All social media posts are to reflect the brand’s mission and values.
Legal compliance: Guidelines help to ensure that all content is compliant with legal requirements such as copyright laws and advertising regulations. Example: all images and videos used in content must be properly licensed and attributed.
Better ROI: Guidelines can help to ensure that all content is effective in achieving its goals and generating a positive return on investment (ROI). Example: Establish a clear set of guidelines and metrics to measure the success of our content marketing campaign so we can optimize the content to generate a better ROI.
Content Governance Types
Content governance models vary based on the organization’s structure, goals, and content strategy.
Here are the main types:
Centralized Content Governance: In this model, a central authority or team oversees all content-related decisions and processes. It ensures consistency and quality but may limit agility.
Decentralized Content Governance: Content ownership and decision-making are distributed across various departments or teams. This model allows for flexibility and responsiveness but can lead to inconsistencies.
Hybrid Content Governance: Combining aspects of both centralized and decentralized models, this approach balances control and flexibility. Certain standards and guidelines are set centrally, while individual departments or teams have autonomy within those parameters.
Ad Hoc Content Governance: Content governance processes are informal and lack a structured framework. This model is common in smaller organizations or during early stages of content development. It may result in inconsistencies and inefficiencies.
Collaborative Content Governance: Content decisions involve input from multiple stakeholders across the organization. Collaboration tools and processes facilitate communication and alignment, ensuring content meets diverse needs.
Each model has its advantages and challenges, and organizations often tailor their content governance approach to suit their specific requirements and culture.
Why Rules And Guidelines For Creating, Editing, And Publishing Content Are Important
Rules and guidelines for creating, editing, and publishing content are important because they ensure consistency and accuracy in all content and help to maintain a strong and consistent brand message, which is essential for building trust and credibility with audiences.
Additionally, they help to ensure that all content is of high quality, which is important for engaging and retaining audiences.
Here are some examples of rules and guidelines you can implement for creating, editing, and publishing content:
Tone And Style Guidelines
Specify the tone and style of different types of content, such as formal and professional for business proposals, and conversational and friendly for social media posts.
Example: All press releases should be written in a formal and professional tone and style.
Grammar And Formatting Guidelines
Define the rules of grammar, punctuation, capitalization, and formatting for your content.
Example: Use the Chicago Manual of Style as the primary guide for grammar, punctuation, capitalization, and formatting.
Branding And Messaging Guidelines
Specify how content should align with your brand’s messaging and values.
Example: All social media posts should reflect the company’s mission and values.
Legal Compliance Guidelines
Ensure that all content is compliant with legal requirements such as copyright laws and advertising regulations.
Example: All images and videos used in content must be properly licensed and attributed.
Content Creation Guidelines
Define who is responsible for creating different types of content, such as blog posts, social media posts, and marketing materials.
Example: The content creator is responsible for writing blog posts and social media posts.
Content Editing Guidelines
Define who is responsible for editing different types of content, such as proofreading, fact-checking, and legal review.
Example: The editor is responsible for proofreading and fact-checking all written content.
Content Approval Guidelines
Describe the approval process, including who is responsible for reviewing and approving content before it is published.
Example: All written content must be reviewed and approved by the editor before being submitted to the approver.
Content Archiving Guidelines
Specify guidelines for archiving or removing content that is no longer relevant or useful.
Example: All content that is more than 2 years old should be archived.
Metrics And Analytics Guidelines
Set guidelines for measuring and analyzing the performance of content, and using the data to make adjustments to the content and governance process accordingly.
Example: Use Google Analytics to track the performance of the website and adjust the content accordingly.
Review and Update Guidelines
Specify how your organization will ensure the guidelines themselves remain relevant and effective.
Example: Review guidelines every 6 months and update them as needed.
Additional Guidelines
Include additional guidelines in your documentation.
For example:
Forum / User-Generated Guidelines
Here are some widely acceptable guidelines you may want to include in your documentation for posting user-generated content on forums, membership sites, etc. :
Respectful Communication: Encourage members to communicate respectfully, avoiding personal attacks, harassment, or offensive language.
Supportive Environment: Foster a supportive and inclusive community where members feel safe and comfortable sharing their thoughts and experiences.
Content Relevance: Post content relevant to the forum’s purpose and categories to maintain a focused discussion.
No Spamming: Avoid excessive self-promotion, spam, or unrelated content. Prohibit the posting of repetitive, irrelevant, or promotional content to maintain the quality of discussions.
Membership Tiers: Align content with the appropriate membership tiers to maintain exclusivity and fairness.
Contribution Quality: Encourage high-quality contributions, such as long-form blog posts, videos, interviews, webinars, and relevant resource lists.
Sophistication: Acknowledge the sophistication of the community and adhere to higher standards of discussion.
Content Protection: Implement role-based content protection to ensure access aligns with membership privileges.
Copyright Compliance: Emphasize the importance of respecting copyright laws and not posting copyrighted material without proper authorization.
Constructive Criticism: Encourage constructive feedback and discussions while discouraging negative or unhelpful comments.
User Privacy: Respect members’ privacy by refraining from sharing personal information without consent and adhering to data protection regulations.
Updates and Amendments: Reserve the right to update or amend forum guidelines as necessary, with clear communication to all members.
Moderation Policies: Outline the consequences of violating forum guidelines, including warnings, temporary suspensions, or permanent bans, to ensure accountability.
Report Functionality: Encourage members to report inappropriate content or behavior to moderators for prompt action.
The Role of Content Governance
Content governance plays an important role in areas like:
Maintaining consistency in your brand messaging
Ensuring the quality of your content
Managing access and permissions for creating and editing content
Tracking and measuring the effectiveness of your content
Let’s take a look at each of these areas.
Maintaining Consistency In Brand Messaging
Content governance plays an essential role in maintaining consistency in your brand messaging by ensuring that all content is consistent in terms of language, tone, and style, and by providing guidelines for visual elements and a process for reviewing and approving content.
This helps to maintain a strong and consistent brand message, which is crucial for building trust and credibility with your audience.
Examples of how content governance helps to maintain consistency in your brand messaging include:
Defining a specific tone and style for all content ensures that all content is consistent in terms of language, tone, and style.
Setting guidelines for the use of images and videos ensures that all visual content is consistent in terms of style and quality.
Creating a brand style guide sets guidelines for the use of colors, typography, and other visual elements that are used across all content.
Implementing a content management system allows your organization to manage, track, and measure the effectiveness of your content, and to control access and permissions for content creation and editing.
Having a centralized team responsible for creating, editing, and publishing content ensures that all content is consistent and aligned with your organization’s overall messaging and goals.
Having a content review and approval process helps to ensure that all content is accurate and meets your organization’s standards before it is published, which is important for maintaining the credibility of your organization and the consistency of your brand message.
Ensuring Quality Of Content
Content governance plays a crucial role in ensuring the quality of your content by establishing rules and guidelines for creating, editing, and publishing content. These rules and guidelines help to ensure that all content you publish will be accurate, relevant, and of high quality.
Examples of how content governance helps to ensure the quality of your content include:
Creating a process for reviewing and approving content ensures that all content is accurate and meets your organization’s standards before it is published.
Establishing guidelines for research and fact-checking ensures that all content is based on accurate and credible sources, which helps to ensure the quality of your content.
Setting standards for the use of grammar, punctuation, and spelling ensures that all content you create will be free of errors, which helps to ensure the quality of your content.
Implementing a content management system allows your organization to manage, track, and measure the effectiveness of your content, and to control access and permissions for content creation and editing. This ensures that the content is of high quality and meets your standards.
Having a centralized team responsible for creating, editing, and publishing content ensures that all content is consistent and aligned with your organization’s overall messaging and goals and that the quality of your content is maintained.
Having a content review and approval process ensures that all content you produce is accurate, relevant, and of high quality before it is published, which is important for maintaining the credibility of your organization and the quality of your content.
Managing Access And Permissions For Content Creation And Editing
Content governance plays an important role in managing access and permissions for content creation and editing.
By establishing rules and guidelines for creating, editing, and publishing content, content governance ensures that only authorized individuals have access to create and edit content, and that content is reviewed and approved by the necessary parties.
Examples of how content governance helps to manage access and permissions for content creation and editing include:
Defining roles and responsibilities for content creation and editing ensures that all content is created by the appropriate individuals and is reviewed and approved by the necessary parties.
Creating a process for reviewing and approving content ensures that all content is accurate and meets your organization’s standards before it is published and that only authorized individuals have access to create and edit content.
Implementing a content management system allows your organization to manage, track, and measure the effectiveness of your content, and to control access and permissions for content creation and editing. This ensures that only authorized individuals have access to create and edit content.
Having a centralized team responsible for creating, editing, and publishing content ensures that all content is consistent and aligned with your organization’s overall messaging and goals and that only authorized individuals have access to create and edit this content.
Establishing an access control system ensures that only authorized individuals have access to create and edit content, and that content is reviewed and approved by the necessary parties.
Assigning different levels of permissions allows your organization to assign different levels of permissions to different users, such as content creators, editors, and reviewers, to ensure that only authorized individuals have access to create and edit content.
Tracking And Measuring The Effectiveness Of Content
Content governance plays a crucial role in tracking and measuring the effectiveness of your content by providing a framework for managing, analyzing, and reporting on the performance of your content.
This allows your organization to evaluate the performance of your content, make necessary changes, and improve the effectiveness of your content over time.
This also helps your organization to make data-driven decisions, which can lead to a more effective content marketing strategy and ultimately increase audience engagement.
Examples of how content governance helps in tracking and measuring the effectiveness of your content include:
Implementing a content management system allows your organization to manage, track, and measure the effectiveness of your content, including metrics such as views, shares, and engagement.
Establishing key performance indicators (KPIs) for content allows your organization to track and measure the effectiveness of your content by monitoring specific metrics that align with your goals and objectives.
Creating a process for analyzing and reporting on content performance allows your organization to evaluate the performance of your content and make necessary changes, such as adjusting the tone, style, or format of your content.
Having a centralized team responsible for creating, editing, and publishing content ensures that all content is consistent and aligned with your organization’s overall messaging and goals and that your team is able to track and measure the effectiveness of your content.
Using web analytics tools allows your organization to track and measure the effectiveness of your content by monitoring website traffic, bounce rates, and other metrics.
Conducting audience research allows your organization to understand your target audience, their preferences, and behaviors, and make necessary adjustments to your content to make it more effective.
Establishing Rules and Guidelines
Establishing content governance rules and guidelines cover areas like:
Defining roles and responsibilities for content creation and editing
Setting guidelines for tone and style of content
Creating a process for reviewing and approving content
Implementing a content management system
Let’s take a look at each of these areas.
Defining Roles And Responsibilities For Content Creation And Editing
By following the steps and suggestions below, your organization can define roles and responsibilities for content creation and editing effectively, which helps to ensure that all content is created by the appropriate individuals and is reviewed and approved by the necessary parties:
Step 1: Identify the key players involved in content creation and editing.
This includes individuals such as content creators, editors, marketers, designers, approvers, and legal or compliance teams.
Step 2: Assign specific roles and responsibilities to each member of the team.
Create guidelines for who is responsible for creating and editing different types of content.
For example:
Content Creator: Research, write, and produce high-quality and engaging content that aligns with the brand’s messaging and goals.
Editor: Review, proofread, fact-check, and edit content to ensure that it is accurate, grammatically correct, and consistent with the organization’s standards.
Marketer: Promote the content through various channels to reach the target audience and increase engagement.
Designer: Create visual elements for the content, such as images and infographics, to enhance the overall design and appeal of the content.
Compliance or Legal Team: Ensure that the content is compliant with legal and regulatory requirements and that the organization is protected from any legal liabilities.
Step 3: Create a process for reviewing and approving content.
This process should clearly outline the steps that need to be taken before content is published, including who is responsible for reviewing and approving the content.
Step 4: Establish a system for tracking and measuring the effectiveness of content.
This system should be used by the team to monitor the performance of your content and make necessary changes.
Step 5: Communicate the roles and responsibilities to the team.
Make sure that each member of your team understands their specific roles and responsibilities, and how they fit into the overall content creation and editing process.
Also, make sure that everyone involved in content creation and editing understands the approval process.
Some suggestions to make this process effective:
Make sure that the roles and responsibilities are clearly defined and communicated to your team members to avoid confusion and mistakes.
Assign roles and responsibilities based on the skills and expertise of each team member.
Review and update the roles and responsibilities regularly to ensure that they are aligned with your organization’s goals and objectives.
Encourage collaboration and teamwork among team members to ensure that your content is of high quality.
Here’s a template you can follow to define roles and responsibilities for content creation and editing in your organization (modify it to suit your own needs):
1. Assign roles:
Content creator: Writes and creates content
Editor: Review, edit, and proofread content for accuracy and style
Approver: Approves and publishes content
2. Establish clear guidelines:
The content creator is responsible for writing blog posts and social media posts
The editor is responsible for proofreading and fact-checking all written content
The approver is responsible for reviewing all content before it is published
3. Define the approval process:
All written content must be reviewed and approved by the editor before being submitted to the approver
The approver must review and approve all content before it is published
4. Communicate the process:
Send out an email to all team members outlining their roles and responsibilities in the content creation and editing process
Hold a team meeting to discuss the process and answer any questions
Review and communicate the process regularly to ensure that all team members are aware of changes.
Setting Guidelines For Tone And Style Of Content
Setting guidelines for the tone and style of content is an important aspect of content governance.
It ensures that all content is consistent in terms of language, tone, and style, which helps to maintain a strong and consistent brand message.
Here is a step-by-step guide on how to set guidelines for the tone and style of content:
Step 1: Define the tone and style of the brand.
This should align with your organization’s mission, values, and overall messaging.
Include guidelines for how the content should sound and feel.
For example, the content might be written in a friendly and conversational tone. Or, if your organization wants to present itself as professional, informative, and trustworthy, the tone of the content should be formal and informative, and the style should be clean and simple.
Also, clearly define the tone and style that should be used for different types of content. For example, a formal and professional tone for business proposals and a conversational and friendly tone for social media posts.
Step 2: Create a brand style guide.
This guide should include guidelines for language, tone, style, and visual elements such as typography, colors, imagery, and composition.
Provide examples of appropriate and inappropriate language: This can include a list of words or phrases that should be used or words or phrases that are considered offensive or insensitive and should be avoided in the content.
For example, the style guide could include examples of appropriate language and tone, such as the level of formality. Guidelines might specify that all content should use active voice and avoid jargon.
Step 3: Communicate the guidelines to the team.
Make sure that all members of your team understand and are familiar with the guidelines.
Create a checklist of items that need to be reviewed before content is published, such as grammar, tone, and style.
Share the style guide with the team, make it easily accessible, and provide training to the team members on how to use it effectively.
Step 4: Provide examples of content that align with the guidelines.
This will help team members to understand what is expected of them and make it easier for them to create content that aligns with the guidelines.
Step 5: Review and update the guidelines regularly.
As your organization and its audience evolve, the guidelines should be reviewed and updated to ensure that they align with your organization’s mission, values, and overall messaging.
Some suggestions to make this process effective:
Make sure that the guidelines are clear, concise, and easy to understand.
Keep in mind the target audience and the purpose of the content while creating the guidelines.
Encourage team members to ask questions and provide feedback on the guidelines.
Use the guidelines to train new team members and as a reference for existing team members.
Here’s a template you can follow to set guidelines for the tone and style of content (modify it to suit your own needs):
1. Define the tone and style:
Business proposals: Formal and professional
Social media posts: Conversational and friendly
Blog posts: Informative and engaging
2. Use a style guide:
Use The Chicago Manual of Style as the primary guide for grammar, punctuation, capitalization, and formatting
All headings must be in Title Case
Use serial comma
Use American English
3. Be specific:
Use active voice in all written content
Avoid using jargon
Use subheadings to break up long paragraphs
Use bullet points when listing items
4. Review and update regularly:
Review guidelines every 6 months
Update guidelines as needed based on feedback from team members and the audience.
Creating A Process For Reviewing And Approving Content
Creating a process for reviewing and approving content is an important aspect of content governance.
This ensures that all content is accurate and meets your organization’s standards before it is published, which is important for maintaining your credibility.
Here is a step-by-step guide on how to create a process for reviewing and approving content:
Step 1: Identify the key players involved in content review and approval.
This includes individuals such as content creators, editors, managers, legal or compliance teams, and other stakeholders.
Step 2: Assign specific roles and responsibilities to each member of the team.
For example, content creators may be responsible for researching and writing content, editors may be responsible for reviewing and editing content, managers may be responsible for approving the content, and legal or compliance teams will be responsible for making sure that the content is compliant with legal and regulatory requirements.
Step 3: Create a checklist of items to be reviewed before content is published.
This checklist should include items such as grammar, tone, style, accuracy, relevance, and compliance with legal and regulatory requirements.
Step 4: Establish a timeline for the review and approval process.
This timeline should include deadlines for when each stage of the process should be completed.
Step 5: Communicate the process to the team.
Make sure that all members of your team understand the process and their specific roles and responsibilities.
Step 6: Implement a system for tracking and measuring the effectiveness of the process.
This system should be used to monitor the performance of the process and make necessary changes.
Here are some additional suggestions to make this process effective:
Use a content management system (CMS) to manage and track the review and approval process. This allows for easy access and collaboration among team members, and the ability to track the progress of the review and approval process.
Establish a workflow: Use a workflow management tool or create a content calendar to help track the progress of each piece of content and ensure that it is reviewed and approved on time.
Encourage collaboration and feedback among team members during the review and approval process. This allows for multiple perspectives on the content and can lead to a more accurate and high-quality final product.
Have a final approval step by senior management or a legal team before publishing the content. This ensures that the content is legally and ethically compliant, and aligns with the overall goals and messaging of the organization.
Review and update the process regularly. As the organization and its audience evolve, the process should be reviewed and updated to ensure that it is still effective and aligned with the organization’s goals and objectives.
Provide training to the team members on how to use the process effectively, and make sure that all team members are aware of the process and their specific roles and responsibilities.
Use data and analytics to track the progress of the content review and approval process, and make necessary changes to improve the process over time.
Here’s a template you can follow to create a process for reviewing and approving content (modify it to suit your own needs):
1. Define the content review process:
Step 1: Content creation
Step 2: Initial review by the content creator
Step 3: Peer review by a team member
Step 4: Final review by the manager
Step 5: Approval and publication
2. Assign roles and responsibilities:
Content creator: Writes and creates content
Peer reviewer: Reviews content for accuracy, grammar, and style
Manager: Approves and publishes content
3. Establish a workflow:
Use Trello to track the progress of each piece of content and ensure that it is reviewed and approved on time
4. Set up guidelines:
All marketing materials need to be reviewed and approved before publication
All blog posts need to be reviewed and approved by a peer before publication
All press releases need to be reviewed and approved by the manager before publication
5. Communicate the process:
Send out an email to all team members outlining the content review process
Hold a team meeting to discuss the process and answer any questions.
Implementing A Content Management System
Implementing a content management system (CMS) can help organize and streamline your content creation and publishing process.
Here is a step-by-step guide on how to implement a CMS:
1. Identify your needs
Determine what features and functionality you need in a CMS. For example, do you need a CMS that allows for multiple users and different levels of access, or one that integrates with other tools such as marketing automation software?
Example: Your company needs a CMS that can handle a high volume of content, allows for multiple users and different levels of access and integrates with the company’s marketing automation software.
2. Research and compare options
Research different CMS options and compare their features, pricing, and scalability. Some popular open-source CMS options include WordPress, Drupal, and Joomla.
Choose a CMS
Select a CMS that best fits your needs and budget.
Install and set up the CMS
Follow the instructions provided by the CMS to install and set up the system on your webhosting account.
Customize the CMS
Customize the CMS to fit your specific needs. This may include adding plugins, creating templates, and configuring settings.
Create and organize content
Create and organize your content within the CMS. This may include creating categories and tags to organize content and creating a workflow for content creation and approval.
Train users
Train users on how to use the CMS, including how to create, edit, and publish content.
Test and launch
Test the CMS to ensure it is functioning properly. Once you are satisfied with the CMS, launch it to your audience.
For example, your company may decide to use WordPress as its CMS.
Here are frequently asked questions about content governance:
What is content governance?
Content governance involves the overarching management and structured control of content across an organization. This ensures that all content aligns with company standards and objectives.
Why is content governance important?
Content governance is critical for maintaining consistency, quality, and compliance in the content lifecycle. It ensures that every piece of content serves a specific purpose and meets established standards, ultimately enhancing effectiveness and accountability.
What are the main elements of a content governance model?
A content governance model typically includes structured processes, clear roles and responsibilities, and policies that guide content creation, management, and archiving. This model helps in achieving better control over content outcomes and efficiency.
How can I establish a content governance process?
Establishing a content governance process involves several steps:
Defining content roles and responsibilities.
Setting up detailed content creation and review workflows.
Implementing policies for content usage and maintenance.
Training team members on governance protocols.
What are the benefits of content governance?
Content governance helps in organizing content production and management processes, ensuring consistency across all channels, improving content quality, and aligning content with business goals. It also assists in compliance with legal and regulatory standards.
Are there different types of content governance models?
Yes, there are several types of content governance models which vary based on the scale of operations and organizational needs. These models include Centralized, Decentralized, Hybrid, Ad Hoc, and Collaborative and can be adjusted or combined to better fit specific organizational structures or goals.
How does content governance impact content creation?
Content governance sets a framework for content creation that includes planning, production, distribution, and maintenance phases. This framework helps in maintaining a consistent voice and style across all content and optimizes the use of resources.
What tools can assist in content governance?
Various tools can assist in content governance, including content management systems (CMS), digital asset management systems (DAM), and project management tools. These tools help in enforcing governance rules, tracking compliance, and facilitating communication among team members.
Summary
Here are the key takeaway points of this lesson:
Content governance is an essential aspect of creating and publishing high-quality content.
Establishing rules and guidelines for creating, editing, and publishing content ensures consistency and accuracy in all content.
By implementing content governance, your business can maintain a strong and consistent brand message, ensure the quality of its content, comply with legal requirements, measure the effectiveness of its content, and achieve a better return on investment.
Follow the above steps to implement content governance and ensure that your content is aligned with your overall messaging and goals.
Best practices for planning, creating, managing, and promoting your content.
Content Management Best Practices
Best practices for planning, creating, managing, and promoting your content.
Content management is the process of creating, editing, and publishing digital content to reach target audiences. It is an essential part of any digital marketing strategy.
With the right content management best practices, your business can improve its online presence, increase website traffic, and generate more leads.
This lesson covers best practices for managing and organizing your content, including tips and strategies for planning, creating, editing, publishing, and promoting your content.
From using a content calendar and creating a style guide to optimizing content for search engines, we will cover the best practices you need to know to improve your content management skills.
***
Content Planning And Organization
Planning and organization are important aspects of content management that can help you to create consistent, relevant, and efficient content that resonates with your target audience and is easily discoverable.
Without proper planning and organization, it can be difficult to effectively create, edit, and publish content that resonates with your target audience.
By implementing the best practices listed below, you can improve the effectiveness of your content marketing strategy and achieve your business objectives:
Consistency: Planning and organizing your content allows you to maintain a consistent tone, style, and message across all of your content. This helps to build trust and credibility with your audience and makes it easier for them to engage with your brand.
Efficiency: Planning and organizing your content in advance can help you to work more efficiently and avoid last-minute scrambling to come up with content ideas. By having a content calendar and style guide in place, you can easily identify gaps in your content and plan ahead to fill them.
Relevance: Planning and organizing your content allows you to ensure that it is relevant to your target audience. By understanding your audience’s needs, interests, and pain points, you can create content that resonates with them and addresses their specific concerns.
SEO: Planning and organizing your content allows you to optimize it for search engines, making it easier for your target audience to find your content when they are searching for relevant keywords.
Examples:
Content calendar: A content calendar is a tool that allows you to plan out your content in advance. You can use it to schedule blog posts, social media updates, email newsletters, and other types of content. By planning out your content in advance, you can ensure that it is consistent and relevant.
Content style guide: A style guide is a document that outlines the guidelines for creating content. It includes information on tone, voice, grammar, and formatting. By having a style guide in place, you can ensure that all of your content is consistent and easy to read.
Content Management System (CMS): A Content Management System (CMS) is a software application that allows you to easily manage your content, keep it organized and updated, and publish website content without the need for technical skills.
Suggestions:
Create a content calendar and stick to it.
Set up a content style guide and make sure everyone who creates content for your organization is familiar with it.
A business that sells beauty products can use a content calendar to plan out its social media updates for the month, with a focus on specific products or promotions each week. They can also create a style guide that outlines the tone and voice they want to use in their social media posts.
A B2B SaaS company can use a content calendar to plan out the topics of their blog posts for the quarter, focusing on the pain points of their target audience, and the solutions their software can provide. They can also create a style guide that outlines the technical terms and acronyms that should be used in the blog posts.
A restaurant can use tools like Grammarly to check grammar and spelling in their menu items and other marketing materials and use Google Analytics to track the performance of their website and adjust their strategy accordingly.
Creating high-quality content is an essential aspect of any successful online marketing strategy. With so much content being produced every day, it’s important to develop effective content production practices that will make your content stand out from the rest.
Here are some of the best practices for content production, including descriptions, examples, tips, and suggestions.
Start with a clear goal in mind
Before you begin creating your content, it’s important to establish a clear goal or objective for what you want to achieve with your content.
Do you want to educate your audience, promote your products or services, or build your brand’s reputation? By having a clear goal in mind, you can create content that is focused, targeted, and effective.
For example, if you are creating content to promote a new product, your goal may be to increase sales. In this case, you might create content that highlights the unique features and benefits of your product, provides customer testimonials, and includes a clear call to action to encourage readers to make a purchase.
Understand your audience
To create content that resonates with your target audience, it’s essential to understand who they are and what they’re looking for. Take the time to research your audience’s demographics, interests, pain points, and online behavior. This will help you tailor your content to their specific needs and interests.
For example, if you’re creating content for a fashion blog aimed at teenage girls, your audience is likely to be interested in topics such as fashion trends, makeup tips, and celebrity style. By understanding your audience’s interests and preferences, you can create content that is more likely to be shared and engaged with.
Develop a content calendar
Consistency is key when it comes to content production. By developing a content calendar, you can plan out your content in advance, ensuring that you always have a steady stream of content to publish on your website, blog, or social media channels.
Your content calendar should include details such as the topic, format, publication date, and distribution channels for each piece of content. This will help you stay organized, ensure that your content is published on schedule, and allow you to plan ahead for important events or promotions.
Focus on quality over quantity
While it’s important to publish content on a regular basis, it’s equally important to ensure that your content is of high quality. Poorly written or low-quality content is unlikely to be shared or engaged with, and can even damage your brand’s reputation.
To ensure that your content is of high quality, take the time to research your topic thoroughly, write clear and engaging copy, and include high-quality images or videos where appropriate. It’s also important to proofread your content carefully and ensure that it is free from errors or typos.
Use a variety of formats
To keep your content fresh and engaging, it’s important to use a variety of formats. This could include blog posts, videos, infographics, podcasts, or social media posts. By using a variety of formats, you can appeal to different learning styles and preferences, and keep your audience interested and engaged.
For example, you might create a series of blog posts on a specific topic, interspersed with short videos or infographics that summarize key points. This can help to break up your content and make it more engaging and accessible to your audience.
Promote your content
Creating great content is only half the battle. To ensure that your content reaches your target audience, it’s important to promote it effectively. This could include sharing your content on social media, reaching out to influencers or bloggers in your niche, or using paid advertising to reach a wider audience.
When promoting your content, it’s important to use a variety of channels and tactics, and to tailor your approach to your specific goals and target audience. For example, if you’re promoting a new product, you might use paid social media ads to target users who have shown an interest in similar products, or you might reach out to influencers in your industry to review your product and share their thoughts with their followers.
Measure and analyze your results
To ensure that your content production practices are effective, it’s important to measure and analyze your results. This can help you identify what’s working well, what’s not working, and where you can make improvements.
Tools such as Google Analytics can provide valuable insights into how your content is performing, including metrics such as pageviews, engagement, and conversion rates. By analyzing this data, you can adjust your content production practices to optimize your results and achieve your goals.
Stay up-to-date with industry trends
The world of content production is constantly evolving, with new formats, platforms, and trends emerging all the time. To stay ahead of the curve, it’s important to stay up-to-date with industry trends and best practices.
This could include attending conferences or webinars, following industry thought leaders on social media, or subscribing to industry newsletters or blogs. By staying informed and learning from others in your industry, you can ensure that your content production practices remain relevant and effective.
Publishing and promoting content is an essential part of content management.
By implementing the best practices below, your business can increase the reach and effectiveness of your content marketing efforts:
Repurpose and republish old content: Repurposing and republishing old content can help you to get more mileage out of your existing content. You can repurpose old content by updating it, turning it into a different format (such as a video or podcast), or republishing it on a different platform.
Use social media: Social media is a powerful tool for promoting content. By sharing your content on social media, you can increase its reach and drive more traffic to your website. Make sure to optimize your social media posts with relevant hashtags and include links to your content.
Leverage email marketing:Email marketing is a great way to promote your content and stay in touch with your audience. You can use email marketing to send out newsletters, updates, and other types of content that will interest your subscribers.
Optimize for search engines: Optimizing your content for search engines is an important step in making sure that your content is easily discoverable by your target audience. This can be done by using relevant keywords, optimizing your meta tags, and using internal and external links.
Use influencers and guest bloggers: Partnering with influencers or guest bloggers can help you to expand your reach and attract a new audience. Influencers and guest bloggers can share your content with their own followers and promote it to a new audience.
Examples:
An e-commerce store can repurpose its old blog post about “how to style a white t-shirt” into a video tutorial, and republish it on its YouTube channel.
A B2B SaaS company can use social media to promote its whitepaper on “how to increase productivity in remote teams” by sharing it on LinkedIn and Twitter, including relevant hashtags and a link to download the whitepaper.
A local business such as a restaurant can use email marketing to send out a newsletter with updates about their menu and specials, and also include a link to their website and a call to action to make a reservation.
Suggestions:
Keep track of your content performance and adjust your promotion strategy accordingly.
Use analytics tools such as Google Analytics and social media analytics to track the performance of your content and identify areas for improvement.
Experiment with different types of content and promotion methods to find what works best for your audience.
Make sure to have a consistent and cohesive approach in your promotion strategy, and use your website, email, and social media channels to promote your content.
SEO is an important aspect of content management as it helps to ensure that your content is easily discoverable by your target audience.
Here is how you can optimize your content for search engines as a content management best practice to increase website traffic, generate more leads, and achieve your business objectives:
Use relevant keywords: Research and use keywords that are relevant to your content and that your target audience is searching for. These keywords should be used in the title, headings, and throughout the content. However, it’s important to use them naturally and avoid keyword stuffing.
Optimize your meta tags: Your meta tags, such as the title tag and meta description, are used by search engines to understand the content of your page. Make sure that your meta tags are optimized with relevant keywords and provide a clear and concise summary of your content.
Use internal and external links: Internal links are links that point to other pages within your website, while external links are links that point to pages outside of your website. Content linking helps search engines understand the structure of your website and the relevance of your content.
Use images and videos: Images and videos can make your content more engaging and increase the time users spend on your website. Optimize images and videos by using relevant file names and alt tags.
Use structured data: Structured data is a way to mark up your content in a way that makes it easier for search engines to understand. By using structured data, you can provide additional information about your content, such as the date it was published, the author, and the type of content it is.
Examples:
A fashion blogger can optimize their content by including relevant keywords such as “summer fashion trends” in the title and throughout the content, optimizing meta tags with keywords and a brief summary, and including internal and external links to other relevant fashion blogs and websites.
A local business, such as a restaurant, can optimize its content by including relevant keywords such as “best pizza in town” in the title and throughout the content, optimizing meta tags, including images and videos of their food and atmosphere, and using structured data to provide information about their location and hours of operation.
Content management is a crucial aspect of any successful online marketing strategy. Effective content management practices can help you organize and optimize your content, ensuring that it’s accessible, engaging, and up-to-date.
Here are some of the best practices for managing your content effectively.
Use a content management system (CMS)
A content management system (CMS) is a software platform that allows you to create, manage, and publish digital content. Using a CMS can help you streamline your content management processes, making it easier to create, edit, and publish content on your website or blog.
Popular CMS platforms include WordPress, Drupal, and Joomla. These platforms offer a range of features and functionality, including customizable templates, plugins, and tools for managing and organizing your content.
Create a content strategy
To effectively manage your content, it’s important to have a clear content strategy in place. Your content strategy should outline your goals, target audience, content topics, formats, and distribution channels.
By having a clear content strategy, you can ensure that your content is focused, relevant, and aligned with your overall marketing objectives. It can also help you identify gaps in your content and opportunities for optimization.
Establish a content governance process
Content governance refers to the policies and procedures for managing and maintaining your content. Establishing a content governance process can help you ensure that your content is accurate, up-to-date, and consistent across all channels.
Your content governance process should include guidelines for content creation, editing, and approval, as well as guidelines for archiving or retiring outdated content. This can help you maintain a high level of quality and relevance in your content while minimizing the risk of errors or inconsistencies.
Use metadata to organize your content
Metadata refers to the information that describes your content, such as tags, categories, and keywords. Using metadata can help you organize and optimize your content, making it easier for users to find and engage with.
For example, you might use tags or categories to organize your blog posts by topic or use keywords in your website metadata to improve your search engine rankings. This can help you improve the usability and discoverability of your content, while also making it easier to manage and update.
Monitor and measure your content performance
To ensure that your content management practices are effective, it’s important to monitor and measure your content performance. This can help you identify which types of content are resonating with your audience, which channels are driving the most engagement, and where you can make improvements.
Tools such as Google Analytics can provide valuable insights into your content performance, including metrics such as pageviews, bounce rates, and engagement. By analyzing this data, you can adjust your content management practices to optimize your results and achieve your marketing goals.
Invest in content maintenance and updates
Content maintenance and updates are essential for keeping your content relevant and up-to-date. This could include updating outdated statistics, refreshing old blog posts with new insights, or archiving or retiring outdated content.
Investing in content maintenance and updates can help you maintain a high level of quality and relevance in your content, while also improving your search engine rankings and user experience. It can also help you identify opportunities for optimization or new content ideas based on existing content.
Learn about the benefits, challenges, and the future of content automation.
Content Automation
Learn about the benefits, challenges, and the future of content automation.
Content automation uses technology to create, manage, and distribute content and involves a wide range of tools that use artificial intelligence (AI), machine learning (ML), and natural language processing (NLP) to automate various aspects of content creation and distribution, including content creation, curation, optimization, and distribution.
While there are some challenges associated with content automation, your business can mitigate these risks by implementing best practices and guidelines to stay ahead of the competition and deliver a better customer experience.
What Is Content Automation?
Content automation is a popular buzzword in the digital marketing world, referring to the use of technology to create, manage and distribute content.
The goal of embracing content automation is to streamline content production and distribution, reduce costs, and improve the overall quality of your content.
There are several types of content automation tools, each with its own set of functions.
Content creation tools use artificial intelligence and machine learning to generate text, graphics, and other multimedia content automatically. These tools analyze data and user behavior to produce relevant and engaging content that resonates with your target audience.
Content curation tools, on the other hand, collect and organize content from various sources to create a library of relevant and useful content for the audience. These tools can also automatically schedule and distribute your curated content on various platforms.
Content optimization tools use data analysis to identify content performance and suggest changes to improve engagement and conversion rates. These tools can also optimize content for search engines by suggesting keywords and improving readability and structure.
Finally, content distribution tools automate the process of sharing content on various platforms, such as social media, email, and websites. These tools can schedule and publish content automatically, freeing up your time to focus on creating new content.
To learn more about content automation tools, see these lessons:
Content automation works by utilizing a combination of artificial intelligence (AI), machine learning (ML), and natural language processing (NLP) technologies to create, manage, and distribute content.
AI is used to mimic human intelligence, such as learning from data and making predictions. It can analyze data to identify patterns and trends, which can help in generating relevant and engaging content.
Machine learning algorithms are used to train AI models to improve their accuracy and effectiveness over time.
NLP is used to analyze human language and generate human-like responses. It can be used to create text-based content, such as blog posts and social media updates, that sound like they were written by a human.
NLP can also be used to analyze existing content to identify keywords and optimize it for search engines.
Big data analytics plays a crucial role in content automation by analyzing vast amounts of data to identify patterns and trends. By analyzing user behavior and preferences, content automation tools can generate content that resonates with the target audience.
Big data analytics can also be used to track the performance of content and identify areas for improvement.
Content automation tools use various techniques and algorithms to automate different aspects of content creation and distribution.
For example, some tools use generative adversarial networks (GANs) to generate images and videos, while others use deep learning algorithms to create text-based content.
Some tools use sentiment analysis to analyze user feedback and improve content quality, while others use natural language generation (NLG) to create summaries, captions, and other types of text-based content.
Examples of content automation technologies include:
GPT-3: a language generation AI model that can create human-like text-based content, such as articles and social media updates.
Synthesia: a video creation tool that uses AI to automatically generate lifelike video content narrated by AI-powered synthetic humans.
Adobe Experience Manager: a content management system that uses ML to automate content creation and optimization.
Google Analytics: a web analytics tool that uses big data analytics to track content performance and identify areas for improvement.
Hootsuite Insights: a social media monitoring tool that uses NLP to analyze user feedback and sentiment.
Overall, content automation uses a range of technologies to automate various aspects of content creation and distribution, improving efficiency, consistency, and quality. By leveraging these technologies, your business can create high-quality content that will resonate with your target audience while minimizing the time and resources required.
The Benefits Of Content Automation
Content automation offers many benefits, including increased efficiency and productivity, improved content quality and consistency, and enhanced audience engagement and conversion rates.
One of the main advantages of content automation is increased efficiency and productivity.
By automating various aspects of content creation and distribution, you can save time and resources that can be redirected to other areas of your business.
Content automation can also help you produce more content in less time.
This can be crucial if your business operates with extremely limited resources.
Another benefit of content automation is improved content quality and consistency.
By using AI and ML to analyze data and user behavior, you can create content that resonates with your target audience.
Content automation tools can also ensure consistency in branding and messaging across various platforms, helping your business to maintain a strong brand identity.
Content automation can also help to enhance audience engagement and conversion rates.
By generating relevant and engaging content, your business can attract and retain customers.
Automation tools can also help you optimize your content for search engines, social media, and other platforms, increasing the visibility of your content and driving more traffic to your website.
Finally, content automation can help you save time and money, while also delivering a better customer experience.
By automating content creation and distribution, you can reduce the need for manual labor and streamline your content production processes. This can help your business save money on labor costs and other expenses, while also delivering a more consistent and engaging customer experience.
Examples of businesses that have successfully implemented content automation include:
While content automation offers several benefits to businesses, it also comes with its fair share of challenges.
Let’s explore some of the challenges of content automation and how your business can mitigate these risks.
One of the main challenges of content automation is the risk of producing low-quality content.
While AI and ML can help businesses to generate content quickly, the resulting content may not always be high quality or engaging for your target audience. This can lead to a decrease in audience engagement and a negative impact on your brand’s reputation.
To mitigate this risk, ensure that your content automation tools and technologies are properly calibrated to produce high-quality content.
Another challenge of content automation is the lack of control over the content creation process.
Automated content creation can sometimes result in content that does not align with your brand’s messaging or voice.
To address this, establish guidelines for content creation and regularly review and approve content generated by your automation tools.
Content automation also poses the risk of plagiarism and copyright infringement.
Automated content creation tools can sometimes inadvertently generate content that is similar to existing content, which can result in legal issues.
To mitigate this risk, ensure that your content automation tools are properly configured to avoid producing content that may infringe on copyright laws.
In addition, ensure that your business uses reputable sources for content curation and that your content is properly cited and attributed.
By taking these precautions, you can avoid legal issues and maintain your credibility with your audience.
Examples of businesses that have faced challenges with content automation include:
Microsoft: the technology giant faced criticism after its chatbot Tay began producing offensive and inappropriate content due to inadequate content filtering. (Source: “Microsoft’s chatbot mess: What went wrong.” BBC News, 2016.)
JPMorgan Chase: In 2013, JPMorgan Chase implemented an automated content generation system to create news stories related to financial markets. The system relied on algorithms to analyze data and generate reports. However, the system produced numerous errors in the news articles, including inaccurate information, misspellings, and nonsensical sentences. (Source: “The Rise of the Robot Reporter.” The New York Times, 2013.)
The Washington Post: The Washington Post launched its Heliograf content automation system in 2016, which was designed to generate news articles automatically. However, the system faced criticism for producing stories that lacked nuance and failed to capture the human element of the news. (Source: “The Washington Post is automating news stories about the Olympics with Heliograf.” Nieman Lab, 2016.)
Associated Press: The Associated Press (AP) began using automated content generation systems in 2014 to create articles about corporate earnings reports. The system was successful in generating thousands of articles in a short period of time. However, it faced criticism for producing articles that lacked insight and analysis. (Source: “How The Associated Press uses automation to create earnings reports.” Digiday, 2014.)
Forbes: In 2018, Forbes launched a tool called Bertie, which used artificial intelligence to generate story suggestions for writers. However, the tool faced backlash from the writing community, who argued that it was replacing human creativity with machine-generated ideas. (Source: “Forbes Unveils Bertie, A Bot That Writes Articles Using AI.” Forbes, 2018.)
Coca-Cola: Coca-Cola launched an automated content generation system called the AI-powered Content Creation Engine in 2019. The system was designed to generate social media content for the company’s brands. However, the system faced criticism for producing generic and uninteresting content that failed to engage consumers. (Source: “Coca-Cola launches AI-powered Content Creation Engine.” The Drum, 2019.)
Content Automation – Best Practices And Guidelines
While content automation can increase efficiency and reduce costs, it is important to follow best practices and guidelines to ensure that the content is high quality and effective in engaging the target audience.
Here are some best practices and guidelines for content automation:
Define your audience: Before beginning any content automation project, it is important to define your target audience. This will help you tailor your content to their interests and preferences. For example, if your audience is millennials, you may want to focus on creating visually appealing content that can be easily shared on social media.
Develop a content strategy: A content strategy should outline the goals, types of content, and distribution channels for your automation project. This can help ensure that your content is consistent and aligned with your overall business objectives.
Use data to inform content creation: Data can be used to identify trends, insights, and gaps in your content. This can help you create more relevant and engaging content for your audience. For example, you can use analytics tools to identify which topics and formats are most popular among your audience.
Ensure accuracy and quality: Automated content should be accurate and free of errors, such as misspellings and factual inaccuracies. To ensure quality, consider using human editors to review the content before it is published.
Add a human touch: While automation can help increase efficiency, it is important to ensure that the content does not lose its human touch. Adding personalization, such as using a recipient’s name or providing customized recommendations, can help make the content more engaging and memorable.
In addition to the best practices and guidelines mentioned above, here are some additional tips for successful content automation:
Understand the limitations of automation: While automation can be efficient and cost-effective, it is important to understand its limitations. Automation cannot replace human creativity and intuition, and it may not be suitable for all types of content. Consider the type of content you are creating and whether automation is the best approach.
Optimize for SEO: Automated content should be optimized for search engines to ensure it is discoverable by your target audience. Use relevant keywords and meta descriptions to help improve search engine rankings.
Monitor performance and make adjustments: Regularly monitor the performance of your automated content and make adjustments as needed. Use analytics tools to track engagement, clicks, and conversions, and make changes to improve performance.
Ensure compliance with regulations and guidelines: If your automated content includes sensitive or regulated information, ensure that it complies with relevant regulations and guidelines. For example, if your content involves healthcare information, ensure that it meets HIPAA regulations.
Continuously improve and iterate: Content automation is not a one-time project, but rather an ongoing process. Continuously evaluate and improve your content to ensure that it remains relevant and engaging to your audience.
The Future Of Content Automation
Content automation is rapidly evolving, and businesses need to stay up to date with the latest trends and innovations in the field to remain competitive.
One of the latest trends in content automation is the use of conversational AI, which allows your business to interact with your audience in a more natural and engaging way.
Conversational AI can be used to automate customer service and support, as well as to create personalized content for individual users.
Another emerging trend is the use of augmented and virtual reality technologies to create immersive content experiences for users.
In addition, businesses are increasingly using data analytics and AI to optimize their content for target audiences. By analyzing user behavior and engagement data, your business can gain insights into what types of content resonate with your audience and adjust your content creation and distribution strategies accordingly.
Looking ahead, we can expect content automation to continue to evolve and become more sophisticated. AI and ML technologies are likely to become more advanced, enabling businesses to create highly personalized and engaging content for their audience.
In addition, we can expect to see the integration of content automation with other emerging technologies, such as blockchain and the Internet of Things (IoT), to create even more innovative content experiences.
To prepare for these changes, your business should invest in the latest content automation tools and technologies, and ensure that your team is trained on how to use these effectively.
You should also stay up to date with the latest trends and innovations in your field and be prepared to adapt new content strategies accordingly.
Examples of businesses that are leading the way in content automation include:
HubSpot: the marketing automation platform offers a suite of content automation tools, including content creation, optimization, and distribution.
Grammarly: the writing assistance tool uses AI to analyze and improve the quality of written content, helping writers to create more effective and engaging content.
Salesforce: the customer relationship management (CRM) platform uses AI and ML to personalize content for individual users and optimize content for target audiences.
Content Automation – FAQs
Here are frequently asked questions about content automation:
What is content automation?
Content automation involves using software to handle repetitive content-related tasks, ensuring adherence to brand guidelines, and enhancing overall content quality and consistency.
How does content automation work?
The process uses a combination of algorithms, tools, and sometimes human oversight to manage and streamline the creation, management, and publication of digital content. It automates tasks like data collection, content creation, and updates.
What are the benefits of content automation?
Content automation saves time, reduces human error, ensures brand consistency, and can improve the scalability of content operations. It allows creators to focus on more strategic tasks such as content planning and analysis.
What types of content can be automated?
Nearly any type of repetitive content tasks can be automated, including social media posts, email marketing campaigns, content updates, and even content personalization for different audiences.
Is content automation expensive?
The initial setup can be costly depending on the complexity of the tasks to be automated and the software used. However, the long-term benefits often offset these initial costs by improving efficiency and reducing the need for manual labor.
Can content automation affect SEO?
Yes, when done correctly, content automation can positively impact SEO by ensuring consistent and timely updates, and by helping to target content based on keyword research and SEO trends.
What are the challenges of implementing content automation?
Challenges include the complexity of setting up systems, the need for continuous updates and maintenance, integrating with existing technologies, and ensuring that automated content still meets quality and relevance standards.
Summary
Content automation can help your business to create and distribute high-quality content efficiently and effectively. While there are some challenges associated with content automation, your business can mitigate these risks by implementing best practices and guidelines.
By embracing content automation, your business can stay ahead of the competition and deliver a better customer experience.
The future of content automation looks bright, with new trends and innovations emerging all the time. By staying up to date with the latest developments in the field, your business can take advantage of these emerging technologies to create more engaging and personalized content for your audience.
Resources
Click on the links below to explore additional ways to automate all content-related areas of your business:
Use mind mapping to streamline your content planning and content creation process.
Mind Mapping
Use mind mapping to streamline your content planning and content creation process.
Mind mapping is a powerful and effective tool for content planning as it enables you to brainstorm ideas, organize your thoughts, and identify key concepts in a logical and systematic manner.
In this lesson, we explore the benefits of using mind mapping for content planning and content organization. We also provide a list of mind-mapping tools that you can use to plan out your content.
What Is Mind Mapping?
Mind mapping is a technique used to organize and visualize information in a hierarchical and interconnected way. It involves creating a diagram or a “mind map” that connects different ideas, concepts, and pieces of information in a way that reflects how they are related to each other.
The process of mind mapping typically starts with a central idea or topic, which is placed at the center of the map. From there, related ideas and concepts are connected to the central topic using branches or lines, forming a tree-like structure. These branches can then be further expanded with sub-branches to create a more detailed and complex map.
This is the basic structure of a mind map built around a central idea.
For example, if you were creating a mind map for a blog post on “healthy meal planning,” the central topic would be “Healthy Meal Planning.”
You might then create branches for subtopics such as “Meal Prepping,” “Grocery Shopping,” and “Recipe Selection.”
Each of these subtopics could then be further expanded with additional branches, such as “Benefits of Meal Prepping” or “Finding Nutritious Recipes Online,” etc.
Use a mind map to create a blog post outline.
Mind maps can be created using pen and paper, whiteboards, or specialized software. They are often used as a brainstorming tool to generate and organize ideas, streamline processes, take notes, solve problems, foster collaboration between team members, and make decisions.
Mind maps are also very flexible. There is no limit to the number of branches, subconcepts, and relationships you can include to make your mind map as detailed as it needs to be.
Also, the web-like appearance of a mind map makes it easy to visualize and understand relationships between concepts or ideas. The visual and nonlinear nature of mind maps can help users to see patterns and connections that might not be immediately apparent in a more traditional outline or list format.
Using diagrams to visually “map” information and organize your thinking processes using branching and radial pictorial methods goes back centuries.
Why Use Mind Mapping For Content Planning?
Mind mapping is a powerful tool for content planning. Mind maps offer a wide range of benefits over traditional text-based methods of planning.
Some of the benefits of using mind maps when planning out your content include:
Creativity
Mind maps stimulate creativity by allowing you to generate ideas in a free-form, non-linear way. By encouraging a broad range of associations, mind maps can lead to new insights and unexpected connections.
Brainstorming
Mind maps are an excellent tool for brainstorming as they allow you and your team to generate and record ideas in a free-flowing manner.
With mind maps, you can brainstorm and generate new ideas and creative solutions to problems. By visualizing your ideas and concepts in this way, you may discover new connections or insights that you may not have thought of otherwise.
You can also quickly capture all your ideas and then arrange and group them into related categories.
For example, you could use a mind map to brainstorm ideas for a blog post on healthy eating habits.
Organization
Mind maps offer a more structured and organized way of planning content than traditional linear outlines. The visual format allows you to see the relationships between different ideas, making creating a well-structured and cohesive piece of content easier.
Mind maps allow you to organize information in a logical and structured way, making it easier to understand, remember, and identify connections between them. By grouping related concepts together, you and your team can create a clear and coherent framework for your content.
For example, you could use a mind map to organize the key themes and sub-themes for an e-book on personal finance.
Efficiency
Mind maps enable you to plan and organize your content more quickly and efficiently than text-based methods. By providing a clear visual overview of your content plan, you can quickly identify gaps and ensure that all important topics are covered.
As with the e-book example above, you could use a mind map to make sure that you have covered all chapters and topics you plan to write about.
Visualization
Mind maps provide a visual representation of ideas, which can help you and your team to understand and remember them more easily.
The use of colors, symbols, and images can enhance the visual appeal of mind maps and make them more engaging.
For example, you could use a mind map to visualize the key messages and visual elements for an infographic on workplace productivity.
Communication
Mind maps are an effective tool for communicating your content plan to others, such as team members, editors, or clients.
The visual format makes it easier for others to understand the structure and flow of your content, leading to clearer and more effective communication.
Collaboration
Mind maps can be easily shared and edited by multiple users, making them an ideal tool for collaborative content planning. They enable you and your team to work together to generate and refine ideas, and to track progress towards shared goals.
For example, your content planning team could use a mind map to collaborate on the key themes and messaging for a social media campaign.
Flexibility
Mind maps are flexible and adaptable, making them suitable for a wide range of content-planning applications. They can be easily updated and revised as your content plan evolves.
You can add new ideas, expand on existing ones, and reorganize the structure of your plan with ease. They can also be used to plan everything from blog posts and articles to e-books and marketing campaigns.
For example, you could use a mind map to plan the structure and content for a webinar on social media marketing.
Memory retention
Mind maps are a great tool for memory retention as they allow you to visually connect information with images and symbols that represent the concepts. This makes it easier to recall the information later.
For example, you could use a mind map to organize the key ideas and arguments for a research paper on climate change.
Time-saving
Mind maps can save time in content planning by enabling you and your team to identify key concepts and themes and quickly see what content you have already created and what content you still need to create.
This can help to streamline your content creation process and ensure that the final product is well-organized and focused.
For example, you could use a mind map to identify the key topics and themes for a series of blog posts on digital marketing.
How To Create A Mind Map
Creating a mind map for content planning is a simple process that can help you to organize your thoughts and ideas in a visual and structured way.
For this example, we’ll use a free online mind-mapping tool called MindMup (listed in the “Mind Map Tools” section further below).
Here is a step-by-step guide on how to create a mind map for content planning:
Start With A Central Topic
To create a mind map, start by identifying the main topic or theme of your content and write your central topic or main idea in the center of your paper or digital canvas. This will be the foundation of your mind map.
For this example, let’s say we want to create a blog post about “healthy meal planning.”
So, after creating a new mind map file, this will be our first entry:
Central topic: Healthy Meal Planning
Use the central node of your mind map to represent your main topic or theme.
Add Subtopics
Next, add subtopics around the central topic, branching out from the center.
These subtopics should be related to the central topic and form the main categories for your content.
You can brainstorm ideas related to your main topic or theme and add them as branches to the central node.
For our example, we’ll add the following subtopics:
Subtopic 1: Meal Prepping
Subtopic 2: Grocery Shopping
Subtopic 3: Recipe Selection
Add subtopics around the central topic of your mind map.
Expand Your Mind Map
After adding subtopics, add branches to each subtopic to further expand on the specific details and ideas related to each mind map category.
For this example, let’s add a couple of branches to our first subtopic:
Subtopic 1: Meal Prepping
Branch 1: Benefits of Meal Prepping
Branch 2: How to Meal Prep for the Week
Subtopic 2: Grocery Shopping
Subtopic 3: Recipe Selection
Add branches to subtopics.
Continue adding branches to your other subtopics by identifying connections between your content ideas and adding them as links between branches. These can then be divided into smaller subcategories or sub-branches to further break down your content ideas.
Expand your mind map to include all of the main ideas for your topic.
Use Colors And Symbols
Use colors and symbols to visually differentiate between different ideas, concepts, and types of content. This can help you to see the relationships between different subtopics and ideas.
For this example, we’ve used different colors and font sizes to make our central topic and subtopics stand out…
Use colors to identify different groups in your mind map.
Review And Refine
After completing your mind map, review and refine it as needed. This can include adding new ideas, restructuring your map, or removing unnecessary elements.
Convert To An Outline
Once you have a complete and refined mind map, you can easily convert it into a traditional linear outline. This can be helpful if you prefer to work with a more text-based format.
Many mind map tools allow you to export your mind map as a text-based file.
For example, with MindMup, you can download your mind map as an outline:
MindMup lets you export your mind map as an outline.
Select the export format to download your file as (e.g. MS Word/Google Writer)…
Let’s export this file as a Word or GDoc document…
You can now use your mind map text in a range of applications (e.g. create articles, slides, web pages, etc.)
Here’s our mind map exported as a text-based outline.
We cover some practical ways to use mind maps below.
Using Mind Maps
Mind maps can be used in a wide variety of practical applications.
Here are some of the ways you can use mind maps to help in your content-related processes:
Content Research
Mind mapping is a valuable tool for content research. Whether you are conducting research for a writing project, marketing campaign, or building out content for pages on your website, mind maps can help you collect, organize, and analyze information more effectively.
As you conduct your research, gather information on each sub-topic and add it to the corresponding branch of your mind map. This could include quotes, statistics, images, or links to articles or other resources.
Using our earlier example, let’s say that you want to create a blog post on “healthy meal planning”.
You could start building your site map by brainstorming ideas. However, if you want to save time, you can also use AI content research tools like ChatGPT.
For example, here is a list of mind-map items generated by ChatGPT using the following prompt:
“Generate a comprehensive, itemized, and hierarchical list of topics to be included in a mind map where the central topic is “Healthy Meal Planning”.”
Use AI tools like ChatGPT to generate mind map topic lists quickly and easily.
You can also expand your mind map entries further using other content research tools, such as entering a topic into a tool like AnswerThePublic.
Use tools like AnswerThePublic to generate further topic ideas for your mind map.
Continue researching and building out your mind map. Remember to share your mind map with other members of the team, clients, stakeholders, etc for additional input and feedback, collaboration, ideas, etc.
After building out your mind map, analyze and synthesize the information you have gathered. Look for patterns or connections between different sub-topics. Use your mind map to help you identify gaps in your research or areas where you need to dig deeper.
Once you have gathered and analyzed all of your research, use your mind map to create an outline for your content. This will help you structure your content in a logical and easy-to-follow format.
Content Planning
Mind maps can help you plan sections for a blog post or content for an entire website.
For example, here’s the mind map we used to plan the initial content structure for ContentManagementCourse.com …
The mind map used for planning the initial content structure for ContentManagementCourse.com
After mapping out the content structure for this website, this mind map then became part of our content production plan.
Content Production
To illustrate how mind mapping can help with content production, let’s go back to our earlier “healthy meal planning” example.
Suppose we want to create an entire website related to this topic.
All you need to do is build a map containing a list of topics for all the articles, media, pages, etc. that you’ll need to create for your site.
A mind map containing all the topics we’ll want to cover to create content for our website.
As seen earlier, most mind-mapping tools allow you to export your mind map as an outline, so once you’ve built out your site map, this would be the next step.
Exporting your mind map as an outline then becomes the foundation of your content production plan.
Here’s your content production plan.
You can transfer the contents of this outline to a production scheduling tool like a spreadsheet or a content calendar and start building out your content systematically to create a comprehensive and well-structured authoritative site.
Content Documentation
Mind mapping is also very useful for keeping your content processes organized.
For example, suppose you plan to build a website.
You can use a mind map to plan out your website structure, and then refer to this mind map to create and organize all the content for each different section or page of your site.
Each section of your website needs content. The same mind map used for website planning can be used to build out your content and keep it organized.
Other Practical Ways To Use Mind Maps
Mind maps are a valuable tool for content-based applications across a wide range of industries and disciplines.
Here are examples of some other applications related to content where mind maps can be used:
Note-taking and study aids: Mind maps can be used to take notes during lectures, meetings, or brainstorming sessions. They can also be used as a study aid to organize and summarize course material. For example, you can use a mind map to summarize the key concepts and ideas from a lecture, training session, or reading assignment.
Project management: Mind maps can be used to plan and organize projects, breaking down the overall goal into smaller, more manageable tasks. For example, a project manager can create a mind map to outline the steps involved in completing a project, assign tasks to team members, and set deadlines.
Decision-making: Mind maps can be used to weigh the pros and cons of different options and make informed decisions. For example, you can create a mind map to compare and contrast the features of different sales funnels to help you decide which one to accept.
Creativity and ideation: Mind maps can be used to generate and organize ideas for creative projects, such as writing, art, or design. for example, you can create a mind map to brainstorm plot points and characters for a story or ebook.
Strategic planning: Mind maps can be used to develop strategies and plans for achieving specific goals, such as business growth or personal development. For example, you can create a mind map to outline the steps involved in launching a new product, including market research, product design, and marketing.
Process mapping: Mind maps can be used to diagram and streamline complex processes, such as workflows or manufacturing processes. For example, you can create a mind map to visualize and optimize the assembly line process, identifying potential bottlenecks and inefficiencies.
Knowledge management: Mind maps can be used to organize and categorize information for easier retrieval and reference. for example, you can create a mind map to organize your company’s database of research papers and publications, allowing users to quickly search and access relevant information.
Mind Mapping Tools
While you could create mind maps using graphic applications like PowerPoint or Google Slides, there are various different tools available for creating mind maps, from free online tools to paid desktop applications.
A mind map created using Google Slides.
Dedicated mind-mapping tools offer several advantages over traditional software for creating mind maps.
Some of these benefits include:
Specialized functions: Mind-mapping tools are specifically designed to create mind maps, so they offer a variety of specialized functions that are not available in traditional software. These functions can include the ability to easily add branches, colors, images, notes, and links to different elements in the mind map.
Increased productivity: Mind-mapping tools often have keyboard shortcuts, automatic formatting options, and other features that allow for faster and more efficient mind-map creation. This can help to increase productivity and save time.
Collaboration: Many mind-mapping tools offer real-time collaboration features, allowing multiple users to work on the same mind map simultaneously. This can be particularly useful for group projects or brainstorming sessions.
Integration with other tools: Many mind-mapping tools offer integration with other tools such as Google Drive, Dropbox, and Trello. This allows for easy sharing and syncing of mind maps with other tools and team members.
Better organization: Mind-mapping tools often have features that allow for better organization of ideas and information. This can include the ability to easily rearrange branches, collapse and expand different sections of the mind map, and add tags or labels to different elements.
More customization: Mind-mapping tools often offer more customization options than traditional software. This can include the ability to customize the colors, fonts, and styles of different elements in the mind map.
Better visualization: Mind-mapping tools often offer better visualization options than traditional software. This can include the ability to create different types of charts, graphs, and diagrams, as well as the ability to add images and icons to different elements in the mind map.
Here is a list of some of the best mind map content planning tools available:
MindMup
MindMup – Free online mind-mapping tool.
MindMup is a powerful and versatile mind map software that helps you organize your ideas and boost your productivity. The mind map software is designed to help you capture and organize your ideas quickly and effortlessly.
With MindMup, you can create unlimited mind maps for free and store them securely in the cloud, so you can access them anytime, anywhere, from any device.
The software boasts a frictionless interface and powerful keyboard shortcuts that help you focus on your ideas and remove all distractions while mapping. MindMup’s keyboard shortcuts allow you to work faster, saving you valuable time and effort.
MindMup is perfect for individual note-taking, collaborative planning, teamwork, and classrooms. Its versatile features and easy-to-use functionality make it an ideal tool for brainstorming, creating presentations, and documenting outlines with ease. You can also publish your ideas online and share them on social networks to reach a wider audience.
MindMup’s powerful features include the ability to convert maps easily to PDF, PowerPoint, outlines, and other file formats. You can also save your maps to Google Drive and manage them using Google Apps. MindMup Atlas adds images and contextual information to ensure that your maps show up nicely on social media platforms like Twitter, Facebook, Google+, LinkedIn, and Pinterest.
MindMup’s functionality goes beyond mind mapping. With MindMup, you can structure writing, create storyboards, post to social media, plan and manage projects, collaborate easily with team members, attach documents, add images and icons, and administer sharing settings for your organization with ease.
MindMup is free to use and there’s no account/login required. Free users can create public maps up to 100 KB and save them for up to six months. Gold users can create private maps, and share and edit concurrently. MindMup also offers community chat help and support to its users.
You’ll probably notice two things about the structure of mind maps. One, they are incredibly flexible. There is no limit to the number of branches, subconcepts, and relationships you can include—your mind map will be exactly as detailed as you need it to be. And two, the web-like appearance makes it incredibly easy to visualize and understand the relationships between each concept or idea.
Lucidspark mind mapping software is a powerful tool that enables you to collaborate with your team to generate innovative ideas and turn them into reality.
With the mind map maker, you can visualize and expand on ideas with ease, making it an ideal solution for teams of all sizes.
Lucidspark’s mind-mapping software is designed to inspire creativity and innovation. It allows you to break down large concepts into specific ideas and explore new ways of thinking. With an unlimited canvas, you can work on multiple ideas simultaneously, using mind map templates and freehand drawing to add your own notes and connect concepts.
Collaboration is key to this mind map maker, and the software enables you to invite your team members to contribute their ideas directly to your mind map.
The in-editor chat, comments, and @mentions make it easy to solicit feedback and keep everyone connected. You can also focus your team’s attention on specific areas of the board and follow individual collaborators to see all their updates in real-time.
A mind map created using Lucidspark.
Lucidspark’s mind map generator comes with a Note Panel that allows you to add bullet points and checkboxes, set the agenda, and provide important context.
With your Note Panel, you can easily brainstorm with your team and keep your ideas organized in a way that makes sense for your team. You can list tasks, document action items, and keep your meeting notes together without creating a separate document.
Lucidspark integrates seamlessly with popular apps, making it easy to access, edit, share, and create a new mind map online using your favorite tools. With Slack integration, you can insert a board in your team’s Slack channel or start a new board directly from Slack.
Google Drive integration allows you to share your board and maintain control with various access permissions. You can import and export your mind map from one application to another without losing your work.
With Lucidspark’s mind map templates, you can add structure to your brainstorming and select the right template for your specific needs.
In short, Lucidspark’s software is easy to use and enables you to invite contributors to your online mind map via email, Slack, or a shareable link. You can even customize your shapes and add more context using the Context Toolbar.
Lucidspark mind mapping software offers a free trial.
Canva is a versatile design software that allows you to easily create mind maps for all kinds of projects.
With a wide variety of customizable templates and an intuitive drag-and-drop interface, you can create beautiful and informative mind maps in just a few clicks, add images and icons to your map, and export your map as an image or PDF.
You can start building your mind map by choosing from one of Canvas’ professionally designed templates or creating your own from scratch. Add branches, icons, images, and text to create a visual representation of your ideas and thought processes.
With built-in collaboration tools, you can easily share your mind maps with your team and get feedback in real time.
One of the unique features of Canva’s mind maps is the ability to easily customize your mind map with your own branding and color schemes. This allows you to create mind maps that align with your company’s branding guidelines and make your ideas more memorable and impactful.
Whether you’re brainstorming ideas for a new project, organizing your thoughts for a presentation, or mapping out a complex process, Canva makes it easy to create and share professional-looking mind maps with a user-friendly interface and robust set of design tools.
MindMeister is an online mind-mapping software that allows you to easily create stunning, unique mind maps.
Its intuitive editor makes mapping your big ideas together with your team quick and effortless. MindMeister is perfect for a variety of uses including project planning, brainstorming, meeting management, and more.
A checklist mind map created using MindMeister mind-mapping software.
MindMeister gives you access to a range of features to help you create mind maps, including expertly-designed themes, three map layouts: mind map view, org chart, or list, customizable styles, shapes, and start/endpoints of your connection lines to show relationships between any two mind map topics, outline mode to toggle between the visual and linear view, expandable notes, and the ability to attach files to maps or link out to documents, articles, and more on the web. With focus mode, you can eliminate distractions and focus solely on your ideas.
Collaboration is easy with MindMeister. You can hold collaborative brainstorming sessions with your team using Brainstorm mode, and add comments and reactions to spark debate on your mind maps in a structured way.
MindMeister also allows you to define how your team uses the software, manage users, groups, and subscription options from a single team admin portal, and create groups within your organization to streamline map storage and sharing.
Sharing your mind maps is simple with MindMeister via your map’s unique share link. you can also export to PDF, Microsoft Word, PowerPoint, and more, or print your maps on paper. MindMeister’s iOS and Android apps allow you to map across multiple devices with real-time sync to ensure that your ideas are safeguarded.
MindMeister provides many mind map templates.
MindMeister provides access to many templates and a vast library of public mind map examples, created by MindMeister users that you can view online or copy to your account.
A mind map from MindMeister’s vast mind map library.
Mind Map Pro is a digital tool designed for creative mind mapping and project management to simplify processes and enhance productivity for businesses.
With integrated task management, planning, analysis, and team chat tools, Mind Map Pro allows you to transform your innovation from a concept within a mind map into a real-world solution.
You can collaborate with team mind maps, discuss ideas with live online chat, and use Kanban task boards with SWOT analysis to reach team goals. Mind Map Pro connects teams across more than 90 countries worldwide, improving communication within offices and enhancing connectivity for remote workers and distributed teams.
With a selection of professional templates, you can kick start your project planning, take notes and export them easily, manage meetings and brainstorm ideas, and visualize them in 2D and 3D mind mapping views.
Mind Map Pro lets you visualize your mind maps in 3D views.
Mind Map Pro also offers an innovative way to manage your tasks creatively with mind mapping, making your ideas happen and increasing your productivity to reach your goals faster.
Coggle is an easy-to-use online software for creating and sharing mind maps and flowcharts.
Coggle lets you easily visualize your ideas, whether you’re brainstorming, planning, or taking notes, without the hassle of downloading or installing anything.
One of Coggle’s key features is its real-time collaboration tool, which enables you to work simultaneously with your team on the same diagram.
Additionally, Coggle saves every change made to the diagram, allowing you to review all changes and revert to any previous version with ease.
Coggle also offers unlimited image uploads and the ability to add floating text and images, making it easy to annotate parts of your map. The software also provides powerful flowcharting capabilities, allowing you to create expressive, powerful diagrams that represent process flows and other advanced things.
Create mind maps for complex processes with Coggle.
Another key feature of Coggle is its multiple starting points, which allow you to add central items to your diagrams and map related topics in a single workspace. Coggle also lets you create as many private diagrams as you want, and you can share them with your team, classmates, or the world.
Coggle requires no login for collaboration, making it easy to allow any number of people to edit a diagram by sharing a secret link with them. You can also use Coggle to take structured notes during meetings or brainstorming sessions, and share your ideas with others.
Coggle is a powerful and versatile tool that can help you to organize your ideas, collaborate with others, and create detailed diagrams that accurately represent your thought processes.
Xmind – full-featured mind mapping and brainstorming app.
Xmind is a comprehensive mind-mapping and brainstorming app that provides a complete toolset for creativity and thinking.
With its non-linear approach, intuitive features, and pre-set structures, Xmind allows you to create mind maps for just about anything.
The app’s powerful features let you organize your thoughts easily and enrich your maps with multimedia information. Xmind provides you with a smart combination of multiple structures on the same branch, making your mind map more cohesive and balanced, especially for complex issues or large projects.
You can outline your thoughts hierarchically with the dedicated Outliner view, which is also a quicker way to jot down notes.
A mind map created with Xmind.
Xmind offers a number of different modes and tools, including:
ZEN Mode -helps you stay focused on one mind map, eliminating distractions and boosting productivity.
Pitch Mode – lets you seamlessly turn your mind map into a slideshow. With practical layouts and auto-generated smooth transitions, pitching ideas becomes effortless. Xmind also provides an Essential Mind Toolbox with intuitive tools made for organizing thoughts and adding further information to your mind map.
Relationship – connect two relevant ideas with customizable line style and text description.
Summary – lets you easily add a conclusion or recap to a group of ideas.
Boundary – is a handy tool for highlighting topics that share similarities or mark special concepts.
Markers – offer a great variety of neat icons for marking priorities, assignment of tasks, progress, etc.
You can also use Labels for simple notation and categorization, and Audio Notes to capture additional text information.
Xmind even lets you present mathematical and chemical formulas elegantly with LaTeX command. The smart color theme ensures you achieve a consistent look throughout your map instantly, while the built-in hand-drawn style adds a fun-filled look to your mind maps.
Over 400 Xmind-designed stickers covering the most common scenarios and professionally-designed structures for specific subjects let you create unique and aesthetically pleasing mind maps.
Miro is a robust and collaborative mind-mapping tool that helps distributed teams brainstorm, plan projects, map out information architecture, create org charts, develop sales strategies, and capture and organize ideas quickly with chat, comments, sticky notes, and video.
Miro empowers remote, in-office, and hybrid teams to communicate and collaborate across formats, tools, channels, and time zones without the constraints of physical location, meeting space, and whiteboards.
With Miro, you can toggle into presentation mode, or break up your map into frames to present slides. Built-in video, chat, @mentions, and comments make communication seamless. Multiple team members can co-create synchronously in real-time, and use an infinite canvas to add any content or other mind maps to the same board.
Miro lets you create collaborative mind maps with your team.
Miro Mind Map works across all devices, includes a timer feature that lets you manage and track your time while running a whiteboarding session in real time, and provides over 300 customizable templates.
Mind42 is a free, online mind-mapping software that provides a unique and efficient way of visually organizing information.
With Mind42, you can quickly and easily create mind maps that can be used for anything from to-do lists to brainstorming sessions and event planning.
Mind42 is ad-supported but completely free to use, with private mind maps created by default. You can also choose to share your mind maps with others, either by sending them a link to view the map or by inviting them to collaborate on the map in real time.
A mind map created using Mind42.
As a specialized tool, Mind42 allows you to enter your thoughts, arrange and refine them, and explore your ideas in a graphical way. It is not a multiple-purpose diagramming tool, but rather a powerful software that supports the creation, management, and editing of data structures required for mind maps.
Mind42 is a web application, which means you can access it from anywhere with an internet connection. You don’t need to download or install anything, as it runs directly in your browser. To get the best Mind42 experience, it’s recommended to use a modern browser such as Google Chrome, Mozilla Firefox, or Apple’s Safari.
SimpleMind is a mind-mapping software that helps you organize your thoughts, remember information, and generate new ideas.
With its intuitive interface and free-form layout, you can easily place topics anywhere you want or use one of the various auto layouts.
SimpleMind allows you to add color, images, and photos to your Mind Map with its Pro version.
You can customize topics and lines, add notes, links, checkboxes, and much more.
A mind map generated using SimpleMind.
SimpleMind allows you to sync your mind maps across platforms using clouds, such as Dropbox, Google Drive, iCloud Drive, or OneDrive.
You can easily share your Mind Map as a .pdf or image, create a slideshow to present your ideas, and even print it.
With SimpleMind, you can change the appearance of your Mind Map by selecting one of the 15+ style sheets or create your own. You can maintain an overview by collapsing and expanding branches, hiding or showing branches or topics, or using autofocus to block out distractions.
SimpleMind is a reliable and clear app that does not collect or sell your information.
MindNode is a mind-mapping app designed to help you organize your thoughts quickly and beautifully.
It allows you to capture, organize, style, and share your ideas effortlessly. With its visual brainstorming feature, you can plan your vacation, outline your next project, and write notes with ease.
MindNode also offers tools such as Tasks, Outlining, Quick Entry, Stickers, Themes, Visual Tags, Focus Mode, and Notes to enhance your brainstorming experience.
The app allows you to export and print your mind maps, and sync your data via iCloud for easy access across multiple devices. MindNode makes it easy to stay organized and on top of your ideas without getting in your way.
A mind map created using MindNode.
MindNode lets you capture, organize, style, and share your thoughts on various topics. The software offers powerful features like outlining, visual tags, focus mode, tasks, quick entry, stickers, themes, notes, dark mode, external screen support, customizable panels, and share options, allowing you to create a clear and structured representation of your ideas.
MindNode’s iCloud sync feature ensures you can access your mind map on any device, allowing you to pick up where you left off.
Scapple mind map software is a virtual sheet of paper that lets you make notes and connect them using lines or arrows. You have complete freedom to experiment with how your ideas fit together, and every note is equal.
Creating notes is as easy as double-clicking anywhere on the page and making connections between ideas is as simple as dragging and dropping one note onto another.
A mind map created using Scapple.
You can move notes around and customize their appearance using colors and borders. Scapple is a simple but powerful way of shaping your ideas and is available for download on both macOS and Windows.
While mind maps are a powerful tool for content planning, there are several best practices that you should follow to ensure that your mind maps are effective and useful.
Here are some best practices to keep in mind when creating mind maps for content planning:
Start with a Clear Goal: Before you start creating your mind map, it’s important to have a clear goal in mind for your content. This could be a specific topic you want to cover, a target audience you want to reach, or a particular format you want to use.
Keep it Simple: While it can be tempting to include every idea and detail in your mind map, it’s important to keep it simple and focused. Stick to the main categories and subtopics, and only include details that are directly relevant to your content goal.
Use Visuals: Mind maps are a visual tool, so it’s important to use visuals to enhance your map. This could include using colors to differentiate between categories, icons to represent different ideas, or images to illustrate your points.
Be Flexible: Remember that mind maps are a flexible tool, and you should be prepared to revise and refine your map as needed. Be open to adding new ideas, moving things around, or even starting over if your initial plan isn’t working.
Collaborate with Others: Mind maps can be an effective tool for collaborative content planning. Consider working with team members or other content creators to generate new ideas and refine your map.
For example, if you were creating a mind map for a social media campaign, you might start by defining your content goal, such as increasing engagement on your brand’s Instagram account.
From there, you could create main categories like “Visual Content,” “User-Generated Content,” and “Hashtag Campaigns,” and then add specific ideas and details to each category.
By following these best practices, you can create effective and useful mind maps that help you to plan and organize your content in a more creative and efficient way.
Mind-Mapping FAQs
Here are frequently asked questions about mind-mapping:
What is a mind map?
A mind map is a visual diagram that organizes information around a central concept, typically used for note-taking, brainstorming, and complex problem-solving.
What is mind-mapping?
Mind-mapping is a visual technique used to organize and represent information through diagrams that outline ideas in a structured format, enhancing creativity and productivity.
Can mind mapping help with problem-solving?
Yes, mind mapping aids in problem-solving by allowing individuals and teams to visually outline the problem, brainstorm potential solutions, prioritize actions, evaluate alternatives, and understand, track, and address the progress of resolving complex issues effectively.
Can mind-mapping be used to address challenges?
Yes, mind-mapping can be used to address challenges by organizing thoughts and approaches to understand and deal with the issues at hand.
What makes mind-mapping an effective brainstorming tool?
Mind-mapping is effective for brainstorming because it encourages the generation of creative ideas by visually mapping out thoughts and connections among them.
What are the steps involved in mind-mapping for problem-solving?
The steps typically involve identifying the problem, generating possible solutions, and evaluating each solution to find the most effective one. This structured approach helps in thorough analysis and decision-making.
How can you use mind maps in the design process?
In design, mind maps are used to brainstorm ideas, visualize connections, and lay out the structure of arguments, making them integral in conceptualizing products and user experiences.
What are the essential elements of a mind map?
Every mind map should include a central theme, branches for main ideas connected to the center, and keywords or images on the branches to symbolize thoughts and concepts.
What can you do with a computer-generated mind map?
Computer-generated mind maps allow for more dynamic organization of information, easy updates, and sharing capabilities, enhancing collaboration in teams.
How do mind maps facilitate collaboration in teams?
Mind maps facilitate team collaboration by providing a visual representation of collective thoughts, making it easier to brainstorm, organize, and evolve ideas in a group setting.
What benefits do mind maps offer to content researchers?
For content researchers, mind maps can organize complex information, outline structures for articles or content creation, and visually connect various research elements, enhancing clarity and efficiency in the research process.
Summary
Using mind maps for content planning and organization is a powerful way to streamline your content creation process. By using a visual representation of your content ideas, you can easily identify connections between ideas and save time by quickly seeing what content you have already created and what content you still need to create.
There are a number of mind-mapping tools you can use. Each tool has its own unique features and benefits, so it’s important to choose the one that best fits your needs and preferences.
With the right mind-mapping tool, you can streamline your content planning process and create more effective and organized content.
This transformational book is essential reading for understanding the importance of using effective systems to grow your business.
The E-Myth: Why Most Small Businesses Don’t Work And What To Do About It
This transformational book is essential reading for understanding the importance of using effective systems to grow your business.
The E-Myth is a classic tome in the world of entrepreneurship.
In this best-selling book, Michael E. Gerber argues that most small businesses fail because their owners fall into what he calls “the e-myth trap.”
This trap is the belief that just because you’re good at something, you’ll automatically be good at running a business that does that thing.
In other words, if you’re a great baker, you’ll automatically be a great bakery owner.
In The E-Myth, Michael Gerber dispels the myths surrounding starting your own business and shows how commonplace assumptions can get in the way of running the business.
Gerber contends that running a business is actually a completely different skill set from the actual work the business does. It’s like being a great football player and thinking that automatically makes you a great coach or team owner. They are different jobs that require different skills.
So, what’s the solution to the e-myth trap?
Gerber suggests that small business owners need to think like franchisees, even if they have no intention of franchising their business. This means creating a system for everything and treating your business like a well-oiled machine. It means working on your business, not just in it.
To do this, Gerber advises business owners to develop standard operating procedures for every aspect of their business, from how to answer the phone to how to package products for shipping. He also stresses the importance of delegating tasks to employees and using technology to automate processes wherever possible.
In short, if you want your business to succeed, you need to think like a franchisee and treat your business like a well-oiled machine. Don’t fall into the e-myth trap – unless you want your business to crash and burn like a stunt car at a demolition derby.
Applying E-Myth Principles To Content Management
So, how can this book help you when it comes to content management?
Well, for a start, the entire approach of this course is based on using E-Myth principles to manage your content effectively.
One of the key takeaways from Gerber’s book is that business owners — especially small business owners — need to work on their businesses, not just in them.
This means focusing on developing and implementing effective systems and processes that can be replicated and scaled, and employing people to manage these systems and processes, rather than trying to manage people and relying on them to do day-to-day tasks that will keep the business running in their own way.
This ensures that your content-related systems and processes are managed in an efficient and organized way, that they can be measured and improved upon, and that this can ultimately lead to achieving your business goals and objectives.
Next, Gerber stresses the importance of creating standard operating procedures for every aspect of your business. This ensures that every aspect of the business is consistent and reliable, no matter who is doing the work.
Another important aspect of Gerber’s approach is the emphasis on delegating tasks to your team and training them to follow and contribute to improving the systems, processes, and procedures of the business.
This helps to prevent organization-wide burnout and failure and allows the business to focus on its strategic aspects, such as growth and expansion.
Finally, Gerber emphasizes the importance of using technology to automate processes wherever possible. This not only saves time and money, but it also ensures that the business is scalable and can grow without becoming overwhelmed by manual processes.
The book walks you through the steps in the life of a business from entrepreneurial infancy, through adolescent growing pains, to the mature entrepreneurial perspective, the guiding light of all businesses that succeed.
Gerber then shows how to apply the lessons of franchising to any business whether or not it is a franchise. Finally, Gerber draws the vital, often overlooked distinction between working on your business and working in your business.
“The E-Myth” is an essential read if you plan to start a small business or improve the performance of an existing business, including all your content-related areas.
PhantomBuster is a lead generation automation tool that helps you automate your lead generation process.
Automate Your Lead Generation With PhantomBuster
PhantomBuster is a powerful lead-generation tool that helps you automate your lead-generation process.
Generating leads is crucial for acquiring new customers and increasing revenue.
However, lead generation can be a challenging task, and one of the biggest obstacles is obtaining verified email addresses for contacting prospects.
PhantomBuster is a powerful tool that lets you generate leads from all major networks and websites with 100+ ready-made automation tools, including obtaining verified email addresses of prospects for your business.
In this article, we briefly cover what PhantomBuster is and the benefits of using this powerful lead generation tool.
What Is PhantomBuster?
PhantomBuster is an automation tool that carries out automated actions on your behalf, and with its intuitive dashboard, you can set it up in minutes.
Use PhantomBuster’s Email Extractor to obtain verified email addresses of prospects.
It works via 100+ automation tools for every major platform and website you can think of, running actions on your behalf while you focus on more important things.
PhantomBuster is designed with lead generation in mind; so your sales and marketing teams will particularly benefit from this software.
For example, you can use Phantoms and Flows (See “How To Use” section below) to auto-connect with a list of LinkedIn profiles, gather emails from a Sales Navigator search, send personalized messages on Twitter, collect contact data from a Google Maps search, extract the followers of an Instagram account, and so much more.
To learn all that you can do with PhantomBuster, visit their site, check out their add-ons store, and read their blog for tutorials on how to extract verified email addresses from LinkedIn, how to automate your lead generation, how to connect Phantoms to your CRM, etc.
How To Use PhantomBuster
There are two types of automations that you can use; “Phantoms” and “Flows.”
A Phantom is an automation that works solo, while a Flow has multiple actions that work in sync with each other.
All you have to do is select a Phantom or Flow from the store, add an input (e.g. your session cookie or an API key to get access), specify what you would like the Phantom/Flow to do, and how often (e.g. run a search URL or work through a Google Sheet database), and hit ‘Launch’.
The automation tool will then take care of the rest. When it’s finished running, it will create a data output file with all the resulting information—ready for you to upload straight to your CRM.
The video below explains what a Phantom is:
Benefits Of Using PhantomBuster To Automate Your Lead Generation
PhantomBuster saves you time and streamlines your lead-generation process with over 100 automated actions across all major websites and platforms.
Instead of losing hours on manual tasks, you can have more time to invest in building real relationships with your clients.
Data extraction that would normally take days will only take a few minutes. You can source targeted profiles from any major platform or website and add them to a .CSV file, Google Sheets document, or spreadsheet.
With verified email addresses, company details, phone numbers, and more, PhantomBuster lets you fill in the gaps and enrich data and emails. You can send tailored messages to nurture new leads and track your progress to ensure the best results.
Phantoms automatically scrape existing public and verified data from users’ digital footprints on the platform.
Note: Data scraping with PhantomBuster is not illegal provided you operate and comply with best practice guidelines.
Try Out PhantomBuster With A Free Trial
PhantomBuster offers a 14-day free trial. Simply create an account (no credit card needed), and test out the platform, tools, and features for yourself.
Streamline your workflow and maximize your team’s potential with content management automation.
Content Management Automation
Streamline your workflow and maximize your team’s potential with these content management automation tips.
With the sheer amount of content being produced every day, manual management and optimization can be overwhelming.
Automating certain content management tasks can greatly improve efficiency and productivity and free up your team’s time to focus on more critical tasks, such as strategy, ideation, and analysis.
This lesson is part of our content automation series and provides essential content management automation tips that can help streamline your workflow and maximize your team’s potential.
Content Management Automation Tips
Here are some essential content planning automation tips to help you streamline your workflow and boost your team’s productivity:
1) Use AI-Powered Tools For Content Ideation
AI-powered tools can help you generate content ideas based on trending topics, search queries, and social media activity. These tools can analyze search data, social media trends, and competitor content to suggest topics that are relevant and likely to perform well, provide valuable insights into the performance of your existing content, and suggest ways to optimize it.
Follow these steps to automate your content ideation:
Enter a keyword or topic related to your industry or niche.
Use the tool to generate a list of content ideas based on popular topics and trends.
Use the ideas generated by the tool to create new content or improve existing content.
Some popular AI-powered content ideation tools include:
SemRush – offers a range of SEO and content marketing tools, including a content ideation tool that can help you generate ideas for your content.
BuzzSumo – allows you to analyze popular content and identify popular topics and trends.
AnswerThePublic – generates a list of popular questions related to your keyword, which can help you create content that addresses the needs and concerns of your target audience.
See these lessons and resources for more information:
Automating your content creation process can save your team hours of work every week and reduce your reliance on external content creators, which can result in significant cost savings.
You can use content creation templates, pre-designed layouts, and AI-powered tools to save time and generate content quickly and efficiently.
Follow these steps to automate your content creation process:
Identify the areas of your content creation process that can be automated, such as content formatting, image creation, or video editing.
Choose the automation tools that meet your needs.
Integrate the tools into your content creation workflow.
Test and optimize your automated content creation process to ensure that it meets your standards for quality and effectiveness.
Use content creation templates to streamline your process and ensure consistency in formatting and style.
Use AI-powered editing and proofreading tools.
Create a content calendar to plan and schedule your content in advance.
Delegate tasks to team members or freelancers to help reduce workload and ensure timely delivery.
Some popular content creation automation tools include:
ChatGPT – helps save time by generating high-quality content such as articles, blogs, social media posts, emails, and other types of content quickly and efficiently. Using predefined templates and guidelines can ensure that all content produced is aligned with your brand’s values and message.
Canva – allows you to create and edit images and graphics for your content.
Grammarly – offers a range of writing and editing tools, including grammar and spell check, tone detection, and plagiarism detection.
Copy.ai – an AI-powered writing tool that can help you write high-quality blog posts, social media posts, and emails faster and better by cutting down your writing time by up to 80%
Lumen5 – create videos from your existing content or from scratch using AI-powered technology.
See these lessons and resources for more information:
Optimizing your content for search engines can help you rank higher in search results, increase your visibility, attract more organic traffic, and reach a wider audience.
Automating the optimization process can save you time and ensure that your content is optimized for the right keywords, meta descriptions, and tags.
Follow these steps to automate your content optimization:
SmartCrawl – a popular WordPress plugin that provides on-page SEO optimization tools, including content analysis, meta-tag optimization, and keyword analysis.
Google Analytics – Google Analytics provides insights into your website traffic and user behavior, which can help you optimize your content for search engines.
Ahrefs – Ahrefs is an SEO optimization tool that provides insights into your website’s backlinks, keywords, and content performance.
See these lessons and resources for more information:
Social media scheduling can be a time-consuming task, but automating your social media scheduling process can help you save time, increase efficiency, and post content consistently and efficiently.
You can use scheduling tools to schedule posts in advance and ensure that your content is posted at the right time for your target audience.
Follow these steps to automate your social media scheduling:
Test and optimize your social media scheduling process to ensure that it meets your standards for quality and effectiveness.
Additionally:
Consider using AI-powered tools to help with content creation and scheduling.
Utilize social media analytics to monitor your performance and adjust your strategy accordingly.
Be sure to customize your content for each social media platform, taking into account the unique features and audience preferences of each one.
Some popular social media scheduling tools include:
SproutSocial – streamline your social media presence by automating the scheduling and publishing of posts across various social media channels, and easily manage your social media accounts from a single dashboard, making it easy to collaborate with your team members and track your social media performance.
Hootsuite – manage and schedule your social media posts across multiple platforms, including Facebook, and Twitter. Consider using Hootsuite’s Bulk Scheduling feature to upload multiple posts at once.
Buffer – schedule social media posts in advance across multiple social media platforms such as Twitter, Facebook, Instagram, LinkedIn, and more.
See these lessons and resources for more information:
5) Use Analytics Tools To Measure And Analyze Your Content Performance
Analytics tools can provide valuable insights into your content’s performance, such as engagement rates, traffic sources, and conversion rates.
Automating the analysis process with analytics tools can also help you track and analyze your content performance, so you can identify areas for improvement and optimize your content strategy.
There are many analytics tools you can use to measure your content’s performance, including:
Website analytics tools for tracking website traffic, user behavior, and conversion rates. Pay attention to metrics such as bounce rate, time on page, and conversion rate to evaluate the effectiveness of your content.
Social media analytics tools to help you track engagement and reach on social media platforms.
Heat mapping tools to help you analyze user behavior and improve website design and content.
Here’s how to use Google Analytics to measure and analyze your content performance:
Create a Google Analytics account and connect your website to the platform.
Set up goals and conversions to track user behavior and measure the effectiveness of your content.
Use the Behavior reports to analyze how users interact with your website and identify popular pages or areas that need improvement.
Use the Acquisition reports to track how users find your website and which channels are driving the most traffic.
Use the Audience reports to understand your audience demographics, behavior, and interests.
Use the Realtime reports to monitor your website traffic in real-time and make data-driven decisions.
Use the data gathered from these tools to inform your content strategy and make data-driven decisions for future content creation.
See these lessons and resources for more information:
We use cookies on our website to give you the most relevant experience by remembering your preferences and repeat visits. By clicking “Accept”, you consent to the use of ALL the cookies.
This website uses cookies to improve your experience while you navigate through the website. Out of these, the cookies that are categorized as necessary are stored on your browser as they are essential for the working of basic functionalities of the website. We also use third-party cookies that help us analyze and understand how you use this website. These cookies will be stored in your browser only with your consent. You also have the option to opt-out of these cookies. But opting out of some of these cookies may affect your browsing experience.
Necessary cookies are absolutely essential for the website to function properly. These cookies ensure basic functionalities and security features of the website, anonymously.
Cookie
Duration
Description
cookielawinfo-checkbox-analytics
11 months
This cookie is set by GDPR Cookie Consent plugin. The cookie is used to store the user consent for the cookies in the category "Analytics".
cookielawinfo-checkbox-functional
11 months
The cookie is set by GDPR cookie consent to record the user consent for the cookies in the category "Functional".
cookielawinfo-checkbox-necessary
11 months
This cookie is set by GDPR Cookie Consent plugin. The cookies is used to store the user consent for the cookies in the category "Necessary".
cookielawinfo-checkbox-others
11 months
This cookie is set by GDPR Cookie Consent plugin. The cookie is used to store the user consent for the cookies in the category "Other.
cookielawinfo-checkbox-performance
11 months
This cookie is set by GDPR Cookie Consent plugin. The cookie is used to store the user consent for the cookies in the category "Performance".
viewed_cookie_policy
11 months
The cookie is set by the GDPR Cookie Consent plugin and is used to store whether or not user has consented to the use of cookies. It does not store any personal data.
Functional cookies help to perform certain functionalities like sharing the content of the website on social media platforms, collect feedbacks, and other third-party features.
Performance cookies are used to understand and analyze the key performance indexes of the website which helps in delivering a better user experience for the visitors.
Analytical cookies are used to understand how visitors interact with the website. These cookies help provide information on metrics the number of visitors, bounce rate, traffic source, etc.
Advertisement cookies are used to provide visitors with relevant ads and marketing campaigns. These cookies track visitors across websites and collect information to provide customized ads.

 Content monetization and content management are intricately connected in our digital ecosystem.
 In content marketing, A/B testing, also known as split testing, is a systematic approach that compares two versions of a webpage to determine which one performs better in achieving predefined goals.
 This guide provides a comprehensive overview of content management for e-commerce websites.
 In today’s digital age, effective content management has become a cornerstone for small business success.
 In today’s competitive business landscape, providing exceptional customer support is no longer an option, it’s a necessity.


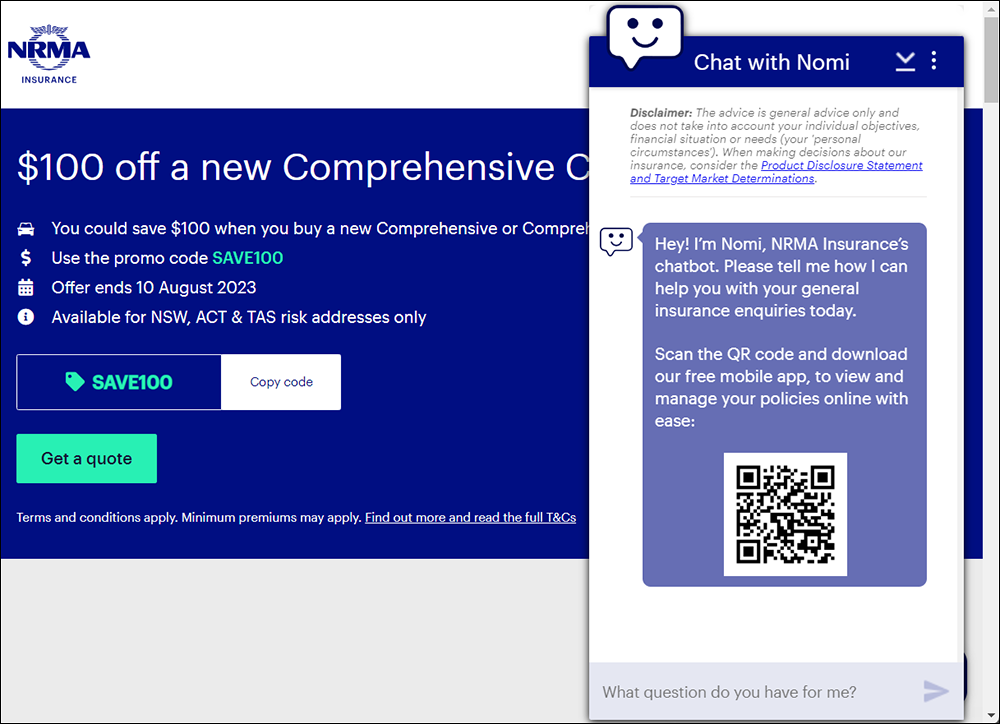


 Are your customers spending a huge amount of time searching through your documentation for answers? Do you wish you could automate your customer support and free up valuable time for your team?
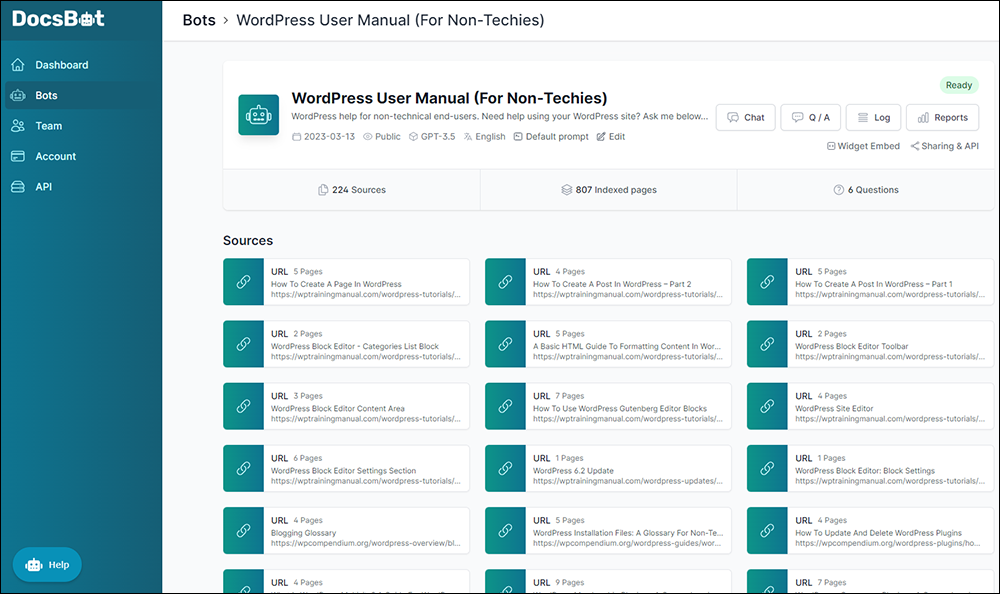


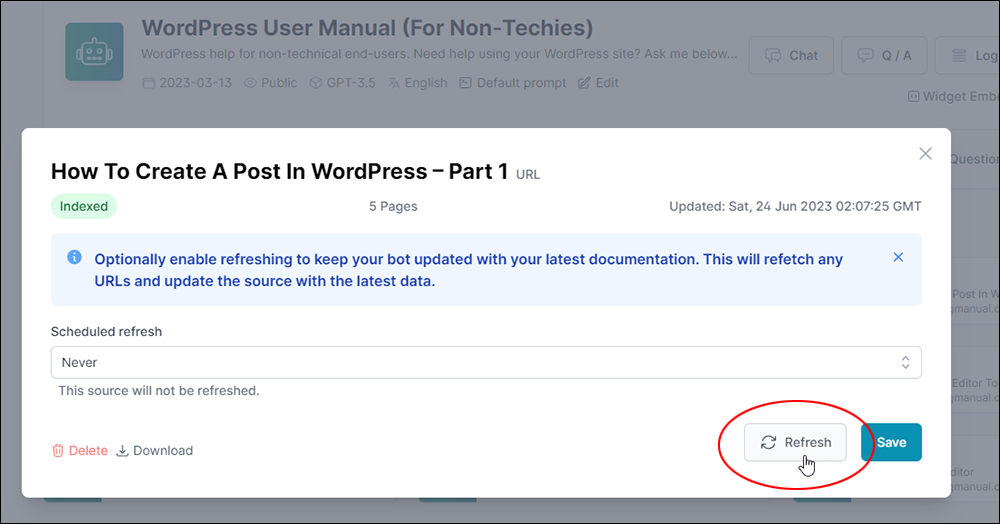


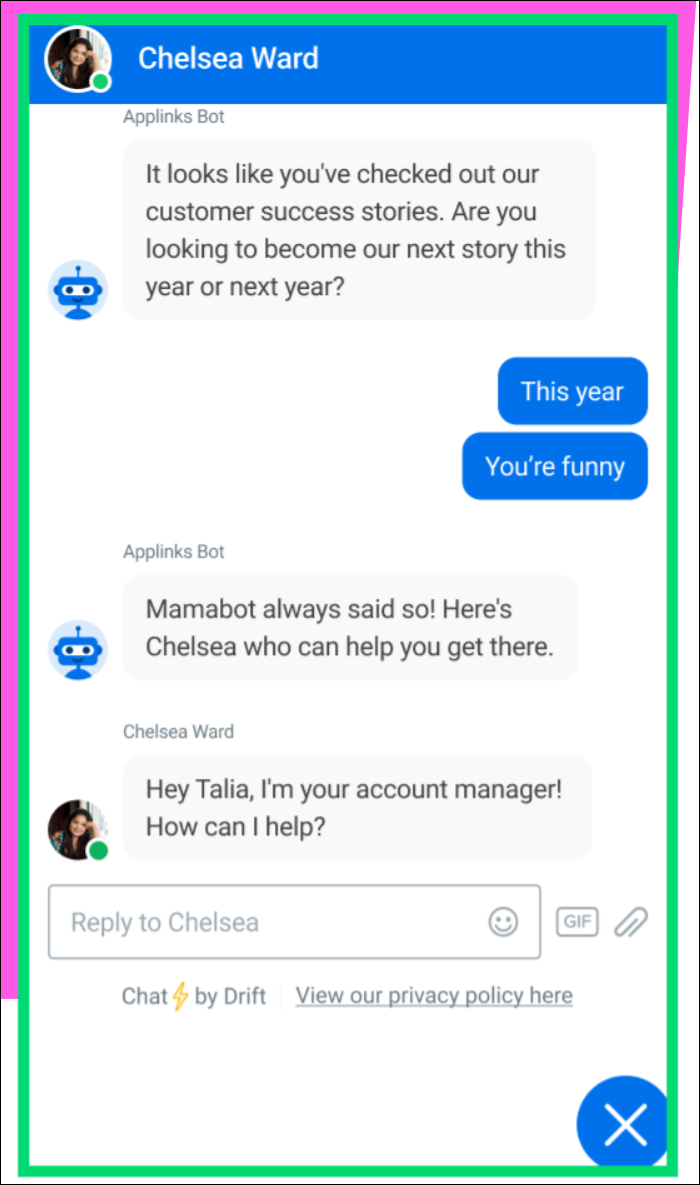


 Traditional content management practices are time-consuming and resource-intensive.


 Content governance is the process of establishing rules and guidelines for creating, editing, and publishing content.
 Content management is the process of creating, editing, and publishing digital content to reach target audiences. It is an essential part of any digital marketing strategy.
 Content automation uses technology to create, manage, and distribute content and involves a wide range of tools that use artificial intelligence (AI), machine learning (ML), and natural language processing (NLP) to automate various aspects of content creation and distribution, including content creation, curation, optimization, and distribution.
 Mind mapping is a powerful and effective tool for content planning as it enables you to brainstorm ideas, organize your thoughts, and identify key concepts in a logical and systematic manner.