Learn about the key benefits and features of an Enterprise Content Management System (ECMS) and popular ECMS platforms.
Enterprise Content Management Systems (ECMS)
Learn about the key benefits and features of an Enterprise Content Management System (ECMS) and popular ECMS platforms.
Learn what an Enterprise Content Management System (ECMS) is, the benefits and key features of an ECMS, and how to choose the best ECMS platform for your needs.
Enterprise Content Management is a framework of tools, methodologies, and processes for managing content throughout its lifecycle, automating workflows and streamlining business processes to drive business goals.
An Enterprise Content Management System (ECMS) is a type of CMS platform designed to facilitate this, allowing organizations to manage, store, and retrieve large amounts of critical business content.
ECMS provides a centralized repository for all types of content, including documents, images, videos, and other digital assets, and a range of tools and features for managing digital content, including document management, workflow management, and version control.
ECM systems also typically comprise six core components (Capture, Manage, Store, Preserve, Access, and Automate), allowing your organization to control all aspects of your document management lifecycle, from creation to destruction.
ECMSs are ideal for organizations that have a large amount of digital content and need to manage it efficiently. They offer features such as advanced search capabilities, secure access to content, and the ability to manage content across multiple departments and locations.
ECMS Features
Key features of Enterprise Content Management Systems include:
Physical document scanning and capturing via tools such as OCR and intelligent document processing.
Advanced search and retrieval capabilities for finding and accessing content via connected information silos.
Document management, workflow automation, approval processes, and collaboration tools for managing and publishing content simultaneously across multiple departments and locations.
Secure access controls for managing who can access and edit content.
Integration with other tools and systems, such as customer relationship management (CRM), customer communication management (CCM), and enterprise resource planning (ERP) systems.
Ability to manage personalized interactions with large volumes of customers.
Version control and history tracking for managing multiple versions of content.
Records management to automatically retain and schedule content disposal.
ECMS Benefits
Enterprise Content Management Systems provide many tangible benefits to organizations. For example, they:
Simplify, centralize, organize, improve, and optimize business processes and information management, making it easy for organizations to manage and access large amounts of content across multiple departments and locations.
Help to ensure that critical business content and sensitive information is secure and accessible only to authorized users.
Provide tools for managing and publishing content effectively and act as a content repository for external applications, which can improve productivity and efficiency, and reduce costs.
Enhance collaboration by allowing multiple users to work on the same content simultaneously.
Enable mobile and remote working with cloud-based file sharing, and document library services.
Help to ensure that the latest version of content is always available, which can help to avoid confusion and errors.
Improve and strengthen compliance and governance by ensuring that content is managed in accordance with legal and regulatory requirements.
ECMS Pros
Some of the pros of using an Enterprise Content Management System include:
ECMS facilitates digital transformation.
ECMS provides advanced search and retrieval capabilities for finding and accessing content.
ECMS offers workflow and collaboration tools for managing and publishing content across multiple departments and locations.
ECMS provides secure access controls for managing who can access and edit content.
ECMS Cons
Some of the cons of using an Enterprise Content Management System include:
ECMS can be complex and difficult to set up and configure.
ECMS can be expensive and require a significant investment.
ECMS may require technical skills to set up and customize.
Popular ECMS Platforms
Most of the popular Enterprise Content Management Systems (ECMS) provide advanced features for collaboration, document management, and workflows, allowing businesses to securely store, manage, and access all types of digital assets, including documents, images, videos, and audio files, and offer platforms that are scalable and customizable, so it can grow with your business and be configured to meet your unique needs.
The ECMS platforms below will not only enable your organization to better manage and share content, documents, and information and collaborate on projects, but they will also help to improve your content management processes, streamline your workflows, and store and manage your content more effectively:
Microsoft SharePoint
Microsoft SharePoint
Microsoft SharePoint is a cloud-based enterprise content management system (ECMS) that not only enables organizations to manage and share information and collaborate on projects, but it also allows users to create and manage websites, intranet portals, extranet sites, document libraries, and lists.
SharePoint integrates with other Microsoft applications such as Office 365, Exchange, and OneDrive, making it easy for users to access and manage their content from a single location. Additionally, SharePoint is a highly scalable and secure platform, making it ideal for organizations of all sizes and industries.
SharePoint provides a centralized platform for document management, version control, and workflow management. It also features powerful search capabilities and a flexible architecture that enables organizations to customize and extend the system to meet their specific needs.
Key features of Microsoft SharePoint include:
Integration with other Microsoft applications such as Office 365, Exchange, and OneDrive
Flexible and customizable architecture
Strong security features
Scalable and suitable for organizations of all sizes
IBM FileNet
IBM FileNet
IBM FileNet is an enterprise-level ECMS that is known for its advanced features, scalability, and integration with other IBM products. It provides tools for managing and organizing content, documents, and records.
IBM FileNet is a comprehensive enterprise content management system (ECMS) designed to help businesses manage, store, and share their critical content.
With IBM FileNet, you can centralize all your content in one place, regardless of format or source, and access it from anywhere, at any time. The platform provides robust collaboration and workflow tools, so teams can work together more efficiently, and it also integrates with a range of other systems and tools, including CRM, ERP, and document management systems.
One of the key benefits of IBM FileNet is its scalability and flexibility. The platform is designed to handle large volumes of content and can be easily configured to meet the unique needs of your business. Additionally, IBM FileNet provides advanced search and discovery capabilities, so you can quickly find the content you need, and it offers robust security features to ensure that your content is protected at all times.
Another strength of IBM FileNet is its enterprise-level capabilities. The platform provides a full range of content management features, including document management, records management, and imaging and capture, so you can manage all aspects of your content lifecycle from a single, centralized platform. Additionally, IBM FileNet provides robust user management and permission controls, so you can ensure that only authorized users have access to your content.
Overall, IBM FileNet is a powerful ECMS that is well-suited for businesses of all sizes, from small startups to large enterprises. Whether you’re looking to improve your content management processes, streamline your workflows, or simply store and manage your content more effectively, IBM FileNet is a solution that can help you achieve your goals.
Key features of IBM FileNet include:
Advanced document management and imaging capabilities
Robust business process management capabilities
Strong security and compliance features
Integration with other IBM products and solutions
OpenText Content Cloud
OpenText Content Cloud
OpenText Content Cloud offers a powerful suite of end-to-end enterprise content management solutions, from capture to full lifecycle management to archiving, and provides businesses with a centralized platform for storing, managing and sharing their content.
Content Cloud integrates with the systems that produce and consume information, extending enterprise-grade content management deeper into the organization and facilitating seamless access, distribution, and use of both structured and unstructured data.
With OpenText, your business can securely store all types of digital assets, including documents, images, videos, and audio files, and access them from anywhere, at any time. The platform is highly scalable and customizable, can be configured to meet unique business needs, and provides robust collaboration and workflow tools, so teams can work together more efficiently.
One of the key benefits of OpenText content services is its extensive set of features and functionalities, which allow businesses to manage and track all aspects of their content lifecycle, from creation to archiving. The platform also provides advanced search and discovery capabilities, so you can quickly find the content you need, and it integrates with a range of other systems and tools, including CRM, ERP, and document management systems.
Another strength of OpenText is its security features, which are designed to protect content and ensure that only authorized users have access to it. The platform provides a secure and scalable infrastructure, as well as robust user management and permission controls, ensuring that content is protected at all times.
Overall, OpenText provides a comprehensive ECMS that is well-suited for businesses of all sizes, from small startups to large enterprises.
Key features of OpenText include:
Scalable and suitable for large enterprise environments
Advanced document management capabilities
Robust business process management and automation capabilities
Integration with other OpenText products and solutions
Alfresco
Alfresco
Alfresco is a leading open-source enterprise content management system known for its versatility and flexible architecture. It provides tools for managing and organizing content, documents, and records, and is widely used by organizations of all sizes.
One of the key benefits of Alfresco is its open-source nature, which gives you the freedom to modify the software and integrate it with other systems and tools as needed.
The platform also offers robust collaboration and workflow tools, so teams can work together on projects in real time, and it provides advanced search and discovery capabilities, so you can quickly find the content you need.
Additionally, Alfresco is built on a secure and scalable infrastructure, so you can be confident that your content is protected and easily accessible when you need it.
Key features of Alfresco include:
Open source and highly customizable platform
Robust document management capabilities
Advanced workflow and collaboration features
Strong integration with other systems and applications
Hyland OnBase
Hyland OnBase
Hyland OnBase is a single enterprise information platform designed to manage content, processes, and cases.
OnBase centralizes important business content in one secure location and then delivers relevant information to businesses when they need it, wherever they are, helping to increase productivity, deliver excellent customer service, and reduce risk across the entire enterprise.
Some of the key features of this ECMS include version control, metadata management, records management, and integration with a wide range of third-party applications and services.
Key features of Hyland OnBase ECMS include:
Advanced document management and imaging capabilities
Robust business process management and automation capabilities
Integration with other systems and applications
Strong security and compliance features
Nuxeo
Nuxeo
Nuxeo is an open-source cloud-based ECMS that is known for its advanced features, scalability, and integration with other tools and platforms. It provides tools for managing and organizing content, documents, and records, and is widely used by organizations of all sizes.
Nuxeo’s platform differs from other traditional Digital Asset Management Systems (DAMS) and ECMSs. Its Federation framework connects your enterprise information systems to provide a central hub for all business information, a single platform to build custom applications, and the ability to optimize and modernize your information management technology stack, delivering a 360° view of all the information within your organization and allowing you to connect with other ECM systems, core business applications, productivity tools, file sharing apps, and all content types to manage customers, cases, suppliers, invoices, etc.
Key features of Nuxeo include:
Open source and highly customizable platform
Robust document management capabilities
Advanced workflow and collaboration features
Strong integration with other systems and applications
Oracle WebCenter Content
Oracle WebCenter Content
Oracle WebCenter Content is an enterprise-level ECMS that provides advanced features for managing and organizing content, documents, and records. It is widely used by large organizations for managing critical business content, especially in the finance and healthcare industries.
Key features of Oracle WebCenter Content ECMS include:
Scalable and suitable for large enterprise environments
Advanced document management and imaging capabilities
Robust business process management and automation capabilities
Integration with other Oracle products and solutions
Box
Box Enterprise Content Management
Box is a cloud-based enterprise content management system that provides organizations with a secure and scalable platform for managing their content.
With Box, businesses can store, share, and collaborate on a wide range of digital assets, including documents, images, videos, and audio files.
Box’s ECMS is designed to be flexible and scalable, so it can grow with your organization as your content management needs change.
Some of the key features of Box’s ECMS include collaboration tools, version control, access controls, metadata management, and integration with a wide range of third-party applications and services.
Box also offers robust security features, including encryption, audit trails, and role-based access controls.
Key features of Box include:
Cloud-based platform with strong security features
Advanced collaboration and workflow capabilities
Integration with other systems and applications
Suitable for both small and large organizations.
Choosing The Right ECMS For Your Organization
An Enterprise Content Management System (ECMS) is a critical tool for organizations that want to effectively manage, store, and retrieve large amounts of critical business content.
By providing a centralized repository for all types of content, an ECMS can help your organization improve information management, enhance collaboration, improve security, and ensure compliance with legal and regulatory requirements.
Each ECM system has its own strengths and weaknesses, and the best choice will depend on the specific needs and requirements of your organization.
When choosing an ECMS, it is important to consider factors such as the size and complexity of the content, the types of content being managed, the need for collaboration and workflow tools, and the need for integration with other tools and systems.
Additionally, consider the costs associated with an ECMS, including both the initial investment and ongoing maintenance and support costs, and the desired level of customization.
Enterprise Content Management Systems (ECMS) – Frequently Asked Questions
What is an Enterprise Content Management System (ECMS)?
An ECMS is a system used to manage an organization’s documents and other content throughout their lifecycle, from creation to archiving. It improves business efficiency by organizing, storing, and easily retrieving information.
What are the key components of an ECMS?
The key components include document management, records management, workflow management, and capture and imaging. These help in organizing, storing, securing, and retrieving documents efficiently.
What are the benefits of implementing an ECMS?
Benefits include improved efficiency, reduced operational costs, enhanced security, compliance with regulations, and increased employee and customer satisfaction.
What are the drawbacks of using an ECMS?
Potential drawbacks include high initial costs, the complexity of system implementation, the need for ongoing maintenance, and possible resistance to change from employees.
How does an ECMS improve business efficiency?
An ECMS streamlines document management processes, reduces time spent searching for documents, automates workflows, and ensures information is readily accessible, thus enhancing overall productivity.
What types of organizations benefit most from an ECMS?
Organizations of all sizes across various industries, especially those with heavy documentation needs such as legal, healthcare, finance, and government, benefit significantly from an ECMS.
What are the pros and cons of an ECMS?
Pros: Increased efficiency, better compliance, enhanced security, and cost savings in the long term.
Cons: High initial setup cost, complexity, and potential resistance from users.
What should be considered when choosing an ECMS?
Consider the system’s scalability, integration capabilities with existing systems, user-friendliness, compliance features, security measures, and total cost of ownership.
Track content progress and make data-driven decisions to optimize your content strategy with a content measurement plan.
Content Measurement Plan
Track the progress of your content and make data-driven decisions on how to optimize your content strategy with a content measurement plan.
Creating a content measurement plan is an essential step in any content marketing strategy.
In this article, we’ll explore the importance of creating a content measurement plan and the benefits it can bring to your business.
***
What Is A Content Measurement Plan?
A content measurement plan is not just a document, it is a powerful tool that can help to improve the effectiveness and ROI of your content marketing efforts.
By outlining the goals, objectives, key performance indicators (KPIs), measurement tools, and schedule for measuring and evaluating the performance of your content marketing efforts, a content measurement plan helps to track progress and make data-driven decisions on how to optimize your content strategy.
Benefits Of Having A Content Measurement Plan
The key benefits of having a content measurement plan include:
Alignment with business goals: A content measurement plan ensures that your content marketing efforts are aligned with your overall business goals and objectives, which can help to increase the ROI of those efforts.
Data-driven decisions: By tracking and analyzing key performance indicators, a content measurement plan allows you to make data-driven decisions on how to optimize your content strategy, which can help to improve the effectiveness of your efforts.
Improved ROI: By measuring and analyzing the ROI of content marketing, a content measurement plan can help you to identify which types of content are most effective and allocate resources accordingly.
Increased accountability: A content measurement plan helps to increase accountability by making it clear what goals and objectives have been set and how progress will be tracked and evaluated.
Better communication: A content measurement plan can help to improve communication between different stakeholders by providing a clear understanding of goals and objectives and how they will be measured.
Continuous improvement: Regular monitoring and measurement allows for continuous improvement, as data from the measurement can be used to adjust your strategy, improve your content and optimize your results.
How To Create A Content Measurement Plan
Creating a content measurement plan involves several steps, including:
Define goals and objectives: The first step in creating a content measurement plan is to define clear goals and objectives for your content marketing efforts. These should be aligned with your overall business objectives and should include specific, measurable targets. For example, a goal could be to increase website traffic by 10% in the next quarter.
Identify key performance indicators (KPIs): Once goals and objectives have been defined, the next step is to identify the key performance indicators (KPIs) that will be used to measure progress towards those goals. These should be specific, measurable metrics that are directly related to your goals and objectives. For example, website traffic and engagement rates are KPIs for the goal of increasing website traffic.
Select measurement tools: After identifying the KPIs, you’ll need to select the tools you will use to track and measure them. Examples of tools include Google Analytics, social media analytics, and marketing automation software.
Set a schedule: Decide on a schedule for monitoring the performance of your content, this could be monthly, quarterly, or even daily. This will help you to track progress and make adjustments to your content strategy as needed.
Analyze and interpret data: Once data has been collected, it’s important to analyze and interpret it to determine what’s working well and what’s not. This may involve identifying patterns, trends, and outliers, and making decisions based on the insights gained.
Make adjustments: Based on the analysis and interpretation of the data, make adjustments to your content strategy as needed. This may involve making changes to the types of content you’re creating, the channels you’re using to distribute it, or the messages you’re communicating.
Content Measurement Plan – An Example
Here is an example of a content measurement plan:
Goal: Increase website traffic by 10% in the next quarter
KPIs: Website traffic, bounce rate, time on page, and new vs returning visitors
Measurement tools: Google Analytics
Schedule: Monthly
Tasks:
Collect data from Google Analytics every month
Analyze the data to identify trends, patterns, and areas of opportunity
Compare the data from the current month to the data from the previous month
Use the insights gained to make adjustments to the content strategy.
Summary
A content measurement plan is not only a critical tool for any content marketing strategy, as it helps to track progress, make data-driven decisions, and improve the effectiveness and ROI of content marketing efforts, but it is also a living document and should be regularly reviewed and updated as needed.
Also, it is important to communicate the plan with the stakeholders involved in the content creation process, so that they understand the goals and objectives of the plan and how they can contribute to it.
A Document Management System can improve your organization’s productivity and efficiency.
Document Management Systems
A Document Management System can improve your organization’s productivity and efficiency.
A Document Management System (DMS) can play a crucial role in your content documentation system by providing a central location to store, manage, and organize all of your electronic and physical documents, automating tasks, providing security and compliance, and integrating with other tools.
In this lesson, we will discuss the key benefits and features to look for when selecting a Document Management System, and provide a list of popular DMS applications.
***
What Is A Document Management System?
Document management systems (DMS) are software programs designed to help organizations manage, store, and track their electronic and physical documents.
These systems provide a centralized repository for all documents, making it easy for users to access and share information.
They also offer powerful tools for organizing, searching, and retrieving documents, as well as for controlling access to them.
Benefits Of Using A DMS
When selecting a DMS, it’s important to consider the specific needs of your organization.
Some key features of a DMS to look for include:
Document organization: A DMS should provide a centralized repository for all documents, making it easy to organize and categorize them. This can save time when searching for specific documents and ensure that all documents are stored in a consistent and easy-to-find location.
Document security: A DMS should include robust security features to protect sensitive information and ensure compliance with industry regulations. This can include user-level access controls, encryption, and backups.
Document version control: DMSs should provide version control functionality, which allows users to track changes made to a document over time and easily revert to previous versions.
Document retrieval: A good DMS should make it easy to search for and retrieve documents, even if they are stored in different locations. This can save time and increase productivity.
Document collaboration: A DMS should include tools for collaboration, such as commenting and shared editing. This can improve team communication and coordination.
Document workflow: Many DMSs include tools for automating document-related tasks, such as routing documents for approval or tracking their status. This can streamline document-related processes and improve efficiency.
Integration: Your DMS should easily integrate with other software systems you already use, such as email or project management tools. This can improve the overall workflow and collaboration between different tools.
Cost-effective: A good DMS should help to reduce the need for paper storage, which can save on costs related to printing, paper, and storage space.
Mobile access: Some DMSs allow users to access documents from mobile devices, which means employees can access their work even when away from the office.
Compliance: DMSs can help organizations to comply with legal and regulatory requirements by providing document retention and destruction policies, and audit trails of access and changes.
Time-saving: A great DMS should automate many of the manual tasks associated with document management such as document retrieval, organization, and version control, which can save time and increase productivity.
Popular DMS Applications
Here is a list of popular Document Management Systems:
Microsoft SharePoint: A web-based DMS that offers document storage, collaboration, and workflow tools. It also integrates with other Microsoft Office applications.
Google Drive: A cloud-based DMS that allows users to store and share files, including documents, images, and videos. It also includes tools for collaboration and commenting on documents.
Dropbox: A cloud-based DMS that enables users to store and share files and folders. It also includes tools for file syncing, version control, and collaboration.
Box: A cloud-based DMS that offers tools for storing, sharing, and collaborating on documents. It also includes advanced security and compliance features.
Evernote: A note-taking application that can also be used as a DMS. It allows users to store and organize documents, images, and audio recordings.
DocuSign: An electronic signature and document management platform that allows users to sign and send documents electronically. It also includes tools for tracking document status and compliance.
Acrobat DC: A PDF editing and management tool that allows users to create, edit, and sign PDF documents. It also includes collaboration and commenting tools.
NetDocuments: A cloud-based DMS that offers document storage, search, retrieval, and collaboration tools. It also includes advanced security and compliance features.
iManage: A DMS that is specifically designed for the legal industry. It offers document management, email management, and knowledge management tools, as well as advanced security and compliance features.
M-Files: A DMS that uses metadata to organize and classify documents. It also includes tools for document workflow and collaboration, as well as advanced security and compliance features.
Alfresco: An open-source DMS that offers document management, collaboration, and workflow tools. It also allows for integration with other software systems.
OpenText Content Suite: A DMS that offers document management, collaboration, and workflow tools, as well as advanced security and compliance features. It also allows for integration with other software systems.
FileHold: A DMS that offers document management, version control, and search and retrieval tools, as well as advanced security and compliance features. It also allows for integration with other software systems.
Docuware: A DMS that offers document management, workflow, and search and retrieval tools, as well as advanced security and compliance features. It also allows for integration with other software systems.
PairSoft(formerly PaperSave): A DMS that is specifically designed for the accounting industry. It offers document management, workflow, and search and retrieval tools, as well as advanced security and compliance features.
DMS vs CMS: What’s The Difference?
A Document Management System (DMS) and a Content Management System (CMS) are both software solutions that are used to manage, store, and distribute digital content.
However, there are some key differences between the two:
Content scope: A DMS is specifically designed to manage and store documents, such as Word, PDF, and Excel files. A CMS, on the other hand, is designed to manage and distribute a wider range of content, such as text, images, videos, and audio files.
Functionality: A DMS typically includes tools for document management, version control, and collaboration. A CMS, on the other hand, includes tools for creating, editing, and publishing content, as well as for managing and organizing website content.
User experience: DMSs are typically used by a specific group of users within an organization, such as the legal or accounting department. They are designed to be used by employees within the organization. A CMS, on the other hand, is used to manage and distribute content to a wider audience, including external users, customers, and clients.
Access Control: A DMS usually has more robust access control features than a CMS, as it is designed to manage and protect sensitive documents, while a CMS is designed to distribute content to a wider audience.
Integration: A DMS may have more integration options with other business-specific software such as accounting or project management systems. A CMS, on the other hand, may have more integration options with e-commerce and marketing platforms, as it’s focused on publishing and distributing content to the public.
In short, while both systems can be used together to manage all of your digital content…
A DMS focuses on managing and protecting documents within an organization, while a CMS focuses on creating, managing, and distributing content to a wider audience.
Document Management System (DMS) vs Document Library
A Document Management System (DMS) and a Document Library are both tools used to store and manage documents, but they serve different purposes and have different functionalities.
A Document Management System is designed to manage, track and store documents, as well as facilitate document collaboration, workflow, and sharing.
A DMS usually includes features such as version control, document check-in and check-out, audit trails, access controls, and document retention policies.
A DMS is also typically used in more complex environments, such as large organizations, where a significant amount of documentation is produced, and where document workflows and processes need to be strictly controlled and monitored.
On the other hand, a Document Library is a simpler tool designed to provide easy access to documents and resources. It usually allows users to upload and store documents in a central location, and share them with others.
A document library may include features such as search, filtering, categorization, and tagging to help users find the documents they need.
It is typically used in smaller organizations, such as small businesses or nonprofits, where the volume of documentation is lower and where simple access and organization of documents are the primary needs.
In short, a Document Management System is a more complex tool that provides advanced document management features, while a Document Library is a simpler tool designed to provide easy access to documents and resources. The choice between the two depends on your organization’s needs and the complexity of your document workflows and processes.
Here are frequently asked questions about documenting management systems:
What is Document Management?
Managing the creation, storage, organization, and disposal of documents within an organization.
Why is document management important?
It helps in maintaining organizational efficiency, ensures compliance with laws and regulations, and improves information accessibility and security.
What is a Document Management System (DMS)?
A DMS is a system used to receive, track, manage, and store documents to reduce paper and organize electronic documents. These systems maintain records of the various versions created and modified by different users (history tracking).
Essentially, a DMS is a software system that manages, stores, and tracks electronic documents and electronic images of paper-based information.
What are the key benefits of using a document management system?
Benefits include improved efficiency in accessing and retrieving documents, reduced costs on paper and storage, significant reduction in physical storage space, better control over sensitive documents and strengthened data security, better compliance with regulations, enhanced efficiency, improved collaboration by allowing multiple users to work on documents simultaneously, and streamlined workflows.
What types of documents can be stored in a DMS?
Any type of document can be stored, including text files, PDFs, spreadsheets, images, and emails.
How much time will using a document management system actually save?
It varies by organization, but improvements in document retrieval times and workflow efficiencies can significantly reduce operational hours.
When should we use a Document Management System?
Whenever managing large volumes of documents, needing secure archival and quick access, or needing to comply with regulatory requirements.
What document management issues can a DMS solve?
It can solve issues related to document loss, access control, audit trail gaps, and inefficiencies in retrieval and storage.
How does a Document Management System reduce costs?
It reduces costs associated with physical storage, paper usage, and administrative overhead.
What should we look for in a document management system?
Key features should include version control, indexing and search, security measures, access controls, audit trails, document workflow, compliance tracking, and the ability to integrate with other business systems.
How do we begin to manage our documents more effectively with a document management system?
Start by defining document categories, setting up indexing and taxonomy, implementing access controls, and training staff on the new system.
How does a Document Management System differ from a Content Management System?
A Document Management System focuses specifically on managing documents in compliance with regulations and internal policies, primarily suited for handling formatted documents. In contrast, a Content Management System manages all types of content including web content and multimedia, often with tools for creating, editing, and publishing digital content.
Can Document Management Systems be web-based and locally hosted?
Yes, Document Management Systems can be configured as web-based solutions that are hosted on local servers or in the cloud, depending on organizational needs and security requirements.
What is an example of an enterprise application for Document Management?
Content Manager is an example of an enterprise application used as the official recordkeeping system by the University of Melbourne. It is designed to manage the lifecycle of information from creation to disposition.
What is records management?
The systematic control of records throughout their lifecycle, from creation to final disposition.
How long should we keep our records?
This depends on legal and business requirements; each type of record will have a different retention schedule based on regulatory and operational needs.
What is a record retention program?
A policy-based system to determine how long different types of records should be kept based on legal and operational requirements.
What is backfile conversion?
The process of converting paper documents into electronic formats to be managed and stored by a document management system.
How do I prepare my business to prevent data loss or breach disasters?
Implement robust data backup and recovery plans, use encryption, regularly update security protocols, and educate employees about cybersecurity.
What is electronic document management?
The use of computer systems and software to store, manage, and track electronic documents and electronic images of paper documents.
What is electronic document imaging?
The process of converting paper documents into digital images.
What does EDMS mean?
Electronic Document Management System, focused on managing, storing, and securing electronic documents.
What are the typical features of an EDMS?
Includes document indexing, search capabilities, version control, security features, workflow management, and compliance tracking.
Useful terms and definitions related to the creation, management, and distribution of digital content.
Content Management Glossary
This content management glossary provides terms and definitions related to the creation, management, and distribution of digital content.
Whether you are new to the content management field or an experienced professional content creator, digital marketer, project manager, or executive, this content management glossary will serve as a useful reference to understand content management terminology and concepts used in the field and help you stay up-to-date on the latest developments and best practices in content management.
Agile Content Marketing
Agile Content Marketing is a flexible approach to creating and managing content. It involves continuously planning, executing, and reviewing content in short cycles, allowing for quick adjustments based on feedback and performance. This method helps businesses stay responsive to market changes and customer needs, ensuring their content remains relevant and effective.
A statement that describes the purpose and values of a business.
Here are some examples of business mission statements:
“To provide the best products and services in our industry, and to always put our customers first.”
“To create value for our shareholders by building a sustainable and successful business that makes a positive impact on the world.”
“To be a responsible and innovative company that creates value for all of our stakeholders, including customers, employees, shareholders, and the communities in which we operate.”
“To help people achieve their financial goals and live better lives through innovative, reliable, and accessible products and services.”
“To be the leading provider of innovative, high-quality healthcare solutions that improve the lives of people around the world.”
“To be the most trusted and respected company in our industry, known for our commitment to excellence and innovation.”
“To be the global leader in providing sustainable solutions that improve the quality of life for all people.”
A plan for achieving the goals of a business, often involving the development of a unique value proposition and a competitive advantage.
Here is an example of a business strategy using content and content marketing:
Our company’s goal is to establish itself as the leading provider of healthy, convenient, and delicious food, helping people around the world to live their best lives.
To achieve this goal, we will develop a content marketing strategy focused on creating and distributing valuable, relevant, and consistent content to a clearly defined target audience. This content will include educational articles, recipe videos, and infographics that highlight the benefits of a healthy diet and the convenience of our company’s products.
The content marketing strategy will also include a strong social media presence, with regular posts showcasing the company’s products, highlighting customer success stories, and offering healthy living tips and inspiration. We will also partner with influential health and wellness bloggers and influencers to amplify its message and reach a wider audience.
Through this content marketing strategy, we will aim to attract and retain a loyal customer base, increase brand awareness and engagement, and ultimately drive sales and revenue growth.
The buyer journey is the process that a potential customer goes through to become aware of, evaluate, and purchase a product or service.
Understanding this process will help you create a content strategy aligned with your target audience’s interests.
The stages of the customer buyer journey can include awareness, research, evaluation, and purchase.
The goal of the customer buyer journey is to understand the customer’s needs and preferences and to guide them through the process of making a purchase.
The process of examining and evaluating written or spoken material to extract meaningful insights and improve the quality of the content.
Content analysis is an essential part of content research, as it can help to ensure that your content is relevant, informative, and engaging to your target audience.
A schedule or plan for creating, publishing, and distributing digital content, often organized by date or topic. A content calendar (also known as an “editorial calendar”) can help organizations plan and coordinate their content creation efforts and ensure a consistent flow of content to their audience.
The process of creating and maintaining records of digital content, including information such as the creation date, author, and any updates or revisions.
The processes and practices used to ensure that content is created, managed, and published in a way that is consistent with an organization’s policies and goals.
Content Management Lifecycle
The stages of content creation, management, and retirement within an organization.
Content Management Metrics
Data used to measure the effectiveness of an organization’s content management efforts.
Content Management Policy
A set of guidelines or rules governing the creation and management of content within an organization.
Content Management Strategy
A plan for creating, managing, and distributing content in a way that supports the goals of a business or organization.
A software application, platform, or a set of tools used to create, edit, organize, store, manage, and publish content on a website or other digital media.
Additional useful CMS-related terms include:
Asset – A digital file or piece of content that can be managed and reused within a CMS.
Workflow – A set of steps or processes for creating, reviewing, and publishing content within a CMS.
Metadata – Data about content, such as tags or keywords, that can be used to classify and organize it within a CMS.
Permalink – A permanent URL that points to a specific piece of content within a CMS.
User role – A set of permissions or privileges that determine what actions a user can take within a CMS.
Taxonomy – A system for classifying and organizing content within a CMS, often using categories and tags.
Content type – A category of content that is defined within a CMS, such as articles, products, or events.
Revision history – A record of all the changes made to a piece of content within a CMS, along with who made the changes and when.
API (Application Programming Interface) – A set of rules and protocols that allow different software systems to communicate and exchange data with each other.
Also, see these types of content management systems:
An enterprise content management system (ECMS) is a software solution that allows businesses to store, organize, and manage their digital content, regardless of format or location.
A component content management system (CCMS) is a software solution that helps organizations create, manage, and publish modular content in a structured manner to be used across different products, services, or platforms.
A digital asset management system (DAMS) is a platform designed to manage digital files such as images, videos, and audio files, allowing users to easily store, organize, retrieve, and distribute their assets.
A marketing strategy that involves the creation and distribution of valuable, relevant, and consistent content to attract and retain a clearly defined audience.
A content marketing plan is a strategy for creating and distributing valuable, relevant, and consistent content to attract and engage a specific target audience, with the goal of driving profitable customer action.
A content marketing strategy is a comprehensive plan for creating and distributing valuable, relevant, and consistent content to attract and engage a specific target audience, with the goal of driving profitable customer action.
It outlines the overall goals and objectives for your content, your target audience, the channels through which your content will be distributed, and the metrics by which success will be measured.
A content measurement plan is a document that outlines the goals, objectives, key performance indicators (KPIs), measurement tools, and schedule for measuring and evaluating the performance of your content marketing efforts.
It helps to track progress and make data-driven decisions on how to optimize your content strategy.
Data and metrics used to measure the performance and effectiveness of digital content, such as website traffic, engagement rates, and conversion rates.
Content Migration
The process of moving digital content from one platform or system to another.
Content Performance
The effectiveness of digital content in achieving its intended goals, such as generating website traffic or driving sales.
A detailed plan for creating and managing digital content, typically including goals, target audience, and a content calendar.
A content plan is a document that outlines the content that your business will create and publish in a given period of time.
It helps your business align its content with its overall marketing and business goals, and ensures that you have a steady stream of relevant, high-quality content to share with your audience.
Your content plan can be divided into smaller plans covering different aspects such as content production, content promotion, and content management, and distributed to different teams of departments responsible for managing and implementing these:
A content production plan is a detailed plan that outlines the specific actions and resources that your business will use to create and publish its content.
It is a more detailed version of a content plan and helps your business stay organized and on schedule when creating content.
A content management plan is a strategy for organizing, storing, and maintaining your business’s content over time.
It helps your business keep your content organized, ensure that it stays up-to-date and relevant, and make it easily accessible to the people who need it.
A Document Management System (DMS) is a software program that is designed to help organizations manage, store, and track their electronic and physical documents.
Evergreen Content refers to content that remains relevant and valuable over time. Unlike news articles or trend-based content, evergreen content addresses timeless topics and provides information that is consistently useful to your audience. Examples include how-to guides, tutorials, and FAQs. This type of content continuously attracts traffic and engagement long after it’s published.
Keyword Research
The process of identifying and analyzing the words and phrases that people use when searching for information on a particular topic.
Keyword research involves finding the terms that are most relevant to your content and that are likely to be used by your target audience. It is an essential part of content research, as it can help you to optimize your content for search engines and ensure that your content is being seen by the right people.
The marketing funnel is a framework used to describe the journey a potential customer goes through before making a purchase. It typically includes the stages of awareness, interest, consideration, and conversion.
The goal of the marketing funnel is to move potential customers through each stage, with the ultimate goal of converting them into paying customers.
A plan for promoting and selling a product or service, including an analysis of the market and the development of a unique selling proposition.
Metadata
Data about data, such as tags or descriptions, that can be used to describe and classify digital content.
Pomodoro Technique
The Pomodoro Technique is a time management method that breaks work into intervals, typically 25 minutes long, separated by short breaks. Each interval is called a “pomodoro.” After completing four pomodoros, take a longer break. This technique helps improve focus, reduce mental fatigue, and increase productivity by encouraging regular breaks.
Project Management
The process of planning, organizing, and overseeing the work of a team to achieve specific goals and meet specific success criteria. When managing content projects, this often involves using content production workflow tools.
A set of standards and guidelines that determine the writing, design, and formatting of your website, documentation, products, or brand.
A style guide serves as a reference for maintaining consistency and ensuring that the various elements of your website, documentation, products, or brand present a cohesive and professional image to your audience.
A document that outlines the guidelines and standards for creating and publishing content for your business.
It provides a set of rules and recommendations to ensure consistency and quality across all your content, from blog posts and social media updates to product descriptions and email newsletters, and standards for the writing, design, and formatting of your web content.
A style guide focuses on visual elements while a content style guide focuses on written elements. Both guides are essential tools for creating a consistent and recognizable brand identity.
The process of using data to identify patterns and trends in the content that is being consumed by a particular audience. By analyzing trends, your business can gain insights into the types of content that are popular among your target audience, and use this information to inform your content creation and marketing strategies.
A user persona is a fictional representation of a business’s ideal customer. It is based on data and research about the target audience, and it is used to help businesses create more effective marketing campaigns and design user-friendly products.
User personas provide a detailed and specific picture of who the target audience is, what their needs and goals are, and how they think and behave.
Learn how to improve your content management practices by documenting procedures effectively.
Documenting Procedures For Effective Content Management
Learn how to improve your content management practices by documenting procedures effectively.
In this article, we will explore the importance of documenting procedures and how to effectively create and maintain them.
We’ll also walk you step-by-step through an example of documenting a procedure when creating content documentation for your business.
***
Why Document Procedures?
Writing clear and comprehensive procedures is crucial for the smooth operation of your organization.
Not only do well-documented procedures provide a roadmap for your employees and team members to follow, but they also provide a record of the steps taken to complete a task, serve as a useful reference for new hires, set standards of quality and ensure consistency in work processes, and improve your overall content management practices.
What Is The Best Way To Document A Procedure?
There are a few key steps to documenting a procedure effectively:
Identify the purpose of the procedure: Clearly stating the purpose of the procedure will help ensure that it is followed correctly and will be useful for those who need to follow it.
Outline the steps involved: List the steps involved in the procedure in a logical order, using numbered or bullet points. Make sure to include any necessary details, such as specific tools or equipment that will be needed.
Use clear and concise language: Use language that is easy to understand and avoid using jargon or technical terms that may not be familiar to all readers.
Include any necessary warnings or precautions: If there are any potential hazards or risks associated with the procedure, make sure to include them in the documentation.
Include any necessary illustrations or diagrams: If a visual aid would help to explain the procedure more effectively, consider including a diagram or illustration.
Test the procedure: Before finalizing the documentation, it can be helpful to test the procedure to ensure that it is clear and easy to follow.
Review and update the documentation regularly: Procedures may change over time, so it is important to review and update the documentation as needed to ensure that it remains accurate and up-to-date.
An Example Of Documenting A Procedure
While the summarized steps shown above are helpful, the actual process of documenting a procedure effectively can sometimes be challenging.
To illustrate this, we’ll go through an actual example and show you how we add new videos to our training sites.
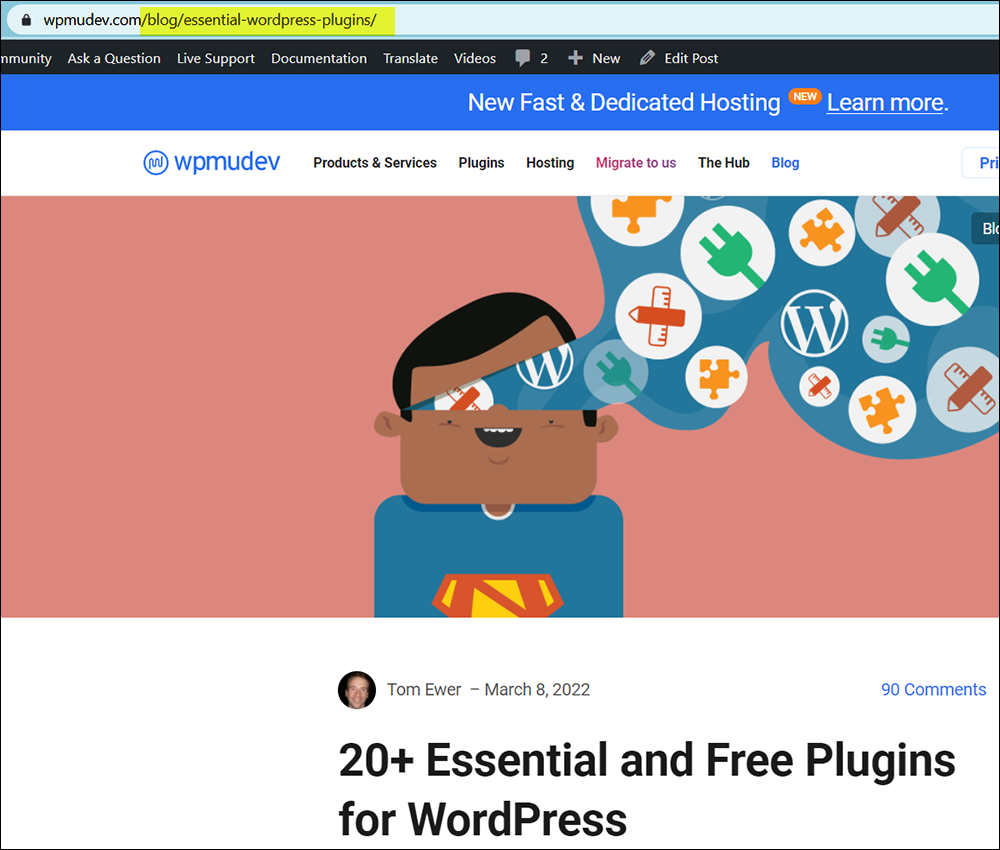
As part of our content management processes for these sites, any time WordPress releases a new version of its core software, we add information about the new version features and improvements, including video tutorials covering these features to the above sites as follows:
WPMasterclasses.com – Add the videos to our video course on building a WordPress site, and update the product information page, the site’s video lesson counters, and the page listing recently added videos.
WPTrainingManual.com – Publish a post about the latest WordPress version.
Note: We write our own content for those sites but we outsource the creation of the WordPress update videos to an external supplier.
So, when our video supplier notifies us that new videos covering the new WordPress version release are available, we then add these videos to our video training site and create a post about it on our WordPress training site.
When new videos are released, we update the content on our training sites.
Adding videos to a couple of sites and creating a post about it sounds simple and straightforward enough.
However, suppose we want to assign these tasks to a newly-hired team member or outsource it to a third-party service provider.
How would we communicate this process effectively to ensure that whoever does the work will perform all tasks consistently to the standards of quality that we ourselves maintain and expect?
Obviously, this involves creating some form of documentation, but how detailed does this documentation have to be?
Let’s walk through the actual process and see.
Documenting Processes vs Documenting Procedures
The simple diagram shown above explains what we want to do whenever a new version of WordPress is released (i.e. add videos to our training sites and create a post about it).
Here is the diagram again:
This is what we want done.
This diagram shows what we want done, but doesn’t explain any of the processes involved in adding video content to the training sites, creating a post about it, and making sure that all relevant information is included for our users and formatted correctly.
So let’s expand the diagram and include these processes as shown in the flowchart below:
These are the main processes we need to be done to add new video content to our training sites.
In a nutshell, these are the processes we need done:
When our video supplier notifies us that a new set of videos is available, we then…
Log into the supplier’s website and download a zip file containing the videos and any additional information included with those files to our computer.
Extract the video files, rename these to match our course website requirements, and prepare the videos for uploading.
The above lists the processes we need to go through every time WordPress releases a new version.
It is, however, still only an “overview.” While it can serve as a guide to help our newly-hired team member or outsourced person understand what we need them to do, it doesn’t specify “how” we want all of these processes to be effectively carried out.
This can lead to confusion, errors, and time-wasting delays due to the lack of detailed instructions, and low-quality output.
So, the next step is to turn all of the above processes into documented step-by-step procedures that anyone can follow to ensure that all of the required tasks are carried out effectively to consistently high standards and performed correctly and efficiently.
In addition to the steps provided earlier, here is the process we suggest following to create step-by-step procedures for your team or for outsourcing:
As you go through the process yourself, initially record the steps involved in the process (tip: record these in a plain text file using simple bullet-point lists).
The next time you repeat the process, follow the steps on your bullet-point list and fill in any “missing gaps” you identify as you work through the processes.
Transfer the contents of your list to a shareable format (e.g. a Word or Google Doc document, an online page on a private section of your site reserved for staff training, etc.)
The next time the task needs to be done, give your list to someone else and ask them to follow the documented instructions. Note down any areas of difficulty experienced by the other person, particularly areas like not knowing where to access login details, not knowing how to use certain software or tools, or not knowing how to perform certain tasks (e.g. how to create a post in WordPress).
Use the information obtained from the previous step to expand your documentation (e.g. add links to other documents containing login details, link to software tutorials or other training sites, add screenshots or video screencasts to illustrate certain steps, etc.)
Give your expanded document to someone else and repeat Step 3, i.e. ask them to complete the task following the documentation. Repeat this process until someone else can perform all of the required tasks successfully on their own by simply following the documentation.
Add the documented procedure to your main content documentation and periodically review and update the information to keep it current, relevant, and accurate.
Let’s show you what “Steps 1 to 3” above would look like as a documented procedure using the example in the section below…
=== START EXAMPLE DOCUMENTATION ===
[Note: Begin this document by providing an “Overview” of the 12 processes involved in performing and completing the task, as described earlier.]
The following resources, sites, services, tools, etc. are required to complete this task (contact your manager for access to all login details, software licenses, etc.):
Login details to PLR4WP.com (video supplier website).
Access to hard drive folders: C:\Business\Businesses\A - WPMasterclasses\01-Vids Various\PLR4WP and C:\Business\Businesses\A - WPMasterclasses\00-Production\WPMC-0019 - BuildWP\00-videos
Access to Amazon AWS S3 account: Bucket = “wpmasterclasses” https://wpmasterclasses.s3.us-east-1.amazonaws.com/vids/0019
Admin access to sites: https://wpmasterclasses.com and https://wptrainingmanual.com (if you are a site administrator, see “Assets” spreadsheet for login details. If you are not a site administrator, then contact your manager for login details).
When an email notification is sent from the video supplier informing us that videos for a new WordPress version or video updates are available, do the following:
Log into https://members.plr4wp.com/vol-01sn4/
Create a new folder with the WP version number (note: ignore periods, so “WP61” not “WP6.1, “WP62” not “WP6.2”, etc.) inside hard drive folders C:\Business\Businesses\A - WPMasterclasses\01-Vids Various\PLR4WP and C:\Business\Businesses\A - WPMasterclasses\00-Production\WPMC-0019 - BuildWP\00-videos
Download video zip files from the supplier website into the hard drive folder C:\Business\Businesses\A - WPMasterclasses\01-Vids Various\PLR4WP
Extract all videos into the above-created folder. Note: the extracted files contain various folders (transcripts, raw video files, audio files, etc.). The video files we need to upload are the finished .mp4 files (not the whitelabel version with the included source files).
Duplicate the extracted .mp4 video folder and add “renamed” to the file name.
Rename .mp4 videos to the filename format wp-version-videonumber-concisefilename (e.g. from “vol1-vid3.18d-whats-new-in-wp-6.1-document-settings-changes” to “wp-61-d-document-settings-changes”).
Move renamed .MP4 videos to the WP version folder created in C:\Business\Businesses\A - WPMasterclasses\00-Production\WPMC-0019 - BuildWP\00-videos
Notes: some videos include accompanying notes (e.g. scripts, checklists, or templates). Add these to this hard drive folder: C:\Business\Businesses\A - WPMasterclasses\00-Production\WPMC-0019 - BuildWP\02-dl
2) Upload Video Files To S3 Bucket
After downloading the video files from the video supplier’s website and preparing the video source files for uploading, the next step is to upload all the video files to the correct S3 bucket on our Amazon S3 account.
Go to Amazon S3 bucket = wpmasterclasses > vids > 0019
Create a new folder in S3 with the same name as the video download folder (e.g.: wp61) inside the course folder 0019
Upload all videos to the above bucket.
After all video files are uploaded, select all files and set permissions as follows:
Owner = Full Control
Any AWS Users = Read
All Users = Read
After setting permissions for files inside the S3 bucket, select all files and copy their URLs to your clipboard.
3) Prepare Content For Video Course
Once all the video files have been uploaded to our S3 account, file permissions have been set correctly, and video file URLs have been copied to your clipboard, the next step is to create a text file containing all the information we will need to update our course content and product pages.
To do this, follow the steps below:
Open up NoteTab Pro text editor, create a new text file, and paste all video URLs into the text file. All videos should have the following format: https://wpmasterclasses.s3.us-east-1.amazonaws.com/vids/0019/foldername/filename
Save this text file as wpversion-notes (e.g. “wp61-notes”) into the WP version folder created in C:\Business\Businesses\A - WPMasterclasses\00-Production\WPMC-0019 - BuildWP\00-videos
Open up the folder containing the renamed video files inside C:\Business\Businesses\A - WPMasterclasses\00-Production\WPMC-0019 - BuildWP\00-videos. Switch the folder view to “details.” Below the list of video URLs add the following details about each video:
Video Title – Use the format WP Version: Part X - Short Title
Video Description – You can obtain this by watching the first few seconds of each video or opening the video transcripts that accompany the videos.
Video Duration – Use the format (XX:XX) for the duration in minutes and seconds.
Also, add the following information to the text file (to be added to WPMasterclasses Video Production master spreadsheet):
Total number of new videos
Total duration of new videos
Proof all of the content (spelling, punctuation, accurate descriptions, video duration, etc.), as this description will be used in various locations (video course, product page, and video update post).
Save the text file when done.
4) Add Video Content To Video Course
After uploading all the video files to Amazon S3 and preparing all the information you will need to describe the content of these videos, the next step is to add this information to the video course.
To do this, follow the steps below:
Log into WPMasterclasses.com and select the WP Courseware > Courses menu option from the main menu to bring up the Courses screen.
Locate the How To Build A WordPress Site Fast course and click Edit.
Scroll down to the Course Builder section and expand Module 3 - New WordPress Features.
Right-click on the top entry and select ‘Open link in new tab’ from the menu. This will load the entry into the post editor.
Switch to the ‘Text’ tab, then select all the content and copy it to your clipboard.
Create a new text file in your text editor and paste the content from your clipboard into this file. You will use this as your template for adding new videos to the course module.
Close the existing course unit window after copying and pasting the item’s contents into your text file.
Return to the Course Builder section, scroll down to the bottom of the section and click on the “+Add Unit” button to create a new lesson page.
Select and copy all the contents from your text file. In the course unit post, switch to the ‘Text’ tab and paste in the content from your clipboard.
Switch to the Visual tab and do the following:
Copy and paste the video description from your ‘WPXX-Notes’ text file into the course unit’s content section. Make whatever adjustments are necessary to the body section of the content.
Change the highlighted section of the video’s filename in this line to match the correct location of the uploaded video (see list of video URLs copied into your text file): [s3mm type="video" files="vids/0019/wp60/wp-60-a-intro.mp4" /]
Copy and paste the video title into the course unit’s Title field. Make it as short as possible (this title will appear on the Course Lessons menu for users.
Switch the course unit post to ‘Text’ tab, then select and copy all the content to your clipboard and click ‘Add Unit’.
This will load another course unit black post into your window. Paste in the contents of your clipboard, make the same adjustments described above, and repeat this process until you have added all the videos to the course.
Drag the newly-added video lessons into their correct positions on the Course Builder module section to arrange course lessons so that newer videos display at the top of the course module.
Click the Update button when done to save your course settings.
Click on the View Course link at the top of the page to bring up the video course module as users will see it.
Click on each of the new video lessons and check that the correct video has been added and plays fine. If you spot any errors (i.e. wrong video, video not playing, typos in content, etc.), fix these by editing the course units and resaving, then test again.
5) Updating Video Course Product Page
After adding the videos to the course, the next step is to update the product page with information about the additional videos.
Copy all of the video description information from the “WPXX-Notes” file to your clipboard.
Scroll down to the ‘Module 3 – New WordPress Features & Updates’ section of the page and paste in the video description list from your clipboard.
Make sure the content is formatted correctly:
WordPress – Version X.X – Add an H4 heading tag
Titles – Bold
Proof content and formatting.
Scroll down to the Course Duration and Video Lessons fields. Update these fields with the additional number of videos and new total duration (hours and minutes).
Notes: Calculate video course duration by dividing the total minutes by 60 (to get the hours), then multiplying the whole integer by 60 and subtracting this number from the total to get the minutes. For example, 397 minutes = (397/60=6.61 = 6 hours. 6 x 60 = 360. 397-360 = 37 minutes. Total video course duration = 6 hours, 37 minutes).
You can get the total number of minutes from the video course production spreadsheet after completing the next step below.
Save to update the product page with the new information.
Click on the View Product link and open the link in a new tab to visit the product page. Perform a visual check to make sure that everything looks ok, i.e.:
Video content
Updated number of video lessons
Updated course duration
6) Update Video Course Production Documentation
After updating the video course and product page, the next step is to update the number of videos and video duration in the video course production documentation so we have an accurate inventory of the site’s content.
To do this, follow the steps below:
Open the Video Course Production Documentation spreadsheet.
Scroll to Row 21 (WPMC-0019).
Add the number of new videos to the number shown in the Lessons cell (Column G).
Add the additional number of minutes to the number shown in the Durations cell (Column H).
Scroll to the top of the spreadsheet. Note the following (you will need these numbers for the next step below):
Column G, Row 1 = New total number of video lessons.
Column Z, Row 1 = New total number of hours of video content.
Save the spreadsheet.
7) Update Video Counters
After updating the product page, the next step is to update the number of “Video Lessons” and “Hours of video” details on the home page and the ‘All Membership Access’ product page.
To do this, follow the steps below:
While logged into WPMasterclasses.com, click on the logo on the top left corner of the site to visit the home page.
Click on the Edit with WPBakery Page Builder link in the dashboard admin menu.
Scroll down to the Pie Charts. Edit the following:
Video Lessons – Click Edit Pie Chart and update the number of video lessons with the number shown in Column G, Row 1 of the Video Course Production Documentation spreadsheet. Click Save to update the pie chart.
Hours of video – Click Edit Pie Chart and update the number of video hours (whole integers only) with the number shown in Column Z, Row 1 of the Video Course Production Documentation spreadsheet. Click Save to update the pie chart then Close to exit the edit screen.
Click Update when done to save your new page contents.
After updating the video counters on the home page and the ‘All Membership Access’ product page, the last step is to add an entry about the newly-added videos to the content to the Video Updates Log page of this site.
To do this, follow the steps below:
While logged into WPMasterclasses.com, go to the Video Updates Logpage and click on the Edit Page link to edit the page.
The easiest way to create a new entry for this page is to select and copy an existing entry from this page (preferably one where updates were made to the same course).
Paste this at the top of the content. Update the date and information (i.e. number of videos added and video topic).
Update the page to save the new content.
Click on the View Page link to inspect the page and make sure that all the information is correct.
This completes the update tasks for new WordPress version release videos on WPMasterclasses.com.
The last step is to create a new post about the updated WordPress version on WPTrainingManual.com.
2 – Create A New WordPress Release Post On WPTrainingManual.com
Create a post for every new major WordPress version release and publish it under the WordPress Updates section of WPTrainingManual.com.
1) Content Planning & Research
Use the following sources to perform content research for the new post:
About WordPress section inside the WordPress Dashboard (under the WordPress icon on the very left of the admin menu bar).
Create a new folder in your hard drive called wp-xx (where xx=version number. For example, WordPress 6.0 = wp-60) inside this directory: C:\Business\Businesses\A - WPTrainingManual\Content\Updates.
Right-click and save any new version release images and videos to be used in the post content to the newly-created folder.
In Amazon S3, create a new folder inside the wp-versions bucket located here https://wptrainingmanual.s3.us-east-1.amazonaws.com/elite/tut/wp-versions/. Name the bucket wp-xx (where xx=version number. For example, WordPress 6.0 = wp-60).
Upload media content to be used in the post to this bucket. Set the correct permissions, then select all file URLs and copy these to your clipboard.
Open the text file created earlier containing notes about the new version and paste the file URLs from your clipboard into the text file. Save the file.
2) Create A Featured Image
Each new version release post requires a featured image with the new version number.
To do this, follow the steps below:
Launch Photoshop and open the file WPTM-VideoUpdates.psd in this folder: C:\Business\Businesses\A - WPTrainingManual\Images\FeaturedImages-WPUpdates
Edit the text layer and add the correct version number to the slide.
Name the file wpxx (where xx=version number without periods or dashes. For example, WordPress 6.0 = wp60) and save the image file to the same folder.
Upload this image as the Featured Image of the post (see next section).
3) Create A New Post In WordPress
The easiest way to create a new post for WordPress version updates is to duplicate an existing post, keep the post content structure intact and edit the content to match the new version number.
To do this, follow the steps below:
Log into WPTrainingManual.com. From the WordPress Dashboard, select Posts > All Posts and then filter the table of posts by Category > WordPress Updates.
Hover over an existing post entry and click Clone to duplicate the post.
Click Edit to open the duplicate post in the WordPress Editor.
Add all media files saved earlier to the Post Content.
Add links from the post to relevant tutorials (e.g. if the post mentions a new feature of the WordPress Block Editor, then link the content to the WordPress Block Editor tutorial).
Fix the post’s meta description.
Save and publish the post.
After publishing the post, visit the WordPress Updates section and make sure that the new entry displays correctly in the grid list, then click through and check to make sure that all the post content is ok.
The above example illustrates the kind of basic documentation your business should aim to create before handing the responsibility for performing the task to someone else, whether in-house or outsourced.
In addition to text instructions, you can add screenshots, videos, etc. to the above documentation and publish it as an online tutorial inside a private or password-protected area of your site (e.g. give staff-only access to the training and documentation).
After documenting the above steps, make sure that the process can be run repeatedly to deliver consistent results, and periodically review and update the content.
Creating detailed documented procedures helps you to see what challenges you will need to address when choosing to outsource the task.
With the above, for example, some of the challenges to work out before outsourcing the task include:
Storing media files, notes, content production logs, etc. on a hard drive: In terms of document storage, it would probably be better to move these to the cloud and use collaborative/shared applications with separate user logins.
Access to tools and applications and competency in using these: The above process requires using licensed tools like Photoshop and S3 Browser, having basic skills in Photoshop, WordPress, etc., and having admin access to your website in order to perform certain functions.
Managing/sharing logins and passwords. For services that require access to credentials (e.g. Amazon S3), it’s important to set things up so that the security of important business accounts is never compromised.
Workflow processes. It’s important to work out beforehand how processes fit into your overall workflow.
Related processes and procedures also need documentation. Processes often involve additional or related processes and subprocesses, and these also need to be documented. For example, the last task in our example (“Promote the post”) is a whole separate process in itself, as documented in our Content Promotion training module.
Documenting Procedures: Final Thoughts
Creating detailed documented procedures can be very time-consuming but it’s vitally important for the sustainability, growth, and long-term success of your business.
Hopefully, you can see from the above that documenting procedures allows your business to:
Create “hands-free” step-by-step documentation that can be used to train new team members and outsource work effectively,
Here are frequently asked questions about documenting procedures:
What is the purpose of documenting procedures?
Documenting procedures helps standardize practices, ensures consistency in operations, and facilitates training and compliance. It serves as a reference tool that can guide current and future actions within an organization.
What should be included in a documented procedure?
A documented procedure should include the purpose of the procedure, scope of where and when it applies, detailed step-by-step instructions, roles and responsibilities, required resources, and safety or compliance considerations.
How detailed should a procedure be?
The level of detail should be sufficient to enable a person with general knowledge of the field to perform the procedure without prior experience. This means including all necessary steps and avoiding assumptions about the user’s knowledge.
Who is responsible for creating procedures?
Typically, the responsibility for creating procedures lies with subject matter experts and managers who oversee the specific processes. It is crucial that those who are intimately familiar with the tasks write the procedures to ensure accuracy and completeness.
How often should procedures be updated?
Procedures should be reviewed and updated regularly to reflect changes in technology, compliance requirements, and operational practices. A good rule of thumb is to review procedures annually, but updates may be needed more frequently depending on the pace of change.
What is the difference between a policy, a process, and a procedure?
A policy outlines the rules or guidelines under which a company operates. A process is the highest level description of a broad task that may involve multiple steps. A procedure is a specific, detailed series of actions that are followed to comply with the policy or to complete a component of the process.
How should documented procedures be formatted?
Documented procedures should be clearly formatted with headings, subheadings, bullet points, and numbered steps to make them easy to follow. Visual aids like diagrams, flowcharts, and screenshots can also be helpful, particularly for complex tasks.
What are the best practices for maintaining procedure documentation?
Best practices include regularly reviewing and updating documentation, ensuring accessibility to all who need it, maintaining clear version control, and getting feedback from users to improve the clarity and effectiveness of the documents.
Learn how to prevent unauthorized users from hotlinking to content hosted on your website.
How To Prevent Content Hotlinking
Learn what hotlinking is and how to prevent unauthorized users from hotlinking to content hosted on your website.
Hotlinking is when someone links directly to assets on your website, such as images, videos, or downloadable documents.
In this lesson, we cover the following:
Why Hotlinking Can Hurt your Business
Hotlinking Examples
Ways To Prevent Hotlinking
How To Prevent Image Hotlinking On AWS
Why Hotlinking Can Hurt Your Business
Hosting a website uses server resources to store your files and serve your content over the internet.
Disk space is the amount of data you can store on your web server.
Bandwidth is the amount of data your host allows you to transfer to and from your web server each month.
When someone embeds content from your site into their site using the direct file URL to your content, they are effectively stealing bandwidth, generating unnecessary traffic hits on your website, and consuming your hosting resources.
Publishing media-rich content increases the size of your web pages and requires more bandwidth to serve your files, images, etc. over the internet.
According to research, the average web page is now around 1.5 MB. You can check the size of your web pages using a tool like Pingdom.
Use a tool like Pingdom to check the size of your web pages.
So, for argument’s sake, let’s say that the average web page on your website is 2MB. If you have 1 GB of disk space, you can host 500 pages.
More importantly, serving your web pages over the internet will use up bandwidth. How much bandwidth your site uses depends on factors like the average size of your web pages, the number of visitors to your website, how many pages they, whether users can download files from your site, etc.
Although many hosting plans nowadays typically include generous amounts of disk space and bandwidth (which reduces the cost of using server resources), hotlinking to content on another site without the content owner’s permission can range from being considered a “rude” practice, to copyright infringement, to downright content theft that can seriously hurt a business.
The bottom line is that a website uses server disk space and bandwidth and this costs money. So, if you host an image or a video on your website and other people link to it from their website, then every time someone accesses that file on their website, your business is paying for it.
If you experience a surge of traffic on your website, check your stats and server logs…someone may be hotlinking to content on your site.
The Copyright Basics Guide can be viewed on The United States Copyright Office website by clicking on this link. Click on the image to view an enlarged version of the image.
Clicking on the link above takes you directly to the PDF guide hosted on the US Copyright Office’s server, hence we are “hotlinking” to that file from this site.
The advantage of linking to the above resource, (which the US Copyright Office is hosting on their server), is that visitors clicking through to it from this site will see the latest version of the guide whenever updates are made to the document, whereas if we were to host the document, it would quickly become outdated, as we have no control over its content, nor the time or the resources to make sure that our hosted file is the latest and most up-to-date version of the document.
One of the disadvantages of linking directly to content hosted on other servers is that if the content owner removes their content, renames the link URL, transfers it to another location, or blocks the content from being accessed entirely (e.g. to prevent hotlinking), you end up with a bad link and poor user experience.
Let’s use another example…
When we looked at content protection tools, we included this video from Copyscape:
Although the above video was sourced from Copyscape’s website, it is actually hosted on YouTube.
So, we are “hotlinking” to YouTube’s servers. This is perfectly acceptable, however, as YouTube encourages people to embed and share videos hosted on their servers (and gives them the option of allowing or disallowing others from embedding or sharing their videos).
“Hotlinking” to the above video, then, isn’t costing the business disk space or bandwith, as YouTube is paying for it.
Now…let’s bring this discussion back to your business.
Suppose one of your web pages includes a bunch of images or a video. If someone copies and pastes the content from your web page on their site, those images will be loaded from your website, which uses up your bandwidth, costing your business money.
This might be ok in some instances. For example, your business may want other sites to link to a downloadable resource that you regularly need to update (e.g. a PDF product catalog) or affiliate banner images.
If your business is not happy to pay for the cost of other people linking to your content from their site, however, then you need to look at ways to prevent hotlinking.
Ways To Prevent Hotlinking
When creating content for your website, it’s important to show the same consideration for other website owners as you would like them to show you and avoid hotlinking to assets hosted on other websites.
The simplest way is to host the assets on your own server. If you find an image on another website that you would like to use on your own website, upload the image to your server (or a file storage solution) and deliver it from there (make sure that you have permission to use the asset or the asset is part of a creative commons license, and give proper credit or attribution).
This also increases the asset’s delivery speed as the user’s browser won’t need to perform an additional DNS lookup.
Unfortunately, you have no control over whether other websites will show you the same consideration, so let’s look at solutions you can implement to help avoid or prevent hotlinking.
Prevent Hotlinking By Renaming Your Files
One of the simplest and most effective ways to prevent hotlinking is to simply rename your files or change the URL of your content (e.g. image).
This method is not recommended, however, as it could lead to pages on your own site having broken links if they link to the content.
For example, if you use WordPress and host videos on Amazon S3, you can manage and protect your content from unauthorized sharing or downloads using a plugin like S3 Media Maestro.
S3 Media Maestro protects your S3-hosted videos from being shared or downloaded without your permission.
Prevent Hotlinking By Editing your .htaccess File
Editing your .htaccess file can help to prevent the hotlinking of images on your website but it requires knowing how to edit files on your server.
For this reason, we recommend letting your webmaster, web developer, or web host handle this for you.
In some cases, you can use the .htaccess file to replace hotlinked images with an offensive image. This can help to deter other websites from hotlinking to your site.
Enable CDN Hotlinking Protection
Does your website use a Content Delivery Network (CDN)? If so, check their documentation. Many CDN services provide built-in hotlinking protection.
Restrict Hotlinking By Blocking Domains
Web hosting management applications like cPanel provides security tools with hotlink protection features that allow you to block specific domains from using your content.
Webhosting management tools like cPanel provide Hotlink Protection security features.
If you have access to your hosting control panel, you can use this method to protect your website from hotlinking to content hosted on your own server.
Simply enable the feature and list all the URLs that are allowed to access your content. Make sure to include http://, http://www., https://, and https://www. versions of your domain.
Enable hotlink protection and add a list of URLs that are allowed to access your content.
If you don’t have access to your web server management tools, then ask your webmaster (or web developer), or web host to configure these settings for you.
File A DMCA Notice
If you discover that a website is hotlinking to your content without your permission or license and this creates a serious issue for your business, you can try asking them to remove the content from their website.
If they ignore or refuse your requests to remove the hotlinks to your content, then you can try filing for DMCA protection against the offending website.
How To Prevent Image Hotlinking On AWS
Amazon Web Services (AWS) like Amazon S3 provide a cost-effective, scalable, and secure way to store and protect data remotely.
You can host images, videos, and downloadable files on Amazon S3’s cloud servers (instead of hosting them on your own server) and add the files to your website, so users can view or access the content.
If you use Amazon AWS to host content remotely, the tutorial below will show you how to protect your assets from hotlinking by creating a special file called an S3 Bucket Policy containing special code that will prevent the unauthorized use of images (or videos, downloadable PDFs, etc.) on your website.
First, we will show you how to use a free tool provided by Amazon called the AWS Policy Generator to create policies that control access to Amazon Web Services (AWS) products and resources, then we will show you how to upload this policy to the folder (called a bucket) where your images and other media are stored.
Step 1 – Create An S3 Bucket Policy
Go to the AWS Policy Generator page. You don’t have to be logged into your AWS account to access this tool.
Prevent content hotlinking with the AWS Policy Generator.
In the AWS Policy Generator screen, go to the “Step 1: Select Policy Type” section, and select S3 Bucket Policy from the “Select Type of Policy” drop-down menu.
Select S3 Bucket Policy from the drop-down menu,
For this policy, we want to deny access to our website images to any site other than our website (or the sites that we specifically nominate), so select Effect > Deny.
Choose Deny in the Effect option.
In the Principal field, type an asterisk (*)
Type an asterisk into the Principal field.
From the Actions drop-down menu, select GetObject.
Select GetObject in the Actions drop-down menu.
For the Amazon Resource Name (ARN) field, we need to enter the location of the bucket where we want to apply the policy.
For this example, we want to block access to all media stored in the bucket, so the string of text we will enter into this field must be in the following format (replace [BUCKETNAME] with your bucket’s name):
arn:aws:s3:::[BUCKETNAME]/*
To view the Amazon Resource Name (ARN) of your bucket, log into your AWS account, then select Storage > S3.
Select Amazon Simple Storage Services (S3) from your AWS account screen.
Select the bucket whose content you want to protect and click on the Copy ARN button to copy the Amazon Resource Name to your clipboard.
Select your bucket and click on Copy ARN.
Alternatively, you can click on the bucket name, then select the Properties tab. You should see the ARN displayed on the screen, as shown in the screenshot below.
You can also find your ARN in the Bucket Properties tab.
Copy and paste this ARN into the Amazon Resource Name (ARN) field and make sure to end a forward slash + asterisk (/*) at the end (see screenshot below)
Paste your ARN into the Amazon Resource Name (ARN) field.
Next, click on the Add Conditions (Optional) link.
Click on the Add Conditions (Optional) link.
Do the following in this section:
Condition – Select StringNotLike from the drop-down menu.
Key – Select aws:Referer from the drop-down menu.
Value – In this field, enter the URL of the domain(s) you want to protect.
If giving access to a single domain only, enter both the “https://domain.tld” and “https://www.domain.tld” values, separated by a comma.
If giving access to multiple domains, repeat the same process as above for all the domains you wish to include in your Bucket Policy.
Click the Add Condition button when done.
Fill in the fields as shown here and click on the Add Condition button.
The policy generator tool will display the Condition you have just added on the screen.
Note: If you want to add more domains to the policy, just enter these into the Value field and click the Add Condition button.
Next, click the Add Statement button.
After adding the Condition click on the Add Statement button.
The policy generator tool will display the Statement you have just added on the screen.
Click the Generate Policy button.
After adding the Statement click on the Generate Policy button.
The tool will generate the snippet of code you will need to add to your Bucket Policy field.
Select and copy all the content generated by the tool to your clipboard.
Select and copy your S3 Bucket Policy text to your clipboard.
Step 2 – Add The Bucket Policy Code To Your Bucket
Return to your AWS dashboard and paste the content from your clipboard into the Bucket policy text area (in the Bucket’s Permissions tab).
Paste the contents of your clipboard into the Bucket policy text area.
If you use a tool like S3 Browser (a freeware Windows client for Amazon S3), you don’t even need to log into your Amazon AWS account.
Just open your S3 Browser tool, and select the bucket from the list…
Select your bucket in S3 Browser.
Right-click on the bucket name and select Edit Bucket Policy.
Right-click and select Edit Bucket Policy…
Paste the bucket policy you created into the text area and click the Apply button.
Paste the content into S3 Browser’s Bucket Policy Editor.
After adding the policy to the bucket containing your site’s images, here’s how to test things to make sure that everything is working:
Go to your website, then select a section of your content on a page that contains images and copy the content to your clipboard.
Test your policy by selecting content from your protected site and make sure to include images.
You will need access to a website on another domain (or ask someone with a website on another domain to help you).
Create a new article or blog post and paste the content you have copied from your website into the new site.
If you have generated and added the policy to your site correctly, no images should show up on the content pasted into the unauthorized domain.
Success…our hotlink-protected images are blocked from displaying on unauthorized sites!
An even simpler way to test things (especially if you can test things on a different domain name) is to simply copy the image address from your website and paste it into your web browser.
This should display an error message like the example shown below, instead of the image.
This is what users will see on their web browsers if they copy your hotlink-protected content.
Congratulations! Now you know how to prevent image hotlinking on your website if you use Amazon’s S3 service to store your website’s media.
Protect your content hosted on Amazon S3 from being hotlinked with an S3 Bucket policy.
Learn how content theft can affect your business and how to prevent your website content from being stolen…
Content Protection
Learn how content theft can affect your business and how to prevent your website content from being stolen…
Content theft is an unfortunate reality of having an online presence.
If your website has unique and valuable content, your content may end up being “borrowed” by your competitors without giving you credit or attribution, or just plain “stolen” for various reasons.
Knowing what you can and can’t do to protect your content from being stolen and implementing effective ways to prevent content theft from happening is a challenge but also an important aspect of good content management.
In this lesson, we cover the following:
How Content Theft Can Affect Your Business
Content Scraping: What Is It?
Protecting Your Content – Your Rights
Preventing Content Theft – Options
How Content Theft Can Affect Your Business
Content theft is a serious problem.
If your website has original, high-quality articles, tutorials, reviews, images or well-written information describing your products or services, this not only makes your content unique and valuable to your site visitors and potential customers, it also makes it appealing to your competitors and to people with nefarious motives.
It is relatively easy to steal content from most websites. You can simply copy and paste the content, right-click to download and save images or other media, take screenshots, etc.
It can be very frustrating to invest a great deal of time, effort, money, and resources and then have worked so hard to create unique and valuable content and then have this stolen from you by a content scraper and used on another website.
Content Scraping – What Is It?
Content scraping (also called web scraping or website scraping) is where some or all of the content of a website is downloaded or copied by another party (usually by automated web scraping bots or tools), often against the website owner’s wishes, and usually done to repurpose the “stolen” content on another site for malicious purposes (e.g. phishing) or to create filler content on spammy sites for SEO (e.g. to attract users for AdSense clicks).
Although not all content scraping is bad (e.g. think of affiliates using your content to market your products and services), malicious web scraping is a parasitic practice that can affect your business negatively in many ways.
For example, content theft violates your copyrights, steals your organic traffic, and can take up valuable server resources and cost you money (e.g. image hotlinking, which we discuss further below).
Although anyone savvy enough can manually go through and copy and paste the entire contents of a website, website scraper bots can download all of your website’s content in seconds, even if you run a large site such as an e-commerce store with hundreds or thousands of product pages. Some bots can also access and scrape gated content by filling in and submitting forms automatically. An example of this is data or price scraping where scraper bots target the pricing information of competing businesses to undercut their rivals and increase their own sales
Since anything posted publicly on the Internet can be scraped, including text, images, code, etc., there is really not that much you can do to protect publicly-posted content (other than to not make it public in the first place).
So, how do you protect your website content?
Well, first let’s take a look at what rights content owners have, and then we’ll look at some options for preventing content theft.
Protecting Your Content – Your Rights
Copyright
Copyright ownership gives you the exclusive right to use your work, with some exceptions. When you create an original work, fixed in a tangible medium, you automatically own the copyright to the work.
Note: With content writing, “who owns the copyright” to content can be confusing and can lead to disagreements.
For example:
Generally, freelance writers own the copyright to their work unless their contract or agreement stipulates that they must transfer the copyright to another person or business.
Employees don’t own the copyright to the work they create, their employers do.
Journalists employed by a newspaper or publisher are an exception (while their employer owns the copyright in their articles as published, the journalist retains the copyright in their work for other specified purposes, such as reproduction in a book).
Another exception is fair use copyright in countries where certain types of uses of your content may be considered fair (e.g. criticism, commentary, news reporting, teaching, scholarship, or research).
Sometimes, rights to use the work are implied even if agreements to transfer the rights were not signed, except when used for purposes that the content creator did not agree or consent to.
Regarding issues of copyright, always seek advice if you are unsure.
Registering a copyright with The United States Copyright Office creates a public record of ownership which is stored with the Library of Congress. This can be useful if you ever need to file an infringement lawsuit in court. Note, however, that new content is not automatically added to the copyright registration (a new registration must be filed to indicate that it covers the new materials).
You can file for a copyright registration for your website’s content (original text or images) with The U.S. Copyright Office eCO online system. Refer to the United States Copyright Office Copyright Basics Guide for more information.
The following additional resources will also help to protect your content and intellectual property:
Creative Commons
A Creative Commons license allows certain uses of your content under conditions that you choose.
To understand Creative Commons it helps to understand how Copyright works.
As stated earlier, when you create something original, fixed in a tangible medium, like a photograph, a song, story, or even articles for your website, you automatically own the copyright to the product of your creativity.
This automatic copyright is known as an “All Rights Reserved” copyright. It protects your creativity against uses that you don’t consent to, such as people or other businesses taking, using, and potentially making money off your work.
In some cases, however, an “All Rights Reserved” copyright may be too restrictive. You may want others to use, share, or build upon certain aspects of your work, as this could have benefits for your business (e.g. increased exposure and promotion by allowing others to share and distribute your content) or your industry, or a particular group or community.
This is where Creative Commons licensing comes in.
“Creative Commons licenses give everyone from individual creators to large institutions a standardized way to grant the public permission to use their creative work under copyright law.”
So, whereas copyright is an “all rights reserved” option in which you hold all rights, a Creative Commons license offers a “some rights reserved” option, allowing for certain uses of your work to occur under specific conditions of your choice.
There are six different Creative Commons license options, ranging from the most to least permissive, where you can give the public permission to share and use your work provided they agree to your conditions. For example, you may allow companies to share your content but not sell it, or re-publish your articles for commercial purposes if they provide credit and attribution, etc.
Creative Commons, then, is not about giving up or replacing copyright (you still own your work), it’s about introducing a more flexible way to manage the rights embodied in copyright by giving you choices about what others can and can’t do with your content.
As mentioned earlier, there are pros to using Creative Commons licenses, such as increased exposure and publicity for your business through the sharing and redistribution of your content. Additionally, Creative Commons licenses are non-exclusive, so you can license the same content under different agreements.
Some of the cons to using Creative Commons licenses is that with almost all of the licenses, you can’t be sure who is using your work or making money from it, and others can use your content without compensating you for the use.
Adding a Creative Commons license to your website is fast, easy, and free. Just visit the website, answer a few questions (e.g. will you allow your work to be used commercially or modified?), and the right type of license will be issued, along with all the elements you need to display it on your site.
Use the license generator to determine which Creative Commons license is right for you.
Now, all this is well and good if you are ok about others using your content, and/or they respect your intellectual property rights.
But, what if others are using your content without permission or attribution? What can you do?
Well, the first step is to find out who is using your content.
Content Detection Tools
The tools below can help you identify sites that are using your content with or without your permission.
Google Alerts
Monitor the web for scraped content about your business with Google Alerts.
Google Alerts is a free service from Google that lets you keep up-to-date with the latest news about all kinds of topics, stay informed about people and companies, and track what other people are publishing about you and your business online.
This is a useful tool if you have content with unique brand names or keywords. Whereas Google search can help you uncover sites using your unique words in their content, Google Alerts is always monitoring for new content and will instantly notify you as soon as it detects that your content containing those words has been used.
Copyscape helps to protect your website from online plagiarism.
Copyscape helps to protect your website, online publications, blog, marketing materials, or any other online content against plagiarism. Simply enter the URL of a page on your site and the free plagiarism checker will look for any copies of your web pages online.
The animated explainer video below provides an overview of the tool:
The premium service automatically scans and monitors the Web for copies of your content and notifies you if it detects any plagiarized content. This is also a useful tool if you plan to outsource your content writing or purchase content from freelance writers, as it allows you to check if the content has been previously sold to others or published elsewhere on the web.
Unicheck is a plagiarism checking software. While it is primarily used to detect plagiarism in academic writing, it can help you find instances where others have used your content without attribution.
Use this tool not only to search for content that may have been copied from your website but also to ensure that your content writers are creating fresh and original content that is also free of plagiarism.
DMCA can help you file takedown requests if you find content that violates your rights.
DMCA is an online service that assists you with getting stolen or plagiarized content removed from sites infringing on your copyright in accordance with The Digital Millennium Copyright Act (DMCA), a U.S. law that criminalizes digital plagiarism.
This service assists you with filing DMCA takedown requests if you find content that violates your rights, as DMCA requires hosting providers to remove content that infringes on intellectual property rights.
Filing a DMCA complaint should be used only as a last resort in situations where the violation can seriously impact your business, as the process of filing a complaint can involve a significant amount of time and effort. For this reason, if you find that your content has been stolen and published on a scammy or spammy site that isn’t ranking high on the search engines, it will probably have very little effect on your website and you can probably just ignore it (or use one of these hotlinking prevention methods if the stolen content includes media files like images, videos, or downloadable files hosted on your site or remotely).
If, however, the violation is significant and/or has taken place on a site that has high visibility, authority, or ranking, then follow the steps below to file a take-down notice.
Filing a DMCA Complaint After Content Theft
Many sites that allow users to upload their own content and web hosts have a DMCA form that you can fill in if you believe there has been a copyright infringement of your content.
For example, Automattic (the company behind WordPress) has a DMCA form that you can fill out and submit on their website.
Automattic’s DMCA’s form submission page.
Many web hosting companies also provide their own forms and processes for submitting claims, as they are legally required to remove content that infringes on intellectual property rights if served with a DMCA notice.
As stated earlier, filing a DMCA complaint can be a fairly lengthy and laborious process, so only do this if you feel it’s absolutely necessary to do so.
Before filing a complaint, make sure that you:
Have sent the website owners or webmaster a polite message asking them to remove your copyrighted material.
Have records of instances of copyright infringement and proof of content theft (e.g. screenshots).
Can provide all the information required to avoid delays.
Once you have done the above, follow the steps below to file a DMCA claim:
Who is hosting the plagiarized content? Locate and record the IP address of the offending website using these domain tools and then input the IP address into the American Registry for Internet Numbers to find the hosting company.
Create your DMCA complaint. Your complaint must include information like identification of the copyrighted work and the original material and a physical or electronic signature. If you need proof of infringement, use the Internet Archive to show that the content was published on your site prior to appearing on the offender’s site. If your site is built using WordPress, you can use a plugin like WordProof to show that your content was published before anyone else using blockchain-registered timestamps.
If your claim is successful, you can expect the offending website’s host to remove your stolen content unless the site owner feels that your complaint is unwarranted and issues a counter-notice.
If for any reason, you’re still experiencing issues or problems, use this form to notify Google and request that they remove the infringing content. If your claim is verified, Google will delist the content from its search results (note: you will have to repeat this process for every page of content stolen from your website).
Instagram – Use this form to report accounts on Instagram pretending to be your business.
Preventing Content Theft – Options
So, you have done everything possible to protect your website content, and it’s still not enough. What more can you do to prevent content theft from happening on your website?
Let’s look at some options:
Make Your Pages/Posts Private
Does your content need to be public? If not, consider making the page or post that includes this content “private.” This way, only those who you give access to your content will be able to view it.
Configure Your RSS Feed To Display Post Summaries Only
Scraping software can obtain content illegally from your website’s RSS feeds if these display full articles in your feed.
If your site allows you to display post summaries only, we recommend choosing this option, as it will limit the amount of content that can be stolen from your site to the post excerpt or post summary only.
Disable Right-Clicking On Your Website
Depending on what kind of platform your website was built with, you may be able to configure your site’s settings to disable right-clicking on users’ web browsers.
For example, if your site runs on WordPress, you can use a plugin like WP Content Copy Protector to disable right-clicking on your website and prevent users from copying your content.
Protect Your Images
Consider adding a watermark to your images. While this may not prevent your images from being stolen, it will let online users know that you are the rightful owner of those images.
There are sophisticated solutions you can use to detect malicious scraper bots and block them from accessing your website’s content (e.g. DataDome), or scammers, fakes, and frauds copying your brand and stealing your revenue (e.g. RedPoints), but in many cases and for many business or websites, these may be overly expensive or unnecessary solutions.
Here are frequently asked questions about content protection:
What is content protection?
Content protection refers to the measures and technologies implemented to safeguard digital content from unauthorized access, copying, distribution, or modification. It aims to maintain the integrity and confidentiality of digital assets.
Why is content protection important?
Content protection is crucial to prevent intellectual property theft, piracy, and unauthorized use of digital assets. It helps content creators, publishers, and distributors maintain control over their content, protect their revenue streams, and uphold copyright laws.
What are some common methods of content protection?
Common methods of content protection include encryption, digital rights management (DRM), watermarks, access control mechanisms, secure authentication, and content monitoring systems.
What role does encryption play in content protection?
Encryption transforms readable data into a secured format that can only be decoded by authorized individuals. It’s essential for protecting sensitive information transmitted over the internet or stored in databases, thus ensuring that content remains confidential and tamper-proof.
How does DRM contribute to content protection?
DRM technologies control access to digital content by encrypting it and managing the decryption keys. It regulates how content is accessed, copied, and distributed, providing a layer of security against unauthorized use.
What role do watermarks play in content protection?
Watermarks are embedded into digital content to identify its origin and ownership. They act as a deterrent to unauthorized use and enable tracking of content distribution.
How can access control mechanisms enhance content protection?
Access control mechanisms regulate who can view, modify, or distribute digital content. By implementing strict access controls, organizations can prevent unauthorized users from accessing sensitive information.
What are the legal aspects of content protection?
Content protection involves adherence to copyright laws, licensing agreements, and intellectual property rights. Legal frameworks govern the use, distribution, and protection of digital content to ensure compliance and enforce accountability.
How can my organization implement an effective content protection strategy?
Organizations can develop an effective content protection strategy by conducting risk assessments, implementing robust security measures, educating stakeholders about security best practices, and staying updated on emerging threats and technologies.
What is content protection in the context of a CMS?
Content protection involves measures to secure website content from unauthorized access or duplication. This includes implementing user authentication, digital rights management (DRM), and data encryption to ensure that only authorized users can access or modify the content.
How can I secure digital content within a CMS?
To secure digital content, use a combination of access controls, encryption methods, secure hosting environments, and regular security audits. These steps help safeguard your content from unauthorized access and cyber threats.
Can I use DRM for CMS content? How does it help?
Yes, DRM can be applied to CMS content to restrict how content is used and distributed. DRM controls the viewing, copying, and alteration of digital media, ensuring content creators retain control over their digital assets and how they are used.
What are the best practices for implementing content protection in a CMS?
Best practices include:
Regular updates and patches to the CMS platform.
Using strong authentication and authorization techniques.
Regular backups of content.
Using HTTPS for secure communication.
Educating users about security practices.
Summary
Content theft is a serious and growing problem on the web and an unfortunate reality of having an online presence.
While you may not be able to stop someone who is hell-bent on stealing your content from infringing on your intellectual property rights, there are things you can do to prevent those who are less savvy from attempting it. This lesson provides a number of methods to protect your content from being stolen.
Action Steps
If you publish valuable content on your site, make sure to implement as many of the methods covered in this lesson to protect it.
Resources
The United States Copyright Office – The official website of the U.S. Copyright Office. See this site for information on U.S. copyright laws and expert advice on copyright law and policy.
Having a manageable website is not only “heavenly” but keeping your website’s content organized also provides your business with the following benefits:
Save Time – Having a “smart” way to organize your content can save a lot of time adding, managing, and updating content on your site. In this lesson, we’ll show you smart methods and tools that let you easily manage content published on multiple areas of your website from one central location.
Improve User Experience – A website that users can quickly and easily navigate to find the content they are looking for creates a better user experience. It helps them to engage with more of your content, keeps them longer on your site, encourages repeat visits, and increases the likelihood that they will tell others about your site.
Boost SEO – Having a well-organized content structure is also part of good SEO practices and helps search engines like Google to better understand and index your content, which can rank your content higher and deliver more organic traffic.
First Things First – Planning Your Website For Better Content Organization
Good content organization starts at the website planning phase, before your website is built
Ideally, your website was or will be built using a Content Management System (CMS). While there are various content management systems available to choose from, the platform that we recommend using is WordPress.
As you will see from the examples used in this lesson, using a CMS platform like WordPress provides a massive advantage when it comes to keeping your content organized, because a CMS is designed to make managing content easier.
What If My Website Doesn’t Run On WordPress?
If your existing website does not run on WordPress, you can ask a web developer to set up a WordPress blog on your domain.
For example, if your website runs on the domain https://yourcompanysite.com, you can set up a blog on a subdirectory of your domain, like https://yourcompanysite.com/blog.
WordPress is highly customizable, so you can easily match your blog’s look and feel with your website’s design and layout to create a seamless web presence.
You can then use your blog for content marketing activities and link your blog content to your existing website’s pages. For example, if your main website is an eCommerce store, you can promote your products on your blog and send visitors to your store’s product pages to purchase.
Built-In Organization Features Of The WordPress CMS
From here on, we’ll assume that your website or blog is powered by WordPress.
WordPress offers many powerful built-in features to help you manage and keep your content organized. Let’s go through some of these features:
Organize Your Web Content with Categories
Post categories help keep your website and your content organized, improve SEO to boost your search engine rankings, and make it easier for site visitors to find what they are looking for.
For a detailed step-by-step tutorial on how to set up and use categories in your posts, see this tutorial: Using WordPress Post Categories
Categories and tags (see below) are normally assigned to WordPress Posts, not Pages, so this tutorial will focus on posts (if you are unsure about the difference, see this tutorial on WordPress Posts Vs WordPress Pages).
Plan Your Categories
Although WordPress is flexible enough to let you add new categories on the fly, it’s more difficult to keep your content organized as you add more content if you haven’t planned out your categories (and subcategories) properly beforehand.
Permalinks are a feature of WordPress that lets you set up search-engine-friendly URLs (for more details, see this tutorial on how to set up and use WordPress permalinks).
When configuring your permalinks, make sure that post categories are included in the URLs.
Including categories in your permalinks helps to keep your content organized.
This will automatically display search-engine-friendly URLs with your categories (and subcategories) and in your post title keywords.
Search-engine-friendly URLs with categories and subcategories included.
Use An SEO Plugin
Installing an SEO plugin helps to improve your content SEO and optimize your post categories, category archive pages, etc.
Optimize your post categories with an SEO plugin.
Adding category descriptions will also display on some WordPress themes and can also help to boost your content’s SEO.
Optimize your post categories with an SEO plugin.
Once your permalinks and SEO plugin settings are configured for your post categories, WordPress will then automatically start delivering you the SEO benefits of using search engine-friendly URLs, such as better content indexing.
Improve User Navigation With Post Categories
Post categories can be used to improve user navigation on your WordPress site in different pages and different sections of your site, such as site maps, menus, sidebar widgets, archive pages, and even your RSS feeds.
For example, here are some of the ways you can help users navigate your content using post categories:
Categories Widget
Adding a categories widget to your sidebar lets users find related content assigned to a category.
Add a categories widget to your sidebar.
When users click on a category link on the categories widget, they are taken to a category archive page.
Category Archive Pages
Category archive pages group together all the posts assigned to a category.
Category archive page.
Breadcrumb Navigation Links
Breadcrumb navigation links display on some WordPress themes. Displaying categories in breadcrumb navigation links helps to improve user navigation and SEO.
Display categories in breadcrumb navigation links.
Clicking on the category section of the breadcrumb link will take users to the category archive page.
You can display breadcrumbs on your pages using SEO plugins or choose a WordPress theme that supports breadcrumb navigation links, like the Avada theme.
Another useful way to organize your web content for site visitors is using menus.
WordPress comes with a powerful built-in feature that lets you easily create different custom menus using drag and drop and add these to different locations on your site (e.g. header, footer, sidebar).
For example, you can create and display your main menu on the header section containing only links to important sections of your website.
We kept our main menu simple by including only a few links to important pages.
And create different menus with other useful links for your site’s sidebar or footer areas, like the course outline we have added to the right-hand side of this website.
We used the WordPress menu feature to create the course outline on the sidebar of this website.
The WordPress menu feature allows you to build an unlimited number of menus with nested submenus and combine links from posts, pages, categories, external URLs, and more, all using drag and drop.
Menus are a powerful built-in feature of the WordPress CMS.
Menus built with WordPress also update dynamically, so if you change the title of your post, the text displayed on your menu link will also be automatically updated (you can also override this by giving the link a custom name).
Use the menu feature of WordPress to keep the content on your site’s navigation areas organized and improve your site’s user experience.
Widgets are another powerful organizing feature of WordPress. They allow you to move entire blocks of content around your site without touching code using drag and drop.
Widgets help to organize the layout of your site and the content inside different sections.
Note: WordPress eventually plans to phase widgets out because the platform has been evolving to use a new technology called “blocks” (see next section below).
WordPress 5.0 introduced a new technology called “blocks” at the end of 2018.
As the name suggests, blocks let you insert content and functionality wherever you like on your site by adding and rearranging different types of blocks.
WordPress offers many different types of blocks, so you can add any kind of content you like, anywhere you like.
Manage all aspects of an image in your WordPress posts and pages using the Image Block.
You can also turn repeatable content into reusable blocks, group different blocks together to form patterns, and apply global styles to control aspects of your content like typography, colors, and layout across your entire site.
WordPress features like global styles let you manage aspects of your content across your entire site.
The WordPress plugin directory has almost 60,000 free plugins you can use to extend the functionality of your website.
For example, earlier in this lesson, we mentioned that categories and tags are normally assigned only to WordPress posts, not WordPress pages. If you want to add categories (and tags) to your WordPress pages, however, you can easily do this by installing a plugin like Pages With Category And Tag.
We provide lists of some of the best WordPress plugins available for managing content on your website in the lessons below:
The above section is another example of how plugins can be used to help keep your content organized. We created this list of tutorials using the plugin described below.
Content Views is a free WordPress plugin that lets you organize, filter, sort, and display content from selected posts, pages, or custom post types using different views and layouts (e.g. grid, table, list) and insert these views anywhere on your site using a shortcode.
Use categories to display posts using different layouts.
The plugin is very easy to use and lets you create unlimited custom views and layouts without touching code. It also gives you complete control over how your content is grouped and displayed to visitors. Views are 100% mobile responsive and the plugin is optimized to help improve SEO.
The free version of the plugin provides 3 basic layouts (Grid, Collapsible list, Scrollable list).
The premium version (Content Views Pro) provides the basic layouts and a lot more, including many advanced features.
Display your content using different views and layouts with the Content Views Pro plugin.
Although this tutorial focuses mostly on post categories, with Content Views Pro installed you can create different views using posts, pages, and custom post types and filter these using a combination of different criteria including post categories, tags, publish date, post author, keywords, and custom fields.
You can also sort and organize your content using a range of methods, including post or page IDs, published date, modified date, drag & drop, post slug, comment count, menu order, custom fields, and even random sort (content displays in random order every time the page is refreshed).
Create customized views to display content on your WordPress site.
You then create Views by selecting different options in the view-building form …
Create different content views by selecting options.
You can live preview your content as you build or edit your views.
Preview as you build.
After creating and saving your views, the plugin generates a shortcode that you can use to insert into your posts, pages, widgets, etc.
Use shortcodes to insert views into your content.
To add a view anywhere on your site, simply add the view’s shortcode to your content, wherever you want it to display. Republish your page and the plugin will automatically populate your content views with the content you have assigned to it.
You can control the content on all content views from the plugin’s settings area. As you add new content to your site, the plugin will automatically add it to the right content views, depending on your configuration settings.
You can also use the Content Views plugin to add an attractive site map for your visitors with post thumbnail images and descriptions. To learn more, go here:
For more details about using the plugin, check out the video below, and visit the FREE version plugin page here, or check out the Content Views Pro website for a full list of features, comprehensive demo site, premium plugin pricing, FAQ section, and more.
(Overview of WordPress Content Views)
Let’s show you now how you can use this plugin to keep your content organized in post lists, site indexes, course outlines, site maps, etc., and improve the layout of your content for your site visitors.
Tutorial: Organize Your Content Layout With The Content Views Plugin
We use Content Views Pro on all of our sites to organize, filter, and display content in our tutorial sections and lessons using mostly post categories and subcategories. We use the premium version of the plugin as it allows us to mix different content types (e.g. posts and pages) and use other advanced features when creating content display views.
Here is an overview of the process using this site as a real-life example:
For our content management course, we wanted to create different training modules and submodules, so the course plan included lessons grouped into categories for each training module and subcategories for submodules.
Our course plan included lessons grouped into categories and subcategories.
In the website planning phase, we decided to build this course using WordPress.
In the content planning phase, we worked out what the course would cover, and created an outline of the course’s training modules, content, and lessons using a spreadsheet. We also assigned categories and subcategories to each module.
Our content planning spreadsheet.
We used this spreadsheet to make sure that we were assigning the right categories and subcategories to all posts, tutorials, lessons, etc. as we created the content.
Keeping an accurate record of all the content we create for this site on a spreadsheet with additional related information like categories, post titles, post IDs, which content view it is assigned to, post URLs, etc. effectively helps to make other content management processes like running a content audit and scheduling content production easier.
***
After working out the course’s training modules and assigning a category to each module, we then added the categories and subcategories to our site in the Post Categories section of our WordPress admin area.
Set up all your categories in the WordPress Post Categories section.
After installing the Content Views plugin, we then created all the site’s content lists (i.e. content views).
The plugin lets you create unlimited views to keep your content organized everywhere on your site.
Next, we configured each view to list the right content and the information we wanted to display about each lesson.
As mentioned earlier, there are many ways to filter and organize views.
For example, we could have created a view of all content assigned to a specific category. This view would then automatically include any new content we create assigned to that category.
Automatically keep your content organized in content lists and indexes by creating a view of all posts assigned to a specific category.
For this course, however, we wanted to display lessons in a particular order.
So, for each training module, first, we first filtered posts (i.e. lessons) by category (1), and then we recorded each post ID number (2)…
Lessons filtered by category with Post IDs column
We then added each post (i.e. lesson) to the content view and arranged its order…
Posts included by Post ID and arranged in order of display.
After creating the view, we added its shortcode to this page.
Just add the shortcode and the plugin will do the rest.
The plugin automatically populates the published page with the content we assigned to the content view.
This content is now organized and displayed in a neat grid view.
Using the above method makes it easy to organize, automate and manage all the course information on this site from one central location.
If you know how you will organize your site’s content (from your content planning phase) but haven’t created all of the content yet, you can set up “empty” content views and add these as placeholders on your pages.
As you begin to add new content to your site, these “placeholder” content views will then automatically populate your pages with the right content.
***
Here are some additional examples of how we use this plugin to keep our content organized and manageable:
Our Content Management Course Outline Page is kept organized using the Content Views plugin.
The only things we have added to the page are section titles and a brief description of the training modules with some graphic elements.
Here’s what our course outline page looks like in Edit mode.
We also use this plugin on our WordPress training site to display a list of all of the site’s WordPress tutorials. Instead of displaying items by categories, however, we use Post IDs to display them in a logical sequence.
We also use the plugin on WPTrainingManual.com to display a list of 130+ WordPress Tutorials.
Similarly, we use the plugin on our video training site to list our video courses (using image thumbnails, the course title, and price fields only) in random order.
We use the plugin to display our video courses list on WPMasterclasses.com in random order.
We also use the plugin on another site called WPCompendium.org to organize content by post categories and subcategories.
Each tutorial category has its own page.
This list of tutorials is grouped by category.
Some sections, however, display a list of subcategories on the page.
This list of tutorial sections is grouped by subcategory.
If a user clicks on any item listed on the category page (e.g. on the WordPress Plugin Tutorials list), they will be taken to other pages that list all the tutorials assigned to that subcategory, e.g. (Security Plugins, eCommerce Plugins, etc.)
Additional Content Organization Methods
In addition to using the above methods, here are some other tools we use to keep the content on this site organized and manageable:
Serve All Images From A Remote Service
We serve most images used on this site (and videos, downloadable files, etc.) from our Amazon S3 account.
Having all media files stored in one location not only makes things easier to manage but if the same files are used on different posts (e.g. an image banner or a downloadable PDF file), then all we need to do is replace the file on the Amazon S3 bucket where it is stored, and all instances of that file will automatically update on this site.
Storing media on a remote service like Amazon S3 makes managing media files on your website easier.
You can upload and manage all your media files to Amazon S3 (including protecting your content from image hotlinking) using a file transfer tool like S3 Browser.
Drag and drop files from your hard drive to your Amazon S3 buckets with S3 Browser.
Note: Some media files in WordPress (like featured images in posts) need to be stored and managed in the WordPress Media Library. The WordPress Media Library stores media on your own server and also lets you easily manage your site’s media files.
The WordPress Media Library is useful for managing media stored on your own server.
Use A Link Redirection Tool
Another method we use to help us manage and organize the content on our sites is to use a link redirection tool to point content to external sites, download files, etc.
This is useful because sites we link to can change their URLs (without informing anyone outside their organization of the change) and this can lead to broken links and a bad user experience.
For more information on using link redirection methods to manage your content see this lesson: Link Management
Final Tips…
Trash old posts and pages from your site when these are no longer used or whenever you redirect the URL of a post or page to another page or website (make sure to create a backup of your content first). This helps to keep things organized on the backend of your site and reduces the size of your database.
Trash old posts and pages from your site that you no longer use or have redirected.
Organize your hard drive and external storage folders and choose “easy-to-search” naming conventions when storing your content, saving your files, choosing filenames for your images, videos, etc.
Make your content folders, files, and media easy to find.
Also, for a list of useful content-organization tools and note-taking apps, go here: Content-Organizing Tools
Content Organization – FAQs
Here are frequently asked questions about content organization:
What is content organization?
Content organization refers to the systematic structuring and arrangement of digital content to make it easily accessible, navigable, and understandable for users. It involves categorizing, labeling, and structuring content elements to facilitate efficient retrieval and consumption.
Why is content organization important?
Effective content organization enhances user experience, improves navigation, increases search engine visibility, and facilitates content maintenance and scalability. It ensures that users can quickly find relevant information, leading to higher engagement and conversion rates.
What are the key components of content organization?
The key components include taxonomy creation, metadata implementation, content categorization, navigation design, information architecture, and content hierarchy establishment. These elements work together to create a cohesive and intuitive content structure.
How can I improve content organization on my website?
Start by conducting a content audit to assess the existing structure and identify areas for improvement. Develop a clear taxonomy, use descriptive metadata, implement intuitive navigation menus, and create a logical content hierarchy. Regularly review and update the organization based on user feedback and analytics.
What are some common strategies for organizing content?
Common strategies include categorization by topic or theme, tagging with relevant keywords, creating hierarchical structures (such as parent and child pages), and using metadata to help describe and retrieve the content more effectively.
How can I improve the searchability of my content?
To improve searchability, use clear and descriptive titles, utilize metadata and tags effectively, ensure that content is well-categorized, and regularly update content to maintain relevance and accuracy.
What role does metadata play in content organization?
Metadata provides additional context and information about content items, such as titles, descriptions, keywords, and tags. It helps search engines understand the content and improves searchability, aids in the automation of content processes like archiving and security settings, and helps users to quickly evaluate the relevance of the content.
How does content organization impact SEO?
Proper content organization enhances SEO by making it easier for search engines to crawl, index, and rank website pages. Clear taxonomy, optimized metadata, and logical content structure contribute to higher search engine visibility and better ranking for relevant keywords.
What are some best practices for organizing content across multiple channels?
Standardize your taxonomy and metadata conventions, maintain consistency in content presentation and labeling, and ensure seamless integration between different channels. Use cross-linking to connect related content across channels and provide a unified user experience.
What is content organization in a CMS?
Content organization in a Content Management System (CMS) refers to the way content is structured and managed within the system. This includes how content is categorized, tagged, archived, and retrieved to ensure efficient use and accessibility.
How does effective content organization benefit a CMS user?
Effective content organization improves navigation, enhances the user experience by making content easier to find, and increases the efficiency of content updates and management. It also plays a critical role in SEO performance.
How should FAQs be integrated into content organization?
FAQs should be organized to directly address common customer questions, grouped by themes or topics to facilitate easy navigation, and be easily accessible from related content areas or via site search features.
Summary
Keeping content on your website organized is an important area of content management.
Getting organized and systematized before you even publish content will also save you a lot of time later, especially when searching for content items that have already been previously created.
Using a CMS like WordPress and the various tools mentioned here will help you keep everything organized so you can access and manage your content more easily and more effectively.
Action Steps
Complete this lesson and spend some time carefully planning and reviewing ways to better organize your web content.
Resources
WordPress Training Manual – A comprehensive WordPress training site for non-technical website owners and WordPress users with access to hundreds of detailed step-by-step tutorials, video tutorials, guides, resources, and more.
WordPress Plugin Directory – Browse and access thousands of free plugins that help to extend the functionality of your WordPress website.
In this lesson, we look at effective content-linking management practices.
Content Linking Management
In this lesson, we look at the challenges of linking to content online and effective content-linking management practices.
Links help users navigate your content and are an essential part of search engine optimization.
The ability to link content to different pages or sections of your website and other websites is what makes the World Wide Web the World Wide Web.
Without the ability to link content, all you would end up with is something like…well..we’ll let the video below explain it:
While many marketing sites provide excellent information on effective ways to build a content-linking strategy to boost your site’s traffic and SEO, the focus of this lesson is on how to effectively manage your content links.
In this lesson, we look at content linking, the challenges of linking to content online, and how to manage links effectively on your website and other digital assets.
Content Linking Basics
While most of us are familiar with content links (called hyperlinks), it will help to understand the challenges of managing links in your content if we start with a basic overview of what links are made of and the different types of content links used on the web.
What Is A Content Link Made Of?
Take a look at the illustration below. It shows how a content link is created, with each part of the hyperlink broken down and labeled.
Anatomy of a hyperlink
Let’s look at the parts of the hyperlink shown above:
Start of link tag: This bit of HTML code is called an anchor tag (hence why it starts with an “a”). The opening tag informs web browsers and search engines that a link pointing to some destination is going to follow. An entire anchor tag includes the opening tag, any tag attributes, the link referral, the anchor text or object, and a closing tag.
Attribute: The href (Hypertext Reference) is an essential attribute of the anchor tag (i.e. the <a> element). It determines the link’s destination and indicates the relationship between pages to search engines.
Scheme: This part indicates the protocol (a set method for exchanging or transferring data around a computer network) that the web browser must use to request the resource. For websites, the protocol is typically either HTTPS (secured version) or HTTP (unsecured version)
Link Referral Location: This is the target link or the URL (Uniform Resource Locator) destination to which the link is pointing. Note: The destination doesn’t always have to be another web page. It could be the address of an image or a file to download. It could also be something other than a URL, such as a specific section of a page or URL (called a jump link – see further below) beginning with a # sign.
Anchor Text: This is the visible text and clickable part of the link.
Close of link tag: This bit of HTML code indicates the end of the link tag to search engines.
As you can see, quite a lot goes into a hyperlink. The example above shows the construction of a very simple hyperlink.
There are more elements that can go into creating URLs, usually consisting of adding different attribute tags to links, such as attributes to indicate formatting (e.g. style="color: #0000ff"), instructions for where to open the links (e.g. target="_blank"), instructions for search engines (e.g. rel="nofollow"), and more.
Additionally, URLs for content like blog posts can have various levels of organizational structure between the domain name and the article title (also called the post slug), including subfolders, post IDs, post date, categories, subcategories, etc.
An example of a URL for a blog post filed under a category.
For this lesson, we won’t concern ourselves with all the technical aspects of hyperlinks (see the “Resources” and “Reference” sections at the end of this lesson for more information on where to go to learn this), but with the areas dealing with managing hyperlinks in your content.
Types Of Content Links
Let’s look now at some of the different types of links commonly used in web content.
First off, content links typically fall into one of two main types:
External Links
Internal Links
External Content Links
Links are considered to be external if hyperlinks point from a source domain to a target domain (i.e. a domain other than itself).
In other words:
If another website links to yours, this is considered an external link to your site.
Similarly, if you link out from your site to another website, this is also considered to be an external link.
External linking is an important part of a website’s search engine optimization (SEO) strategy (also called off-site SEO).
The PROs of external linking include:
Links pointing from external websites to yours can help to boost your authority, improve your search rankings, and increase traffic to your site.
The CONs of external linking include:
You have no control over who links to your website, what they are linking to, and where they are linking from.
While we provide some useful link management methods and tips in this lesson, external linking strategies are beyond the scope of this tutorial.
If you are interested in learning more about SEO linking strategies (including external linking strategies) see the “Resources” and “References” sections at the end of this lesson.
Internal Content Links
Internal links are links pointing to other URLs on your website.
In other words, when you link to your own pages on your website, those are internal links.
Although all internal links perform the same essential function, which is to help users better navigate your content and help search engines to better understand and index your content, there are different kinds of internal links you can use on your site.
Now that we have briefly covered the structure and types of links commonly used in web content, let’s look at some of the problems you can experience with links and how to fix these.
Content Link Management
Some common problems you may experience using links in your content which can lead to error pages (e.g. page not found errors), wrong destinations, poor user experience, etc. include the following:
Incorrect Links
This includes incorrectly formatted links, misspelled links, links with additional or missing characters, etc., and can lead to a ‘page not found’ error message.
Oops! That page can’t be found…check your links!
It’s easy to add an incorrect link to content, especially when typing out URLs.
https://domain.com/articel-name-goes-here (misspelled post address)
https://domain.com.com/article-name-goes-herehttp(additional text or invalid character string added to URL)
Solution:
Check to make sure that the URL has been typed correctly, spelled correctly, copied and pasted correctly, etc.
Content Not Found At Destination URL
This can affect URLs, jump links, links to images or file downloads, etc. and typically happen when content sections or pages are moved to a different section of your website without thought of the consequences (i.e. what about all the links pointing to the content that has been moved?).
Pointing links to content that cannot be found at their intended destination can result in error pages, poor user experience, or both.
Solution:
Keep track of changes to page URLs in your documentation.
Use the broken link and/or redirection tools (see below).
Use a search and replace tool to change URLs used in multiple locations of your site (see below).
Use a link management tool to manage links used in multiple locations of your site (see below).
Pages With Renamed URLs
If you rename the URL of a blog post (e.g. by changing the post slug), links pointing to the old URL from other pages (especially external links) or websites can lead to error not found pages.
Solution:
In WordPress sites, a feature called permalinks creates an internal redirection if you change the post slug. External links pointing to the old URL can still lead to errors, however, so additional steps may be required.
Keep track of changes to page URLs in your documentation.
Use the broken link and/or redirection tools (see below).
Use a search and replace tool to change URLs used in multiple locations of your site (see below).
Use a link management tool to manage links used in multiple locations of your site (see below).
Links To Private Content
Linking to content in private areas of your website (e.g. password-protected pages, membership areas like members-only forums or download sections, restricted areas in server directories, etc.) can lead to “permission denied” errors and error messages.
Solution:
Check when copying and pasting links into your content.
Don’t publish links to private content on public-facing pages or areas of your website.
Self-Referring Links
Circular reference links occur when links point back to the same source the content originates from.
If you are linking from content on a page back to itself, users will most likely just see the page load again.
However, if you redirect a page URL to itself, the page may go into an endless loop of redirects, resulting in an ERR_TOO_MANY_REDIRECTS error message displaying in your web browser, like the example below.
An ‘ERR_TOO_MANY_REDIRECTS’ error page.
Solution:
Use the redirection tool (see below) and check that you are not copying and pasting the same URL into the ‘from’ and ‘to’ fields.
Pages, URLs, Or Sites That No Longer Exist
External links pointing to pages, URLs, or sites that no longer exist will lead to a ‘page not found’ error.
Solution:
Use the broken link-checking tool to fix or remove broken links (see below).
Use a search and replace tool to change URLs used in multiple locations of your site (see below).
Use a link management tool to manage links used in multiple locations of your site (see below).
Jump Links Not Working
If jump links are not working properly, either nothing will happen when a user clicks on a jump link or they will end up going to a different content section, which can be confusing and frustrating to users.
Solution:
Make sure that you have set up your jump link’s anchor and target links correctly (i.e. both the source and destination terms match, and the right link attributes and a # or id have been used in the anchor and target locations).
If using WordPress, you can use a plugin like Easy Table of Contents to automatically create and add jump links to your content sections. (This is the plugin used on this site – see the top of this lesson for a live example).
Most sites nowadays use the https:// protocol, which is more secure than sites using http://.
Normally, this is not an issue, as sites whose URLs begin with https:// will automatically convert URLs to the right protocol and deliver users to the right pages.
However, if the destination URL points to a site that begins with http:// (i.e. a site that is not secure), visitors may get a warning message like the one shown below:
This warning message is shown on sites that do not support HTTPS.
Seeing a message like the one above can discourage visitors from visiting the website.
Solution:
Make sure your site uses the HTTPS protocol. Many reliable and secure web hosting platforms offer free Secure Socket Layer (SSL) certificates, which allow you to run secure sites with the HTTPS protocol. For more information, go here: HTTP vs HTTPS: What You Need to Know
Make sure that your links match the destination URL’s protocol (i.e. don’t point https:// URL links to http:// sites and vice-versa).
Non-Clickable Links
Formatting regular content to look like clickable links can lead to a poor user experience.
For example:
This looks like a clickable link … but it’s not! (Go ahead..try to click on it!)
In the above example, the text has been styled and formatted to look like a clickable link, when in fact, it’s just plain text with underlined formatting and text colors that match the colors of a clickable link.
Solution:
Avoid styling and formatting your text to look like clickable links. This will only frustrate your website users.
Linking To Unpublished Content
Developing a content linking strategy for web pages that are still being written or are unpublished presents several unique challenges.
These include:
Identifying Link Opportunities: Without fully written content, it can be difficult to identify appropriate internal linking opportunities. This requires a predictive approach, planning content and links based on anticipated content and themes.
Content Silos and Structure: Unpublished content means the website’s structure may still be evolving. Without a clear structure, it’s challenging to strategically place links that enhance navigation and boost SEO through a structured and cohesive hierarchy.
Link Relevance: Ensuring relevance between linking pages is crucial for SEO and user experience. When content is not yet complete, predicting the relevance and context of links between future content involves assumptions that may not hold true once the content is fully developed.
Balance of Links: Determining the number and balance of links in content that is yet to be written is problematic. Too many links might disrupt readability and user experience, whereas too few could underutilize SEO potential.
SEO Integration: Integrating effective SEO practices in the linking strategy without complete content involves guessing keywords and related semantic topics, which might lead to revisiting and revising once the content is published.
Future-Proofing Links: Ensuring that the planned links will remain relevant and functional as more content is added or updated on the site requires ongoing adjustments and foresight into the future content development plans.
These challenges need a flexible, dynamic approach to internal linking strategies, with ongoing revisions and updates as new content is developed and published.
As you can see, coming up with a linking strategy for multiple web pages that are still being written and need to be interlinked can be tricky. For a practical solution to this challenge, see this lesson: Linking Content On Multiple Web Pages
How To Check And Fix Broken Links
Regularly checking your content for broken links and fixing these promptly is an important part of good link management, as broken links can affect your site’s SEO and lead to poor user experience.
The Broken Link Checker plugin lists all the links found on your site with status reports, anchor text, and where it is located.
This plugin continually checks your site’s internal and external links to help you find and fix broken links.
You can view all broken links in your content in the Broken Links tab.
When broken links are detected, the plugin sends you a report. You can then go into the plugin’s screen and perform various options, such as editing the link’s URL, unlinking it from your content, marking it as “not broken”, dismissing, or rechecking the link.
The plugin also lists any problems that it suspects may be temporary or false positives.
If warnings persist for any link, the plugin marks it as a broken link.
You can also view all links you have redirected or dismissed.
The Broken Link Checker screen also lists all redirected and dismissed links.
The plugin also lets you recheck and visit any links that you are not sure about.
Google+ no longer exists…better recheck this link!
Broken links can happen when you move content from one page to another or change the page URL.
For example, let’s say you have a web page on your site called https://www.dreamcar.com/sports and you then rename your page URL to https://www.dreamcar.com/ferrari.
What are your best options for redirecting your website visitors from old pages to new pages?
If other websites are linking to https://www.dreamcar.com/sports and a visitor clicks on this link, they will most likely end up seeing an error page, unless you redirect visitors from the old URL to the new URL.
You can add a “this page has moved” message on the old page and add a link pointing to the location where the content now resides, or…
You can set up a link redirection that will automatically send anyone clicking on a link pointing to the old page to the new page.
If your site runs on WordPress, you can easily redirect visitors from old posts to new posts using a plugin.
Redirections are not only useful for ensuring that site visitors reach their intended content, but they can also inform search engines to update their database records with your new content location.
Another use for redirecting URLs is if your site has pages or links pointing to http:// addresses that need to point to https://.
If you use WordPress, we recommend using a plugin like Redirection or any other plugin that will add link redirection codes to your site’s .htaccess file.
Replacing Broken Or Missing Links
If your content links to an external page that is no longer available (i.e. it leads to an error page when you click on the link), then your choices are:
Leave the link in the article leading to an error page (not recommended)
Replace the link with a link to another site containing similar information (e.g. the same news item reported elsewhere or someone else’s review of the same product)
Remove the link altogether.
Redirect the link (see the section below)
Another option you can use to leave a link pointing to content that is no longer available (for reference purposes ) when there is no other URL you can point your link to, is to replace the link from the broken or missing page with an existing archived version of the page stored on Wayback Machine.
Wayback Machine archives hundreds of billions of previously indexed web pages.
Wayback Machine is a massive historical database of previously indexed web pages. It stores hundreds of billions of archived “snapshots” of web pages (note: these pages may or may no longer exist).
For example, during a recent content review, we found this link in an article leading to an error page:
https://unamo.com/blog/mobile-first-indexing
Uh oh…where has this page gone?
The site itself seemed fine but a link to their blog section lead to the error shown above.
While this could simply be a temporary issue that would be rectified in time by the site owners, external links are out of our control, so we decided to replace the link with the archived version of the page stored on Wayback Machine’s servers.
Here is how to do this:
First, visit Wayback Machine and enter the URL of the page you are looking for. This will bring up a calendar listing all previous instances that the page was crawled and indexed by the Internet Archive.
Hover over one of the highlighted dates and click on a saved snapshot.
Fortunately, Internet Archive’s Wayback Machine stored the version of the page we are looking for.
This will bring up the archived page.
Found it!
Now, simply copy and paste the archived URL into your content, replacing the original link.
So, in this example, we replaced the link shown below that led to an error page…
https://unamo.com/blog/mobile-first-indexing
With this link to the archived version of the web page…
Even though the page is missing images and other elements, visitors will still be able to reference the information relating to the link in our content and not an error page.
LinkTrackr is a web-based link tracking, affiliate cloaking and split testing software used to track sales and leads.
This all-in-one link management tool is designed to enhance your affiliate marketing and sales funnel tracking experience. It lets you easily shorten and cloak your affiliate links with a user-friendly interface that seamlessly integrates with all popular affiliate networks.
Key Features of this powerful tool include:
Link Shortening and Cloaking: Effortlessly shorten and cloak your affiliate links for a professional and clean appearance. Compatibility with all major affiliate networks ensures flexibility in your marketing strategies.
Link Rotation and Split Testing: Rotate links and conduct split tests on landing pages or offers to optimize conversion rates. Test the effectiveness of different strategies and refine your approach for maximum results.
Retargeting Capabilities: Insert retargeting codes on any cloaked link to engage with your audience effectively. Enhance your marketing efforts by reconnecting with potential customers through retargeting.
Customizable Redirects: Redirect links based on geo-location, click limits, and expiration dates, providing precise control over your campaigns. Ensure your links are directed strategically for the best user experience.
Seamless Integration with Google Analytics: Works seamlessly with Google Analytics, allowing you to track and analyze data effortlessly. Gain valuable insights into the performance of your links and campaigns.
Comprehensive Sales and Leads Tracking: Real-time conversion data for every sale or lead in your funnel. Track your entire sales funnel, including upsells, downsells, and one-time offers with ease.
Source, Medium, and Campaign Tracking: Easily identify the source of your conversions by creating campaigns to track various channels. Gain a deeper understanding of your marketing channels and their impact on conversions.
Intelligent Conversion Rules: Avoid duplicate conversions with intelligent tracking rules that can be easily customized. Tailor the conversion tracking rules to align with your specific promotions and marketing strategies.
ROI and Profitability Reports: Detailed reports show your expenditure, profitability, ROI, and other critical metrics. Make informed decisions based on comprehensive data to maximize your return on investment.
Affiliate Marketing Optimization: Cloak and track affiliate links to protect your commissions and gain control over your data. LinkTrackr supports major affiliate networks, including ClickBank, JVZoo, Commission Junction, Shareasale, and more.
Import Commission Reports: Easily import CSV reports from affiliate networks for in-depth commission tracking. Match Sub IDs to our tracking system for detailed reports on each commission generated.
Pixel and Postback Tracking: Streamline tracking for networks supporting third-party pixel codes or postbacks. Automatically integrate affiliate sales data into LinkTrackr with pixel and postback tracking.
PPC Campaign Tracking: Centralize and consolidate your PPC campaigns for more effective management. Optimize Google AdWords campaigns with automatic tracking of campaign, ad group, ad ID, and keywords.
Keyword-Specific Conversion Data: Identify which keywords are driving sales and leads for better PPC optimization. Track each conversion back to the referring keyword to refine your keyword strategy.
A/B Split Testing and URL Rotator: Optimize landing pages and test affiliate offers from different networks. Improve conversion rates and ROI by systematically testing and refining your landing pages.
Customizable Tracking Rules: Configure every aspect of your tracking to align with your specific requirements. Customize tracking rules for ad networks, Google Analytics, and other trackers to suit your unique needs.
Custom Cookie Rules and Session Settings: Set custom cookie lengths for varied conversion results aligned with your ad network. Customize session length and exclusion settings to define new and unique visitors based on your preferences.
Efficient Bot Filtering: Regularly updated bot list ensures real traffic engagement. Optionally add your own bot filters to tailor bot engagement based on your preferences.
LinkTrackr empowers you to take control of your marketing efforts, providing a comprehensive solution for link management, sales funnel tracking, and affiliate marketing optimization.
Pretty Links is an affiliate links, link branding, and link tracking and marketing plugin for WordPress.
Key Features of this plugin include:
Link Optimization: Create clean, simple URLs that redirect to any other URL, effortlessly turning long URLs into concise ones. Fully configurable slugs with the option to generate random characters or create personalized slugs for your URLs.
Seamless Stripe Sales: Unlock the power of PrettyPay™ Links for branded, one-click paths to payment, enabling instant sales anywhere.
Versatile Redirects: Support for 301 (Permanent), 302 (Temporary), and 307 (Temporary) redirects, offering flexibility in directing users.
One-Click Link Sharing: Centralized area for copying and managing pretty links, simplifying link sharing and management.
Comprehensive Tracking: Track the number of clicks and unique clicks per link, providing insights into the performance of your pretty links. Generate highly customizable reports with configurable charts per day, filterable by link, date range, and unique clicks.
User-Friendly Interface: Extremely intuitive admin user interface for easy setup and efficient link management.
Download Click Details: Download click data for your links with the plugin generating a CSV containing essential information for effective link management.
The plugin also offers a Pro version with advanced features and tools for enhanced link management, such as
Product Displays: Create beautifully styled and responsive displays for affiliate links to boost commissions effortlessly.
Keyword & URL Replacements: Automate keyword and URL replacements, allowing Pretty Links to scan and replace defined keywords and URLs within your site’s content.
Advanced Redirect Types: Take control with cloaked redirects, JavaScript redirects, Meta-Refresh redirects, Tracking Pixel redirects, and Geographic redirects.
Automatic Pretty Links for Posts/Pages: Automation feature to create pretty links automatically for new pages or posts, streamlining the link creation process.
Link Categories & Tags: Group and categorize links for more straightforward link management.
Expiring Links: Set expiration dates for links, deciding where users are redirected after clicking an expired link.
Link Health: Weekly scans to identify and report any broken links created within the Pretty Links plugin.
The plugin also offers seamless integration with Google Analytics for easy link tracking and compatibility with other analytics tools for performance insights.
If you are seeking a comprehensive link management solution, Rebrandly is another tool worth exploring.
Rebrandly provides advanced analytics and tracking features, allowing you to monitor and optimize every aspect of your links.
With Rebrandly, you can create custom tracking links, analyze your traffic sources, and even set up A/B tests to optimize your conversions and fine-tune your affiliate marketing campaigns effectively.
While primarily known for its URL shortening capabilities, Bitly also offers link management features that can benefit affiliate marketers.
With Bitly, you can create shortened, trackable links and gain insights into their performance through analytics. This tool is especially handy for those who frequently share their affiliate links on social media platforms.
Use Trackerly to manage, redirect, and track the performance of your marketing links.
What happens if you add links to distributable documents such as PDFs, slides, videos, emails, etc., and then change the content’s destination URL on your site?
Or, let’s say that you are an affiliate for a certain product and the company decides to change affiliate platforms, requiring you to change all of your affiliate links or lose out on affiliate commissions.
What do you do if you have hundreds or thousands of affiliate links placed on your site and the company decides to change its links?
The best way to handle the situations described above is to use a link redirection management tool that lets you manage thousands of links (some tools even allow you to manage links on multiple domains) from a central location.
If replacing links to content that is no longer found on a page with a link to another page or site containing similar information (e.g. the same news item reported elsewhere or someone else’s review of the same product), removing the link or linking to an archived web page is not an option, then consider using one of the link redirection tools listed below.
Redirection Tools
Redirection enables you to forward one URL to another. It’s a handy way to not only send users and search engines to another URL while preserving your search engine rankings for that page, but you can also preserve the ‘link juice’ of the out-of-date content by redirecting old pages or posts to new ones with newer and better information.
WordPress Plugins
As mentioned earlier, a great plugin you can use to create automated redirection links is Redirection.
WordPress plugin – Redirection
See our description of the plugin here or visit the plugin site directly for more information: Redirection
If you use a WordPress SEO plugin like SmartCrawl, you can take advantage of SmartCrawl’s Automatic Linking feature, which lets you boost your site’s SEO through internal linking methods by having the plugin automatically link words in your content to other posts or pages on your blog or even external sites.
Activate SmartCrawl’s Automatic Linking feature to automatically link words in your content.
The plugin gives you complete control over your linking by allowing you to specify which post types you want automatic linking to be inserted in and linked to, the minimum lengths of post titles to autolink to, the maximum number of links per post or page, optional settings, exclusions, etc.
Configure SmartCrawl’s Automatic Linking feature in the plugin’s Advanced Tools screen.
Another powerful feature of the plugin is URL Redirection, which lets you automatically redirect traffic from one URL to another.
This feature is useful if you have changed the URL of a post or page on your site and want to redirect visitors to the post or page’s new URL.
Use SmartCrawl’s URL Redirection feature if you change the URL of a post or page on your site.
SmartCrawl’s URL Redirection feature includes advanced redirection options, such as the ability to use Regex (regular expression), which looks for all URLs containing a specific word in the URL and redirects them to a single URL.
Here are frequently asked questions about linking web content:
What is linking in web content management?
Linking refers to the practice of connecting various pieces of content on the web through hyperlinks, allowing users to navigate between them easily.
Why is linking important in content management?
Linking enhances user experience, improves SEO by showing relationships between content, and helps distribute page authority across your website.
What types of links are used in web content?
There are primarily two types: internal links, which connect pages within the same website, and external links, which connect to pages on different websites.
How can linking impact SEO?
Proper linking can improve site architecture and increase the link equity among pages, which is beneficial for SEO as it helps search engines discover new content and determine its relevance.
What are best practices for linking web content?
Use descriptive anchor texts, ensure links are relevant to the content, update or remove broken links, and balance the number of internal and external links to avoid saturating the page.
What tools can help manage links in web content?
Tools like Google Search Console or specialized plugins for content management systems (e.g. Broken Link Checker) can help identify and manage broken links, as well as analyze the impact of links on your site’s SEO performance.
How do you ensure the quality of external links?
Only link to reputable and relevant sites, regularly check the validity of external links, and monitor the quality of content to which you are linking to ensure it remains appropriate and beneficial.
What are some common mistakes in linking web content?
Common mistakes include over-linking on a single page, using non-descriptive anchor text, linking to low-quality or irrelevant sites, and having broken links.
How often should links be reviewed in web content?
Links should be reviewed regularly, at least every six months, to ensure they remain accurate and relevant, and to remove or update any that are broken or outdated.
Can linking patterns affect website performance?
Yes, excessive linking, especially if scripts or plugins are used to manage them, can slow down page loading times, affecting user experience and SEO.
Summary
Linking to content and pages on your site and other websites is essential to having an online presence. Links help users navigate your site and find what they are looking for and having a good linking strategy is important for SEO.
Content linking, however, also presents a challenge, as all your links also need to be managed, especially when the content or pages these links are pointing to get moved elsewhere, or destination pages and URLs are changed, replaced, or removed.
Action Steps
Review your internal and external content linking strategy and implement some of the tools and methods suggested in this lesson to manage your links effectively.
This section looks at implementing an effective content backup strategy for your business.
Content Backup Strategy
This section looks at implementing an effective content backup strategy for your business.
If content plays any part in the success and growth of your business, website, or digital presence, then we recommend developing and implementing an effective content backup strategy.
This will ensure that, if anything should happen to your business, to your website, or to your digital presence, your content can be fully restored quickly and easily.
This section looks at implementing an effective content backup strategy – what needs backing up, how often to back up, and cost-effective backup tools and methods.
Content Backups Goals And Objectives
The goals and objectives of performing regular content backups include:
Protect against data loss: This goal aims to protect your business against data loss due to hardware failure, software corruption, or other unforeseen events. Examples include regularly creating backups of website files, using backup software or services, and storing backups in multiple locations.
Ensure business continuity: This goal focuses on ensuring that your business can continue to operate in the event of data loss. Examples include having a disaster recovery plan in place, regularly testing backups to ensure they can be restored, and ensuring backups are easily accessible in case of an emergency.
Meet compliance requirements: This goal aims to meet any legal or regulatory requirements for data retention and backup. Examples include adhering to industry-specific regulations such as HIPAA or SOX, and keeping backups for a certain period of time to meet legal requirements
Easily revert to a previous version: This goal focuses on providing the ability to easily revert to a previous version of your website in case of errors or issues. Examples include creating point-in-time backups, keeping multiple versions of backups, and having the ability to easily restore backups.
Save time and resources: This goal aims to save time and resources by automating the backup process and reducing the need for manual intervention. Examples include using backup software or services that automate the backup process, setting up scheduled backups, and utilizing incremental backups to minimize data transfer.
Secure backups: This goal focuses on ensuring that backups are secure and protected from unauthorized access. Examples include encrypting backups, using secure protocols for data transfer, and using secure storage for backups.
Monitor and test backups: This goal aims to regularly monitor and test backups to ensure they are working correctly. Examples include regularly testing backups to make sure they can be restored, monitoring backup logs for errors, and setting up alerts for backup failures.
Store backups in multiple locations: This goal focuses on ensuring that backups are stored in multiple locations to protect against data loss due to physical disasters. Examples include storing backups on the cloud, on external hard drives, and on a separate server.
Your Content Backup Strategy
Having a content backup strategy is all about answering this question…
“How would we feel if something happened to our business, our website, or our digital presence?”
With this answer…
“Peace of mind.”
People take out health insurance, life insurance, business insurance, income insurance, home insurance, car insurance, etc. for “peace of mind.”
This is no different. If your content is important to your business, then you need content insurance to give you peace of mind.
Having an effective content backup system in place will ensure that your content can be restored fully, quickly, and easily should anything unpredictable or unexpected happen to your business or content.
The challenge is that in order to implement an effective content backup system that can fully restore your content quickly and easily, your business first needs to implement the following systems:
These are the ‘content insurance’ systems your business needs to ensure peace of mind.
Content Documentation System
Your content documentation system includes planning and documenting all the processes, procedures, policies, guidelines, workflows, and checklists used to create all the content used in your business.
This ensures that if something disastrous were to happen and you have no backups, your business can assess what content it needs to recreate.
If the goal of your content backup strategy is to have “complete peace of mind,” then your content backup system must be comprehensive and take into account all business-related content generated from every area of the business, stored everywhere, including external servers and applications, internal company drives, and user devices.
Your content backup strategy must take into account all content from all business areas and all user devices.
In essence, this involves making an inventory of what needs to be backed up in each of the following areas:
Servers
Most of your public-facing content will be stored on servers.
This includes your website and all of its files, data, databases, and applications.
Many webhosting services include daily, weekly, or monthly server backups (full or incremental) depending on your webhosting plan. Some even include hourly backups, which are useful for sites that process large amounts of data, eCommerce sites, etc.
Typically, these backups are run automatically and managed by your webhosting company.
When creating your content backup strategy, contact your web host and ask them or review how data and files on your servers are backed up, how often, how data, files, and content can be restored, etc., and include this in your documentation.
Applications
Many applications, services, and tools used for work productivity, content production, and content promotion are run on cloud-based platforms (i.e. Software as a Service, or SaaS).
This makes the companies running these services responsible for keeping your account secure and your content backed up.
When creating your content backup strategy, make an inventory of all the services and applications that host your content externally, make a note of their backup processes and policies, and find out if it’s possible to export or back up your content and data files to your own backup solutions, so you can safeguard and protect your content.
Devices
Content such as business documentation and company-branded media files (e.g. logos, banners, etc.) should be stored on devices accessed through company accounts.
Sometimes, however, these files can end up being stored on personal devices, such as laptops and mobile devices of staff members.
It’s important, therefore, to assess and review where all of your business documentation is being stored and implement correct policies and procedures so that content isn’t lost if a team member leaves their role or loses their laptop or mobile phone.
Once you have done this, add this information to your backup plan.
Content
While your website content will typically be stored on a server and your business may choose to store other content on external applications or services, there are loads of internal documents that are probably being stored on internal drives, user devices, and other locations.
This content includes documents for external distribution (e.g. marketing brochures, pdf guides, reports, lists, drafts, revisions, etc.), content for internal communications (e.g. emails), etc.
It’s important to make sure that a record of this content is also uploaded to company folders, services, and accounts listed in your backup plan.
Back-Up Your Backups
Human error, malicious activity, technical errors, and natural disasters can lead to serious loss of data.
As stated earlier, if the plan is to achieve “complete peace of mind,” then your content backup strategy must not only include a system for backing all content from all areas of the business stored on all devices across the organization but also maintain regular backups of your backups.
Having multiple backups of backups stored across different locations is the ultimate strategy for mitigating and protecting your company’s content and data.
What Is An Offsite Storage Solution?
An offsite storage solution involves storing your website data and backups in a different physical location from your primary site.
This can be achieved through services that keep your data in secure data centers away from your main operations, offering protection against local disasters like fires or floods.
Why Use A Secure Data Storage Solution?
Storing your data backups on your computer hard drive can present a serious risk if your computer crashes or dies due to excessive use, or malicious viruses.
Using a secure offsite, remote, or cloud data storage solution for your website backups and files is a practical and sensible way to ensure that your valuable data can be recovered quickly if something happens to your computer.
For example, if your website is compromised by a cyberattack, having an offsite backup ensures you can restore the site to a previous, uncorrupted state quickly, avoiding prolonged downtime and potential loss of revenue.
Additionally, offsite storage solutions often provide scalable options that can grow with your business, offering cost savings compared to maintaining your own backup infrastructure.
Which Type Of Storage Solution Should You Use?
There are different types of storage solutions you can consider using.
For example:
Offsite Storage:
Definition: Physical storage of data in a location separate from your main site.
Example: Backing up your WordPress site to an external hard drive kept in a different building.
Remote Storage:
Definition: Accessing data stored at a distant location via the internet.
Example: Using a remote server to access and store files that are not physically close to you, such as through a company’s distant data center.
Cloud Storage:
Definition: Data stored on virtual servers hosted on the internet by third-party providers.
Example: Services like Google Drive or Dropbox, where data is stored in the cloud and can be accessed from anywhere with an internet connection.
The ideal backup interval depends on how often new content is added to your system and how valuable the content is.
If you run a high-volume eCommerce website, for example, you may want to back up your transaction data (and accompanying external sales data, communications, etc.) hourly.
If new content is regularly added to your website, then your website should get backed up at least daily (or nightly).
You may choose to back up files and content used for content planning, content production, or content promotion (e.g. media files, outline or draft documents, etc.) weekly or monthly.
The same applies to company documentation such as guides, policies, templates, etc. Depending on how often these documents are updated, you may want to create a monthly, quarterly, or semi-annual backup schedule.
The bottom line is that backup intervals must suit your business and help to eliminate the risk of losing important content, files, or data should anything unexpected happen.
Where To Backup Content
Your organization’s content will either reside internally or externally.
Content stored internally (documents, files, data, applications, etc.) is typically backed up using solutions like remote or cloud backup services and external drives.
As stated earlier, backing up content stored or hosted externally is the responsibility of the service providers. If you can export your data from these services, then add those export files to your internal data backup system.
For information on business cloud storage backup services, backing up your computer devices, and WordPress backup plugins, see the articles and tutorials listed in the “References” section at the end of this lesson.
Create A Content Backup Strategy Document
Your Content Backup Strategy document includes your content documentation and organization systems, a list of where all your content is being backed up to, their corresponding backup schedules, and who is responsible for performing these backups.
For this reason, we recommend focusing first on creating and implementing a Content Documentation System and Content Organization System.
Your Content Backup System then becomes the process of regularly backing up these systems.
A comprehensive Content Backup System includes backing up everything in your Content Documentation and Content Organization systems. (Click on the above image to enlarge).
Content Backup Checklist
Use the checklist below to ensure you have a complete content backup system for backing up the following:
Server Backup
Server applications
Website files
Website data
Databases
Applications
SaaS (e.g. work productivity tools, content production software, content promotion services)
Documents (e.g. PDF guides, downloadable files, etc.)
Website (files, data, content revisions, etc.)
Media (e.g. images, videos, audio, slide presentations, etc.)
Content Backups – FAQs
Here are frequently asked questions about content backups:
What is a content backup?
A content backup refers to the process of copying and archiving website data so that it can be restored in the event of data loss, whether accidental or due to a cyber attack.
Why are backups important in content management?
Backups are crucial as they ensure that your digital content is safeguarded against data loss, corruption, or system failures, thus maintaining business continuity.
How often should I backup my website content?
The frequency of backups depends on the volume of content changes and the critical nature of your data. Daily backups are common, but more frequent backups might be necessary for highly dynamic sites.
What should be included in a content backup?
A comprehensive backup should include all website files, databases, images, and any additional resources used by the website such as plugins or custom code.
Where should I store my backups?
It is best practice to store backups in multiple locations, including both on-site and off-site storage solutions. Cloud storage services are also a popular and secure option.
How can I ensure my backups are secure?
Secure your backups by using encryption, strong access controls, and ensuring that any physical or cloud storage providers comply with industry-standard security practices.
What is the difference between incremental and full backups?
A full backup copies all selected data, whereas an incremental backup only copies data that has changed since the last backup, which can save storage space and reduce backup time.
How do I restore from a backup?
Restoring from a backup typically involves accessing your backup storage, selecting the appropriate backup, and using your CMS or a specialized tool to restore the data to your live environment.
Can automated tools help with content backups?
Yes, many CMS platforms have plugins or built-in features that automate the backup process, scheduling backups at regular intervals and storing them in predefined locations.
What common issues should I be aware of with content backups?
Potential issues include incomplete backups, backups failing to run as scheduled, data corruption during backup, and inadequate testing of backup integrity.
Summary
Trying to keep track of all the content flowing in, out, and through your organization is complex and challenging.
However, it is important to have a Content Backup strategy in place, so that if a disaster ever strikes your business, you can restore your content fully, quickly, and easily, and return to business as usual.
Action Steps
Review your Content Documentation and Content Organization systems.
Review the backup processes for all content stored on servers, applications, user devices, etc.
Choose backup intervals to suit your business that will eliminate the risk of losing important content, files, or data should anything unexpected happen to your business, website, or digital presence.
Automate as much of the backup process as you can, including uploading backup and export files of all your content to secure cloud storage solutions or external drives.
Create and implement a content backup system for all of the above that includes making backups of your backups.
Document all of the above in your Content Backup Strategy Document.
Note: To receive practical content management tips and links to useful information, including downloadable checklists, and templates, sign up for our free Content Management Course Lessons, delivered directly to your inbox.
Checklists & Templates
Checklists and templates play a pivotal role in content management for several reasons:
Consistency and Standardization: Checklists and templates ensure a consistent approach to content creation, editing, and publication, fostering standardization across various tasks and team members.
Efficiency and Time-Saving: They streamline workflows, providing a structured framework that helps content managers and teams efficiently navigate through tasks. This leads to significant time savings.
Communication and Collaboration: Checklists serve as clear communication plans, outlining job responsibilities and facilitating collaboration within the content management process.
Error Reduction: Templates act as guides, reducing the likelihood of errors in content creation and publication. They ensure that essential steps and details are not overlooked.
Productivity Boost: By providing a structured roadmap, checklists and templates contribute to enhanced productivity, allowing content managers to conquer goals and meet deadlines more effectively.
Below you will find checklists with links to the Content Documentation section and other lessons in this training course containing downloadable templates and resources and additional information.
Refer to our content management glossary if you need help understanding some of the terms or concepts described in this section.
Your Business
Complete the steps below to ensure that your business has set up the right foundation to develop an effective system for managing its content:
WordPress Keyboard Shortcuts – Become a WordPress power user and save time editing content with this handy WordPress keyboard shortcuts reference guide.
WordPress Security Checklist– Use this WordPress security checklist to make sure that your site is fully secured and protected against hackers and malicious users.
In this lesson, we look at the documentation we recommend you develop and store for effectively managing content in your business.
Refer to our content management glossary if you need help understanding some of the terms or concepts described in this section.
***
The Importance Of Documentation
Imagine that your business is run by a team of highly competent, experienced, and knowledgeable people and that there is no need to document anything in your business because everyone is an expert in their area and knows exactly what to do in every situation.
One day, a group of very wealthy investors comes along and expresses an interest in buying your business. They love your products and are very impressed with how things are run.
After introducing them to your wonderful team, they express curiosity about how your business is able to maintain such great standards of quality and consistency and ask about your systems and processes.
You start telling them about the wonderful people in your team and how they know everything.
Your investors then quickly lose interest and withdraw their offer to buy your business.
Why?
Because without documentation, all of the systems and processes of your business exist only inside people’s heads and only for as long as they are physically present and working in your business.
If this is where all of your business systems and processes live, then yours is a very high-risk business! Source: The Small Business Digital Manager
If someone leaves your business, they take your business systems and processes with them.
Documented systems and processes:
Allow your business to improve quality and consistency across all areas.
Help to provide better and faster hiring and training across your organization.
Lead to higher individual/team productivity and efficiency, and better performance and results.
Save time and speed up business growth.
Increase the value of your business.
More importantly, having documented systems and processes allows you to work on your business and improve its results by improving its systems and processes.
Documentation helps you manage your content more effectively.
The section below includes a list of the documentation we recommend your business develop, keep regularly updated, and make accessible to your content team. It will help to improve the quality, consistency, accuracy, and management of all content and content processes in your organization.
Internal Documentation
“Internal documentation is the record of all your company’s internal knowledge, ranging from processes and procedures, best practices, IT and software specs, and much more. Internal documentation is intended for reference by employees to get their work done and standardize performance across the organization.”
In addition to having internal documentation such as company policies and documenting procedures and processes describing how work should be done in the business, keeping documentation for the areas below will help your team create accurate content about the company aligned with its business objectives:
Internal Content
Business Vision, Mission, Core Values
Company History
Business Strategy/ Business Plan
SWOT Analysis
Team Organization Chart
Employee/Team Member Profiles And Descriptions (for blog author pages)
Support Request Guidelines (to help the Customer Support team)
For more information on additional content you can document about your business, see the Business Basics section.
Web Pages
Check that your site has the following pages (note: some pages are optional) and review their content:
Basic Pages
Home Page
About Us/Meet The Team
Contact Page
FAQs
Landing Pages (Products and Services)
Blog Section
Portfolio/Our Work
Careers/We’re Hiring
Roadmap
Legal Pages
Privacy Statement
Terms And Conditions
Website Disclaimers
General Data Protection Regulation (GDPR) Compliance
Affiliate Agreement
Anti-Spam Policy
Compensation Disclosure
External Linking Policy
Health Disclaimers
Refund Policy
Media Terms Of Use
Web Content Accessibility
The Web Content Accessibility Guidelines (WCAG) provide technical specifications to improve the accessibility of web content, websites, and web applications across all devices for people with a wide range of disabilities.
Essential Accessibility is an all-in-one accessibility platform that provides accessibility tools, expertise, training, and support, including compliance guides and a downloadable interactive WCAG checklist.
Use Essential Accessibility’s WCAG 2.1A and AAA interactive checklists to ensure your site and content are compliant with accessibility guidelines.
Documenting the content below will help to speed up the process of content creation and ensure content is aligned with business outcomes and expectations:
Documenting the content below will help to speed up the process of content production, improve timely delivery to production deadlines, and help to ensure the quality and consistency of all created content:
How to share content effectively with others (internally and externally)
This documentation can include training, guides, guidelines, and tips on:
Organizing email inboxes and folders
Using applications and sharing content on work tools (e.g. Slack, Zoom, etc.)
Uploading files to your website, web server, and cloud storage services.
Most professional tools provide their own documentation and tutorials, so there’s no need to reinvent the wheel. Just create a simple guide with key processes team members should follow, add links to the tool’s documentation, tutorials, and help sections, and include additional resources from the web (e.g. links to helpful articles or videos).
For example, you can use links to resources like the examples shown below to quickly create a simple yet useful guide for team members on how to organize their Gmail inboxes to help them save time and increase their productivity, then provide this guide as part of their orientation and training process:
Positioning statements help to ensure that your marketing efforts are aligned with your brand.
Unique Selling Proposition (USP) – Describes to your target market how you’re different and why they should buy from you.
Unique Selling Point– Describes how your company stands out from the competition.
Value Proposition – Describes what you are offering to customers for what they are paying and answers the question: Why should customers care that you’re different?
Documenting the areas below will help to improve your content management processes:
Website Documentation
Keeping the information on your website accurate and up-to-date is a form of documentation.
This includes:
Company Pages (e.g. About Us)
Products & Services Pages
FAQs
Blog
Legal Pages
Legal Pages
Your website needs various legal pages to comply with regulatory requirements (e.g. federal and state laws), and 3rd-party providers (e.g. Google). Legal pages can also protect your business from legal issues, legal threats “takedown” notices, etc.
Additionally, depending on the nature of your business, you may also want to consider including some or all of the following pages:
Affiliate Agreement (if you sell products or services through an affiliate program.)
Anti-Spam Policy
Compensation Disclosure
External Linking Policy
Health Disclaimers (e.g. if your website provides general health or medical content.)
Refund Policy (if you run an e-commerce site.)
Media Terms Of Use (e.g. if you allow users to download videos or audio files on your site.)
Disclosure Pages – Types
Adding correct disclosure information to your site is essential. For example:
No Material Connection – Make your visitors aware that you will not receive compensation for writing the content.
Affiliate Links – Make your readers aware that you may be compensated financially if they buy through your affiliate link.
Review/Sample Copy – Disclose to your visitors if you have been given a review or sample copy of the product or service you’re reviewing by the author or developer.
Sponsored Post – Make your visitors aware that you were compensated in some way to write the post.
Third-Party Advertising – Let users know if you’re using online behavioral tracking technology. This is required to comply with the “enhanced notice” the Better Business Bureau has been requiring website publishers to show prominently on their sites since January 1, 2014.
Remember to regularly review and update the information on all of the pages listed above.
Documentation Management Systems
Other types of systems that allow you to manage documentation and your content include:
Document Management Systems – A software program designed to help organizations manage, store, and track their electronic and physical documents.
Digital Asset Register – Keep a record of all your documentation and digital assets with descriptions, versioning, location, access URLs, software licenses, subscription services, logins, passwords, etc.
CMS – Building your online presence using a platform like WordPress functions both as a content management system, and a content documentation system as described in the “Website Documentation” section above. Also, see these different types of Content Management Systems:
Document Library – A document library is a collection of files, documents, or records that are systematically organized and stored in a digital format.
Content Tracking – Create documents and guides to help your team track content production and content performance across your organization, understand and interpret results, and create reports.
Documentation Storage – Create documents and guides to help your team access and use various digital storage tools (see below).
Effective content management requires effective ways to collaborate, store, organize, and retrieve documents and content.
Storing documents and content, however, presents its own challenges, as this involves not only working out an efficient way to store, access, and archive digital assets, but also making sure that assets can be worked on collaboratively and be shared, reused, and repurposed across multiple channels.
Some options for storing your documentation and your content include storing your documentation using digital asset management (DAM) software…
You can use Digital Asset Management (DAM) Software…Source: Canto
On a knowledge base platform…
Store public or private documentation and content for customers and employees on an online self-service knowledge base. Source: Document360
On a cloud storage solution (e.g. Amazon S3, Dropbox, etc.)…
Store your documentation on the cloud using a solution like Amazon’s AWS…
In folders on a shared drive (e.g. Google Drive)…
Store your documentation inside folders on a shared drive.
Or in additional places like cloud-based email, work productivity tools (e.g. Slack channels), and other tools.
Whether your organization chooses to use a digital asset management (DAM) system, online knowledge base software, or set up folders on a shared drive or cloud storage solution will depend on your organization’s digital asset management strategy.
Create an organized system of folders to add all the documentation your team members will need to complete their projects and make these sharable and accessible to your team.
Use easily identifiable folder naming conventions when storing documentation to ensure that the process remains standardized.
Make sure to reference where the folders containing your documentation are located. You can do this using your web browser’s Bookmarks tool and in internal documentation (e.g. create an online guide for your content team for easy access and retrieval of documents).
Document Access
You’ve documented everything in your business and worked out where to store it all…great!
Now, you need to work out how to make all of this documentation easily accessible and retrievable for your team. Otherwise, this will defeat the purpose of creating an efficient system to manage all of your documents and content effectively.
Effective content management requires effective documentation, storage, and access systems.
In addition to the storage methods mentioned earlier (e.g. DAM and Knowledge Bases), there are many places to access your documentation, including:
For example, your web browser’s Bookmarking tool is a great way to organize and access links to documentation and useful tools and resources for your content team.
Your web browser’s Bookmarking tool is a great way to organize and access links to documentation, tools, and useful resources.
You can even export and share your bookmarks so everyone in your team can access the documents, tools, and resources they need quickly and easily.
Use your web browser’s Bookmarking tool to create an organized way for team members to quickly and easily access all the documentation they need to create, promote, and manage content.
Content Documentation – FAQs
Here are frequently asked questions about content documentation:
What is content documentation?
Content documentation refers to the process of creating, storing, managing, and updating all forms of documentation related to a company’s content processes, including text, images, video, and multimedia. This ensures information is easily accessible and can be updated or repurposed efficiently.
Why is content documentation important?
It helps maintain consistency across various content channels, improves collaboration among team members, ensures compliance with legal and regulatory requirements, and serves as a historical record of content strategies and outputs.
What are the key elements of effective content documentation?
Effective content documentation should include a clear purpose, audience identification, structured format, detailed content guidelines, and revision history. These elements ensure that documentation is useful and accessible to all stakeholders involved.
How does a content management system (CMS) support content documentation?
A CMS helps in organizing, controlling, and publishing documentation without requiring technical expertise. Features like version control, access permissions, and integration capabilities make CMS an indispensable tool for content documentation.
What should be included in a content documentation strategy?
The strategy should outline the content lifecycle, roles and responsibilities of the content team, documentation standards, storage and retrieval processes, and tools and technologies used for creating and maintaining documents.
How do I choose the right tools for content documentation?
Select tools based on your specific needs for collaboration, version control, ease of use, scalability, and integration with other systems. Consider the nature of your content and the size of your team to find a suitable solution.
What are some common challenges in content documentation and how can they be addressed?
Common challenges include maintaining up-to-date records, ensuring document accessibility, and managing multiple content formats. Regular audits, training for team members, and leveraging a robust CMS can help address these issues.
Summary
All too often, business knowledge, systems, and processes are stored in the heads of employees and scattered across all the various tools used in the business. There is little documentation and no single source of truth for it.
This leads to valuable time and effort wasted searching for information across all areas of the business, including information required to assist in speeding up areas like content planning, content production, and content promotion.
An effective content documentation system that allows your content team to quickly and easily access all stored documents is essential to effective content management.
Documentation is a massive undertaking, but once started and implemented, it leads to improved results in all areas of the business.
Action Steps
Review this lesson and identify all the different areas of your business that need documentation.
Create a list of all the documented systems and processes each of these business areas needs to operate efficiently and effectively, especially in areas related to content planning, content production, and content promotion.
Develop a plan for organizing, storing, accessing, distributing, and implementing all business documentation.
Begin documenting all systems and processes listed above. This can be as simple as creating bullet-point guides, procedures, and checklists.
Train your team members to use and follow the documentation.
Continually review and improve your documentation.
Resources
How To Use Amazon S3 – Video course on using Amazon AWS to store files (e.g. media, documentation, etc.)
Content Troubleshooting Guide – Use this guide to help you troubleshoot issues with your content and improve your content management.
Learn how to set up systems for managing your content effectively.
Content Management
This section looks at how to set up systems for managing your content effectively.
The most effective way to help your business realize its goals and objectives is to turn every content-related area of your business into systems that anyone in your organization can help to manage.
It’s difficult to manage content effectively if you have not set up effective systems and processes to handle the areas of your business responsible for planning, creating, delivering, distributing, and promoting your content.
At the same time, it’s difficult to plan, create, deliver, distribute, and promote your content successfully if your business doesn’t have an effective way to manage all these processes.
In this module, we look at how to address these challenges.
Additionally, we recommend subscribing to our free content management course email lessons if you haven’t already, as these provide a practical step-by-step way to implement the lessons in this course.
As a subscriber, you will also get notified when new posts containing practical information and valuable content management tips are added to our blog.
Content Management Is Challenging
Managing content for your website and other digital assets can be challenging as it involves a combination of creativity, organization, and technical skills.
Here are some of the main challenges of managing your content that you may run into:
Content creation: Generating new, high-quality content that aligns with your goals and resonates with your target audience.
Content curation: Selecting, editing, and organizing existing content to keep your website fresh and up-to-date.
Content organization: Structuring your website’s content in a logical and user-friendly way, making it easy for your visitors to navigate and find what they are looking for.
Content maintenance: Keeping your website’s content up-to-date, removing outdated or irrelevant information, and updating, revising, and archiving content to keep it accurate, relevant, and useful.
Content governance: Setting guidelines, policies, and standards for creating, managing, and publishing content on your website, and ensuring that all content on the website adheres to legal and ethical guidelines and company policies.
Multiple authors and contributors: Managing the contributions of multiple authors and ensuring consistency and quality across all content.
Integration with other systems: Integrating your content management system with other systems such as CRM, analytics, or e-commerce platforms.
Multilingual content management: Managing content in multiple languages for your website catering to a diverse audience.
Content security and backups: Protecting your website’s content from unauthorized access, complying with data privacy regulations, and ensuring that regular backups are made to restore the content in case of unfortunate events.
Measuring and analyzing performance: Tracking metrics such as website traffic, engagement rates, and conversion rates to measure the success and effectiveness of your content management efforts.
Addressing The Challenges Of Managing Your Content
According to digital marketing experts, your business should use content marketing to promote and market itself using content, and you should do this by:
Publishing new content regularly on your blog and on social media,
Sending out regular email newsletters to your subscribers (and your email marketing should be segmented to different users – i.e. prospects, customers, partners, etc.)
Creating special reports, and guides to generate new leads for your businesses.
But that’s not all…
Your business should also be continually creating new content targeting different audiences using tweets, pins, stories, videos, audio, infographics, slides, webinars, etc.
And your content must not only engage, entertain, delight, inform, educate, and sell, but if you want your content to rank well in the search engines, it must also be original, authoritative, expertly written, well-researched, and able to satisfy all the needs of your audience (or different audience groups).
That’s asking a lot of any business. Especially businesses with limited budgets and resources.
And once you figure out how to create (and meet the cost of creating) all this content…
How do you manage all of this content you have created?
How do you keep your content organized, up-to-date, and accessible so that anyone who needs it can quickly and easily access it without wasting time searching for it or duplicating it?
Managing all the content in your business requires setting up effective systems and processes for content planning, content production, and content promotionbefore you even start planning, creating, or promoting any content.
Without these systems and processes, your business is just guessing what may or may not work and hoping this will lead to great results.
Creating content without a plan, without defined targets, and without systems for measuring its performance and results is like throwing bricks into an empty yard and hoping these will somehow arrange themselves into a beautiful house.
This would be a complete waste of time, effort, money, and resources, wouldn’t you agree?
The More Content You Have, The More Content You Have To Manage
Suppose you have a blog and you regularly publish new content on it.
In just a few short years, your blog could have hundreds or even thousands of existing posts. Many of these posts will eventually contain information that needs updating, rewriting, or removing.
You can’t stop creating new content, but as your content gets old, you also have to keep maintaining it.
Managing the existing content in your business is like painting bridges. Maintaining the structure fresh and up-to-date to make sure it remains standing while everything around is trying to corrode it is an ongoing process.
So many factors can affect your existing content.
For example:
Facts, stats, and prices are continually changing,
Companies, brands, and platforms appear, evolve, get acquired, change names, or collapse,
External pages that your content links to (and are out of your control) are constantly being added, modified, moved, or removed,
And many other things.
Keeping track of all your existing content to see if anything has changed (and if so, what has changed) is a massive challenge, especially as your business matures and your web presence becomes more established.
The Solution: Develop And Implement An Effective Content Management System
If…
Your business needs a web presence,
Your web presence needs web content,
Your content needs management, and
The more content you have, the more content you have to manage…
Then the challenge for your business is to figure out not only how it can keep pumping out new content regularly, but also how it can proactively maintain all of its existing content updated, relevant, and accurate, in addition to managing all of its content-related processes and activities, while working within its current business setup.
Assessing Your Current Content Management Practices
As we have just seen…
Effective content management involves managing both the planning, production, and promotion of new content and the ongoing maintenance of existing content, throughout your entire organization.
So, is your business ready to manage its content effectively?
Think about all the areas of your business that are involved in the planning, creation, delivery, distribution, and promotion of your content, and ask yourself these questions:
How quickly can your business create and publish new content?
How does your business keep a pipeline of new content going?
How does your business keep the information in your existing content (across all content types and distribution channels) up-to-date, relevant, and accurate?
How do you know when your content is out of date, has become irrelevant, inaccurate, or obsolete?
How can you tell if your content is performing well?
How do you keep your content processes documented, organized, and accessible so anyone who needs the information can quickly and easily locate it?
How can you tell if your team members are implementing and following effective content management processes?
How quickly can your business adapt to incorporate new content planning, production, and promotion processes, strategies, methods, and tools?
The above answers will help you develop an effective Content Management Strategy, which is outlined below.
Your Content Management Strategy
The first step to managing content effectively in your business is to develop a content strategy.
Without this blueprint to guide your content activities and direction, your business will be like a rudderless ship.
While you are doing this, your team should also be documenting your content processes, tracking your content’s performance, and periodically reviewing your content to make sure it’s still aligned with your business objectives.
Additionally, your business needs to think about doing all this in an organized way while protecting and regularly backing up its content.
Your Content Management Plan
After creating your content strategy and content plan, the next step is to break your overall content plan down into smaller plans for content production, content promotion, and content management.
Your content management plan is a document that outlines the process and procedures for managing and maintaining the content that your business produces.
It typically includes your goals and objectives for your content, your target audience, the types of content to be produced, the distribution channels to be used, the roles and responsibilities of team members, the workflow and approval process, and the key performance indicators (KPIs) to measure the success of your content management practices.
Your business needs a content management plan because it helps you to efficiently and effectively manage the content that you produce, from the initial idea to the final publication.
It also allows for a clear understanding of the roles and responsibilities of team members and stakeholders and establishes a consistent workflow, which helps to ensure that your content is accurate, on-brand, and on-time.
Also, a content management plan allows your business to track the performance of your content over time, and make adjustments as needed to ensure that you are meeting your content goals and reaching your target audience effectively.
Furthermore, a content management plan can help your business ensure that your content is organized, easily searchable, and retrievable, which can save time and resources in the long run, and provide a consistent customer experience.
Additionally, having a content management plan in place will help your business keep your content up-to-date and accurate, avoid duplication of effort, and ensure compliance with legal or regulatory requirements.
In short, your content management plan is a strategy for organizing, storing, and maintaining your business content.
It helps your business keep its content organized, ensuring that it stays up-to-date and relevant, and making it easily accessible to those who need it.
Content Management Plan Goals & Objectives
Common content management plan goals and objectives include:
Content organization: The goal is to create a structure and system for organizing and categorizing content in a way that makes it easy for users to find and access. This can be achieved by using tags and categories to organize blog posts and creating a hierarchical file system for document management.
Content creation: The goal is to create and publish new content that is relevant, valuable, and engaging for the target audience. This can be achieved by writing and publishing blog posts, creating and publishing videos, and creating and publishing infographics.
Content optimization: The goal is to improve the visibility and performance of existing content through search engine optimization (SEO) techniques. This can be achieved by researching and including relevant keywords, optimizing meta tags, and creating internal and external links.
Content distribution: The goal is to reach and engage the target audience through various channels such as social media, email, and other digital platforms. This can be achieved by sharing content on social media, sending newsletters, and creating and sharing infographics on social media platforms.
Content measurement and analytics: The goal is to track and measure your content’s performance in terms of engagement, conversion, and other key performance indicators (KPIs). This can be achieved by using Google Analytics to track website traffic, using social media analytics to track engagement, and using A/B testing to optimize conversion rates.
Content governance: The goal is to ensure that all content is accurate, up-to-date, and compliant with legal, ethical, and brand guidelines. This can be achieved by creating and enforcing a content style guide, regularly reviewing and updating content, and ensuring that all content is accessible and inclusive.
Content archiving: The goal is to preserve and protect historical content for future reference. This can be achieved by keeping a record of all previous blog posts, preserving old videos, and archiving all previous documents and files.
How To Create A Content Management Plan
Here are the steps you can follow to create a content management plan for your business:
Inventory your content: Perform a content audit and create a list of all the content your business currently has, including the format, title, and location of each piece.
Identify the types of content: Group your content into categories, such as blog posts, videos, podcasts, whitepapers, etc. This will make it easier to manage and keep track of.
Create a content schedule: Decide how often you will update and republish each type of content. This will help ensure that your content stays current and relevant.
Establish a process for creating and publishing content: Develop a workflow for creating and publishing new content, and make sure that everyone who creates content knows what is expected of them.
Create a system for storing and sharing content: Decide on a way to store and share your content, such as a content management system (CMS) or shared drive.
Define roles and responsibilities: Assign roles and responsibilities for content management to the appropriate people or teams within your organization.
Regularly review and update your plan: Regularly review and update your content management plan as needed to ensure that it is still effective.
Example Of A Content Management Plan
Here is an example of what a simple content management plan for a SaaS company that creates marketing software might look like:
Inventory: Blog posts, case studies, webinars, product demos, whitepapers
Types of content: Blog posts, case studies, webinars, product demos, whitepapers
Content schedule:
Blog post: Once a week
Case study: Once a month
Webinar: Once a quarter
Product demos: Once a quarter
Whitepaper: Once a year
Process:
Research: Marketing team
Writing: Marketing team
Editing: Marketing team
Design: Graphic designer
Publishing: Marketing team
Storage: Google Drive
Roles and responsibilities:
Content management: Marketing team
Content scheduling: Marketing team
Content publishing: Marketing team
By following these steps and regularly monitoring your results, the SaaS company will be able to create a content management plan that will help them keep their content organized, ensure that it stays up-to-date and relevant, and make it easily accessible to the people who need it.
Content Management Checklist
Define your content management goals: Clearly define the goals for managing the content, such as improving website traffic or increasing customer engagement.
Create a content inventory: Create an inventory of all existing content, including the format, topic, and target audience.
Develop a content strategy: Develop a content strategy that outlines the goals, target audience, topics, and formats for the content.
Establish a content workflow: Establish a content workflow that outlines the process for creating, reviewing, editing, and publishing content.
Set up a content calendar: Set up a content calendar that outlines the publishing schedule for your content.
Optimize for SEO: Optimize your content for search engines by including relevant keywords, meta descriptions, and alt tags.
Track and analyze: Use analytics tools to track the performance of your content and gather insights for future content management.
Review and update: Review and update your content on a regular basis to ensure it stays fresh and relevant.
Collaborate and communicate: Collaborate and communicate with other teams and stakeholders to ensure the content aligns with the overall company goals and objectives.
If your business is already underway and your content management practices have started to become chaotic and disorganized, then we recommend going through our Content Troubleshooting Guide.
The email lessons will guide you through the course and provide the information you need to start managing your content effectively.
As a subscriber, you will also get notified when new posts (containing practical information and valuable content management tips) are added to our blog.
Content Management – FAQs
Here are frequently asked questions about content management:
What is content management?
Content management involves the creation, organization, publication, and governance of digital content with a unified strategy to meet specific business goals. It encompasses tools, processes, workflows, and technologies to help individuals or teams streamline content production and distribution.
What are the key components of effective content management?
Effective content management relies on clear goals, well-defined workflows, collaboration tools, version control, metadata management, and analytics for continuous improvement.
What are the common challenges in managing content effectively?
Common challenges include content fragmentation, inconsistent workflows, poor version control, lack of collaboration, content governance issues, and difficulties in measuring content performance.
How can businesses streamline content creation?
Businesses can streamline content creation by defining clear objectives, creating content calendars, establishing editorial guidelines, leveraging content templates, and using collaborative tools for efficient content production.
What are the best practices for organizing digital content?
Best practices include implementing a taxonomy and metadata strategy, using consistent naming conventions, organizing content hierarchically, implementing search functionality, and periodically auditing and updating content structure.
How can businesses ensure content quality?
Businesses can ensure content quality by establishing quality standards, conducting thorough reviews, leveraging style guides, implementing approval workflows, and providing training for content creators.
What role does content governance play in effective content management?
Content governance establishes policies, processes, and guidelines for content creation, publication, and maintenance to ensure consistency, compliance, and alignment with business objectives.
How can businesses measure the effectiveness of their content management efforts?
Businesses can measure effectiveness through key performance indicators (KPIs) such as traffic, engagement metrics, conversion rates, content reuse, and user feedback.
What are some strategies for effective content creation?
Plan your content strategically with a clear understanding of your target audience and goals. Use tools for content ideation, like keyword research and competitor analysis, and ensure consistency and quality in your content creation process.
How can I ensure my content meets quality standards?
Establish clear content guidelines, utilize content calendars for scheduling, conduct regular audits, and set up a process for peer reviews or editorial oversight.
What are the best practices for managing content updates and revisions?
Regularly review and update content to keep it relevant. Use version control systems to manage changes and maintain records of revisions. Ensure that updates are communicated effectively within your team and to your audience.
How do I optimize my FAQ page for effectiveness?
Your FAQ page should be easy to navigate, reflect your brand’s voice, and directly answer common questions. Organize questions logically or categorize them, and update the page regularly to include new or evolving questions.
Summary
All web content needs management and the more content you have, the more content you have to manage.
Before you can manage content effectively, however, you need systems and processes to manage all content-related areas of your business.
From creating high-quality and engaging content that aligns with your website’s goals to organizing and categorizing it in a way that is easy for users to navigate, managing content requires a strategic and systematic approach.
Additionally, maintaining and updating the content, ensuring adherence to legal and ethical guidelines, and integrating with other systems are also important aspects of content management.
Furthermore, measuring the performance, dealing with multiple authors and contributors, and ensuring the security and backup of the content are also significant challenges to be addressed.
Without a proper plan in place, managing content can be a time-consuming and complex task.
Action Steps
Review the lessons in this training module and begin to implement systems and processes for managing content effectively in your business.
Content reviews are the best way to ensure that you stay on top of managing your existing content as your digital presence grows.
Content Reviews
Content reviews are the best way to ensure that you stay on top of managing your existing content as your digital presence grows.
Content reviews are a vitally important part of effective content management.
In this lesson, we look at why, when, and how to conduct periodic content reviews to ensure that your content remains in alignment with your content strategy.
***
What Are Content Reviews?
Content reviews are the process of evaluating and checking the quality and relevance of the content on your website or other digital platforms.
Why Do Content Reviews?
The goal of a content review is to ensure that your content is accurate, up-to-date, and relevant to your target audience and that it aligns with your company’s brand and messaging.
As mentioned in the overview lesson of the Content Management module of this course, effective content management involves managing both the production of new content and the management of existing content in your business.
Managing your existing content and making sure that it not only remains up-to-date and relevant to your audience but is also aligned with your content strategy is an ongoing process.
This process becomes even more necessary as your digital presence grows and more new content is added, giving you more existing content to manage.
The solution is to implement an effective and periodic content review process.
Performing in-depth content reviews is a vitally important part of effective content management.
Content Reviews Goals And Objectives
The goals and objectives of performing regular content reviews include:
Ensure accuracy and credibility: This goal aims to ensure that all the content and information presented on your website is accurate, credible, up-to-date, and relevant to your target audience. Examples include fact-checking, verifying and citing sources, and updating outdated information.
Improve readability and clarity: This goal focuses on making sure the content is easy to read, understand, engage with, and user-friendly. Examples include using simple language, breaking up content into smaller sections, and using headings, subheadings, and formatting to improve readability.
Remove duplicate or low-value content: This goal aims to remove duplicate or low-value content that can dilute the user’s experience. Examples include identifying and removing duplicate content, consolidating similar content, and removing irrelevant or low-value content.
Increase search engine visibility: This goal focuses on improving your website’s search engine rankings in order to drive more organic traffic. Examples include optimizing meta tags, adding keywords, creating high-quality helpful content, and ensuring that your content is well-structured.
Increase user engagement: This goal focuses on making the content more engaging and interactive to increase user engagement. Examples include using multimedia and interactive elements and encouraging user feedback and comments.
Ensure consistency and brand alignment: This goal aims to ensure that all content is consistent with your brand’s voice, tone, and style. Examples include creating a style guide, reviewing for consistency in voice and the use of branding elements, and ensuring that all images and videos align with your brand.
Improve website navigation: This goal focuses on making your website easy for users to navigate and find the content they are looking for. Examples include creating a clear and consistent website structure, improving website navigation, reviewing for broken links, and ensuring that all pages are linked and that all links are working correctly.
Address user feedback: This goal aims to address any user feedback or complaints and make necessary changes to improve the website. Examples include monitoring social media and website comments, reviewing user feedback, and making changes based on user feedback.
Monitor analytics to identify gaps: This goal focuses on monitoring your website’s analytics to gain insights into user behavior, improve performance, and identify gaps in the content. Examples include setting up Google Analytics, setting up tracking codes, tracking website traffic, monitoring bounce rates, and regularly monitoring and analyzing website metrics.
Improve accessibility: This goal aims to make your website and web content accessible to all users, including those with disabilities. Examples include reviewing for accessibility issues, providing alternative text for images, using captioning and transcripts for videos, and using semantic HTML.
The Content Review Process
During a content review, you or a member of your content team should go through all of the content on your website and check for errors, inconsistencies, and areas that need improvement.
This may include fact-checking, verifying sources, and updating outdated information. Your team should also check for readability, user engagement, and how well your content is optimized for search engines.
Performing a content review may include different steps such as:
Identifying the content that needs to be reviewed.
Assigning a team or individual to perform the review.
Setting up a schedule for the review.
Reviewing the content and making notes and recommendations.
Implementing changes and updates to the content.
Testing the changes and monitoring the results.
Developing Your Content Review Process
Before you can embark on a proper review of your existing content, make sure that you already have your Content Strategy and Content Production systems in place.
Without these systems, you won’t know what you are aiming toward or how to get there.
Once these systems are in place, the next step is to conduct a thorough Content Audit of your existing content.
This would result in a document listing every existing item of content in your business that is used to grow your business.
Note: To make this lesson practical, we’ll confine our Content Audit examples to website content only and use screenshots generated from the author’s work as the blog editor of a technology company’s website.
What Exactly Are You Reviewing?
Before we look at how to run a content review, let’s briefly review exactly what you should be looking at when reviewing your content.
You know that your content has to meet the following criteria:
Provide your target audience what they are looking for.
Provide search engines what they are looking for.
Provide your business what it is looking for.
So, your content review is about ensuring that:
Your target audience will find your content to be 100% valuable, useful, informative, up-to-date, and accurate, and turn to your site for solutions to their questions, problems, and needs.
Search engines will find your content to be authoritative and 100% relevant to what users are searching for, and reward you with content that ranks increasingly higher in their search results, and delivers you consistent organic traffic.
Your business will achieve its strategic objectives, e.g. get more leads, sales, and conversions using content.
To achieve the above, the focus of your content review should be to make sure that all of the areas listed below deliver the best possible results when users and search engines land on your content:
Article outlines and structures make complete sense to readers and are fully optimized for search engines.
Headlines are compelling and lead to users clicking through to the rest of the article.
The introductory section describes succinctly what the content is all about and what readers can expect to gain from reading it.
Articles have a clickable table of contents. Readers can jump to the section they are interested in quickly.
The content structure is skimmable. Readers can quickly understand what the article is all about.
Stats, references, and citations are accurate and up-to-date.
The content is readable and easy to comprehend.
Internal links lead to useful and relevant content.
Graphics add value to users.
CTA used in the content has proven to convert well.
The content matches the overall query intent of the user.
Reading the content aloud makes perfect sense.
Content has been fact-checked by a subject matter expert (SME).
Now that you know what you should be looking for in your content, let’s look at how to set up and run effective content reviews.
Your Content Audit Results
One of the most effective ways to document and present your content audit results is to use a spreadsheet.
You can add as much detail to your Content Audit spreadsheet as you like, but we recommend adding two distinct sections to your audit after listing all of your content items (one per row):
SEO Analysis
Create columns to record the results of all of your meaningful content SEO metrics for each content item, e.g.:
Content analysis metrics
Keyword performance metrics
Traffic performance metrics
Engagement metrics
Conversion metrics
SEO performance metrics are important because any changes you make to your content can impact your SEO results.
Incidentally, this also makes things more challenging when it comes to making decisions to improve your content.
For example, what happens if improving your content results in lower search rankings, less traffic, or fewer conversions?
Content Analysis
In this section, add columns where you simply indicate with an “X” which action you recommend taking for each post/article as you go through and review these.
For example:
Trash – Select this column if you are going to trash the article (because it has no traffic, no backlinks, the content is obsolete, etc.).
Redirect – Select this column if you are going to redirect visitors landing on this article to another article. For more information on redirecting articles, see further below.
Fix – If most of the content is fine but there are some minor glaring issues (e.g. spelling or grammatical errors, a sentence or paragraph that should be removed or added, links that need to point to different pages, etc.) and it would take no more than 15-30 minutes to fix this, then mark the item as a “quick fix” (or just fix it on the spot).
Update – If sections of the content are outdated, irrelevant, or obsolete and it would take more than an hour or so to fix these, the item may need to be scheduled for an update.
Rewrite – If the topic is worth preserving but the content contains mostly outdated, irrelevant, or obsolete information that would require a complete rewrite to fix, then the item may need to be scheduled for a rewrite.
Leave As Is – If the content is fine and performing well, you may simply want to leave it as is. Or, this could be an old announcement post where the content is outdated but has historical value for the company and so the decision is to leave it as it is.
Query – Select this column if you are not sure what to do with the article and need to consult other members of your team (e.g. an editor, SEO analyst, product manager, etc.
Comments – Use this column to add notes if you feel a need to further explain your rationale for why you recommend taking such an action or record important things about the item to keep in mind.
Once you have added this information to your audit document, assigned members of your team can then go through each piece of content, review, classify, and make recommendations, and decision-makers can then act on those recommendations in alignment with your content strategy.
Example: Blog Post Audit
Below is a screenshot taken from a section of a content audit performed for a popular technology blog containing over 3,000+ published posts.
This blog generates millions of visits each year and ranks for tens of thousands of industry-related keywords.
As no content audit had previously been done on the company’s blog, this was a massive project, so here’s how we made it doable:
First, we divided all the blog articles into the years they were published (e.g. 2010, 2011, 2012, etc.), all the way to the present year.
We then added these posts to worksheets for each year and assigned these worksheets to each content team member to review.
Blog posts were assigned to worksheets in the audit spreadsheet according to the year they were published.
Use Color Schemes
Next, we agreed on a color-coding scheme to make it easier to determine ‘at-a-glance’, the status of each content item, and what (if any) action was required.
For example:
Green: Completed. This item has either already been fixed, reviewed, and approved by the blog editor or another role assigned the responsibility of making a final decision. In other words, this item’s action is completed and there is nothing else to do.
Yellow: Currently Being Worked On. This item has been scheduled for a quick fix, update, or rewrite, scheduled to a writer, and is currently being worked on.
Orange: Fixed – Needs Review. This item has been worked on and just needs someone to review it. If everything is ok, then the item gets marked green (i.e. completed).
Pink: Has Problems That Need Addressing. If a member assigned the task of reviewing this content item can’t decide what should be done with the article, then they tick the “Query” column for that item, add their notes in the “Comments” column, and highlight the item row in pink before moving onto the next item.
Blue: Redirection. The content reviewer has determined that this item should be redirected to another article or blog post. Here are the criteria used to make a redirection decision: if the old article has significant traffic and backlinks but the content is too outdated, irrelevant, or beyond saving, and there is a similar article or post that visitors can be redirected to, then it’s best to redirect this post to the other post. The reviewer should then add the suggested destination article to redirect this post to in the “Comments” section.
You can assign whichever review criteria you want to assign to content items.
In larger companies, different departments or teams may choose to create their own criteria and assign their own color schemes to mean different actions.
In this case, we recommend documenting this using the spreadsheet’s comments feature so that the color code explanations are viewable by hovering over each column header.
You can add your color code explanation to the Audit spreadsheet’s Status column and make it viewable as a tooltip.
In fact, we recommend adding comments to all the column headings in your spreadsheets so there is no confusion about what your content team is required to do. This is another great way to document your workflow processes.
Adding comments to spreadsheet column headers is a great way to document your workflow processes.
Divide Large Tasks Into Smaller Projects
When performing a complex review or content audit for the first time, you may want to break the task down into smaller projects.
For example, some of your subtasks may include:
Review article URLs to improve SEO or check if content can be made evergreen (to save having to update it again).
Review content images for licensed use of media (to avoid licensing/copyright infringements) meta descriptions for SEO (e.g. image alt tags), etc.
Check if articles have consistent elements (e.g. featured images, correctly formatted sections, a table of content with jump links, calls-to-action, etc.)
Replace product or brand names, links to outdated products, update/remove pricing information, etc.
You can create as many subtasks as you like by simply adding new worksheets to your spreadsheet and populating each worksheet’s rows and columns with the information you need to review.
Add new worksheet tabs for content review subtasks.
In the example we are looking at in this lesson, any time the content team is asked to review and change something throughout the blog (e.g. change links from the paid version of some products to their free version), a new worksheet is created specifically for handling that subtask.
Assign Priority Codes
After creating your main task spreadsheet (or subtask worksheet), you can assign priority codes to a column if you need to further segment the task into tasks that are urgent and should be worked on immediately vs non-urgent items that can be worked on when there is some spare time or items that will take longer to resolve.
For example, you could create a “Solution” or “Recommendation” column and assign a 1-2-3 priority code to items as follows:
Work on these immediately (quick wins, e.g. a quick fix or update). These may be assigned to high-traffic or high-converting articles containing wrong information or content that is outdated, irrelevant, or obsolete.
Schedule these into workflow (require more time, e.g. a content rewrite)
Loads of issues or problems (carefully review and assess these items before going any further).
Add a column to your content review spreadsheet to prioritize tasks if required.
As you review each item, add notes in the “Comments” column when appropriate or necessary. These notes will not only help you remember why you made the recommendation but it also helps others to understand the rationale behind your recommendation and to take over the project if required.
Add a “Notes” column to your review spreadsheet where team members can jot down notes, comments, reminders, and recommendations.
Classify Your Content
If you are performing a content audit for the first time, it may also help to review and classify your content into main categories and subcategories.
This will help your business understand and identify:
What content topics you have (or have not) already published content about.
Which industry or niche topics to focus on for improving SEO rankings.
How many articles have been written on a similar or related topic (and checked for duplicate content or consolidated into authoritative articles).
How to better organize your content for SEO using silos, topic clusters, pillar pages, internal linking, etc.
Missing gaps in your overall content plan and new content opportunities.
Content reviews provide a great opportunity to review and reorganize your content categories.
As you work on the review process, you can schedule content updates and rewrites (or new content projects) based on its recommendations.
This also gives you an opportunity to make sure that your existing content and any future scheduled work are aligned with your strategic objectives.
Additional Review Tasks
Here are some additional tasks (and subtasks) you may want to include in your Content Review (create separate worksheets for these if required and prioritize accordingly):
Check For Broken & Suspicious Links
Broken links not only deter visitors from staying on and returning to your site, but they can also negatively impact your search engine rankings.
Also, suspicious links can cause serious harm through malware or phishing.
You can check for broken links using tools that will not only automate the process and save you time by scanning all the URLs on your site but also allow you to export the results.
Broken links in your content can impact your search results. Use broken link-checking tools to help you fix this.
For tools that can help you check and fix broken links, go here:
While not all the content you create will be “evergreen,” you can avoid creating long-term problems by making sure that your article URLs are evergreen.
For example, everything looks fine in the article below. The article URL (10-plugins-to-improve-your-wordpress-pages) matches the article title (10 Plugins to Improve Your WordPress Pages).
This blog URL matches the blog title, but…
The problem is that as time goes by, your content may change.
With the listicle below, for example, several years after it was published, many of the items covered in the article no longer exist or are no longer available, so the content was updated.
Now the article’s URL (120-free-premium-wordpress-themes) doesn’t reflect the title (60+ Free Premium WordPress Themes) or the content that visitors may expect to see after clicking from a link with the original URL to the updated content.
Visitors clicking through to the article may get confused or disappointed to find that the content contains a different number of items than shown in the article’s URL.
The solution is to make the article’s URL “evergreen” so that regardless of how often the content changes, it won’t affect the users’ experience or require the web address to be updated.
The content of this post can change as often as needed…adding more or fewer items to this article won’t affect its URL or visitors’ experience!
This is not only a good content SEO practice, but it will also save you time making changes to the content in the future.
To keep your article URLs evergreen, therefore, it’s best to avoid wherever possible using words in the post slug that will create issues if/when your content changes.
For example:
Amounts, Numbers, Quantities, etc.: e.g. use best-burger-restaurants-foodsville instead of the-best-14-burger-restaurants-in-foodsville. You can now promote as many burger restaurants as you want in your article regardless of how many new restaurants you remove or add to the list.
Dates: e.g. use best-air-fryer-recipes instead of best-air-fryer-recipes-2022. Keeping the post URL generic allows you to update your list and change the article’s title every year to keep it relevant without creating any problems.
New, Launched, Released, etc.: e.g. use portable-brand-name-coffee-maker instead of new-portable-brand-name-coffee-maker-released. This keeps your article’s URL relevant long after the newly launched product or service stops being “new”.
Redirect Trashed Posts
If you consolidate the content of two or more blog posts into one new article (e.g. to make it more comprehensive and authoritative), you may want to trash the old posts to prevent duplicate content.
A good practice when trashing old posts or changing URLs is to create a 301 Redirect. This automatically redirects any visitors clicking on the old URL to the new article location and instructs search engines to follow the new URL whenever they come across the old URL.
If your site uses WordPress, you can use a plugin like Redirection to easily add and manage URL redirects.
WordPress lets you easily manage URL redirections using a plugin.
Using tools to manage redirections is especially useful if you have an established web presence with thousands of published posts and trashed posts.
A redirection tool can help you manage thousands of redirected links and trashed post URLs.
Check For Design Consistency
Another subtask you can add to your content reviews is to skim through the page and check for consistent design elements as you review each article or blog post.
Some elements you can check include:
Featured images (e.g. hero banners)
Content images (e.g. size: too small or too large, visibility: are there errors preventing images from displaying on the page? content: is the image showing incorrect, irrelevant, or outdated information?)
Media (e.g. check that videos are not displaying a “this video has been removed and is no longer available” message.)
Calls-to-action (CTAs) – e.g. Is the content promoting an expired offer or a product that you no longer sell?
Other: e.g. check pricing information, the presence of broken code, etc.
For example, during our content review of the technology blog, we noticed that many older posts were missing feature banners.
On this particular blog, banner images display above the article’s title.
This blog post is missing a featured image above the Post title.
It’s easier to check for things like missing featured images while conducting the content review, so here’s how to address this issue.
First, add a new column to your main Content Review spreadsheet or create a subtask worksheet (or even a separate spreadsheet altogether) to track articles that need design elements to be fixed (e.g. create a post banner, fix media problems like embedded videos that no longer play or have been removed, etc.).
Create a new subtask using a spreadsheet.
Since you are already looking at the article, it should only take you a few additional seconds to notice something blatantly wrong or missing as you go through and review each content item and record it on your subtask list as a “to-do”.
Once you notice something missing on the page, even if you can’t see it, you can’t unsee it!
In this example (and as explained in the Workflow Documentation lesson), we work with a team of illustrators, so whenever article banners are required:
The person assigned to review the article adds the task to the “Banner required” spreadsheet, creates a task in the content production workflow tool (Jira), and pings the design team channel using the work communication tool (Slack) to notify them that a new job has been created.
Design team members work out amongst themselves who is available to take on the assignment. This is then noted on the spreadsheet using a color-coding system.
When the artwork has been created, the illustrator then provides a download link to the Design team’s artwork folder (Google Drive).
The team member who requested the artwork then uploads the banner to the article and marks the task as done on the subtask spreadsheet.
This old blog post now has a new banner image.
The content team member responsible for performing quality checks reviews the subtask spreadsheet periodically and clicks on each article link marked as “done” to make sure that each task has been completed successfully (i.e. check that a new banner has been added to the post) and did not get accidentally skipped or missed during the process.
This quality check also involves making sure that the artwork is visually suitable for the article topic, and consistent with branding guidelines, dimensions, resolution, etc.).
Use content reviews to check for consistency in your content’s design and essential elements like CTAs, formatting, etc.
Check Meta Content
While conducting the content review, it’s also important to perform certain content SEO checks, like:
Images: Check images for alt tags, captions, etc. (and either fix or improve anything that needs fixing on the spot or make a note in the comments section)
Content Formatting: Check for correctly formatted section headings (e.g. H1-H6)
Other: e.g. check for the presence of a Table of Contents with jump links to section headings.
Check images for alt tags and captions and fix or improve these wherever possible.
Check For Compliance Issues
If you outsource your content writing to external agencies, freelance writers, guest authors, etc. it’s important to make sure that your content is not going to get your site penalized by search engines or even get you into legal issues (e.g. copyright infringements, unauthorized use of images, etc.)
While conducting this kind of review can be quite elaborate and time-consuming, there are some things you can check for that won’t take as long, such as:
Make sure stock images are licensed: If your content uses stock images, make sure that you have the rights to use these in your content. If you can’t find the license or attribution or have any doubts about an image, it’s best to remove it from your content or replace it with an image that you do have the right to use and can prove if asked to do so.
Delete suspicious/spammy links: Unless you have entered into a prior agreement with the article writer, check and remove links that aren’t relevant, don’t make sense in the overall context of the content, or links that just shouldn’t be there (e.g. someone else’s promotional or affiliate links).
Disclaimers & Compliance – If your content does include affiliate links (e.g. Amazon), AdSense ads, etc. make sure that everything on your page complies not only with the policies of 3rd-party advertisers but also with state, federal, and legal requirements, such as adding disclaimers for site users, GDPR notices, etc.
Make sure that you have the rights to use stock images in your content.
If your site displays content hosted on external sites (e.g. embedded media, applications, code snippets, etc.), it’s important to make sure that:
The 3rd-party service is active and operational,
The embedded content is working normally
You have access to the external service account
Having access to the external account hosting your content is very important and should not be overlooked during the content review process.
For example, if we go back to the technology blog we’ve been using as an example in this lesson, some of the articles on the blog feature snippets of code.
Sometimes, these code snippets are added as regular content with some special formatting to make it stand out from the rest of the article’s content, as shown in the screenshot below.
Here is a code snippet added to the content as regular content…
Other times, however, code snippets are hosted externally and added to the blog’s content via a script or shortcode.
This is fine, except for the fact that previous blog writers who no longer work for the company had:
Set up accounts under their own names on these external services, then
Created the code snippets within their own accounts, and
Added this content to the blog articles via shortcodes linked to their own accounts.
This content is hosted externally and embedded from the account of an author who no longer works for the company.
Most of the company’s previous writers had followed this method, putting every externally-hosted snippet of code on the blog in peril.
While it’s completely understandable why the article writers would have done this (many were guest writers and it’s easier for them to work inside their own accounts when writing their articles), what this means is that if any code in any of the snippets embedded in the blog needs editing, the company’s content team cannot access the snippets to make the necessary changes on their own content because they don’t control or have access to those accounts.
So, if the original author(s), who are no longer with the company (and who may not be contactable) decide to either close or deactivate their account, then managing articles containing their embedded content becomes a serious issue for the company.
If this user closes his or her account, this content may need to be recreated from scratch.
The recommended solution was for the company to create its own account with the 3rd-party service, transfer all the code snippets found on its blog to its account, then replace all the embedding shortcodes found in all blog articles with their own shortcodes.
The company created its own account with the content-hosting service so all existing code snippets on its blog could be transferred from other users’ accounts.
As you can imagine, with thousands of published articles on the blog, this was quite an undertaking. It required a new and separate review of all the blog articles containing the embedded shortcode for this service.
Following the same content review process, we created a new worksheet for this subtask and assigned team members to go through and transfer all the content from the previous writers’ accounts to the company’s account.
Reviewing content may not be the highlight of a content manager’s life, but it definitely plays a big part in it!
After completing the transfer of content from a previous writer’s account to the company’s account and replacing the code snippet shortcode on the blog article, the team member marked the item as fixed and highlighted the item’s row in yellow.
Another team member then checked the articles highlighted in yellow to make sure that everything looked ok.
This content snippet was transferred successfully to the blog owner’s account.
After confirming that the content transfer was performed successfully, the item was then highlighted on the spreadsheet as green.
Every content snippet on the blog was checked to confirm that it was transferred to the site owner’s account.
This process continued until all items on the spreadsheet had been completed, checked, and marked as done.
All code snippets were transferred successfully. This review is done!
If planned and executed correctly, your Content Review document (e.g. a spreadsheet or other tool) becomes your master blueprint, allowing you to perform future content audits, reviews, and performance assessments against defined metrics more easily.
Initially, it’s a lot of work to get all this done, but it will save a lot of time in the future. It will also allow your business to make better (i.e. more strategic) decisions about your content and adapt faster to any changes affecting your business moving forward.
Content Review Setup
You can stay on top of the tasks and subtasks associated with performing a content review by:
Assigning the work to team members (if you have the resources available),
When and how often should you schedule content reviews?
Ideally, you should perform an initial content audit and then aim to do a periodic review of your content at least once a year.
The schedule for reviewing content that will work best for your organization, however, really depends on:
How much existing content you have already published
How much new content you are currently publishing or plan to publish
What kind of content your organization publishes (i.e. cornerstone, gated, evolving)
How much of your content is currently outdated, irrelevant, inaccurate, or obsolete
What resources are available to conduct a thorough content review and implement its findings.
Also, keep in mind that the process described in this lesson works for both periodic (i.e. repeated regularly) and one-time reviews.
One-Time Reviews
One-time reviews are done when your organization requires global changes to be made to your content or some form of “search and replace” across your entire site or a section of it.
Examples of this are:
Pricing changes (e.g. update or remove pricing information across your site)
Replace product/service/brand name changes or descriptions
Replace or remove calls-to-action, expired offers, etc.
Check for broken or suspicious links, specific content sections, design elements, offers or text added manually to content, content belonging to specific topics, categories, authors, etc.
Periodic Reviews
Periodic content reviews are designed to ensure that your content is being maintained up to standards.
Examples of regular reviews include:
Complete or partial content audits to check if the content is up-to-date, relevant, and accurate for its intended audience.
SEO reviews (e.g. analyze the Top 20 most visited/best-converting articles each month for content and SEO improvements).
Spam comment checking – this can be done daily, weekly, at the start and end of the week, etc.
Spam Comment Checking
If you plan to allow site visitors to leave comments on your blog posts, you are opening yourself up to receiving — and having to deal with — comment spam.
Comment spam can negatively impact your content SEO.
For this reason, we recommend taking the following into account when developing a process for reviewing and handling spam comments:
Is it Spam? Sometimes it’s difficult to assess whether comments and replies left on blog posts are actually spam or not. You will need to define which kinds of comments are ok to leave posted and which should be deleted from your posts.
Is it technical? Make sure to work out how to respond to comments left on your blog that require a reply from someone with technical knowledge about your products or services. This may involve reaching out to your technical team for a reply or asking technical members of your team to reply directly.
Is it content related? Does the comment or reply relate to the topic of the article? Or did the commenter simply find an opportunity to inject a spam comment?
Who should reply? Who is responsible for replying to comments left on your blog posts? Should the post’s author or the customer support team reply? What if the original post author no longer works for your company?
How quickly should you reply? After defining who replies to comments left on articles the next is to work out the maximum acceptable period for leaving comments unanswered (e.g. 48 hrs).
Here is a suggested process to make the content review simple and systematic:
We recommend you start the process by performing a thorough content audit listing all of your content items on a spreadsheet or other tool where you/your team will then record key information about each item.
Next, distribute and assign the work to those who are able to participate. Make sure to document what you are asking your team to review and assess either in the tool itself (e.g. using descriptive column names, tooltips, etc.) or in a shareable guide or document.
When team members review and assess each item, they should enter their recommendations by placing letters or marks in columns (e.g. “x” or ticking checkboxes if you want to add these), use color codes, assign priority numbers, type notes, comments, etc.
The sooner you begin implementing your content review process, the easier it will be to keep your existing content up-to-date.
Using a shared spreadsheet (e.g. Google Sheets) allows the process to be saved, so members can work on their assigned tasks a little bit each day or whenever they are not attending to other priorities, then leave and come back to the task, and pick things up again from where they left off.
Your content review spreadsheet is both a tool for tracking work progress and documenting the process itself.
As your spreadsheet records the total work progress, how much work is being completed per session, and who is accountable for it, this allows you to set some benchmarks and metrics for future content reviews (e.g. how many content items a team member can review in X amount of time).
The better you design the process initially, the less time it will take to complete subsequent reviews.
As each subtask is completed and marked off…
Once the review gathers momentum, it can be satisfying to see tasks are being completed.
You get closer and closer to completing the overall review…
This is content review nirvana!
So that ultimately, your business achieves the goal of thoroughly reviewing and updating your existing content.
Is there any greater satisfaction than seeing your content review spreadsheet go from this to this? You’ll look forward to doing it all over again next year!
Once your content review is completed, take a moment to acknowledge and appreciate your team for a great achievement, schedule the next content review on your content calendar (e.g. set it as a task to be done annually), and repeat this process all over again.
If performing a content review seems all too daunting, remember:
“Mile by mile, it’s a trial; yard by yard, it’s hard; but inch by inch, it’s a cinch.”
Gabrielle Giffords
Content Reviews – FAQs
Here are frequently asked questions about content reviews:
What is a content review?
A content review is a thorough assessment of the text, images, videos, and other media on a website or in a content management system to ensure accuracy, relevance, compliance, and quality.
Why are content reviews important?
Content reviews help maintain the credibility and reliability of information presented, ensuring it meets the intended audience’s needs and complies with legal and ethical standards.
Who should perform a content review?
Content reviews should be performed by content specialists, editors, or subject matter experts familiar with the content’s context and the standards required for its presentation.
What does a content review involve?
A review involves checking for factual accuracy, grammatical correctness, style consistency, and compliance with regulatory standards. It may also include optimizing content for search engines and improving user engagement.
How often should content reviews be conducted?
The frequency of content reviews depends on the nature of the content. High-impact or frequently visited content might need more frequent reviews, while less critical material may be reviewed less often.
What tools can assist in content reviews?
Tools like content management systems, SEO platforms, grammar checkers, and plagiarism detectors can aid in efficient and effective content reviews.
How do you handle negative findings in a content review?
Address negative findings by revising the content accordingly, providing training for content creators, or implementing stricter quality controls to prevent future issues.
Can automated tools replace human content reviewers?
While automated tools can help streamline the review process and catch common errors, human judgment is essential for interpreting context and nuanced language, and for making strategic decisions about content.
What are the challenges in content reviewing?
Challenges include maintaining objectivity, managing large volumes of content, staying updated with the latest content standards, and balancing SEO with user experience.
What is the impact of not conducting content reviews?
Neglecting content reviews can lead to outdated or incorrect information, decreased user trust, legal repercussions, and a damaged brand reputation.
Summary
Content reviews are a critical step in ensuring that your website provides high-quality, valuable information to visitors, and they can also improve your overall website performance, user experience, and search engine visibility.
Regular content reviews are important to maintain the quality and relevance of your content, and to ensure that the website continues to meet the needs of your target audience.
Managing content effectively requires performing regular content reviews, so the best thing to do is to systematize it as soon as possible and integrate it into your overall content strategy.
Keeping track of all your existing content to see if anything has changed (and if so, what has changed) is a mammoth task, especially as your digital presence matures and becomes more established.
So many factors can affect your existing content. Facts, stats, and prices continually change. Companies, brands, and platforms appear, evolve, get acquired, change names, or collapse, products and services get added, modified, or dropped, externally-linked content gets moved or removed, and a host of other things can happen.
If you regularly publish new content, your website or blog can grow into hundreds or thousands of existing posts or articles in just a few short years, and many (if not most) will contain information that needs to be added, updated, or removed.
Content reviews are the best way to ensure that you stay on top of managing your existing content as your digital presence grows.
Action Steps
Perform an initial content audit of your website or blog’s content.
Review and implement the steps described in this lesson.
Schedule periodic maintenance reviews in your team’s content calendar.
Content-tracking methods and tools to help you better manage and improve content performance.
Content Tracking
This section looks at content-tracking methods and tools to help you better manage and improve your content performance.
You’ve probably heard the saying, “you can’t manage what you can’t measure.”
Well, you can’t measure what you can’t track.
Managing your content effectively requires being able to track and measure your content’s performance across all areas of your business.
In this lesson, we look at various methods and tools you can implement to track, measure, and improve content performance in your organization.
***
Why Track Your Content?
In order to grow with content, your business needs a content strategy.
After implementing a content strategy, the question to ask is…”how do you know the content strategy is working?”
In other words, how can you tell if your content-related activities are delivering results? If so, what kind of results? And are these results helping your business meet its goals and objectives? Is the content helping your business to grow?
Your business can only know if its content strategy is working if it has defined specific content metrics and benchmarks and can observe these being met.
“How can you observe if your content metrics and benchmarks are being met?”
Simple…
By tracking the results of all your content-related activities, then measuring and comparing these against the content metrics and benchmarks you have defined to make sure that all your content processes, activities, and results align with your content strategy.
Content tracking helps you determine if your content strategy is working.
Benefits Of Tracking Content Performance
Tracking content performance can provide a variety of benefits, including the ability to:
Measure the effectiveness of different types of content: By tracking metrics such as engagement, reach, and conversion rates, you can determine which types of content are resonating with your audience and which are not. This information can be used to inform your future content strategy decisions.
Identify audience demographics: Tracking metrics like demographics and location can help you understand who is engaging with your content and tailor your messaging accordingly.
Optimize content distribution: By monitoring metrics such as click-through rates, you can determine which channels and platforms are driving the most traffic to your content and adjust your distribution strategy accordingly.
Improve ROI: By tracking metrics such as conversion rates and revenue generated, you can determine the ROI of your content marketing efforts (see further below) and adjust your strategy to maximize return on investment.
Track competitors: By monitoring key metrics of your competitors’ content, you can identify opportunities to differentiate your own content and gain an edge in the marketplace.
Examples:
You create a blog post and track metrics like page views, time on page, and bounce rate to determine how well the post is performing.
You create a video and track metrics like views, engagement, and shares to see how well your video is resonating with your audience.
You create a landing page and track metrics like form submissions and conversion rates to determine how effective it is at generating leads.
Content Metrics
The term content metrics is often used to describe metrics used to track content marketing results, such as how well content is performing on social media, how much traffic it generates, and what kind of sales or leads are being generated by the content used to support those marketing activities.
Before you can promote your content, however, you need to create it.
After you’ve created and promoted your content, you need to manage it.
Tracking the effectiveness of your content’s performance to determine the success of your content strategy, therefore, requires setting relevant and actionable metrics and benchmarks for all content-related areas of your business, not just content marketing.
We have created a separate lesson on this topic here: Content Metrics
Measuring Content ROI
Measuring the return on investment (ROI) of your content marketing activities can be challenging, as it can be difficult to attribute specific revenue or conversions directly to individual pieces of content.
However, there are several methods that you can use to measure content ROI, including:
Attribution modeling: This method involves assigning a percentage of the credit for a conversion to various touchpoints in the customer journey, such as a specific piece of content. This can help determine the overall impact of content on conversions.
Lead generation: By tracking the number of leads generated from specific pieces of content, you can determine the ROI of your content in terms of the cost per lead.
Sales: By tracking the number of sales generated from specific pieces of content, you can determine the ROI of your content in terms of the cost per sale.
Engagement: By tracking metrics like page views, time on page, and bounce rate, you can determine the level of engagement your content is generating, and use this information to inform future content strategy decisions.
Brand awareness: By tracking metrics such as website traffic, social media engagement, and mentions in the press, you can determine the impact of your content on brand awareness.
It is important to note that measuring ROI of content is not always straightforward, and may require a combination of metrics and methods to get a clearer picture. Also, ROI calculation should be in line with your overall business goals and objectives.
Content Tracking Tools
After defining which content metrics you will track to help you determine if your content is aligned with your content strategy, you need tools to help you track and measure how your content production, content promotion, and content management efforts are performing.
No single tool can help you track all of the above, so let’s look at various tools and options you can use to set up tracking systems for each of these areas.
Content Production Tracking Tools
Your content production tools should have built-in features that allow you to track workflow metrics, measure content production efficiency, and report on things like:
How many projects are currently in content production?
How many projects per status? (e.g. new, draft, in review, on hold, etc.)
How many projects has each team member been assigned?
How many projects have been completed per member and in total during X time period?
How long does it take on average to complete a project in a specific content type (e.g. a blog article or video)?
How many projects have unresolved issues? What are these unresolved issues? What’s causing these unresolved issues?
How much work is yet to be completed per member and in total?
How many projects were not completed within their allocated timeframe? What is the reason? (e.g. technical holdups, lack of resources, unrealistic expectations set, etc.)
How is the workload distribution? Is the work being distributed fairly between team members? If not, why?
Track content production metrics using tools that let you calculate content production efficiency.
There are many tools available for tracking content performance. Here are just some of these tools:
Google Analytics
Google Analytics
Google Analytics provides free access to insights and useful reports for tracking all your content marketing metrics and accessing content performance.
We recommend using Google Analytics together with other content performance tracking tools.
Looker Studio (formerly Google Data Studio) is another free tool from Google that gives you powerful insights into your website’s performance from various data sources like Google Search, Google Analytics, Google Ads, YouTube, social media platforms such as Facebook, Reddit, and Twitter, databases, etc.
Looker Studio demo.
For example, while Google Search Console provides data and insights about your website’s performance in Google Search, understanding this data and extracting actionable insights from it can be challenging.
Looker Studio turns your data into informative, easy-to-read, and fully customizable and shareable dashboards and reports with Search Console data visualizations to help you make better data-driven decisions.
Looker Studio provides a range of dashboard templates that allow you to interpret data and improve your content performance.
Looker Studio’s drag-and-drop report editor lets you visualize your data in seconds with charts and tables, create interactive reports with viewer filters and date range controls, include links and clickable images to create product catalogs, video libraries, and other hyperlinked content, add annotations and branding with text and images, apply styles and color themes, and more.
The video below provides an overview of Looker Studio:
If your site runs on WordPress, there are a range of plugins you can use to track all kinds of performance metrics, such as social shares, opt-ins, lead conversions, sales, etc.
For example, with a free plugin like Hustle installed on your site, you can track your blog post’s social shares…
Use Hustle’s social sharing floating bar to track your content’s social media shares.
And view reports that help you track the success of your social sharing or lead generation campaigns…
Check your campaign performance stats inside WordPress with Hustle’s integrated dashboard.
For more plugins that can help you track content performance in WordPress, see this section: WordPress Engagement Plugins
Server Logs
Server logs can help to improve content performance in areas like technical SEO.
Server-file logs contain accurate information about every server request made for any file on your site (e.g. images, pages, etc.) and additional data that can help you improve your content performance using technical SEO.
For more sophisticated content performance tracking solutions, check out the tools below:
Databox
Databox Metric-Tracking Software.
Databox lets you connect data from over 70+ tools and track it from any device using customizable dashboards.
You can set up dashboards for different purposes that let you pull the metrics you want to track and visualize KPIs in various different ways, without requiring coding or design skills.
Databox provides 200+ free marketing dashboard examples and templates.
Databox also provides a query builder and a drag-and-drop formula builder so you can create custom metrics from popular integrations to get a more granular view of your company’s performance and calculate metrics from any data source.
With Databox, you can track company, team, and individual performance, gain insights into any activity and stay up-to-date on important metrics using goal tracking, KPI scorecards and alerts, annotations, automated reports, and more.
Klipfolio is a cloud-based web app that helps you grow your business by understanding, visualizing, and tracking useful and important KPIs and metrics.
Klipfolio lets you gather, share, display, and learn from your data in real time. You can also follow your data over time, enabling historical comparisons to track your progress, and make timely, effective business decisions.
If WordPress powers your CMS, you can find basic but useful information about your published content in the “At a Glance” section of your WordPress Dashboard.
The WordPress dashboard provides useful content publishing metrics about your CMS.
For example:
The number of posts/pages published on your blog or website.
The “At a Glance” panel is a default feature of WordPress that comes pre-installed with the software. However, you can enhance and expand this to add a wealth of other useful information about your content using many plugins.
WordPress lets you add a wealth of useful content tracking information about your site using plugins.
Learn more about various useful CMS plugins for WordPress here: WordPress CMS Plugins
Content Documentation Tracking
Regardless of what type of business you are in, you should be building a documentation library and keeping track of things like:
Document downloads – what documents are users downloading the most?
Document versions – are users downloading the latest/most up-to-date versions of your documents?
Document authors/managers – Who authored this content? Who is responsible for maintaining this document and keeping it updated?
Last time updated – When was this document last updated? Does the content need to be reviewed?
Additionally, there are specialized systems you can use to manage and track your organization’s content documentation, such as:
Document Management Systems – These help your organization transition from using paper documentation to storing and managing digital documents.
Digital Asset Management Software – Digital asset management (DAM) software stores, organizes, and distributes rich media files (e.g. images, files, video, audio, presentations, documents, etc.) in a central location. While many businesses invest in DAM software to manage their marketing content, it can be used to provide employees, clients, contractors, and other key stakeholders with controlled access to digital assets stored in a centralized digital library. A great place to research Digital Asset Management software is by reading software users’ reviews on G2.com
Workflow Documentation – Documenting workflows not only helps to define the roles, tasks, processes, and steps involved in the production of content, but it also helps to organize content ideas, prioritize projects, track their execution, determine what happens to the content after its published, and record how and where all the information gets stored.
Record Management – These systems are associated with governance, risk, and compliance and are often used in highly regulated industries like healthcare, where there is a need to control the creation, maintenance, and destruction of records.
Document Imaging – These systems scan, collect, organize, and manage digital images converted from paper documents.
Enterprise Content Management -These systems focus not only on content but also data, putting content in context by incorporating components of other types of document management systems, such as workflows, processes, business rules, etc.
Troubleshooting Content Tracking Issues
Measuring the performance of your content can be challenging, but there are several strategies that can help to overcome this difficulty, including:
Identify key performance indicators (KPIs): Identifying the right KPIs can help to ensure that the business is measuring the right metrics and that the metrics align with the business’s overall goals. Identify key performance indicators (KPIs) that align with the goals of your business, such as website traffic, engagement rates, or conversions. Track these metrics regularly to measure the effectiveness of your content.
Use analytics tools: Analytics tools can provide valuable insights into the performance of your content and can help to identify areas for improvement. Use analytics tools, such as Google Analytics, to track key metrics such as website traffic, bounce rate, and conversion rate. Use this data to understand how your content is performing and identify areas for improvement.
Conduct A/B testing: A/B testing can help to understand what type of content resonates best with your target audience. Conduct A/B testing on different types of content, such as headlines, images, and call-to-action buttons, to understand which elements drive the most engagement and conversions.
Gather feedback: Gathering feedback from your target audience can provide valuable insights into how your content is perceived and can help to identify areas for improvement. Use surveys, focus groups, or other methods to gather feedback from your target audience. Use this feedback to understand how your content is being received and identify areas for improvement.
Keep an eye on competitors: Understanding how your competition is doing can help to identify areas where the business can improve its content. Use tools such as Ahrefs, Semrush, or BuzzSumo to track the performance of your competition’s content. Use this information to understand what type of content is resonating with your target audience and identify areas where your business can improve its content.
By implementing these strategies, your business can create a comprehensive content performance measurement system that will help you understand the effectiveness of your content, identify areas for improvement, and make data-driven decisions. This will help your business improve its content and achieve its content marketing goals.
Content Tracking – FAQs
Here are frequently asked questions about content tracking:
What is content tracking?
Content tracking refers to the process of monitoring and analyzing the performance and engagement of digital content across various channels and platforms. It involves gathering data on how users interact with content to assess its effectiveness.
Why is content tracking important?
Content tracking is vital for understanding audience behavior, optimizing content strategy, and measuring the impact of content marketing efforts. It helps organizations make data-driven decisions to improve content quality and drive desired outcomes.
What are the benefits of content tracking?
Content tracking enables businesses to identify content that resonates with their audience, optimize marketing strategies, improve ROI, and enhance user experience. It also helps in identifying trends, refining targeting, and maximizing content effectiveness.
What are the key metrics used in content tracking?
Common metrics include page views, unique visitors, bounce rate, time on page, conversion rate, social shares, and click-through rate (CTR). These metrics provide insights into content performance, audience engagement, and conversion effectiveness.
How can I track content performance?
Content performance can be tracked using various analytics tools such as Google Analytics, Adobe Analytics, and content management systems (CMS) with built-in tracking capabilities. These tools offer features to monitor user behavior, analyze data, and generate reports.
How does content tracking differ from site analytics?
While both involve collecting data on user interactions, content tracking focuses specifically on how users interact with and respond to content, whereas site analytics may include additional data like server performance, traffic sources, and more technical metrics.
How can I effectively implement content tracking?
To implement content tracking effectively, define clear objectives, choose relevant metrics aligned with business goals, select appropriate tracking tools, set up tracking codes or tags, regularly analyze data, and iterate strategies based on insights.
Can content tracking improve SEO performance?
Yes, by analyzing content performance data, you can identify which pieces of content are performing well in search engine rankings and user engagement, which can inform your content creation and optimization strategies for better SEO results.
What are some challenges in content tracking?
Challenges include data privacy regulations, accuracy of tracking methods, integration of data from multiple sources, and interpretation of complex analytics. Addressing these challenges requires adopting best practices, leveraging technology, and staying updated on industry trends.
What privacy considerations should be kept in mind with content tracking?
Businesses must comply with data protection regulations such as GDPR or CCPA, which involve obtaining user consent before tracking their data, ensuring data is securely stored, and providing users the option to opt-out of tracking.
What is content tracking in the context of a CMS?
Content tracking refers to the monitoring and recording of user interactions with content within a Content Management System (CMS). This can include page views, link clicks, form submissions, and other interactions to understand content effectiveness and user engagement.
Why is content tracking important for businesses using CMS?
Content tracking helps businesses measure the performance of their content, understand audience preferences, optimize marketing strategies, and improve user experience by delivering more relevant content.
How can I set up content tracking in my CMS?
Most CMS platforms offer built-in tools or integrations with analytics services like Google Analytics. To set up content tracking, you typically need to configure these tools within your CMS settings and add any necessary tracking codes to your content pages.
What are some common metrics tracked in content management systems?
Common metrics include page views, unique visitors, time on page, bounce rates, conversion rates, and social shares. These metrics provide insights into how effectively content is attracting and retaining users.
Summary
Managing your content effectively requires being able to track and measure your content’s performance across all areas of your business.
This lesson has looked at various methods, tools, and strategies you can implement to track, measure, and improve content performance in your organization.
Action Steps
Review all areas of your business where content is used to help the business grow
Assess how effectively this content is being tracked and if what is being tracked is contributing to meeting the content metrics set out in your content strategy.
Research and implement tools and methods to improve your content tracking in areas like content production, content promotions, content management, etc.
We use cookies on our website to give you the most relevant experience by remembering your preferences and repeat visits. By clicking “Accept”, you consent to the use of ALL the cookies.
This website uses cookies to improve your experience while you navigate through the website. Out of these, the cookies that are categorized as necessary are stored on your browser as they are essential for the working of basic functionalities of the website. We also use third-party cookies that help us analyze and understand how you use this website. These cookies will be stored in your browser only with your consent. You also have the option to opt-out of these cookies. But opting out of some of these cookies may affect your browsing experience.
Necessary cookies are absolutely essential for the website to function properly. These cookies ensure basic functionalities and security features of the website, anonymously.
Cookie
Duration
Description
cookielawinfo-checkbox-analytics
11 months
This cookie is set by GDPR Cookie Consent plugin. The cookie is used to store the user consent for the cookies in the category "Analytics".
cookielawinfo-checkbox-functional
11 months
The cookie is set by GDPR cookie consent to record the user consent for the cookies in the category "Functional".
cookielawinfo-checkbox-necessary
11 months
This cookie is set by GDPR Cookie Consent plugin. The cookies is used to store the user consent for the cookies in the category "Necessary".
cookielawinfo-checkbox-others
11 months
This cookie is set by GDPR Cookie Consent plugin. The cookie is used to store the user consent for the cookies in the category "Other.
cookielawinfo-checkbox-performance
11 months
This cookie is set by GDPR Cookie Consent plugin. The cookie is used to store the user consent for the cookies in the category "Performance".
viewed_cookie_policy
11 months
The cookie is set by the GDPR Cookie Consent plugin and is used to store whether or not user has consented to the use of cookies. It does not store any personal data.
Functional cookies help to perform certain functionalities like sharing the content of the website on social media platforms, collect feedbacks, and other third-party features.
Performance cookies are used to understand and analyze the key performance indexes of the website which helps in delivering a better user experience for the visitors.
Analytical cookies are used to understand how visitors interact with the website. These cookies help provide information on metrics the number of visitors, bounce rate, traffic source, etc.
Advertisement cookies are used to provide visitors with relevant ads and marketing campaigns. These cookies track visitors across websites and collect information to provide customized ads.
 Learn what an Enterprise Content Management System (ECMS) is, the benefits and key features of an ECMS, and how to choose the best ECMS platform for your needs.


 A Document Management System (DMS) can play a crucial role in your

 In this article, we will explore the importance of documenting procedures and how to effectively create and maintain them.
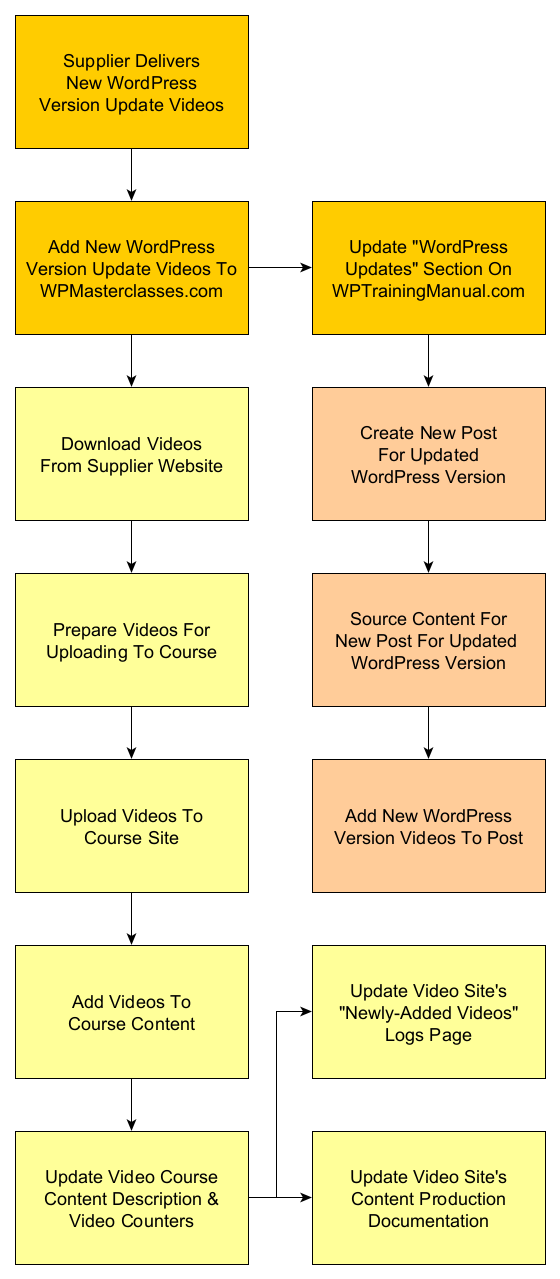
 Hotlinking is when someone links directly to assets on your website, such as images, videos, or downloadable documents.

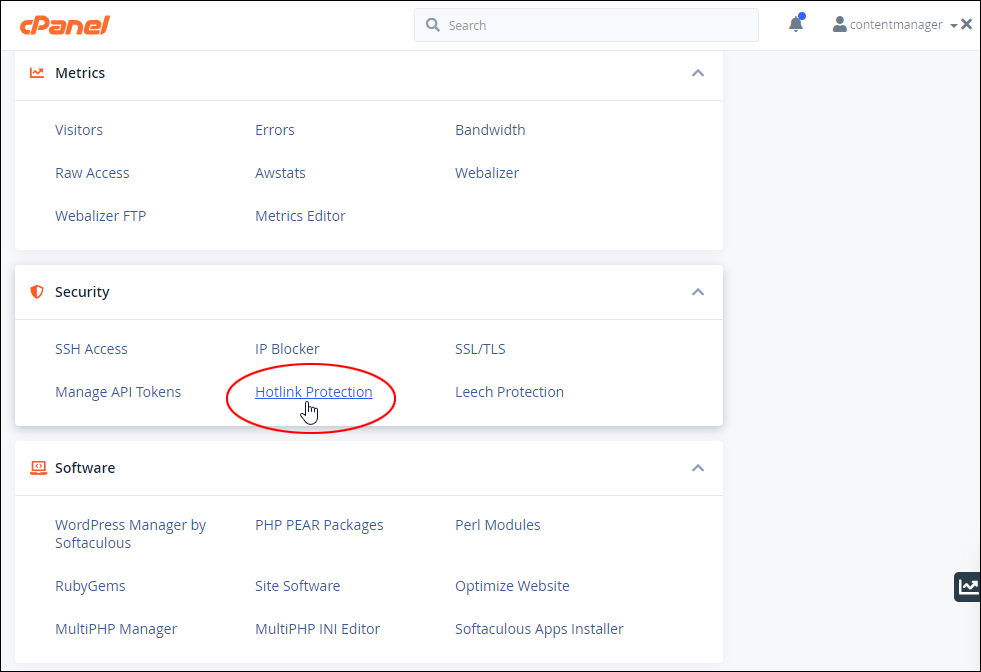
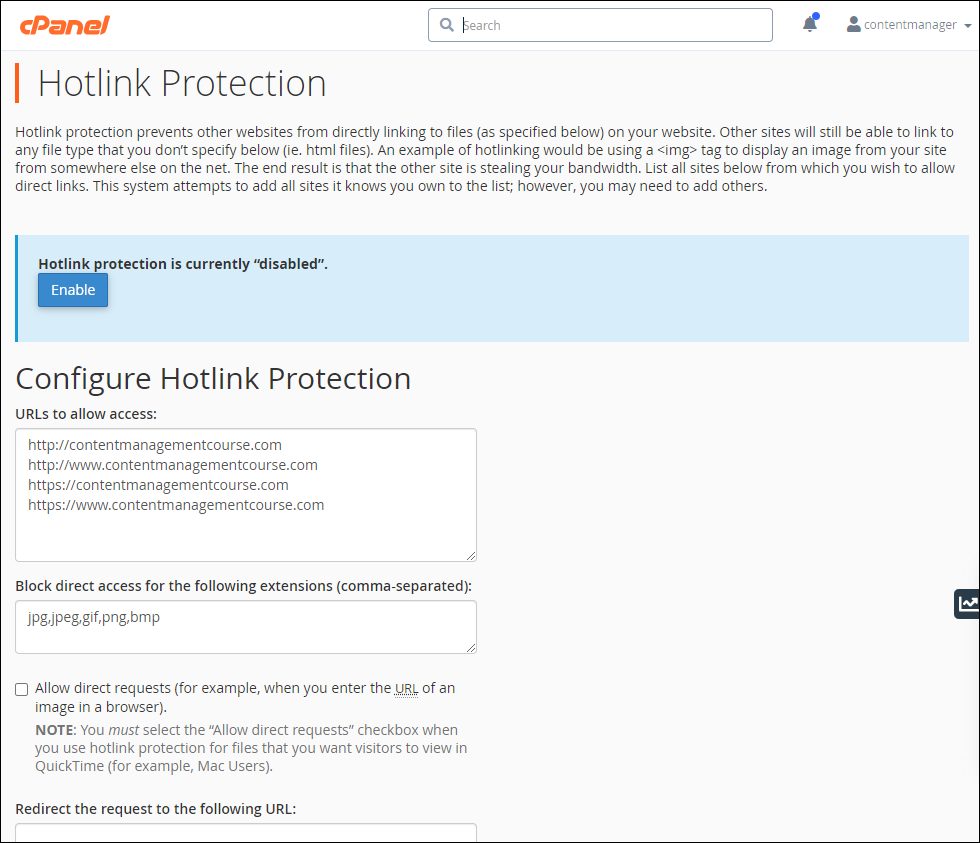
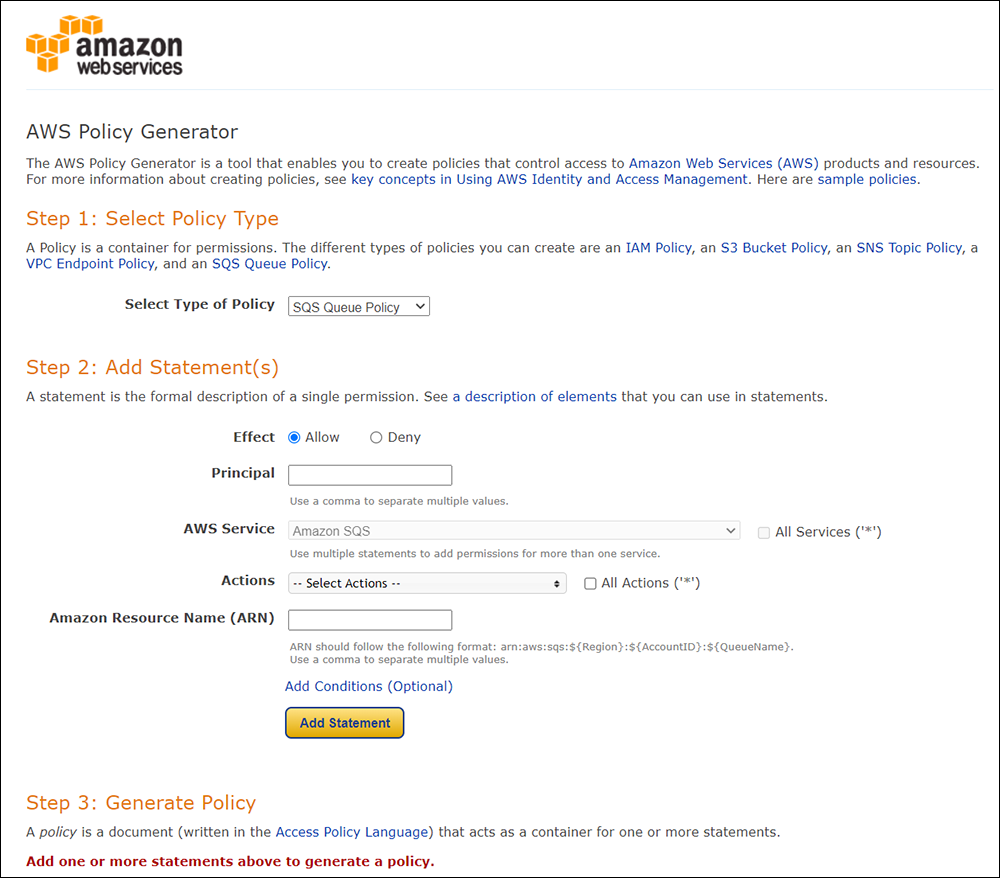
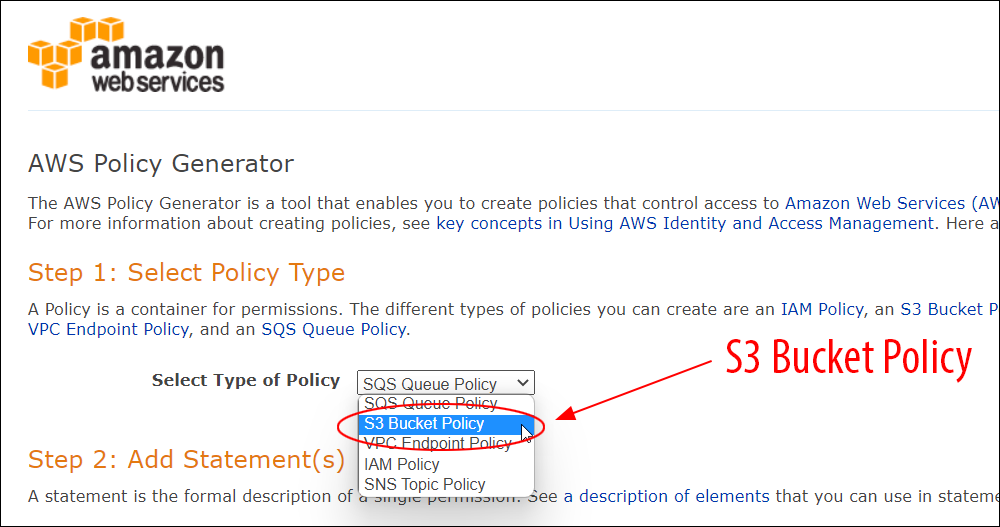
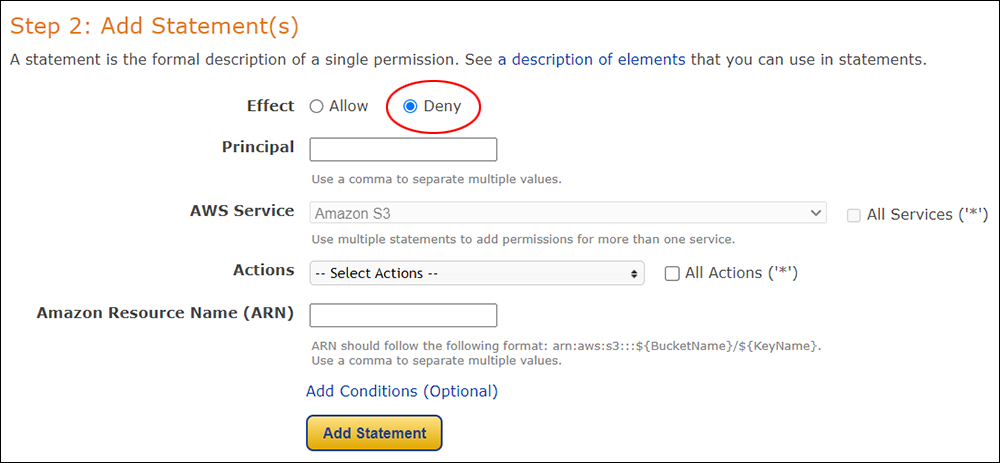

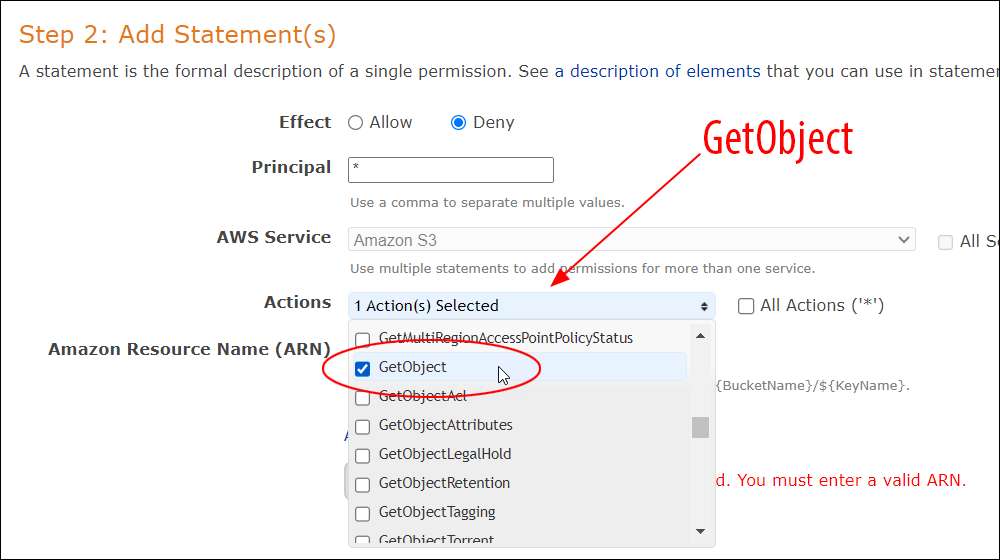
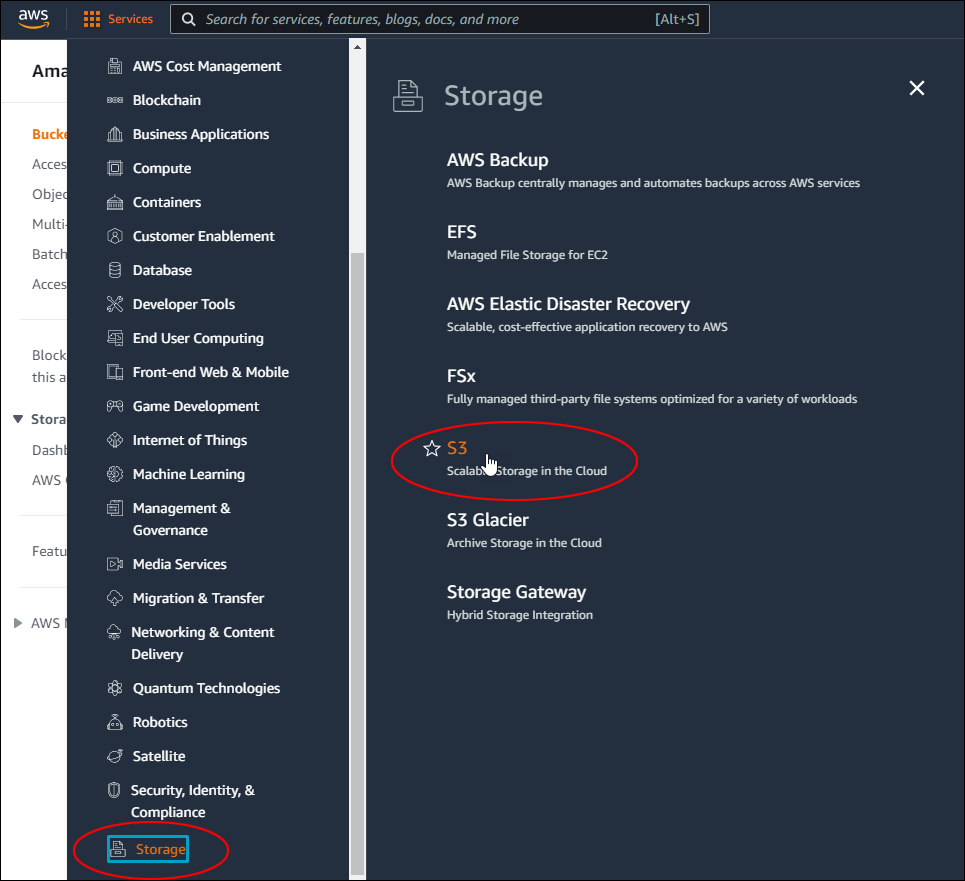
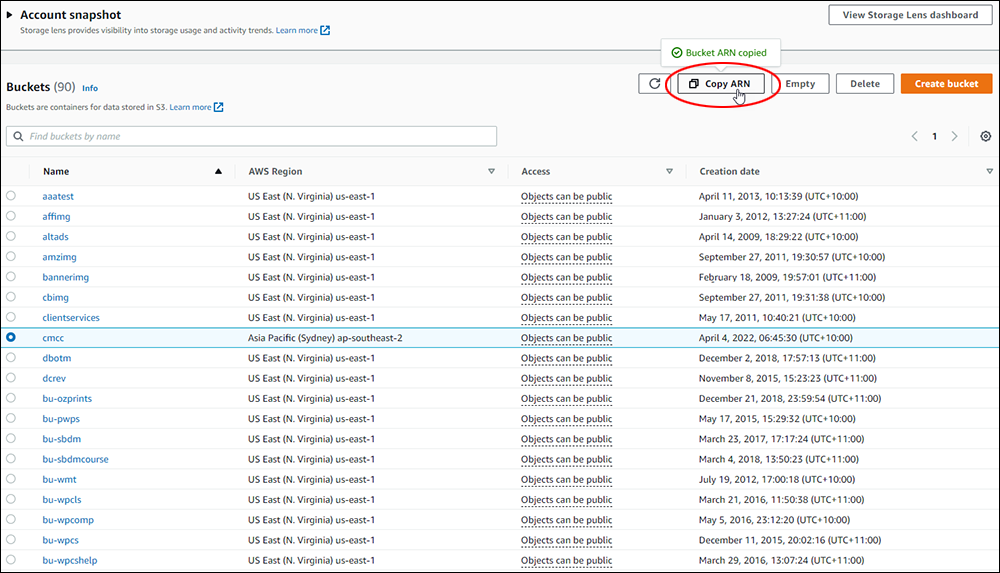
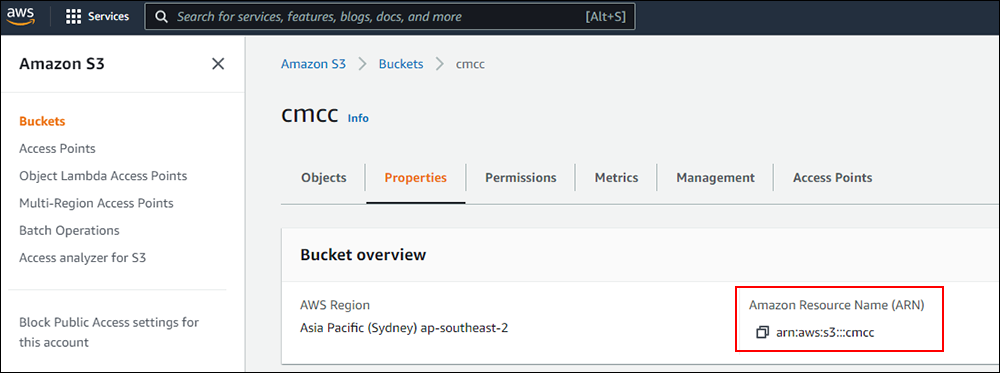
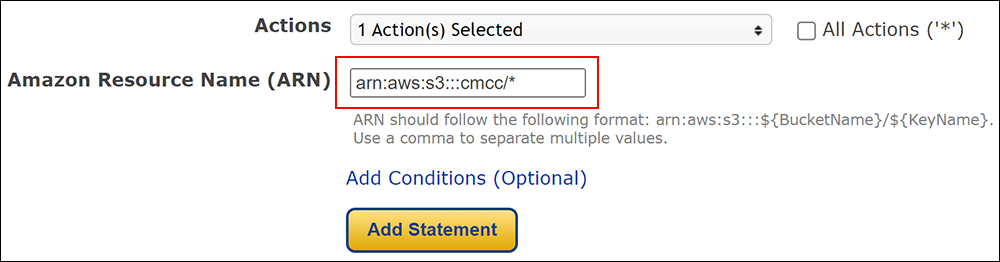
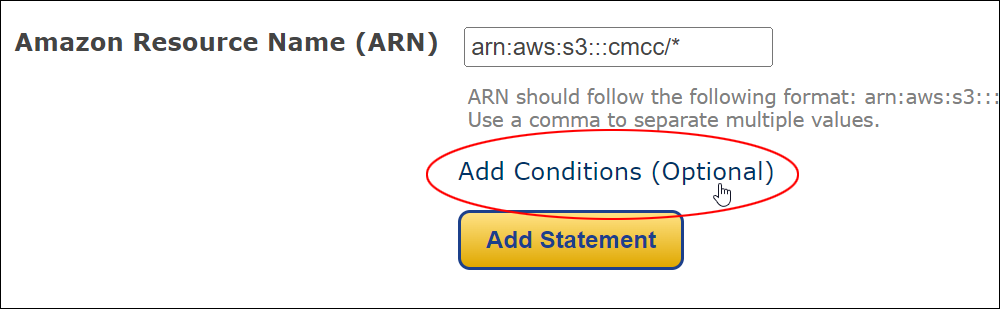
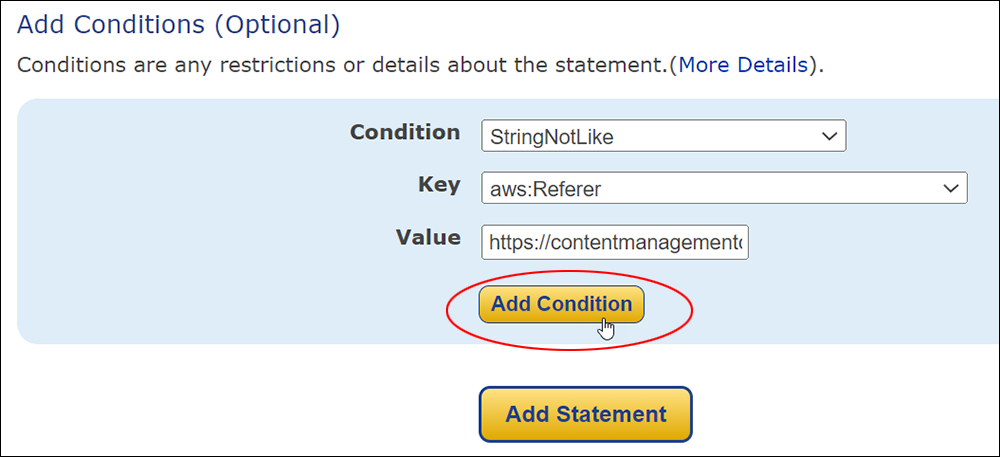
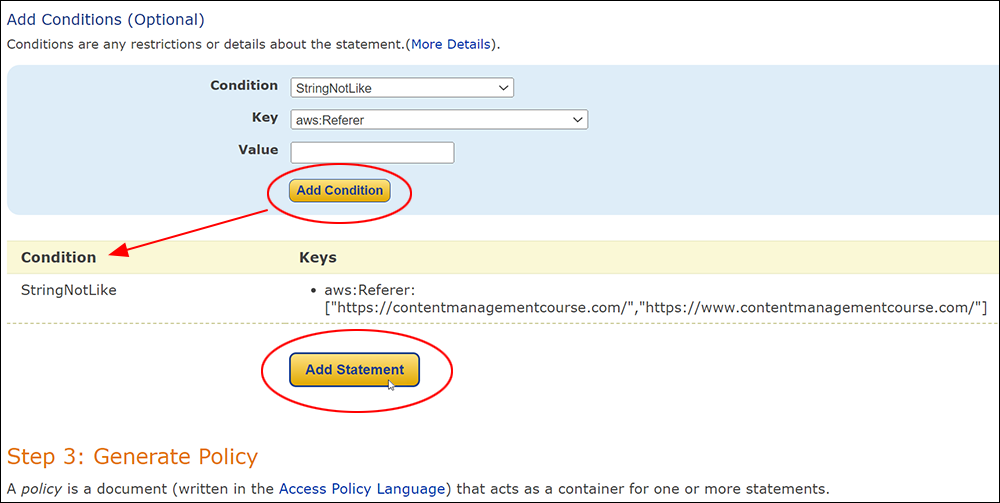
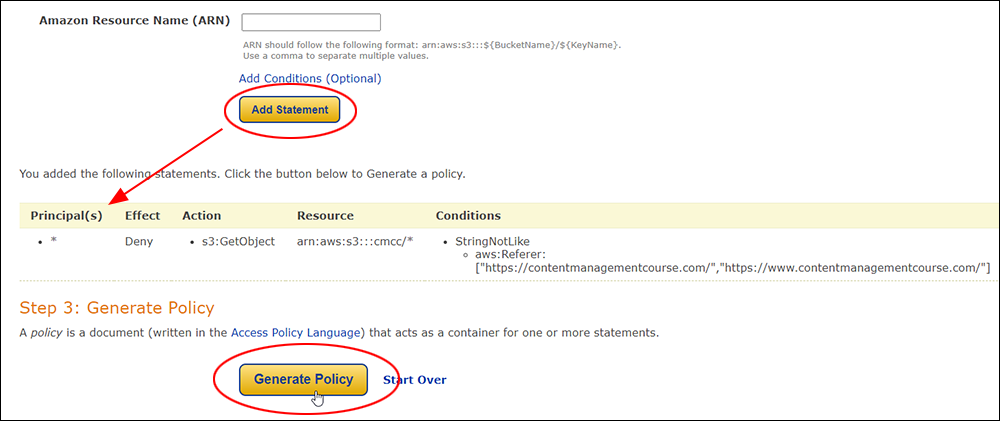
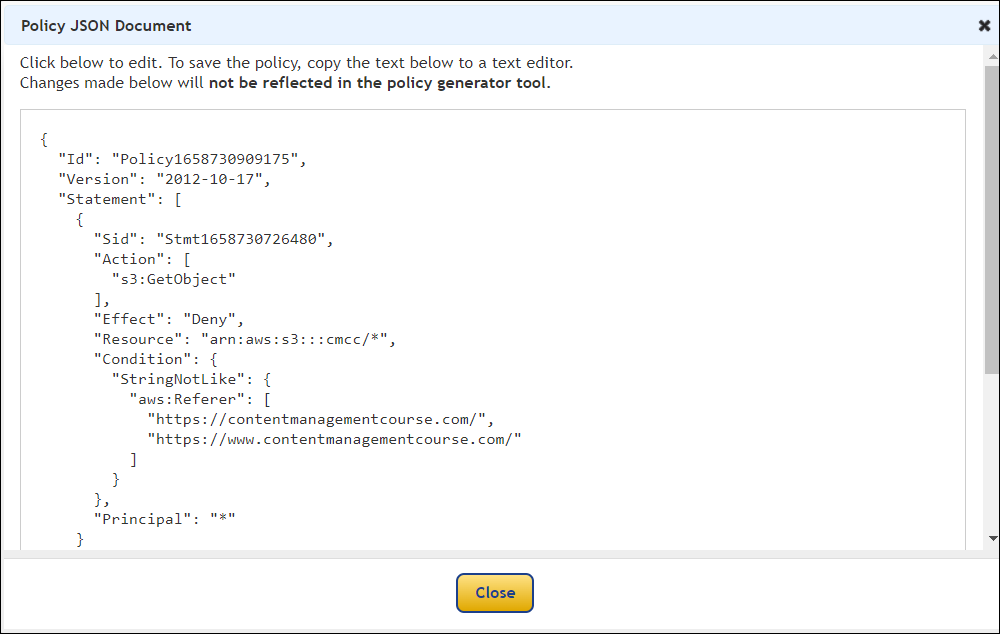
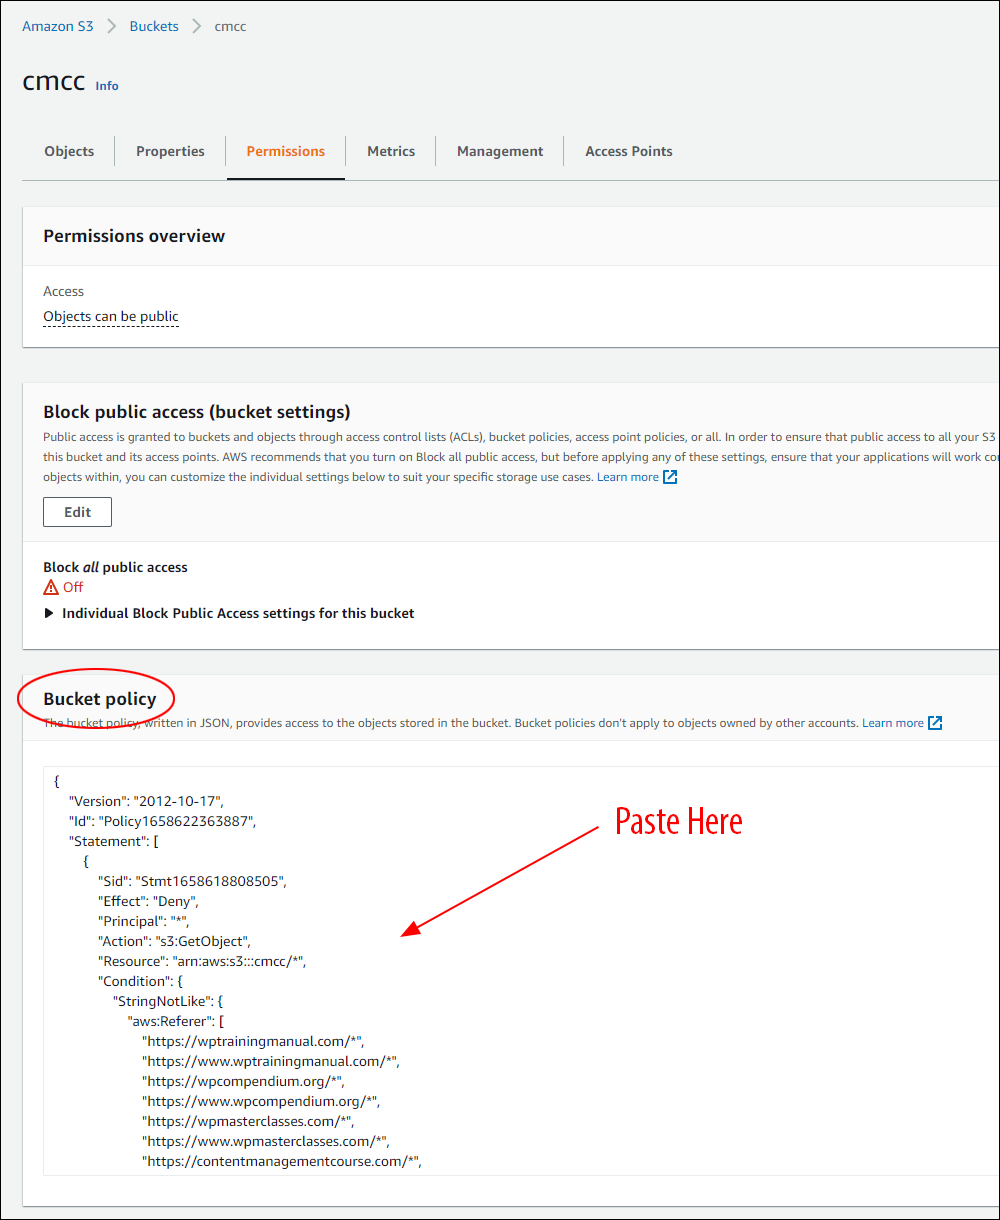
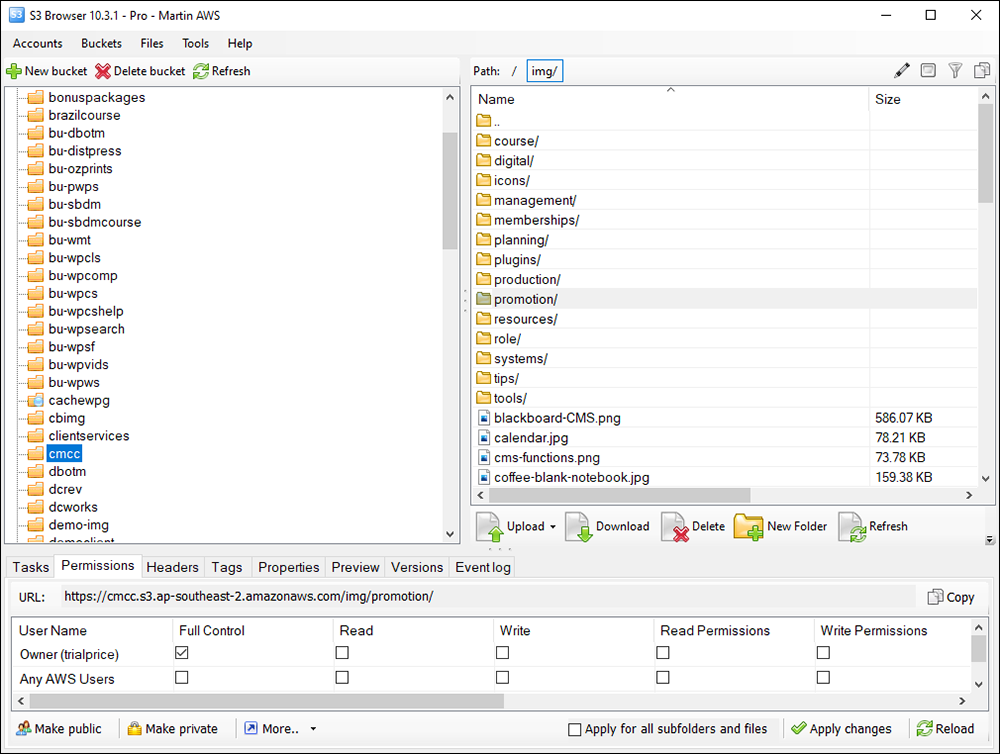
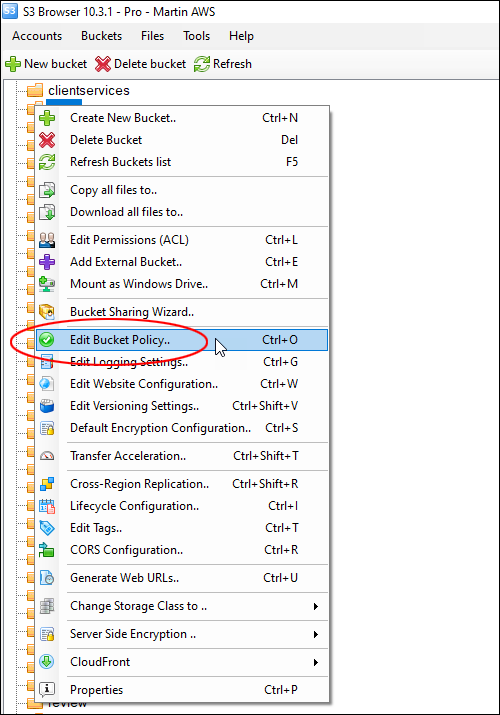
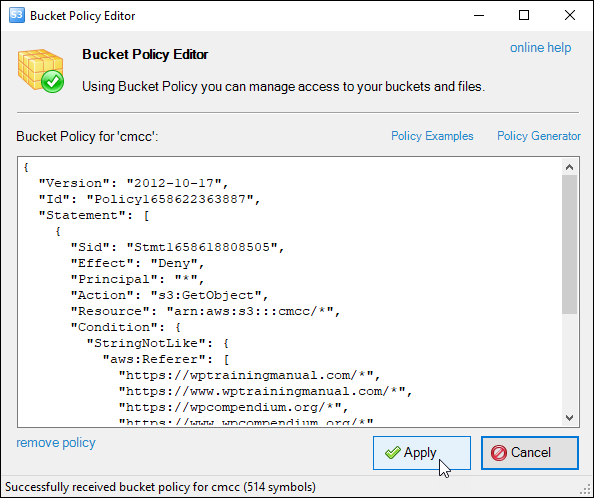
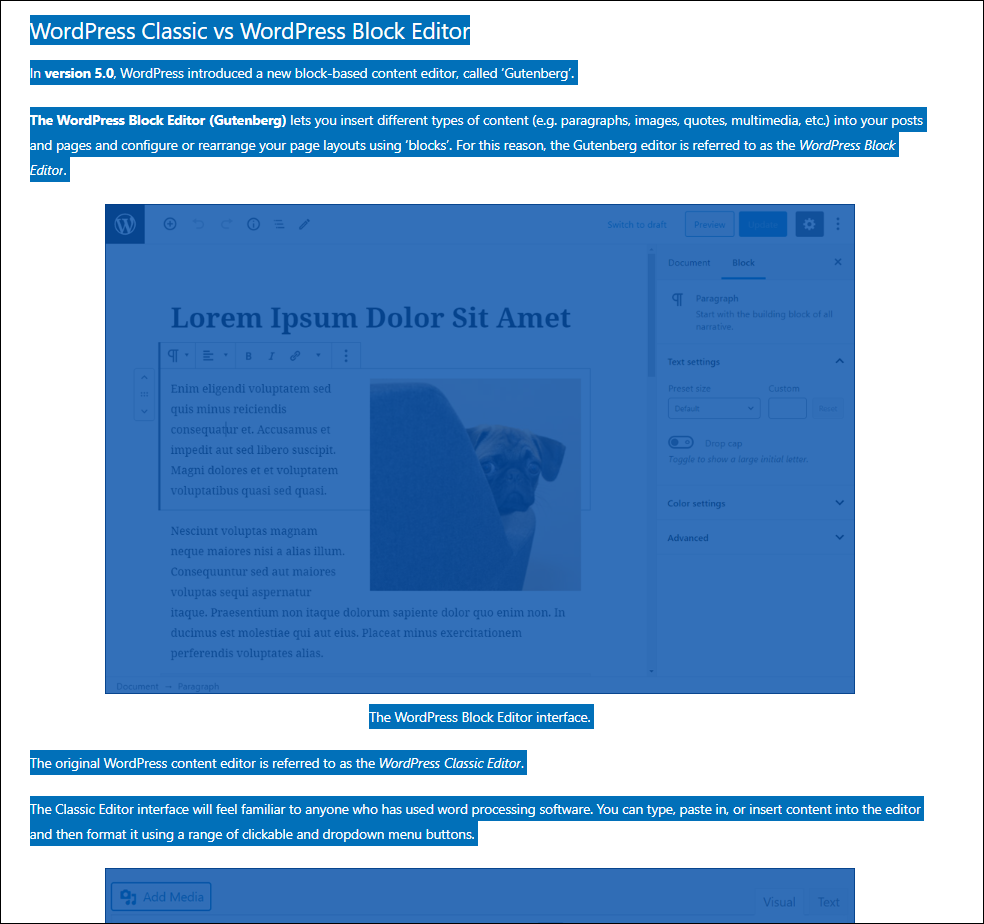
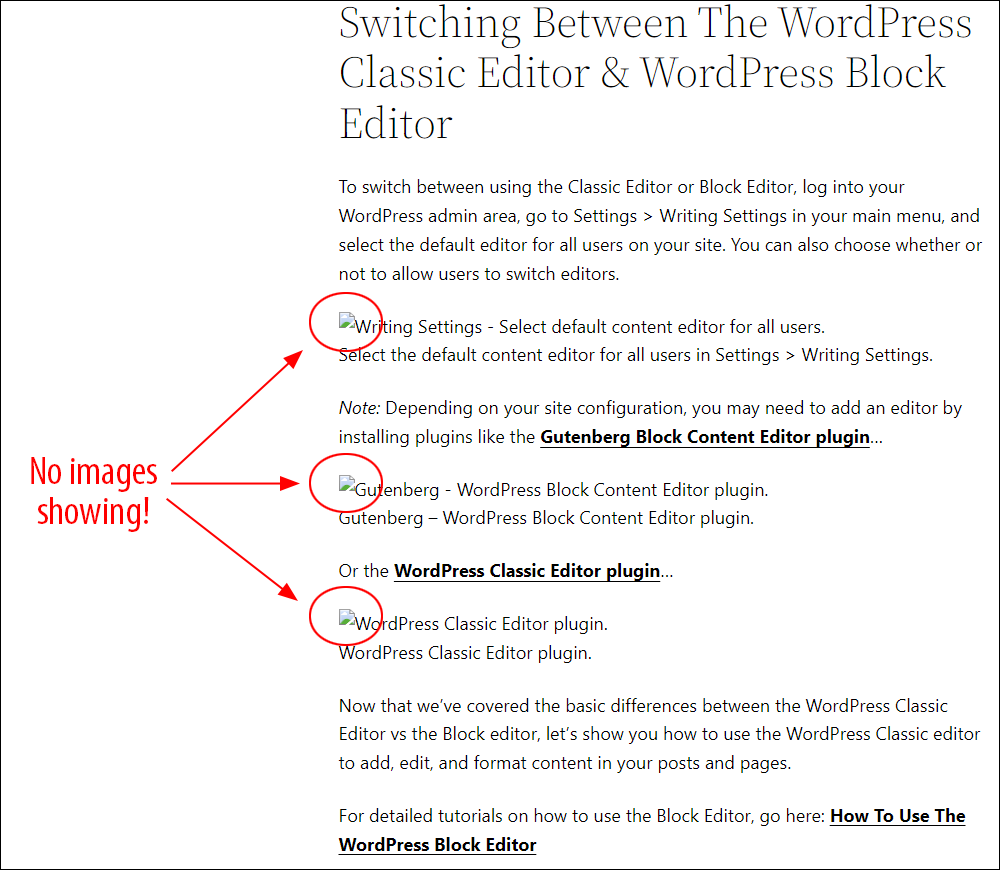
 Content theft is an unfortunate reality of having an online presence.
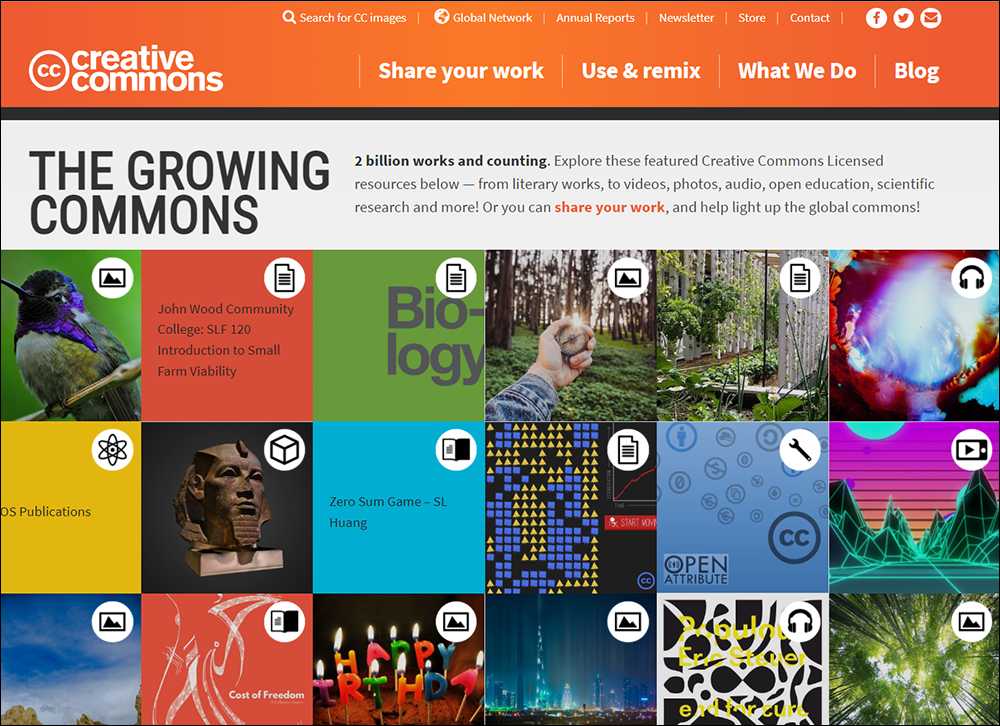


 Keeping content on your website organized is an important area of content management.
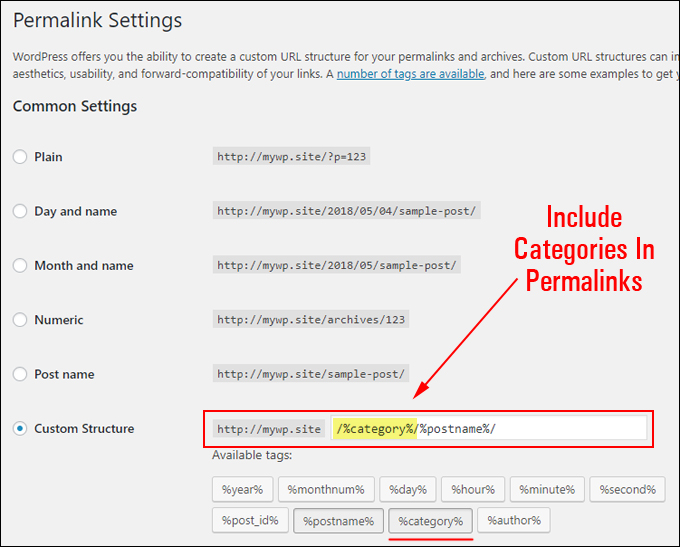
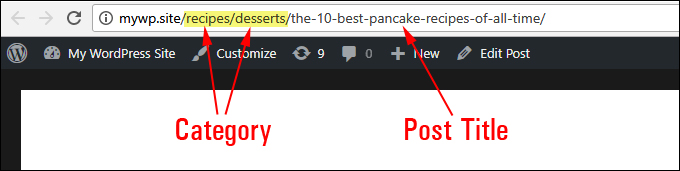
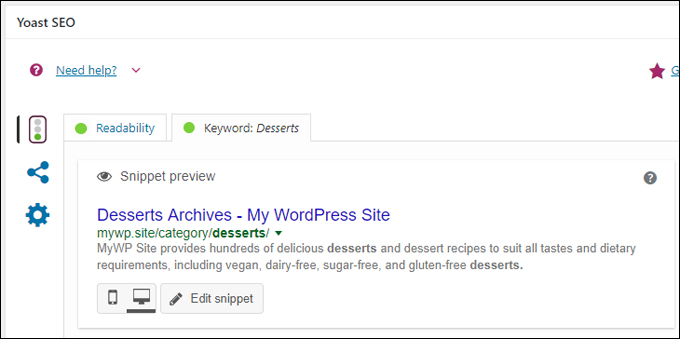
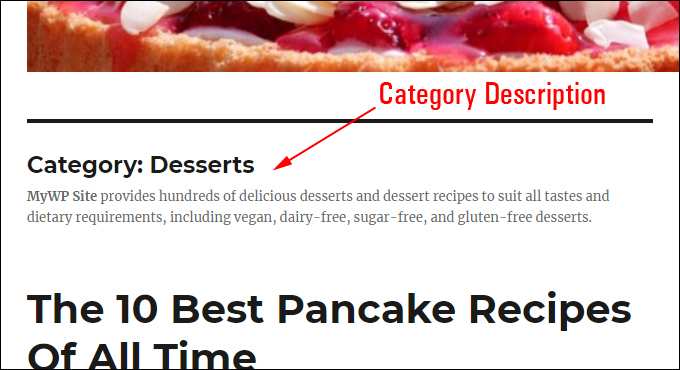
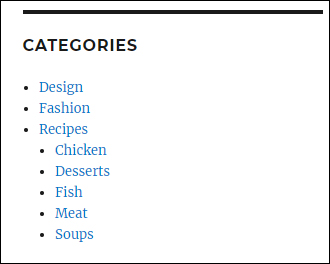

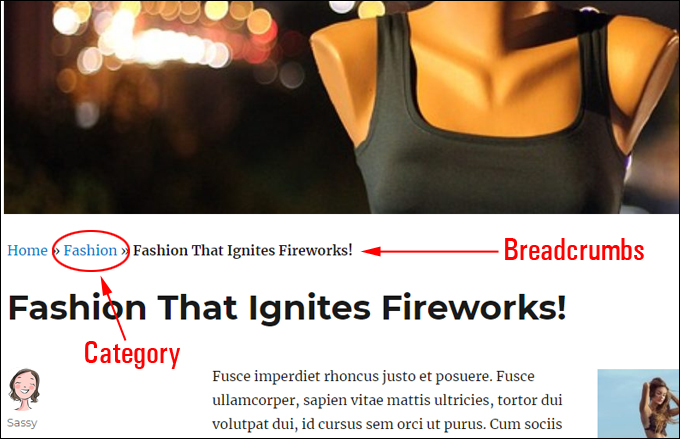
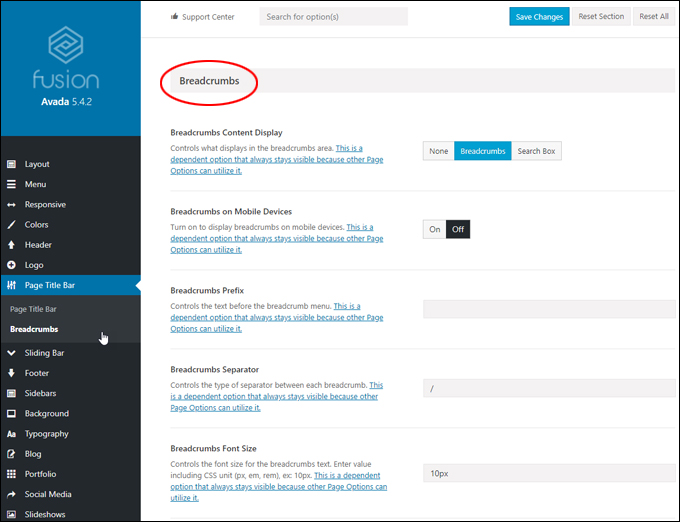
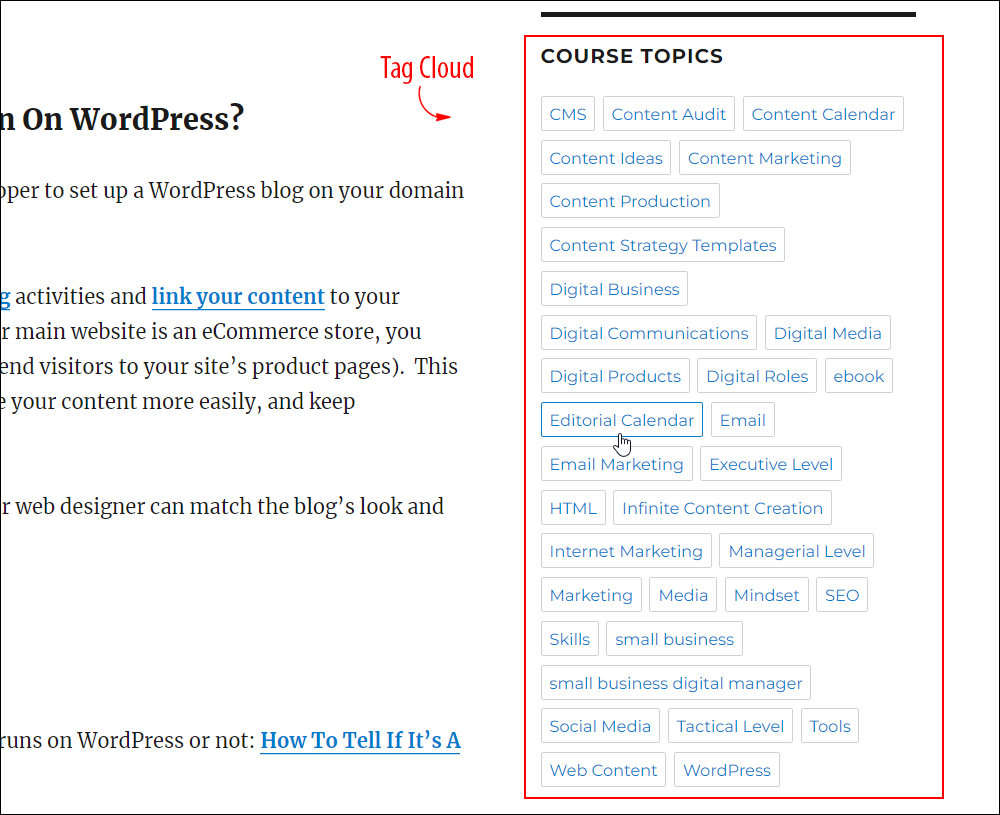
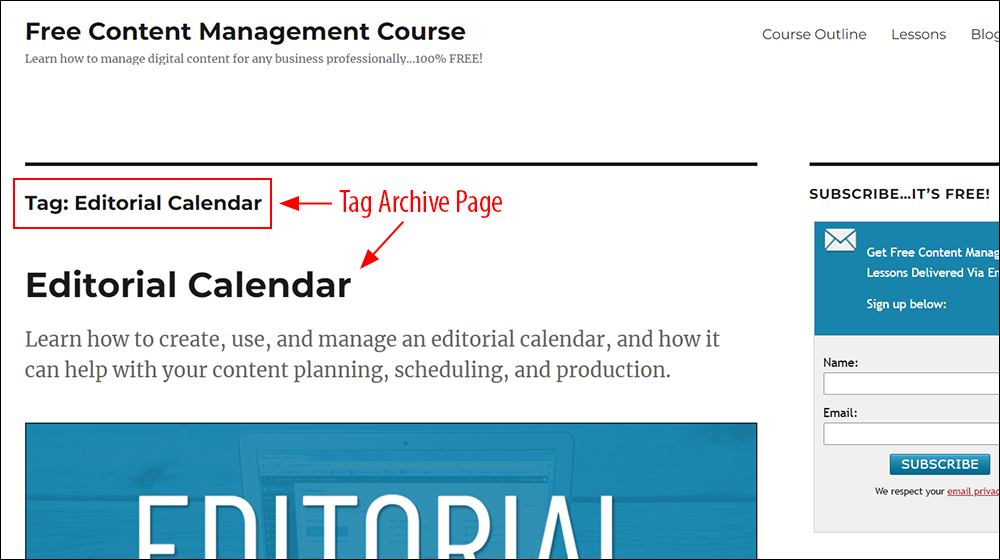
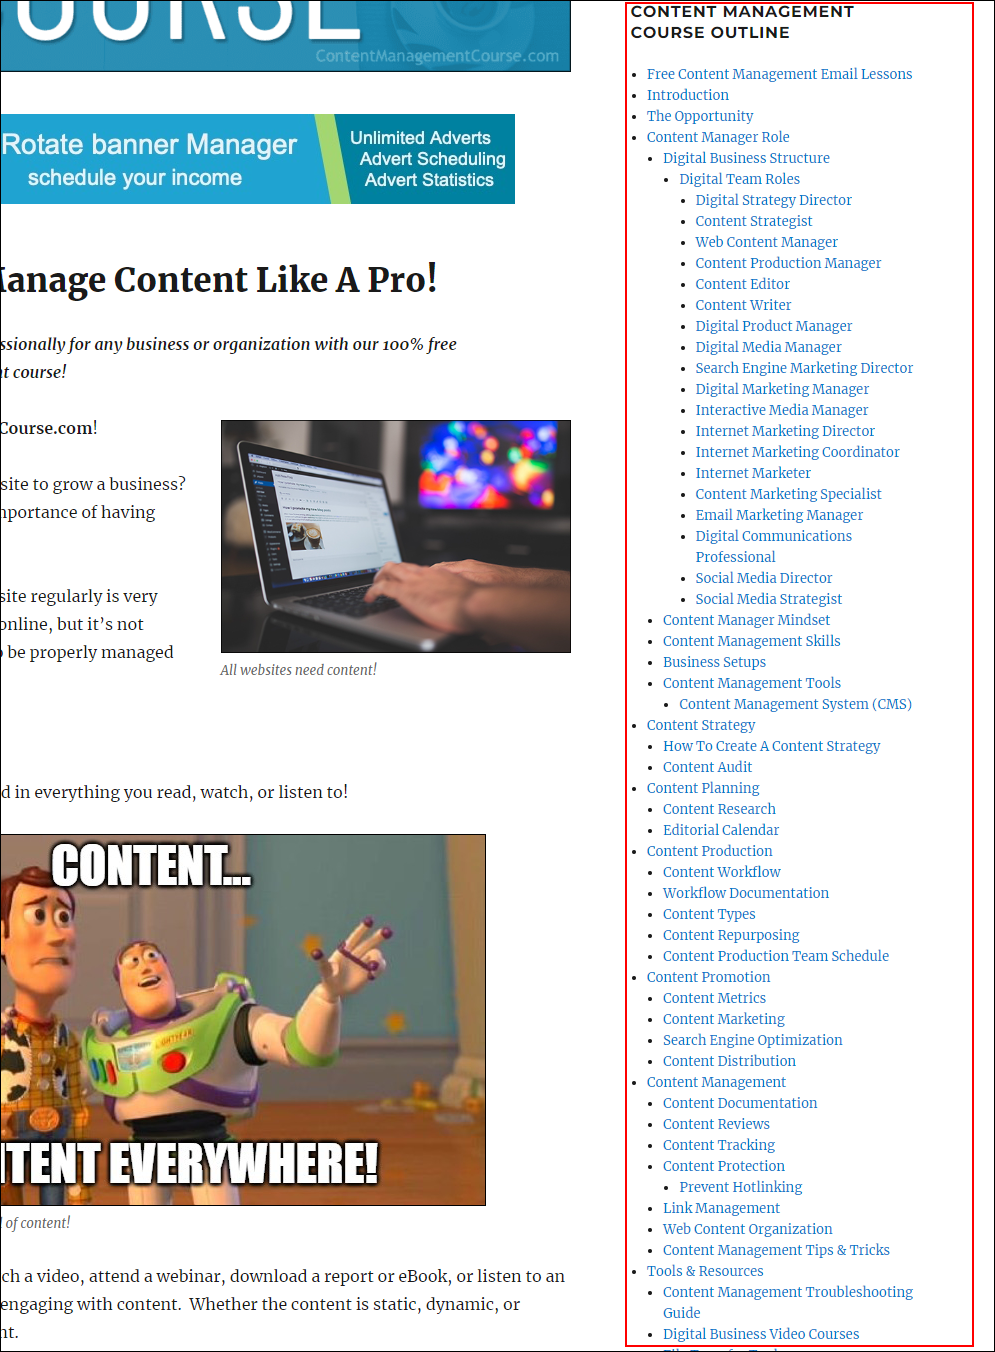
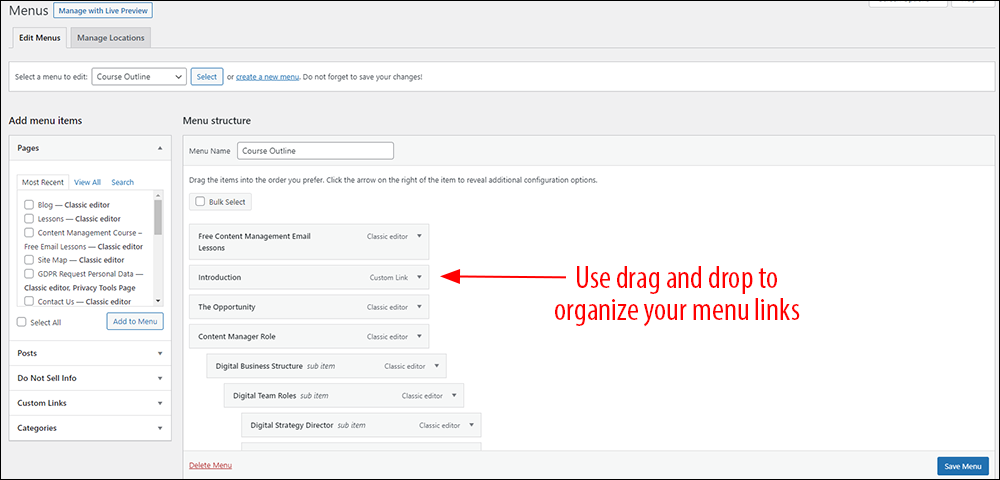
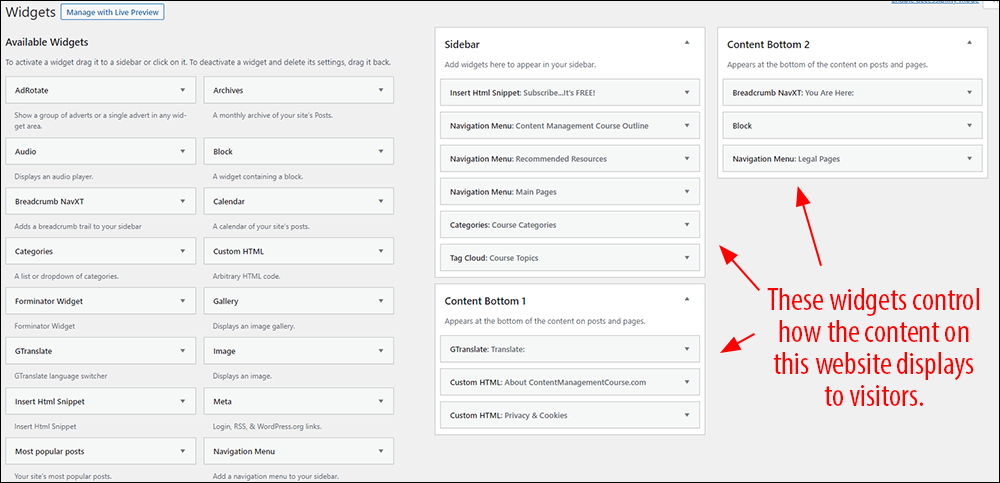
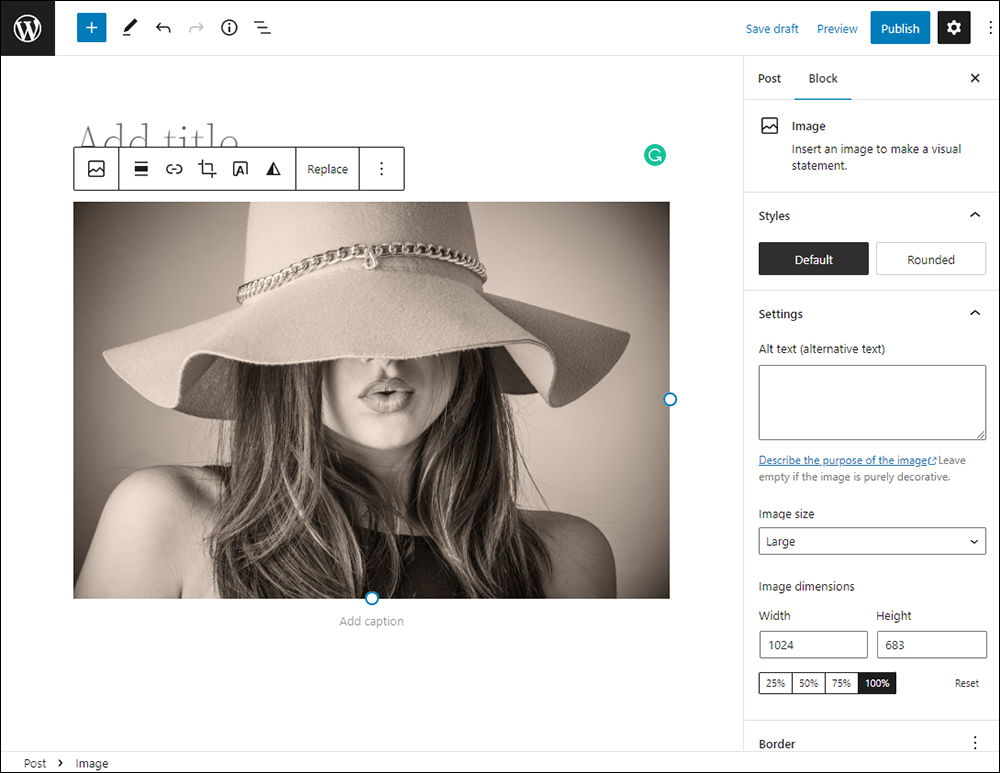
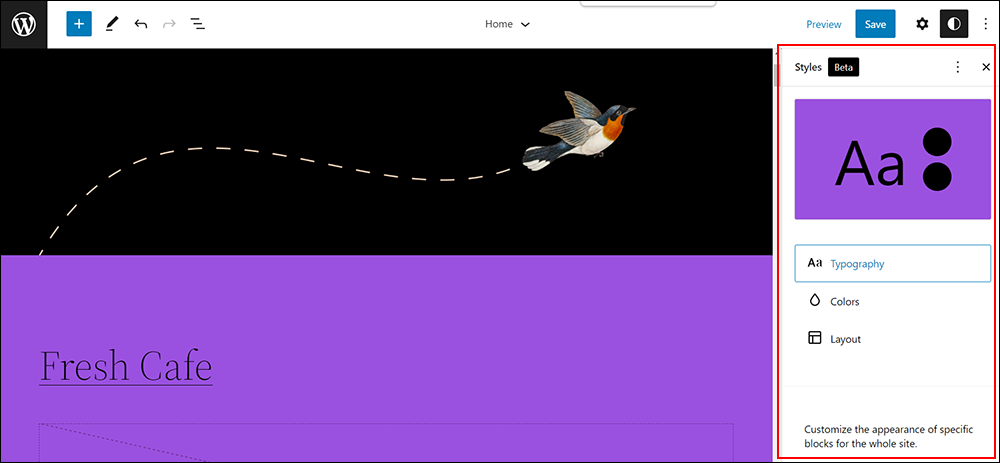


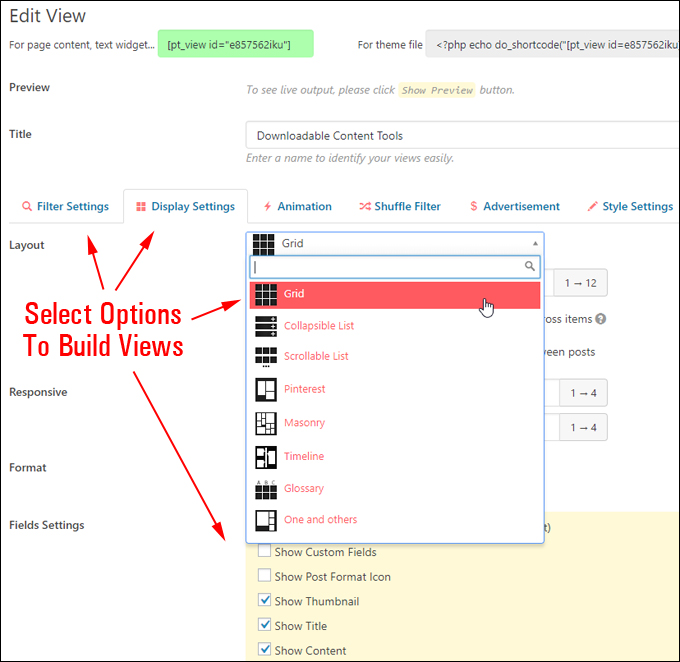
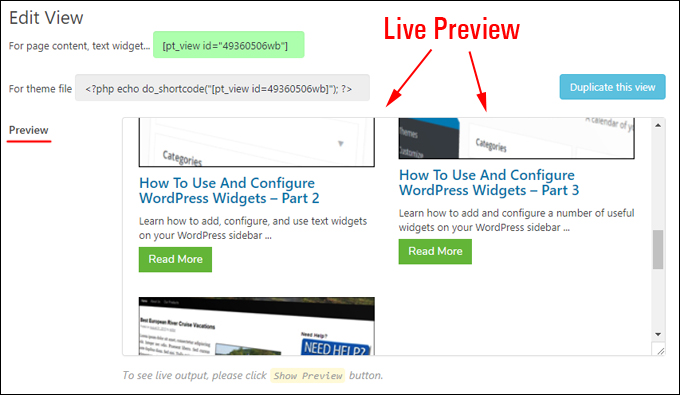
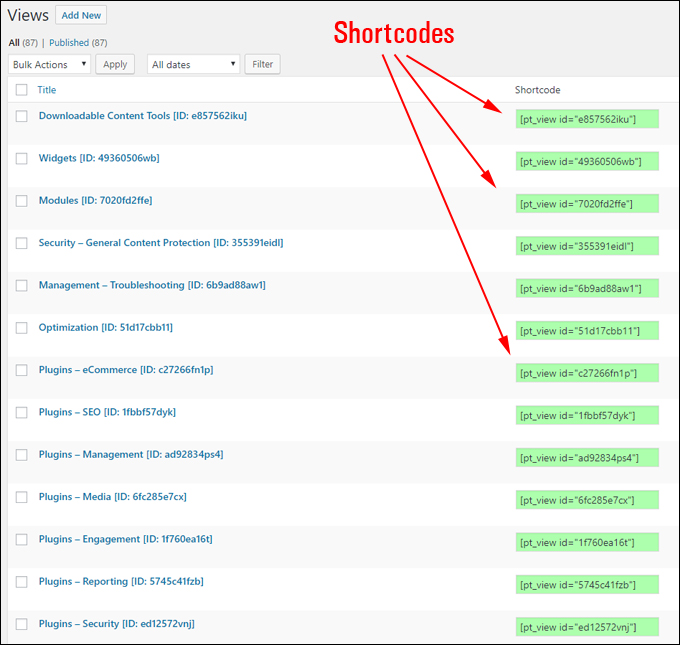
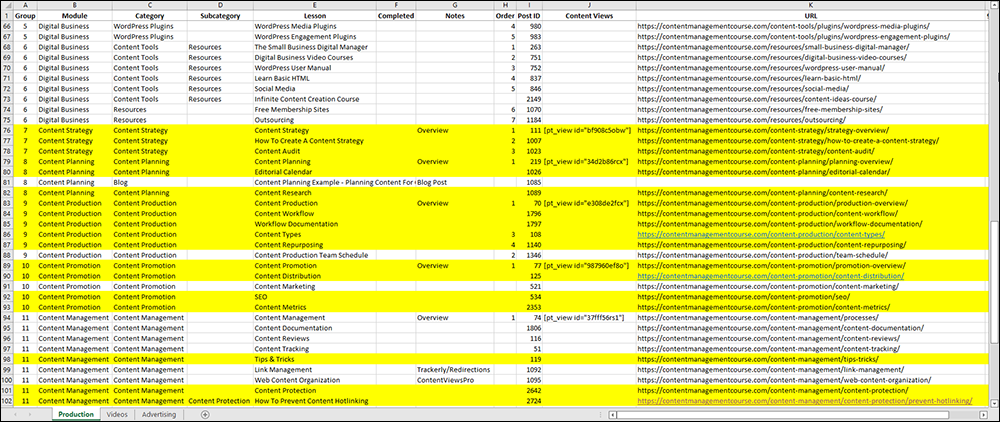
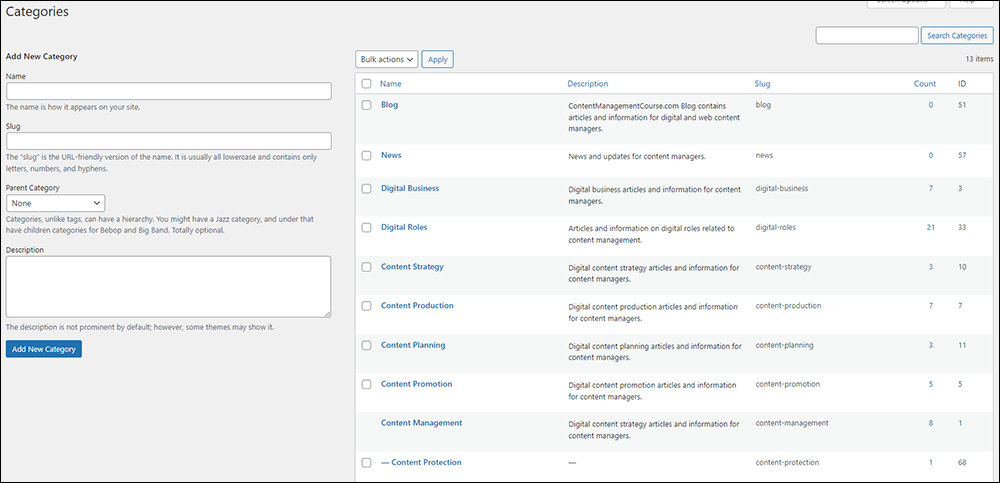
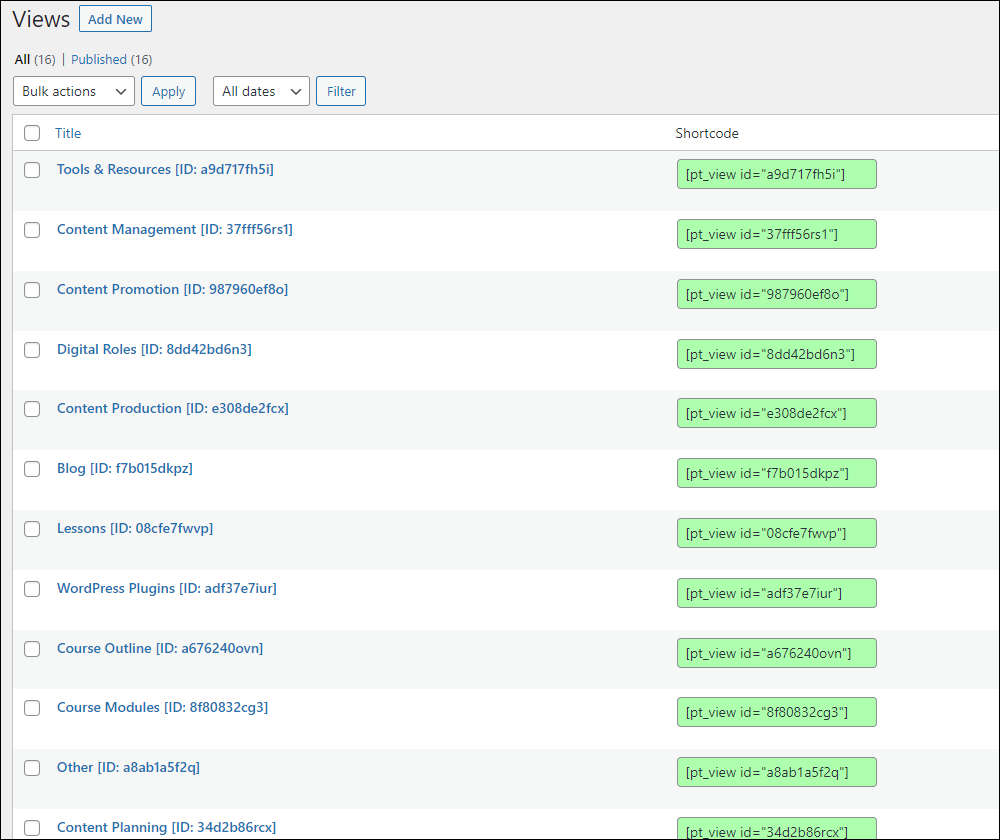
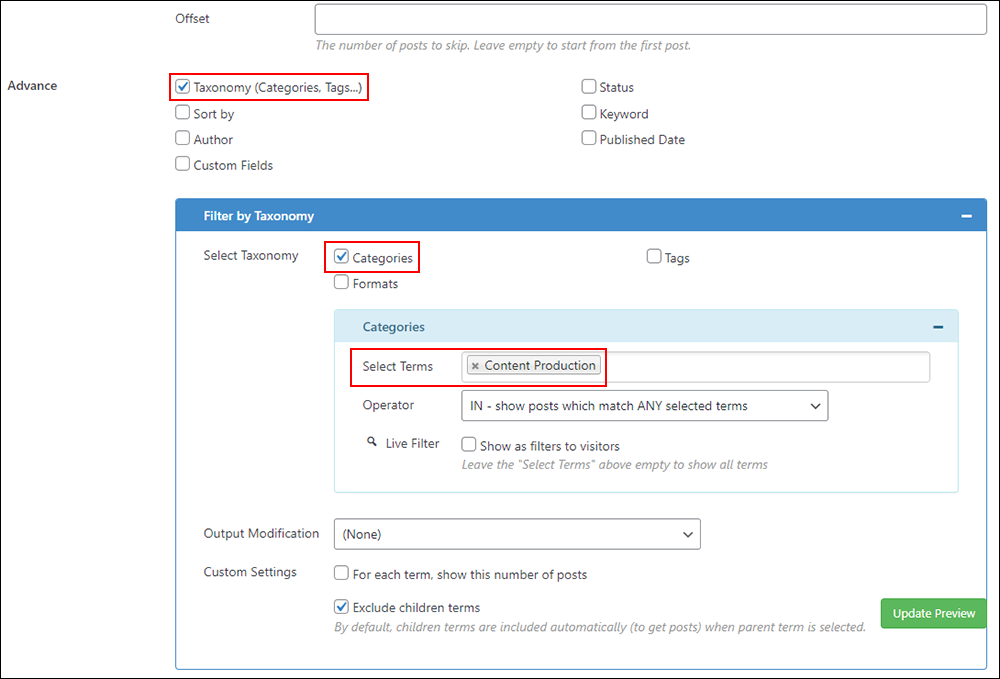
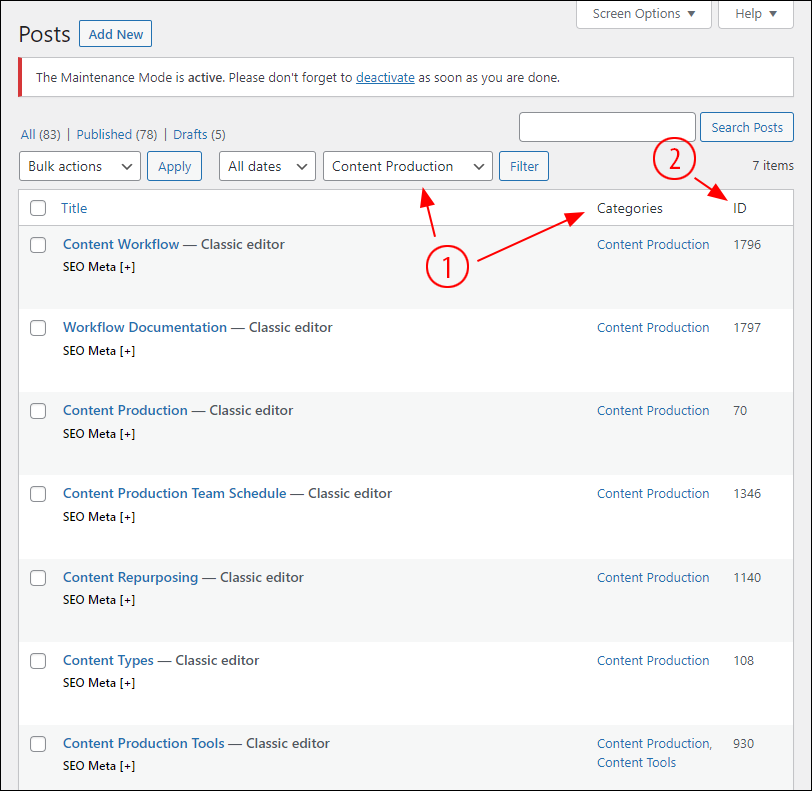
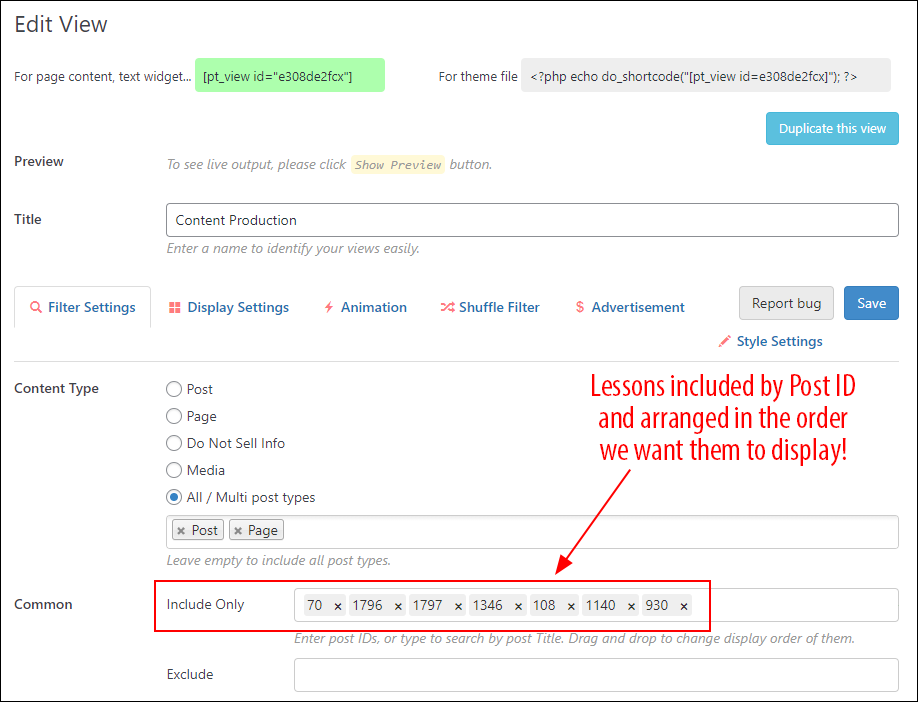
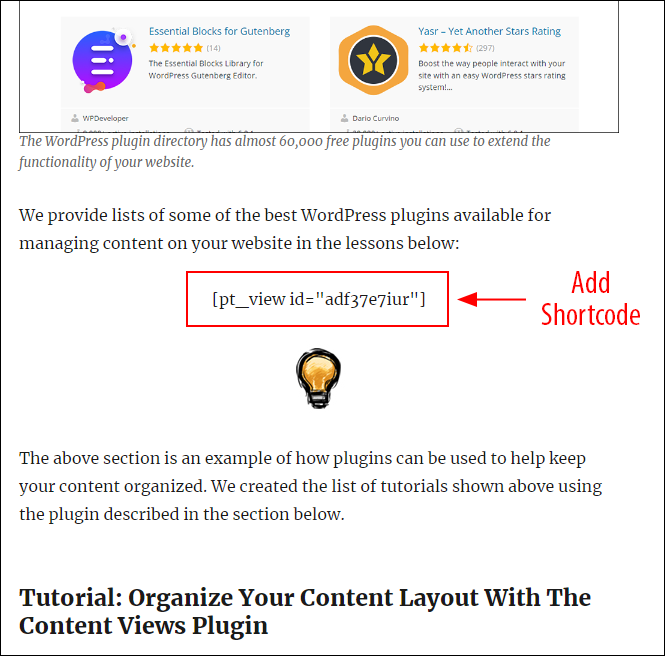
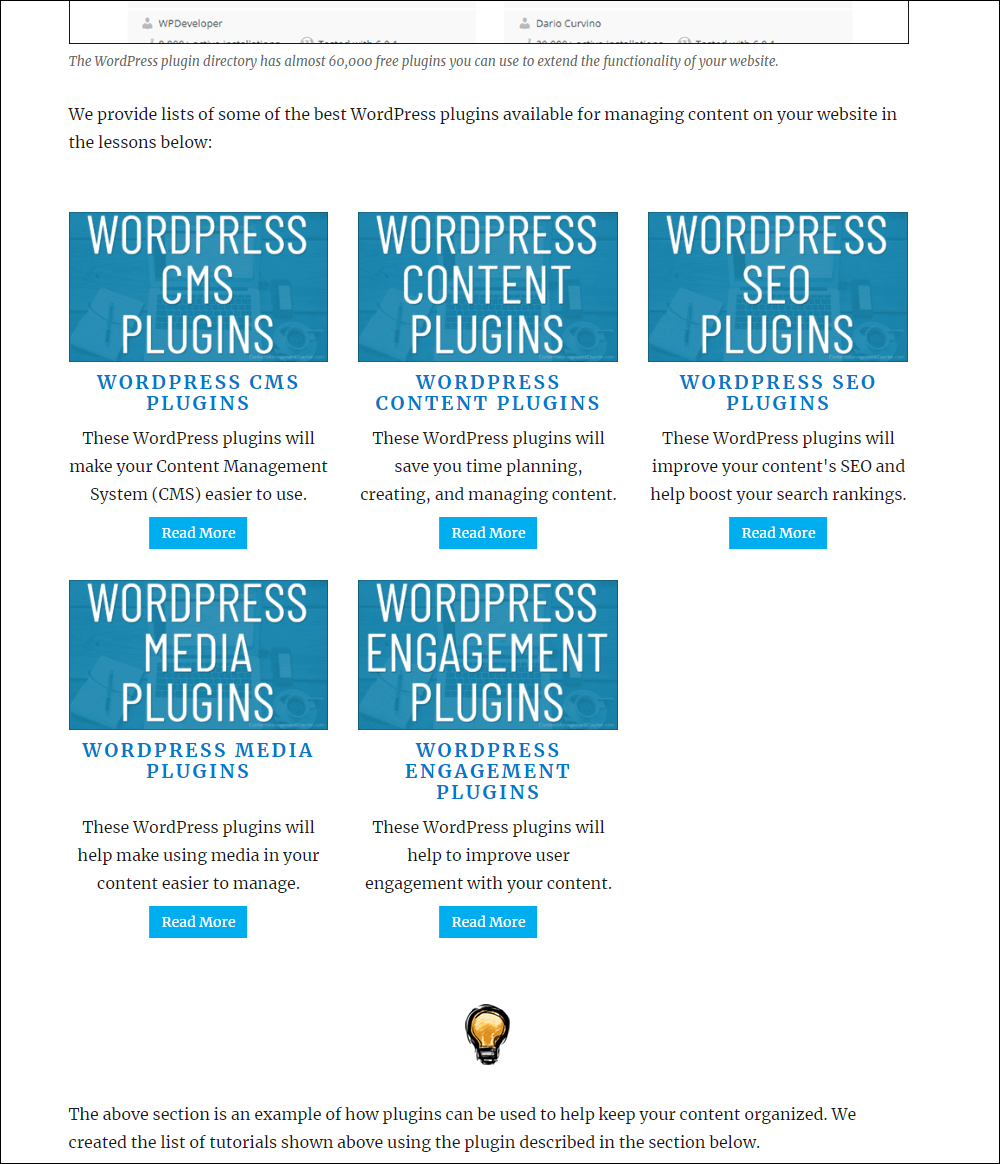
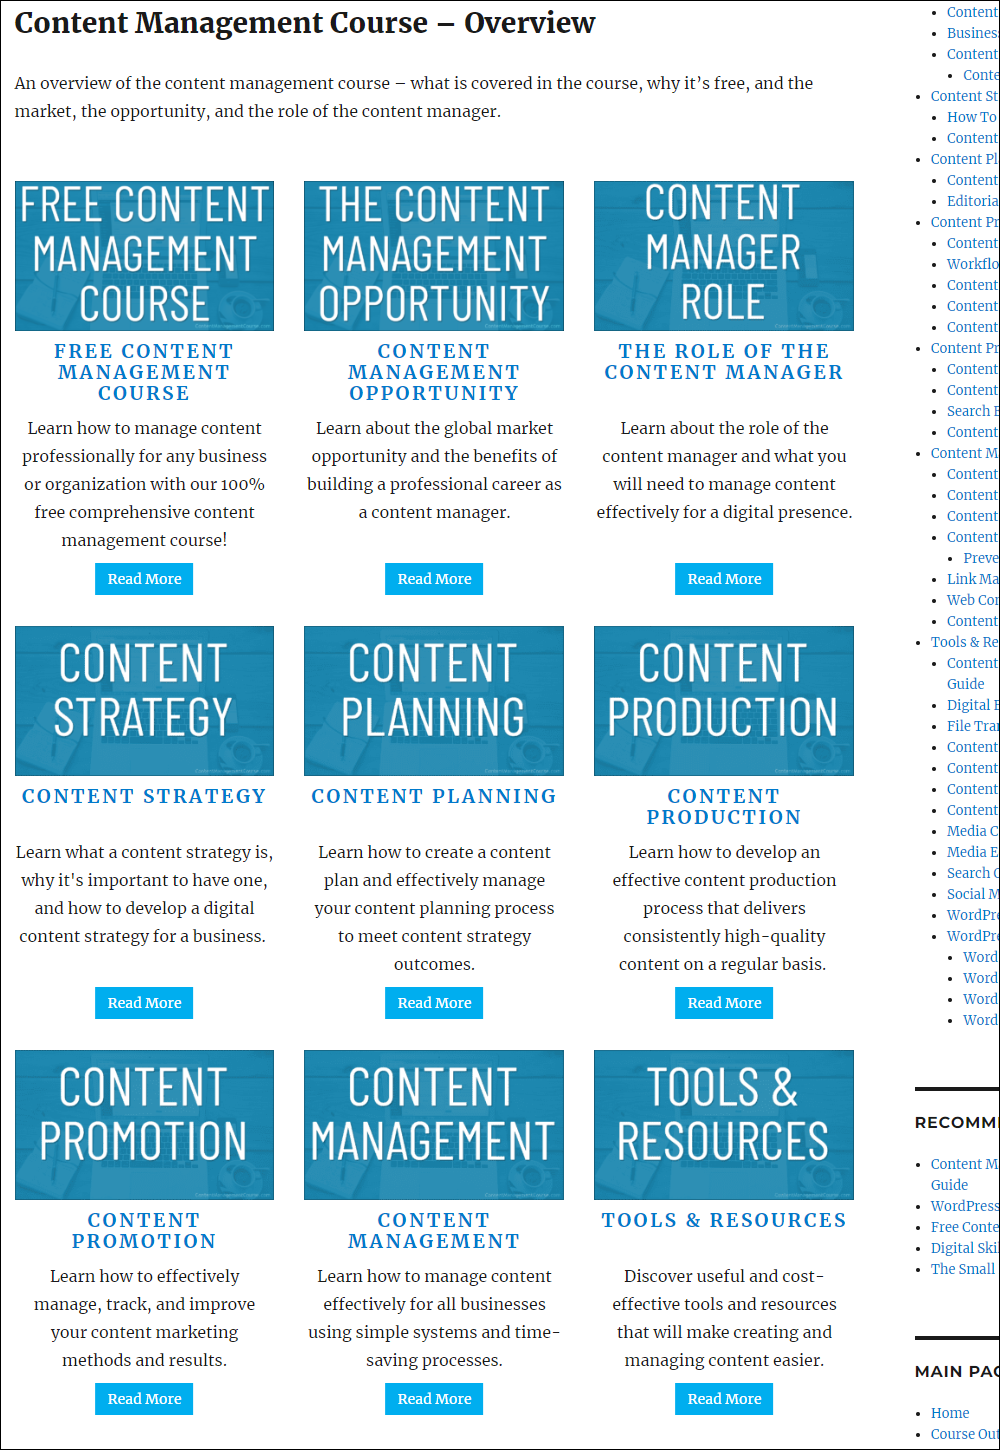


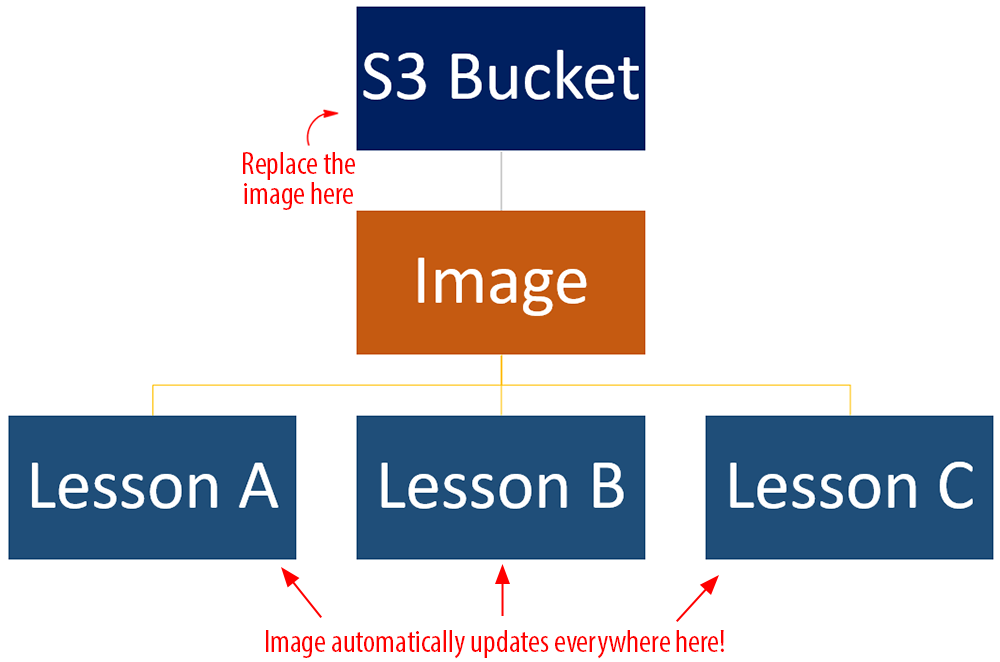
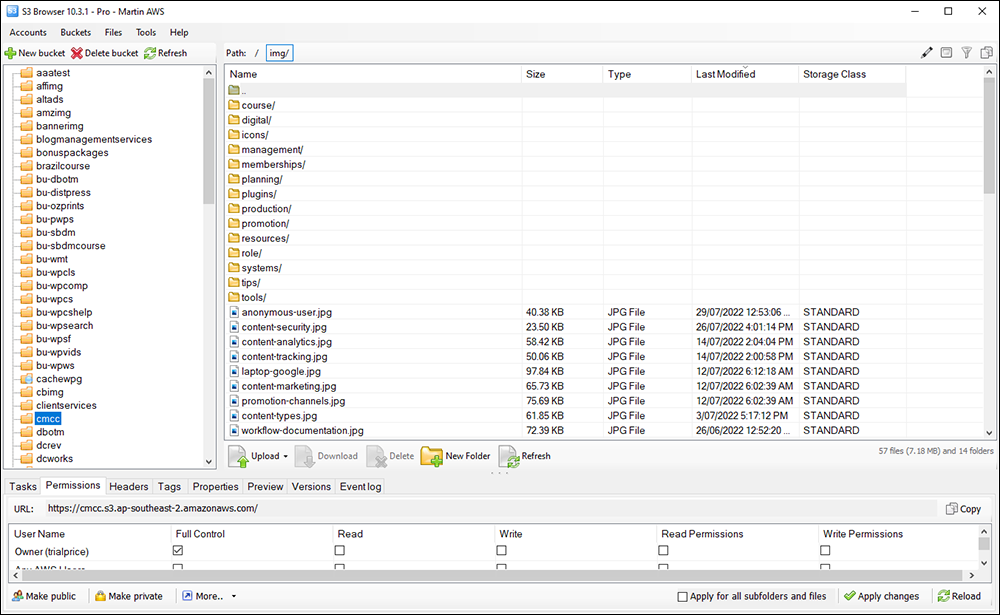
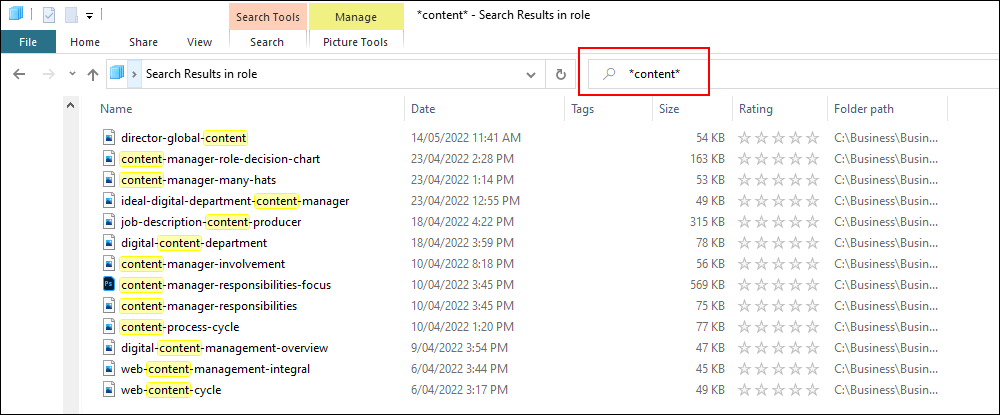
 Links help users navigate your content and are an essential part of search engine optimization.

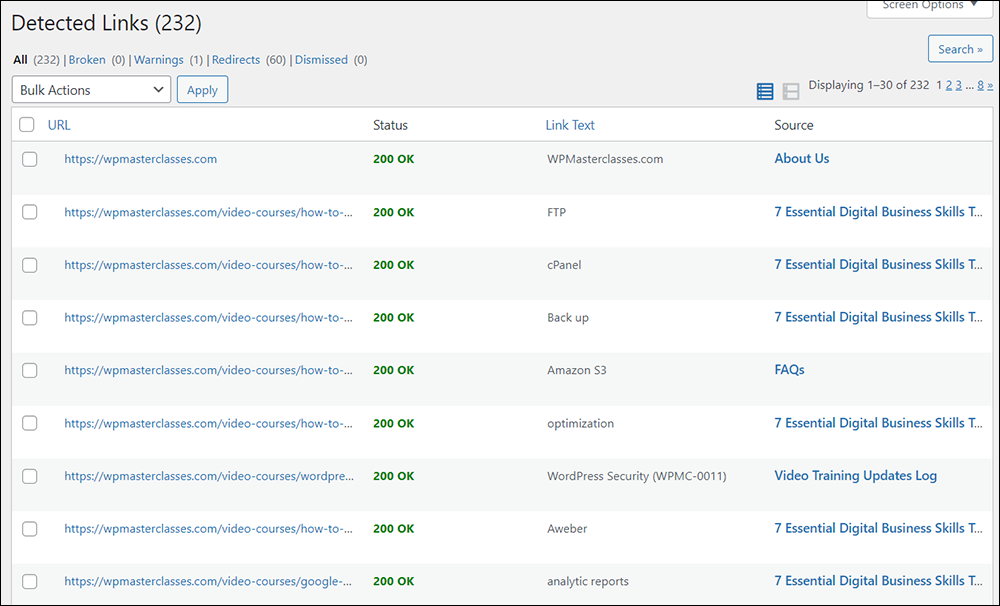
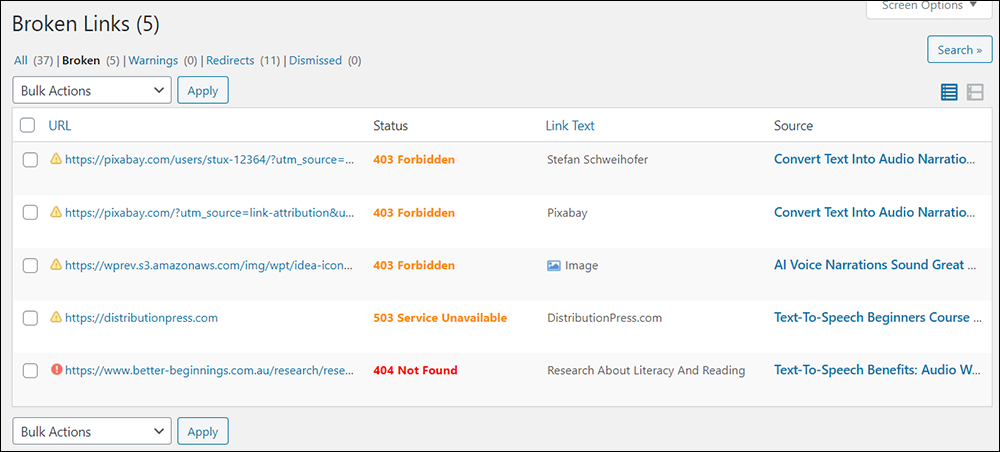


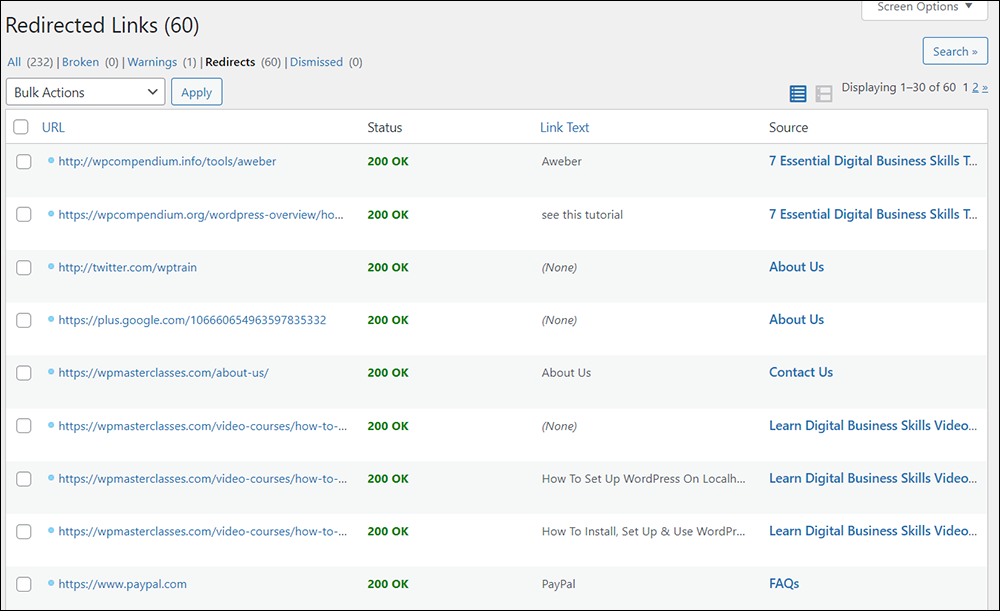
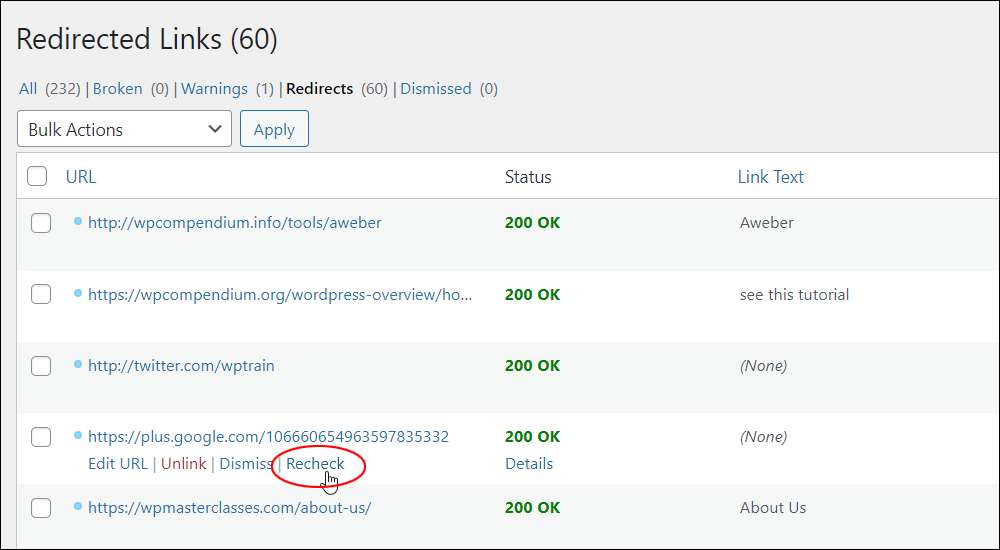
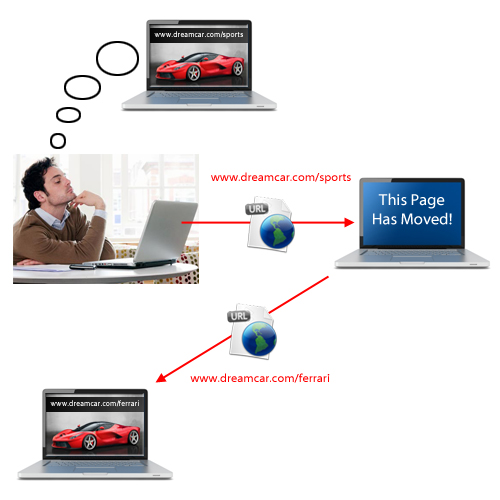
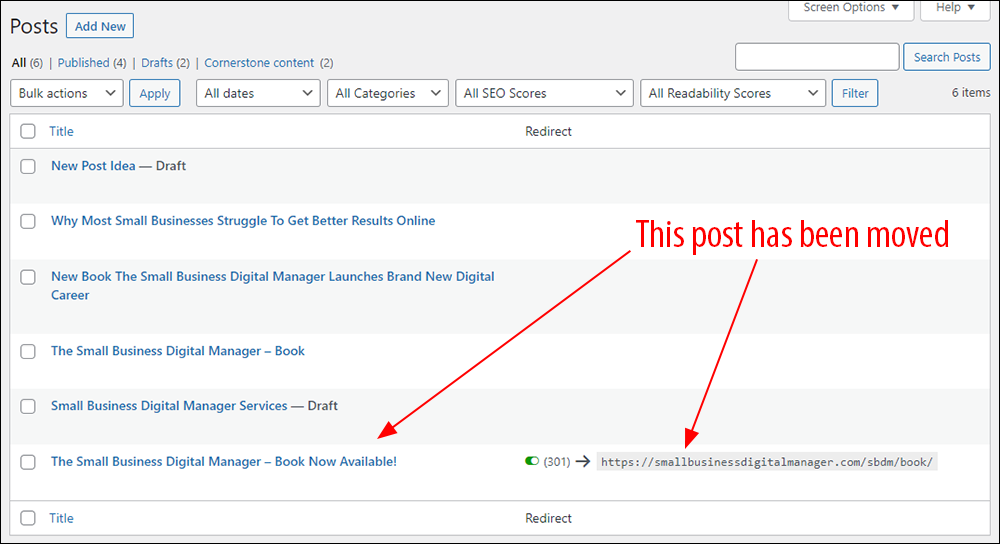
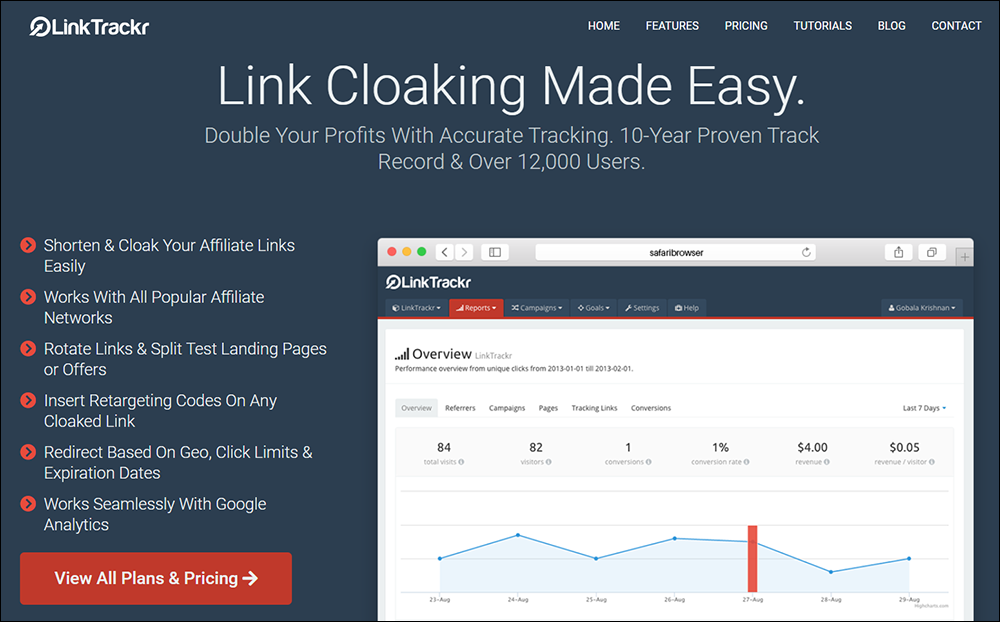


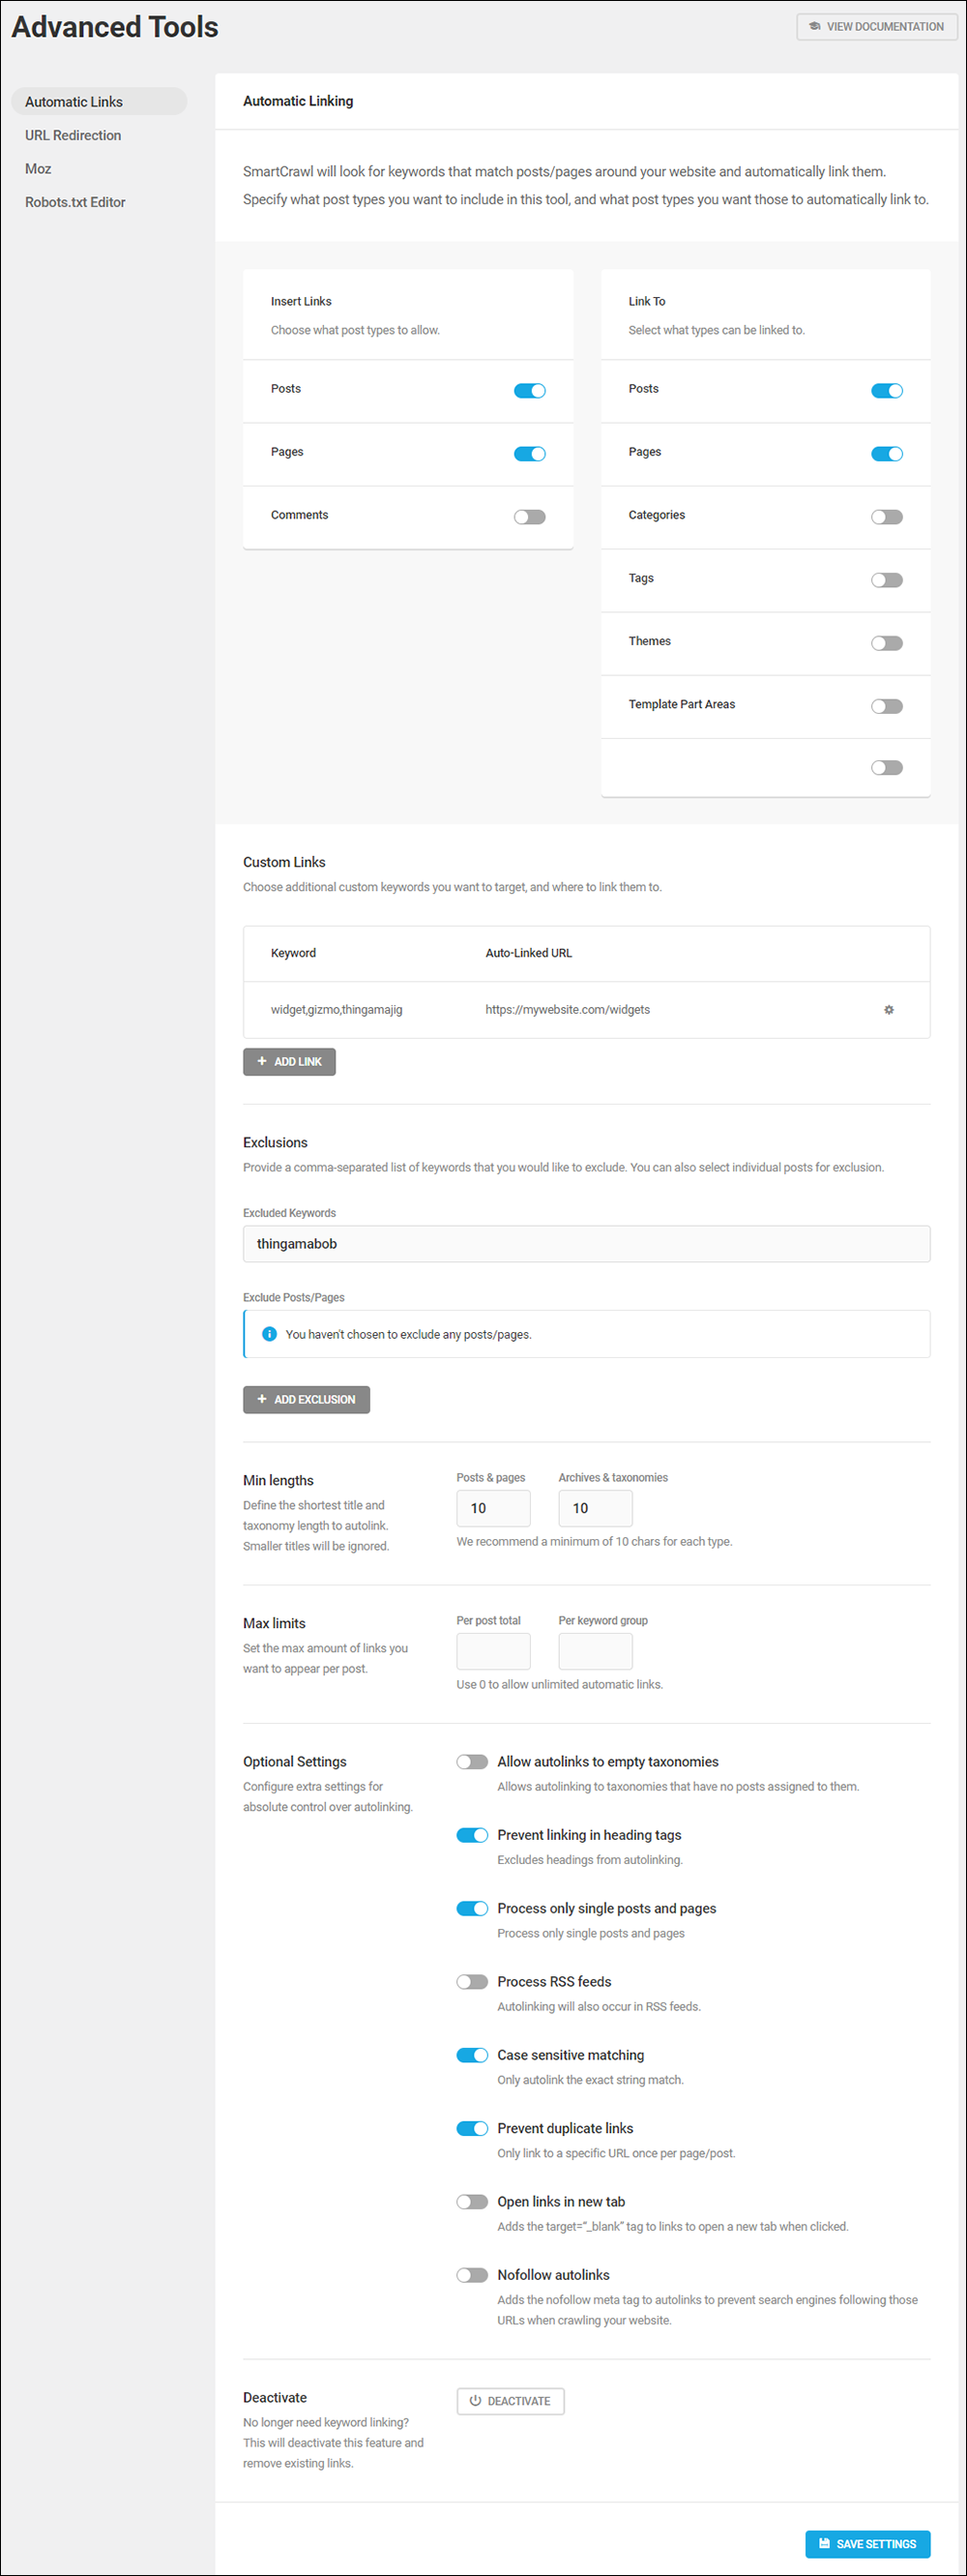
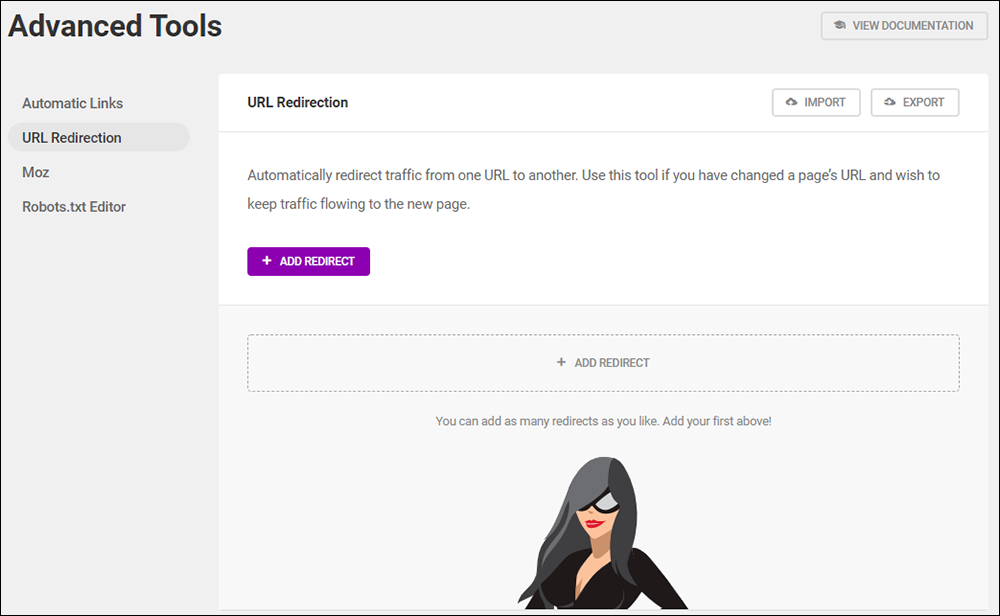
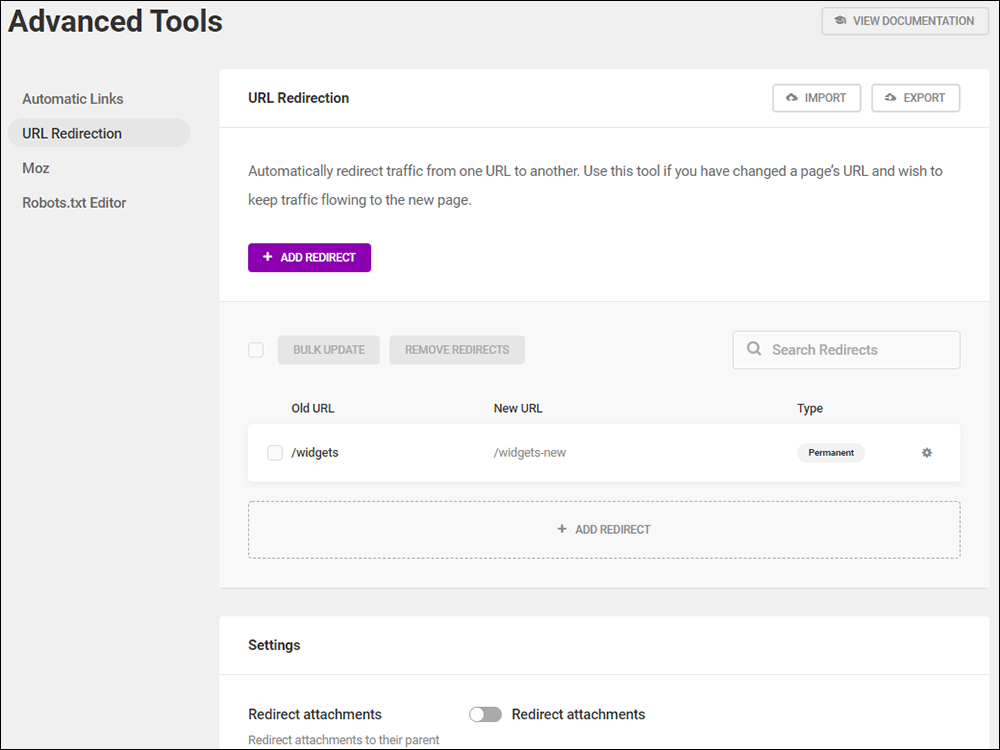
 If content plays any part in the success and growth of your business, website, or digital presence, then we recommend developing and implementing an effective content backup strategy.
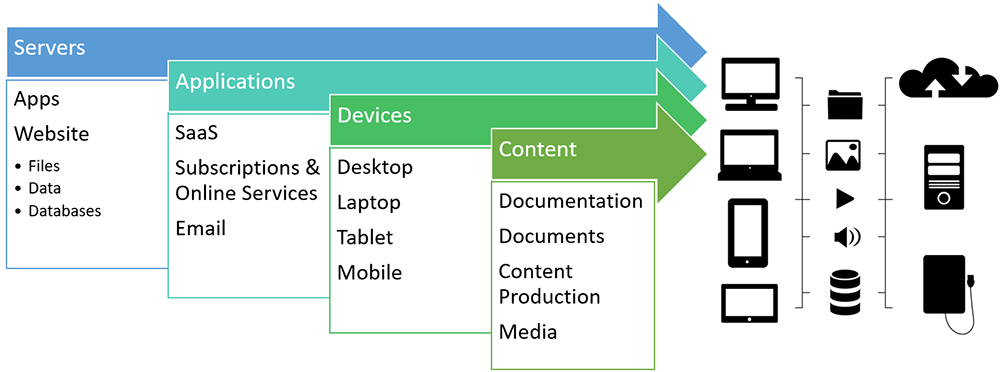
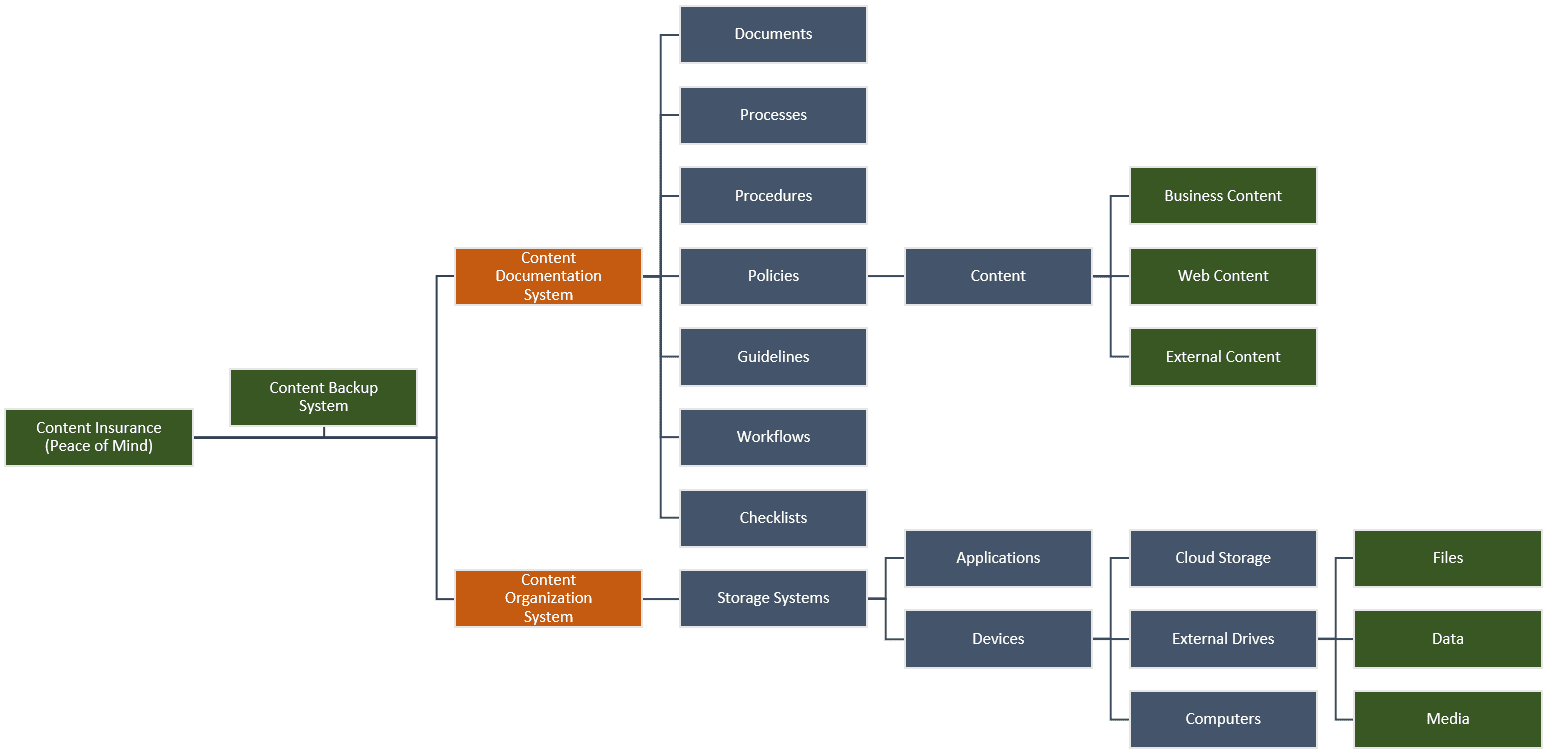
 Use the checklists and templates in this section to help improve your content team’s efficiency and productivity in areas like
 Documenting systems and processes in areas of your business like


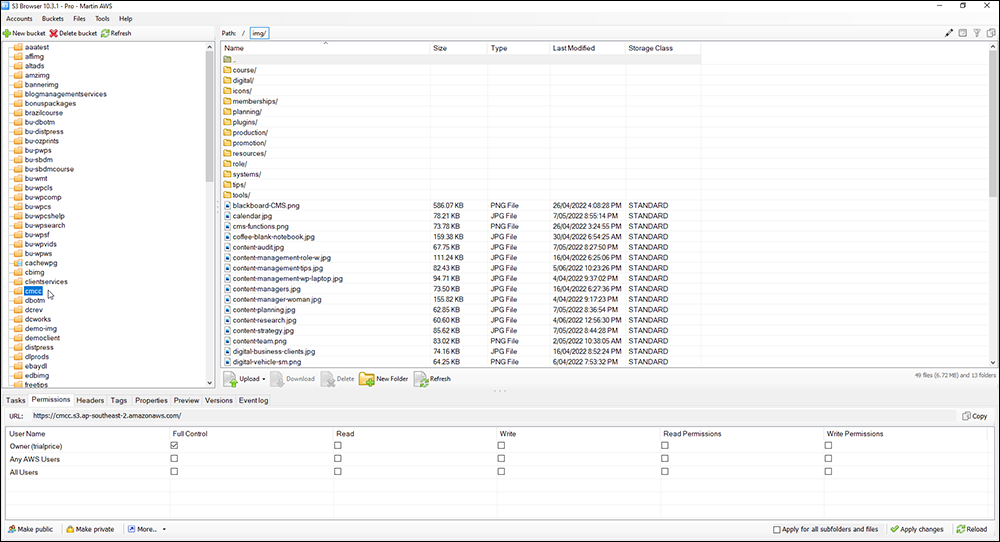


 The most effective way to help your business realize its goals and objectives is to turn every content-related area of your business into systems that anyone in your organization can help to manage.
 Content reviews are a vitally important part of effective content management.